
Popular categories
Looking for a yarn?


Comments / Questions (12)
![]() Sylvie Pacaud wrote:
Sylvie Pacaud wrote:
Très joli modèle. Merci de vos explications.
30.10.2024 - 08:15
![]() Liliana Cossi wrote:
Liliana Cossi wrote:
Se voglio iniziare il lavoro dall alto come si fanno gli aumenti?grazie
11.12.2023 - 16:35DROPS Design answered:
Buonasera Liliana, questo modello è stato progettato per essere lavorato dal basso verso l'alto: per un'assistenza così personalizzata può rivolgersi al suo rivenditore DROPS di fiducia. Buon lavoro!
11.12.2023 - 22:19
![]() Vaillant wrote:
Vaillant wrote:
Bonjour Est-ce que la maille des deux mailles prises ensemble constitue la 1ère maille des 3 mailles suivant le jeté ? Merci
31.12.2021 - 12:57DROPS Design answered:
Bonjour Mme Vaillant, je regrette, je ne suis pas sûre de bien comprendre pas votre question. Lorsque vous tricotez le rang ajouré à 3 et à 12 cm, vous tricotez d'abord 3 mailles endroit, puis vous répétez (1 jeté, 2 m ens à l'end) jusqu'à ce qu'il reste 3 mailles et terminez par 3 mailles endroit (= il y a 6 mailles endroit côte à côte, sans "jours"). Est-ce que ceci peut vous aider?
03.01.2022 - 10:20
![]() Concha wrote:
Concha wrote:
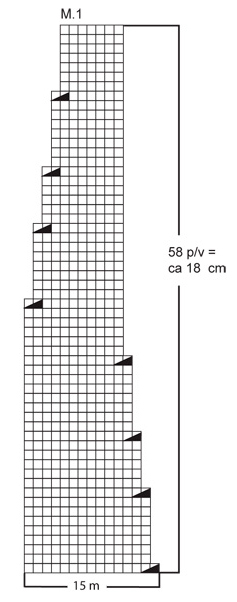
El gráfico M1 se repiten los menguados de 2 puntos juntoscada 14 puntos en la pasada circular
19.09.2019 - 17:29
![]() Paule wrote:
Paule wrote:
Je vais essayer c'est très joli
21.08.2019 - 22:38
![]() Beverly wrote:
Beverly wrote:
Hi .. I am unsure how to use the M1 in the instructions .. how do I work this out to be like written instructions .. kind regards Bev
06.06.2019 - 11:10DROPS Design answered:
Hi Beverly. Each square in the diagram = 1 stitch. The symbol definition tells you how to work them. The diagram is read from bottom to top, from right to left. You can have a look at our lesson: how to read knitting diagrams, here for a detailed explanation of how to work according to diagrams. Happy knitting.
06.06.2019 - 11:22
![]() Annette wrote:
Annette wrote:
Hallo, die Anleitung sagt, der Mini-Poncho wird kraus re gestrickt, im Diagramm ist aber glatt re angegeben. Auf dem Bild sieht es eher nach glatt links aus. Wieso wird lt. Diagramm glatt re gestrickt, was ganz offensichtlich nicht der Fall ist? Vielen Dank für Ihre Hilfe!
24.04.2016 - 17:17DROPS Design answered:
Liebe Annette, vielen Dank für den Hinweis, Sie haben völlig recht. In der Legende zum Diagramm war in der deutschen Fassung ein Fehler, den wir gleich beheben werden. Der Kragen/Mini-Poncho wird kraus rechts gestrickt.
26.04.2016 - 09:40
![]() Dana wrote:
Dana wrote:
Bonjour. Continuer en suivant M1 veut dire repeter tjr le 1er rang de 15 m jusqu’au bout+ 3mousse de cq coté pendant 18cm?
31.10.2013 - 21:36DROPS Design answered:
Bonjour Dana, "continuer en suivant M1" signifie effectivement tricoter les 58 rangs du diagramme sur toutes les mailles, soit 14 fois en largeur. Bon tricot!
01.11.2013 - 09:32
![]() DROPS Design NL wrote:
DROPS Design NL wrote:
Hoi Marian. Je hebt gelijk. De vertaling moet r op de goede kant en r op de verkeerde kant. Ik heb het gewijzigd. Bedankt. Gr. Tine
29.11.2010 - 10:07
![]() Marian wrote:
Marian wrote:
De teltekening zegt recht op de goede kant, averechts op de verkeerde kant. Op de foto zie ik een ribbelsteek ipv een tricotsteek.Klopt de Nederlandse vertaling wel?
27.11.2010 - 14:22
|
|||||||
Bella Doncella |
|||||||
 |
 |
||||||
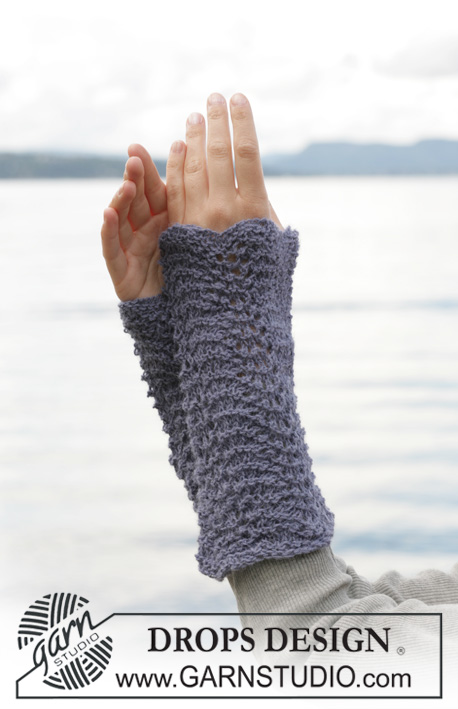
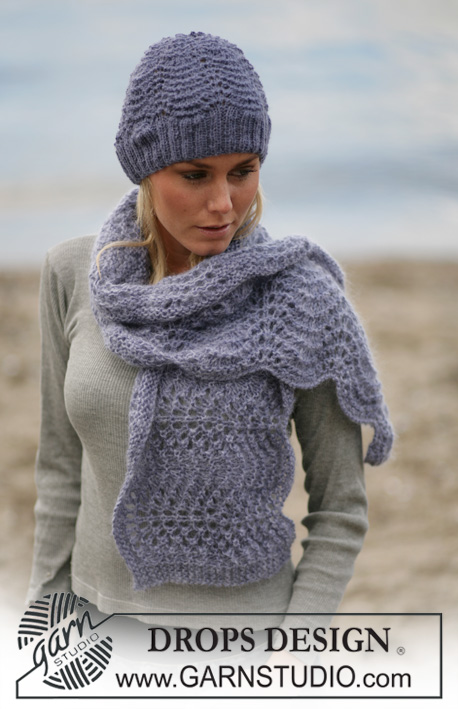
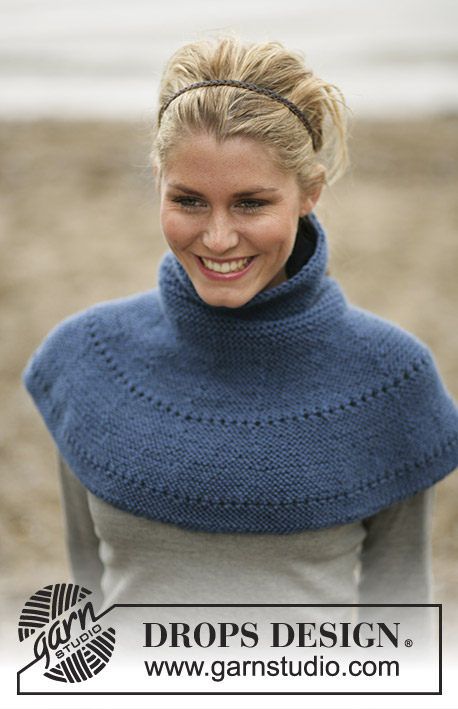
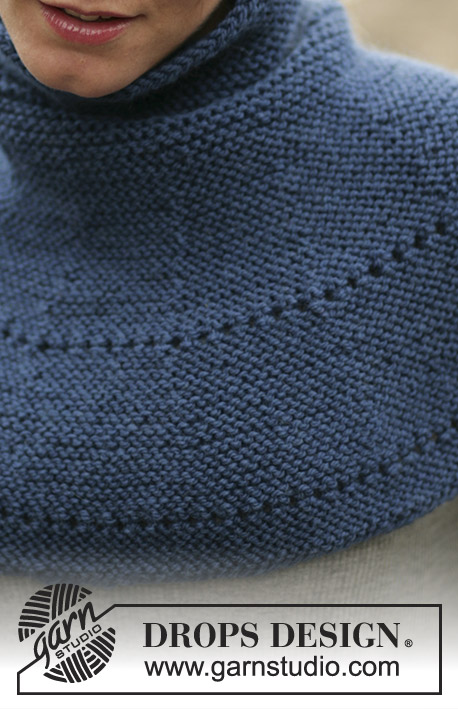
Neckwarmer in DROPS Alaska
DROPS Extra 0-404 |
|||||||
|
Knitting tension: 17 sts x 32 rows on needles size 5 mm in garter sts = 10 x 10 cm. Pattern: See diagram M.1, the diagram is seen from the RS, the English translations for the diagram are at the end of this pattern. Button holes: Cast off for button holes at the right edge. 1 button hole = cast off the 4th st from the edge. Cast on a new st in the same place on the return row. Cast off for button holes when the piece measures 21, 30 and 39 cm. Shoulder part: The piece is knitted forth and back on needle. Bend the circular needle double and cast on 246 sts on 2 needles size 5 mm (this is done to make the edge more elastic). Pull out 1 needle and knit in garter sts. When the piece measures 3 cm knit next row as follows: K3, *make a yo and K2 tog*, repeat from *-* and finish with K3. Continue in garter sts until the piece measures 7 cm. On the next row dec 30 sts evenly = 216 sts – NB: Do not dec over the outer most 3 garter sts each side. Now continue with M.1 with 3 sts of garter sts each side. At the same time when the piece measures 12 cm knit the next row as follows: K3, *make a yo and K2 tog.*, repeat from *-* and finish with K3. Remember to cast off for the button holes – see explanation above. After M.1 = 104 sts remaining. Knit 4 cm in garter sts. On the last row dec 30 sts evenly distributed = 74 sts. remaining The piece measures approx. 29 cm Collar: Continue in garter sts. When the collar measures 12 cm cast off loosely. Sew on the 5 buttons. For the bottom 2 buttons use the lace rows as button holes. |
|||||||
Diagram explanations |
|||||||
|
|||||||
 |
|||||||
Have you finished this pattern?Tag your pictures with #dropspattern or submit them to the #dropsfan gallery. Do you need help with this pattern?You'll find 8 tutorial videos, a Comments/Questions area and more by visiting the pattern on garnstudio.com. © 1982-2026 DROPS Design A/S. We reserve all rights. This document, including all its sub-sections, has copyrights. Read more about what you can do with our patterns at the bottom of each pattern on our site. |
|||||||


With over 40 years in knitting and crochet design, DROPS Design offers one of the most extensive collections of free patterns on the internet - translated to 17 languages. As of today we count 324 catalogues and 12290 patterns translated into English (UK/cm). 12290
We work hard to bring you the best knitting and crochet have to offer, inspiration and advice as well as great quality yarns at incredible prices! Would you like to use our patterns for other than personal use? You can read what you are allowed to do in the Copyright text at the bottom of all our patterns. Happy crafting!
Post a comment to pattern DROPS Extra 0-404
We would love to hear what you have to say about this pattern!
If you want to leave a question, please make sure you select the correct category in the form below, to speed up the answering process. Required fields are marked *.