
Popular categories
Looking for a yarn?


Comments / Questions (12)
![]() Lissen Andersen wrote:
Lissen Andersen wrote:
Hver gang der skal tages ud, og det ikke passer med 2 ret og 2 vrang, så strikkes der ret, i de næste 2 udtagninger, og først i de følgende 2 udtagninger, strikkes der atter vrang. De to ekstra udtagninger i ret, skal løbe ubrudt fra grundstammen, der hvor masketråd eller maskemarkøren sidder, så de løber ud i buer, med vrangmasker i bunden
22.01.2026 - 22:35
![]() LINDA wrote:
LINDA wrote:
This pattern has me scratching my head at what am I not understanding in the directions. I do understand purling the twisted YO's and the knitting/increasing in the first 4 rows. If row 5 is...K1, YO, P2, YO, K2, YO, P2, YO, K2, YO..... What do you do for row 6...K1, P3, K3, P3, K3? How can I maintain a K2, P2 ribbing with adding just one stitch in between each K2, P2? What am I missing?
13.12.2025 - 00:52DROPS Design answered:
Dear Linda, the new stitches increased should be incorporated into the rib K2, P2 on each side of the K2 you are increasing on each side; so rib will not match around until you have increased a number of sts divisible by 4 to get the pattern working in the round. Could this video help you understanding how to increase in rib?
15.12.2025 - 11:38
![]() Brigitte wrote:
Brigitte wrote:
Après avoir tricoté les tours 1 à 4 du début, doit-on par la suite tricoter le corps de La Tuque en reproduisant seulement les tours 3 et 4 ?
28.11.2025 - 14:40DROPS Design answered:
Bonjour Brigitte, tout à fait, vous continuez à augmenter comme vous l'avez fait auparavant, tous les 2 tours, de chaque côté des fils marqueurs, soit 4 augmentations tous les 2 tours - cf AUGMENTATIONS. Bon tricot!
28.11.2025 - 16:05
![]() Katrin wrote:
Katrin wrote:
Hallo! Ich habe ebenfalls Probleme die Zunahme im Muster nachzuarbeiten. Mit den ersten 4 Reihen wie beschrieben komme ich soweit zurecht. Ich bin aber nicht ganz sicher ob der Maschenmarkierer quasi mit wandert oder an einer Stelle verbleibt. Das Trainingsvideo hilft mir da leider auch nicht weiter, da dort mit einer Rundnadel gearbeitet wird, hier aber zunächst mit einem Nadelspiel. Wie schaffe ich es, dass das Rippenmuster Runde über Runde noch übereinander passt? Vielen Dank!
07.10.2025 - 13:38DROPS Design answered:
Liebe Katrin, Sie können sich am besten an den beiden Rechtsmaschen orientieren, in denen die Markierer jeweils sitzen. Es wird stets neben diesen Rechtsmaschen zugenommen, Sie haben also quasi zwei markierte Rechtsrippen, neben denen Sie jeweils zunehmen. Die zugenommenen Maschen müssen Sie passend zum restlichen Rippenmuster einarbeiten. Gutes Gelingen weiterhin!
24.10.2025 - 23:59
![]() Alina wrote:
Alina wrote:
Dzień dobry, czy można użyć tylko drutów z żyłką 3,5 80 cm?
30.09.2025 - 22:26DROPS Design answered:
Witaj Alino, oczywiście że tak. Pozdrawiamy!
01.10.2025 - 10:30
![]() Annamarie wrote:
Annamarie wrote:
Thank you for your previous reply. So I make the increase yo either side of the two markers only. In the next row those yo increases become stitches but they don’t fit into the rib pattern k2, p2. What am I doing wrong?
16.06.2025 - 15:30DROPS Design answered:
Dear Annamarie, rib won't fit until you will have increased a total of 4 times, so just continue working stitches K over K and P over P. See with this video how you increase in rib. Happy knitting!
19.06.2025 - 10:42
![]() Annamarie wrote:
Annamarie wrote:
Hi, I have knitted the first 4 rows and have 16 stitches on my needle. Do I now follow those first 4 rows again continuing to increase all the way along, every third stich? Confused with the increase tip before and after markers, Is it only the nearest yo stitches to the markers ? Please help
15.06.2025 - 13:55DROPS Design answered:
Dear Annamarie, from now on you repeat rounds 3 and 4, working the increases into the rib, as in round 3. You will increase before/after the markers, regardless of how many stitches are in between the markers. So you should always work as: Work rib until 1 stitch is left before the marker, 1 yarn over, knit 1, marker, knit 1, yarn over, continue working. Happy knitting!
16.06.2025 - 00:44
![]() Gina wrote:
Gina wrote:
Hi Garnstudio. I’ve just cast on for this pattern and worked the first row, but having read through the first 4 rows and beyond, it says to continue increasing every 2nd round. However from what I can see the increases are on rows 1 and 3. Please clarify.
05.06.2025 - 11:13DROPS Design answered:
Dear Gina, correct, just continue to increase on every other round as you made before on round 1 and round 3 - read also INCREASE TIP until you have increased the required number of times/stitches. Happy knitting!
05.06.2025 - 14:26
![]() Carmen Arteaga wrote:
Carmen Arteaga wrote:
Muy lindo, podria hacer este modelo con cuello, tipo balaclava?como tendria que hacerlo muchas gracias
07.03.2025 - 17:15DROPS Design answered:
Hola Carmen, nosotros no hacemos patrones personalizados. Puedes ver este patrón como ejemplo de una balaclava similar como inspiración.
09.03.2025 - 19:32
![]() Anna wrote:
Anna wrote:
Forstår ikke instruktionerne efter 4. Omgang, hvis der fortsættes med at tage ud brydes 2ret/2vrang mønsteret, instruktionen med at løbende strikke omslagene ind i ribben giver ingen mening eller bør forklares bedre
26.08.2024 - 13:38
|
|
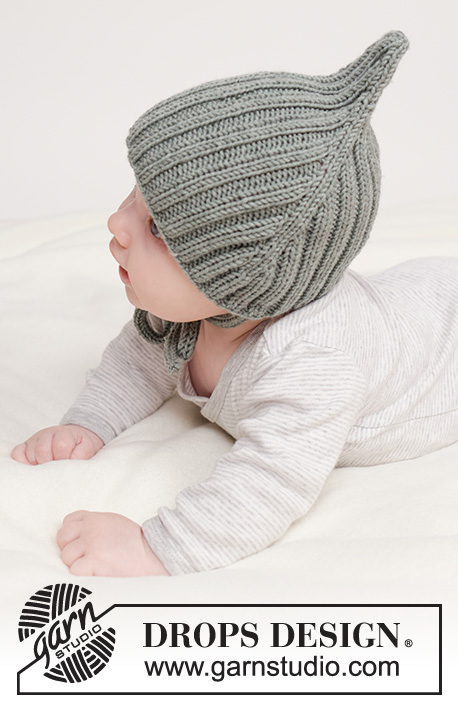
Forest Pixie Hat#forestpixiehat |
|
 |
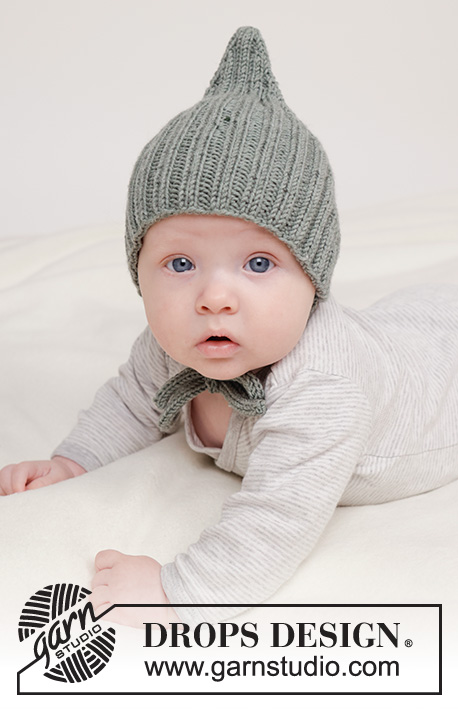 |
Knitted hat for babies and children in DROPS Merino Extra Fine. The piece is worked top down with rib. Sizes 0 to 4 years.
DROPS Baby 45-4 |
|
|
------------------------------------------------------- EXPLANATIONS FOR THE PATTERN: ------------------------------------------------------- INCREASE TIP: Work until there is 1 stitch left before the marker-thread, make 1 yarn over, work 2 stitches as before (marker-thread between these 2 stitches), 1 yarn over. On the next round work the yarn overs into the rib as follows: BEFORE MARKER-THREAD: Knit/purl the back loop (stitch twists to the right). AFTER MARKER-THREAD: Slip the yarn over knit-wise onto the right needle, place it back on the left needle the other way around (twisted), knit/purl the front loop (stitch twists to the left). ------------------------------------------------------- START THE PIECE HERE: ------------------------------------------------------- HAT – SHORT OVERVIEW OF THE PIECE: The piece is worked in the round, top down. 2 ties are worked to finish and sewn onto each side. HAT: Cast on 8 stitches with double pointed needles size 3.5 mm and DROPS Merino Extra Fine. Knit 1 round. Insert 2 marker-threads, the first after the 2nd stitch and the second after the 6th stitch (4 stitches between). Work in the round and increase at each marker-thread as follows – read INCREASE TIP: ROUND 1: Knit 1, 1 yarn over, knit 2, 1 yarn over, knit 2, 1 yarn over, knit 2, 1 yarn over, knit 1 = 12 stitches. ROUND 2: Knit 1, purl 1 (remember to work the yarn overs twisted as described above), knit 2, purl 1, knit 2, purl 1, knit 2, purl 1, knit 1. ROUND 3: Knit 1, purl 1, 1 yarn over, knit 2, 1 yarn over, purl 1, knit 2, purl 1, 1 yarn over, knit 2, 1 yarn over, purl 1, knit 1 = 16 stitches. ROUND 4: Knit 1, purl 2 (remember to work the yarn overs twisted), knit 2, purl 2, knit 2, purl 2, knit 2, purl 2, knit 1. Continue increasing every 2nd round, working the yarn overs into the rib (knit 2, purl 2). Increase a total of 22-22-26-26 (30-30) times = 96-96-112-112 (128-128) stitches. Continue the rib (knit 2, purl 2) until the piece measures 16-17-18-19 (19-20) cm. Cast off. TIES: Cast on 4 stitches with needle size 3.5 mm and work as follows: * Knit 1, take the yarn to the front (towards you), slip 1 stitch purl-wise, place yarn at the back (away from you) *, work from *-* 1 more time, then push all stitches back to the beginning of the needle. Continue working like this, creating a round cord. Cast off when the tie measures 18-20-22-24 (26-28) cm. Work 1 more tie in the same way. Fasten 1 tie on each side of the hat, 4 to 8 stitches after the 2 knitted stitches, with increases on each side (towards mid-back) |
|
Have you finished this pattern?Tag your pictures with #dropspattern #forestpixiehat or submit them to the #dropsfan gallery. Do you need help with this pattern?You'll find 14 tutorial videos, a Comments/Questions area and more by visiting the pattern on garnstudio.com. © 1982-2026 DROPS Design A/S. We reserve all rights. This document, including all its sub-sections, has copyrights. Read more about what you can do with our patterns at the bottom of each pattern on our site. |
|


With over 40 years in knitting and crochet design, DROPS Design offers one of the most extensive collections of free patterns on the internet - translated to 17 languages. As of today we count 324 catalogues and 12290 patterns translated into English (UK/cm). 12290
We work hard to bring you the best knitting and crochet have to offer, inspiration and advice as well as great quality yarns at incredible prices! Would you like to use our patterns for other than personal use? You can read what you are allowed to do in the Copyright text at the bottom of all our patterns. Happy crafting!
Post a comment to pattern DROPS Baby 45-4
We would love to hear what you have to say about this pattern!
If you want to leave a question, please make sure you select the correct category in the form below, to speed up the answering process. Required fields are marked *.