
Popular categories
Looking for a yarn?


Comments / Questions (21)
![]() Suzanne wrote:
Suzanne wrote:
Section labeled increases for yoke pattern states move the markers i believe my markers are in position. After finishing increase for sleeves the markers are where pattern states me to move them too. Did I do something wrong?
18.11.2025 - 02:55DROPS Design answered:
Hi Suzanne, The section for yoke increases is only for sizes XL, XXL and XXXL. In the other sizes, the increases are finished, so this could be the case for the size you are working on? Regards, Drops Team.
18.11.2025 - 06:38
![]() Hanneke wrote:
Hanneke wrote:
Dit vest heb ik, op de mouwen na, gebreid. Is supermooi geworden! De mouwen zou ik echter gewoon lang willen hebben. Kunt u aanwijzingen geven hoe ik dat het beste kan doen? Met vriendelijke groet, Hanneke. En alle lof voor de ontwerpers van dit hele leuke patroon!
03.09.2025 - 19:15DROPS Design answered:
Dag Hanneke,
Helaas is het voor ons niet mogelijk om patronen aan te passen naar persoonlijke wensen, maar je zou de mouwen gewoon door kunnen breien tot je gewenste lengte. Misschien moet je nog een paar keer minderen midden onder de mouw, zodat de mouw niet te wijd is bij de pols.
04.09.2025 - 21:13
![]() Claudia Daniel wrote:
Claudia Daniel wrote:
Hallo, ich stricke den cardigan in größe m. wenn ich alle 9cm ein knopfloch arbeite, hab ich am ende 6 knopflöcher, angegeben sind für gr. m 5 knöpfe, das ist leider einer zuwenig. bitte überprüft mal die anzahl der benötigten knöpfe in der anleitung liebe grüße claudia
14.07.2024 - 09:32DROPS Design answered:
Liebe Claudia, die Knopflöcher selber verbrauchen ja auch noch etwas "Platz", Sie messen für das nächste Knopfloch ab dem unteren Rand des vorherigen Knopflochs. Unten ist die Jacke nicht komplett geschlossen, ab dem letzten Knopfloch nach unten bleibt sie ein Stück offen. Wenn Ihnen das nicht gefällt und Sie weiter unten auch noch gern einen Knopf hätten, können Sie ein Knopfloch mehr (samt Knopf) einarbeiten. Viel Spaß beim Stricken!
28.07.2024 - 11:32
![]() Carina wrote:
Carina wrote:
Bueno gracias pero al final he empezado los aumentos después de esas primeras 4 filas de punto jersey para que todo cuadre
22.04.2024 - 18:21
![]() Carina wrote:
Carina wrote:
Es que en esas 4 vueltas de punto jersey ya se han aumentado 4 puntos y entonces el delantero derecho no queda simétrico con el izquierdo. O es que los aumentos no se empiezan hasta que lleguen los calados? Por favor contestadme aunque sea pesada porque ya lo he deshecho 4 veces Gracias
19.04.2024 - 13:50DROPS Design answered:
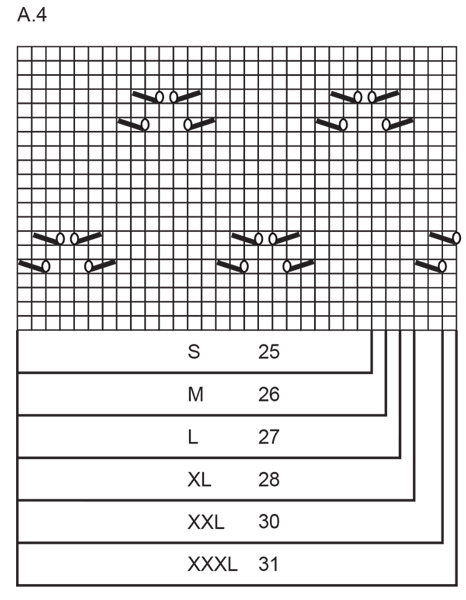
Hola Carina, los aumentos comienzan como se indican en el patrón. Si trabajas los aumentos incorporando los puntos nuevos en A.1, como se ha contestado en la pregunta anterior, el patrón no debería descuadrarse. Cada diagrama del delantero sigue teniendo su número de puntos concreto, mientras que el resto de puntos de los aumentos en A.2, A.3 y A.4 se trabajan con A.1, que serían como un trozo de A.2/A.3/A.4. A la hora de trabajar A.1, te aseguras de que la repetición de A.1 no interrumpa los otros diagramas. Estas repeticiones deberían quedar después de A.2, antes de A.4 y a los lados de A.3.
21.04.2024 - 23:29
![]() Carina wrote:
Carina wrote:
Es que en esas 4 vueltas de punto jersey ya se han aumentado 4 puntos y entonces el delantero derecho no queda simétrico con el izquierdo. O es que los aumentos no se empiezan hasta que lleguen los calados. Por favor contestadme aunque sea pesada porque ya lo he deshecho 4 veces Gracias
19.04.2024 - 01:57DROPS Design answered:
Hola Carina, los aumentos comienzan como se indican en el patrón. Si trabajas los aumentos incorporando los puntos nuevos en A.1, como se ha contestado en la pregunta anterior, el patrón no debería descuadrarse. Cada diagrama del delantero sigue teniendo su número de puntos concreto, mientras que el resto de puntos de los aumentos en A.2, A.3 y A.4 se trabajan con A.1, que serían como un trozo de A.2/A.3/A.4. A la hora de trabajar A.1, te aseguras de que la repetición de A.1 no interrumpa los otros diagramas. Estas repeticiones deberían quedar después de A.2, antes de A.4 y a los lados de A.3.
21.04.2024 - 23:29
![]() Carina wrote:
Carina wrote:
Gracias, pero otra pregunta, en la talla XL, en A2 por ejemplo, ya no serán 28 puntos al empezar el dibujo de calados, no? Perdón por preguntar tanto, pero este patrón me está costando un poco Gracias por todo
18.04.2024 - 16:37DROPS Design answered:
Hola Carina, si aumentas puntos en A.2 esos puntos dejan de ser parte de A.2 y pasan a ser parte de A.1. Estos puntos se trabajarán en punto jersey (como la gran mayoría del diagrama A.1) hasta tener suficientes como para trabajar el diagrama A.1 completo, con los calados incluidos.
21.04.2024 - 23:25
![]() Carina wrote:
Carina wrote:
Hola Entonces las 4 primeras filas en punto jersey de A2, A 3 y A4 se hacen o no? Por favor contestadme Gracias
18.04.2024 - 14:56DROPS Design answered:
Hola Carina, las 4 primeras filas de A2, A 3 y A4 se hacen en punto jersey. Saludos!
18.04.2024 - 15:24
![]() Carina wrote:
Carina wrote:
Y por qué A2, A3 y A4 tienen 4 filas de punto jersey y A1 empieza ya con el patrón de calados? Este patrón no está bien explicado.
17.04.2024 - 11:59DROPS Design answered:
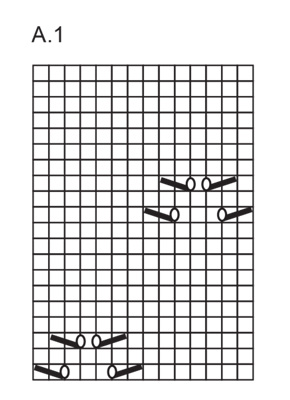
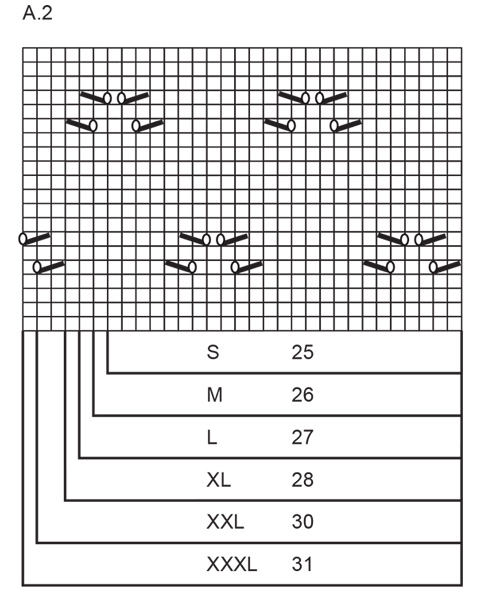
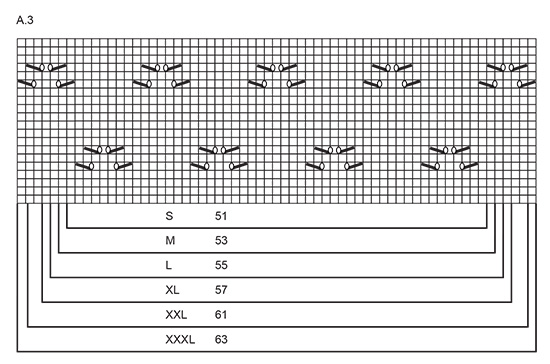
Hola Carina, A.1 muestra 1 repetición del patrón. A.2, A.3 y A.4 muestran el patrón de calados en el delantero derecho, espalda y delantero izquierdo, respectivamente. Cuando aumentemos, los puntos aumentados se trabajan según A.1. Por lo tanto, A.1 no se empieza a trabajar hasta tener suficientes puntos para ello y se trabaja dentro del patrón de calados de A.2, A.3 y A.4. Mientras que los otros comienzan con 4 filas en punto jersey y después comienzan el patrón de calados, donde se irá incorporando A.1. Por ejemplo, puedes ver que A.3 (espalda) tienes 4 repeticiones completas del diagrama A.1.
21.04.2024 - 23:18
![]() Carina wrote:
Carina wrote:
Hola otra vez Pero si el aumento coincide justo con el dibujo de los agujeritos ya se desbarata todo, no? Gracias
15.04.2024 - 11:16DROPS Design answered:
Hola Carina, los aumentos no pueden coincidir con el dibujo de calados. El dibujo de calados solo se trabaja como repetición extra una vez tengas suficientes puntos como para trabajar una repetición completa del patrón de calados; en caso contrario estos puntos se trabajan en punto jersey. De esta forma, el patrón de calados no se desbarata con los aumentos.
21.04.2024 - 23:09
|
|||||||||||||||||||||||||
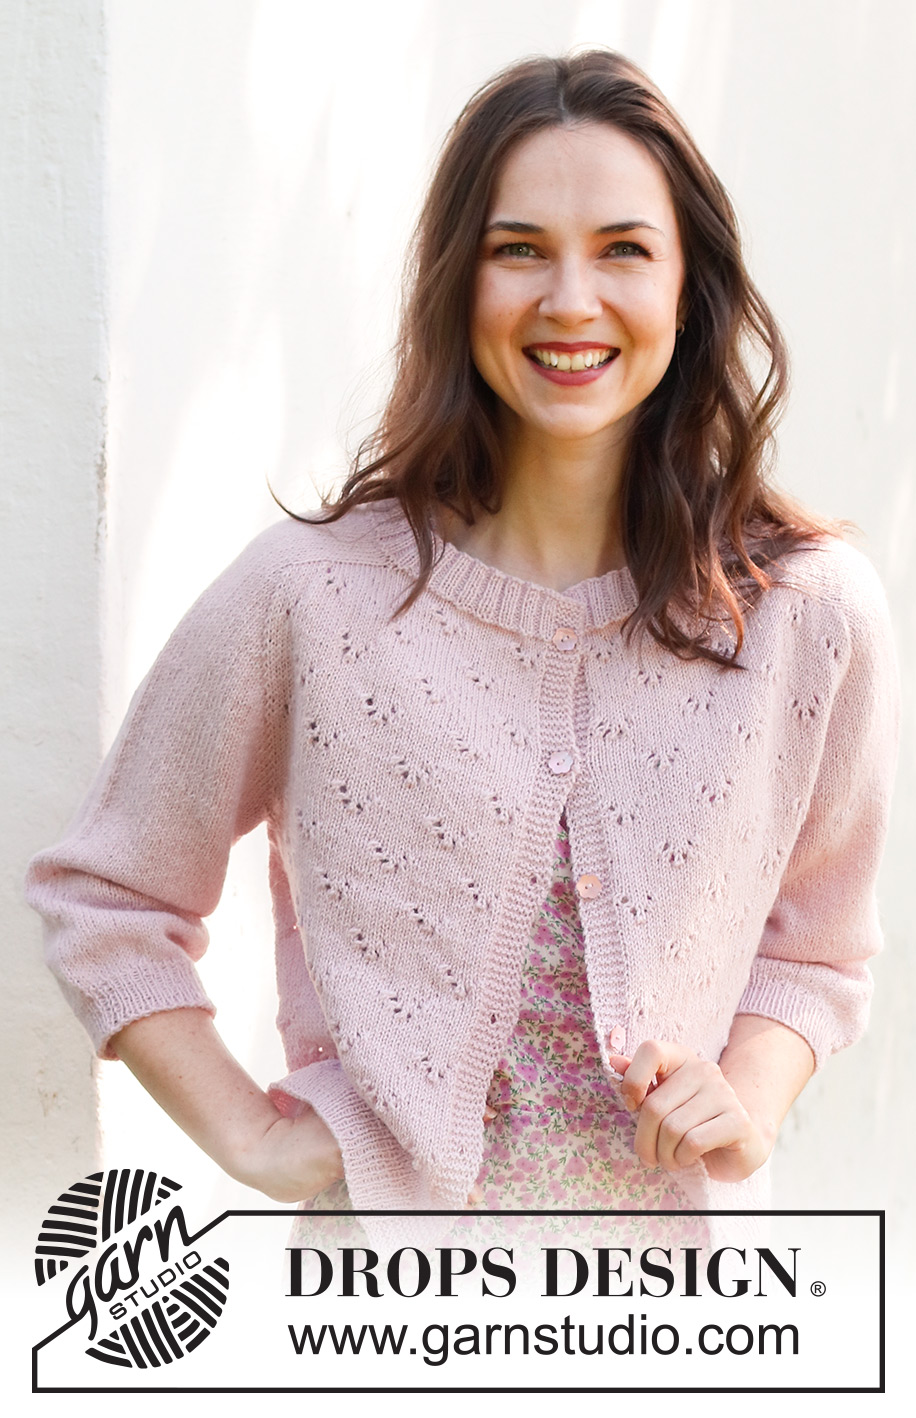
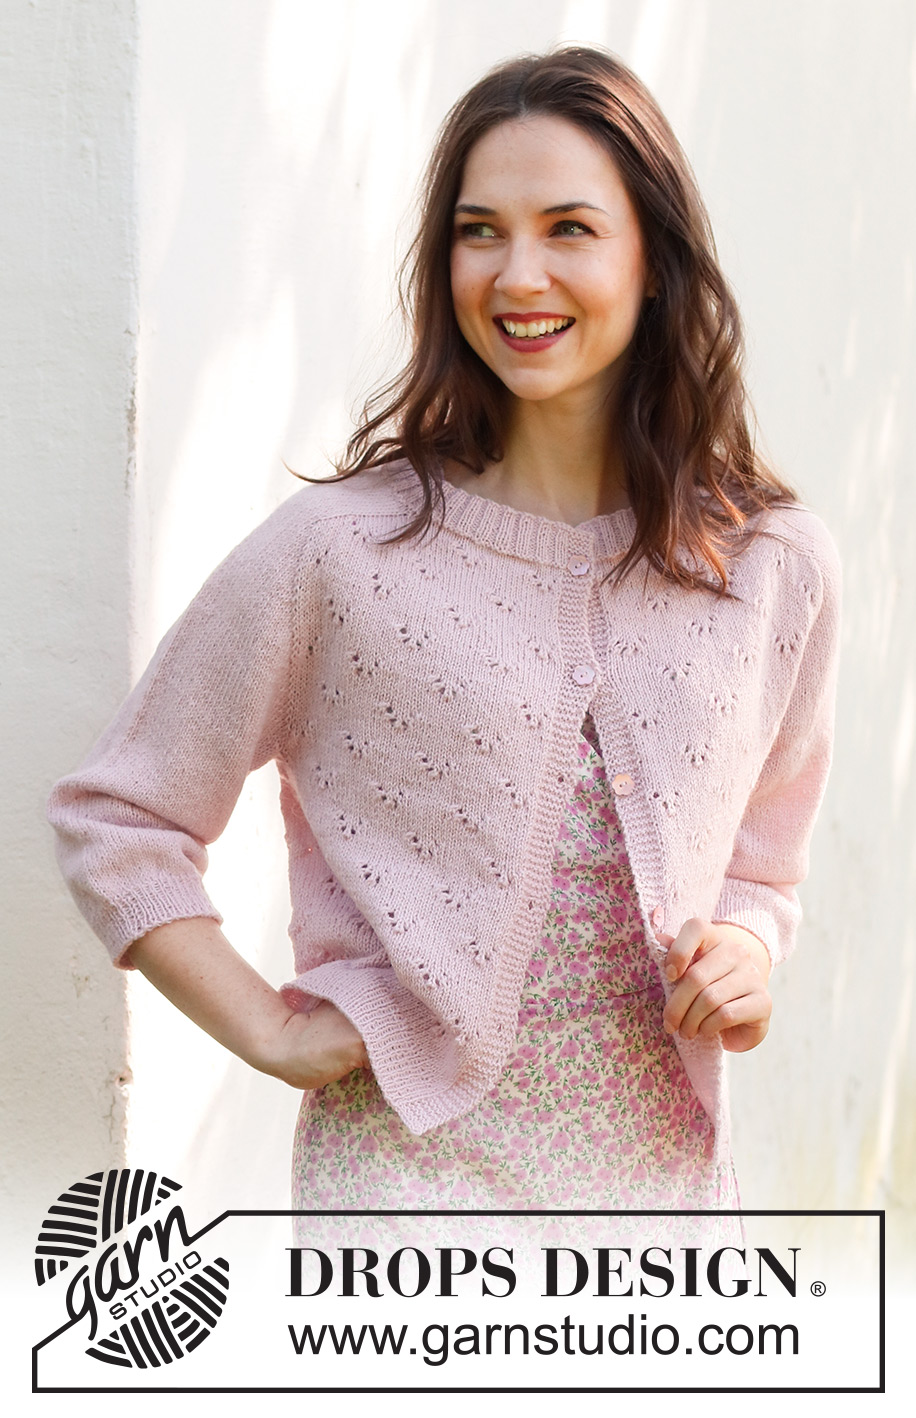
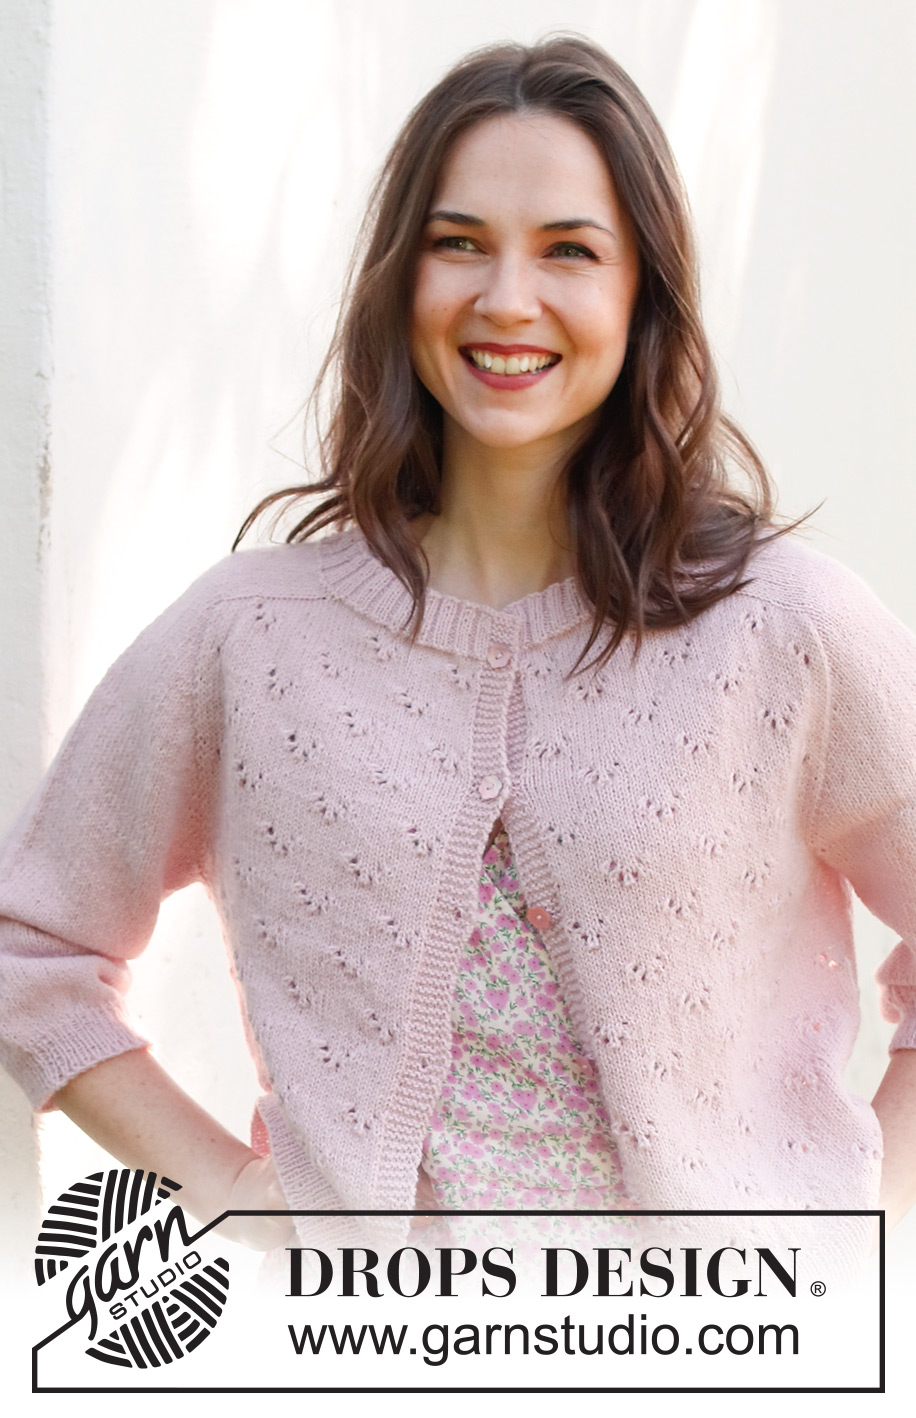
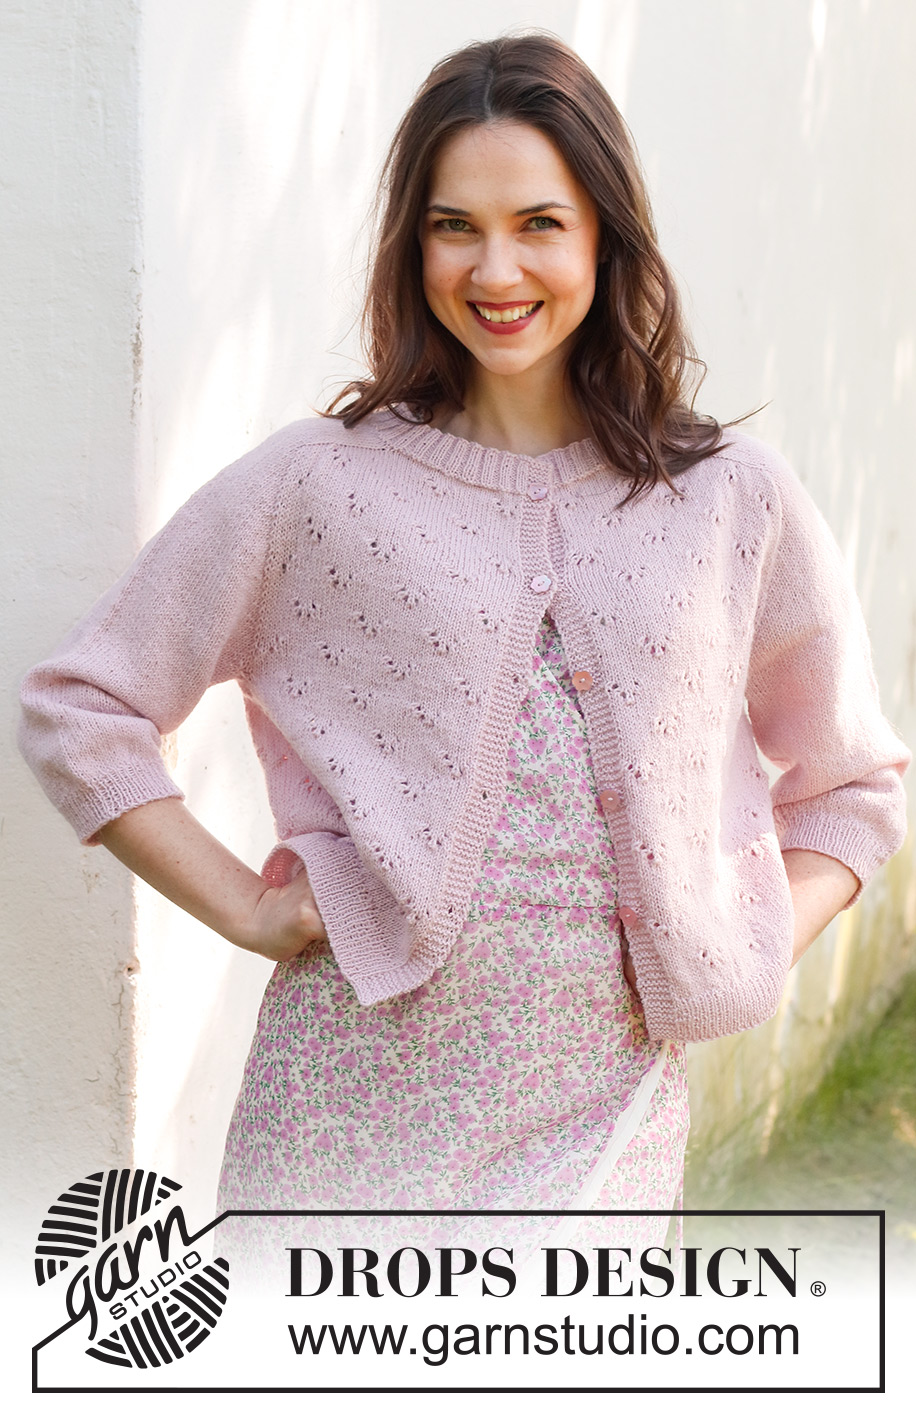
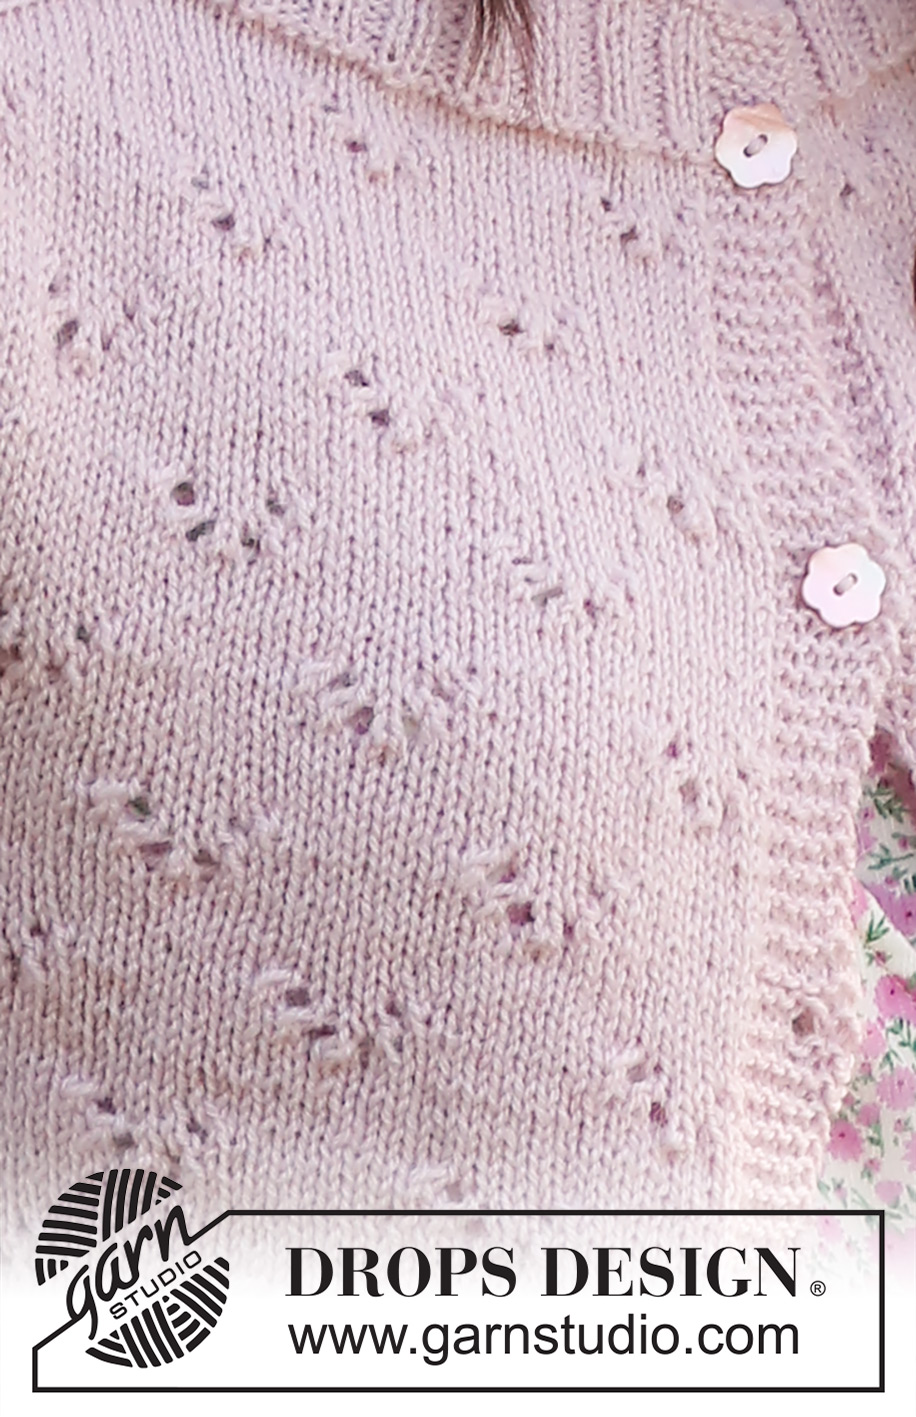
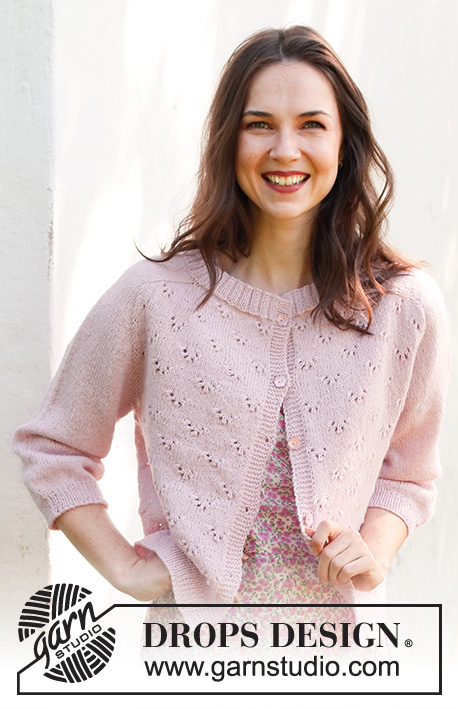
Pink Peony Cardigan#pinkpeonycardigan |
|||||||||||||||||||||||||
 |
 |
||||||||||||||||||||||||
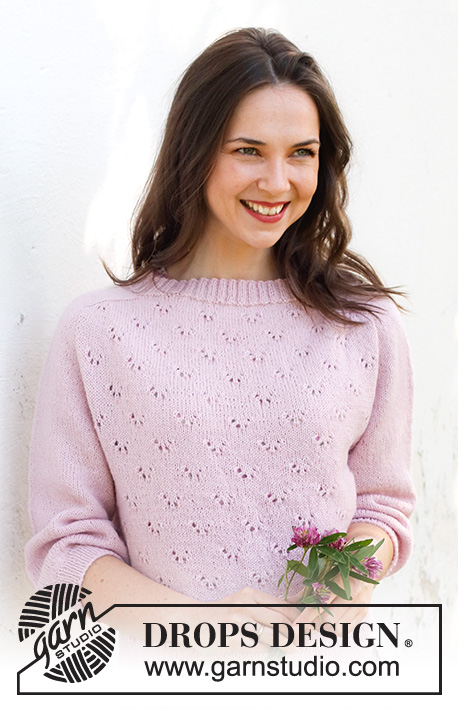
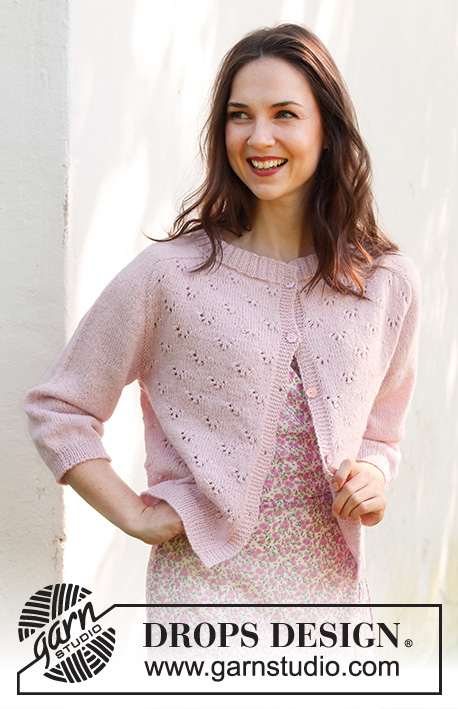
Knitted jacket in DROPS Flora. Piece is knitted top down with saddle shoulders, lace pattern and ¾ -length sleeves. Size: S - XXXL
DROPS 232-26 |
|||||||||||||||||||||||||
|
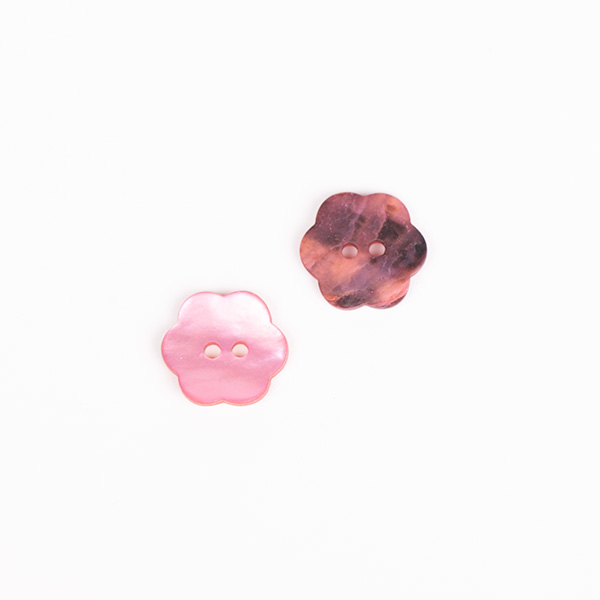
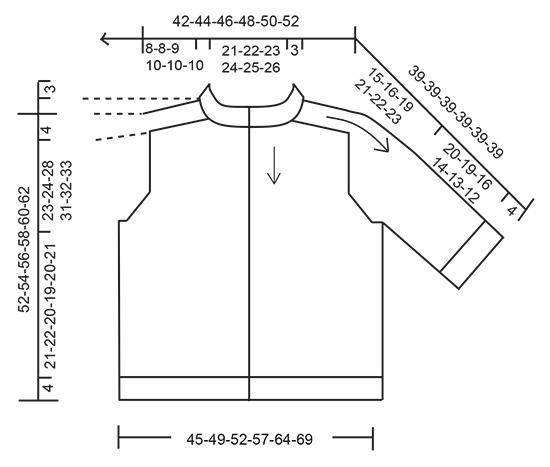
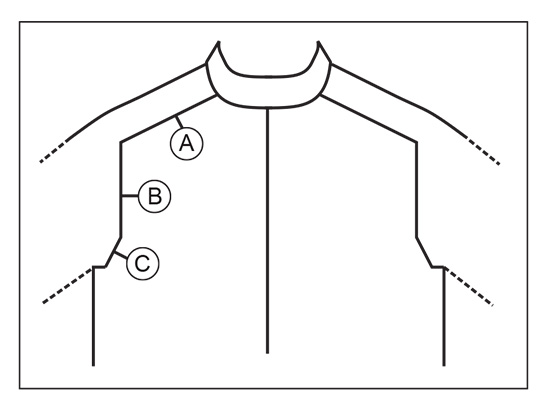
---------------------------------------------------------- EXPLANATION FOR THE PATTERN: ---------------------------------------------------------- GARTER STITCH (back and forth): Knit all rows. 1 ridge vertically = knit 2 rows. BUTTONHOLES: Decrease for buttonholes on right band (when garment is worn). 1 buttonhole = work from right side as before until 3 stitches remain on needle, make 1 yarn over, knit 2 together and finish by knitting 1. On next row (wrong side) knit the yarn over to make a hole. Decrease first buttonhole right after rib in the neck, then decrease the next 4-4-4-5-5-5 buttonholes as explained above approx. 9-9-9-10-10-10 cm apart. PATTERN: See diagrams A.1 to A.4. Find your size in the diagrams. Diagrams show all rows in pattern seen from the right side. INCREASE TIP-1 (applies to increase for saddle shoulder, sleeves and yoke from RIGHT SIDE): BEFORE MARKER: The new stitch is twisted towards the right. Use left needle to pick up yarn between 2 stitches from row below, pick up yarn from the back and knit stitch in front loop of stitch. AFTER MARKER: The new stitch is twisted towards the left. Use left needle to pick up yarn between 2 stitches from row below, pick up yarn from the front and knit stitch in back loop of stitch. INCREASE TIP-2 (applies to increase for saddle shoulder from WRONG SIDE) BEFORE MARKER: The new stitch is twisted towards the right. Use left needle to pick up yarn between 2 stitches from row below, pick up yarn from the front and purl stitch in back loop of stitch. AFTER MARKER: The new stitch is twisted towards the left. Use left needle to pick up yarn between 2 stitches from row below, pick up yarn from the back and purl stitch in front loop of stitch. ---------------------------------------------------------- START THE PIECE HERE: ---------------------------------------------------------- JACKET - SHORT OVERVIEW OF THE PIECE: Work neck edge and yoke back and forth on circular needle from mid front, work top down. Increase stitches for saddle shoulder, then increase stitches for sleeve, and increase stitches for yoke. Now divide yoke for body and sleeves. Worked back and forth on circular needle from mid front. Work sleeves in the round on double pointed needles/a short circular needle. NECK EDGE: Cast on 170-178-182-186-194-198 stitches on circular needle size 2.5 mm with DROPS Flora. Purl 1 row (= wrong side). Work next row as follows from right side: 6 band stitches in GARTER STITCH - read explanation above - * knit 2, purl 2 *, repeat from *-* until 8 stitches remain on needle, knit 2, and finish with 6 band stitches in garter stitch. Continue rib like this for 3 cm. When rib has been worked, knit 1 row from wrong side while decreasing 13-17-17-17-17-17 stitches evenly (do not decrease over stitches in band) = 157-161-165-169-177-181 stitches. Decrease for BUTTONHOLES on right band - read explanation above. Switch to circular needle size 3 mm. Then work yoke as explained below. YOKE: Insert a marker after band at the beginning of row mid front – NOW MEASURE PIECE FROM HERE! In addition insert 4 new marker in the piece as explained below - this is done without working the stitches, and each of these 4 markers are inserted between 2 stitches. Use markers when increasing for saddle shoulder. They should be a different colour than the marker by neck. 1st marker: Begin mid front, count 31-32-33-34-36-37 stitches (= front piece), insert 1st marker in next stitch. 2nd marker: Count 22 stitches from 1st marker (= shoulder stitches), insert 2nd marker before next stitch. 3rd marker: Count 51-53-55-57-61-63 stitches from 2nd marker (= back piece), insert 3rd marker before next stitch. 4th marker: Count 22 stitches from 3rd marker (= shoulder stitches), insert 4th marker before next stitch. 31-32-33-34-36-37 stitches remain on front piece after 4th marker. Move these 4 markers upwards when working, increase at each of these markers later. SADDLE SHOULDER INCREASE: Read all of the following section before continuing! Continue piece with 6 band stitches in garter stitch, A.2 over the next 25-26-27-28-30-31 stitches, stocking stitch over the next 22 stitches, A.3 over the next 51-53-55-57-61-63 stitches, stocking stitch over the next 22 stitches, A.4 over the next 25-26-27-28-30-31 stitches, and 6 band stitches in garter stitch. A.1 shows a repetition of pattern, when increasing stitches for saddle shoulder the new stitches should be worked in this pattern. AT THE SAME TIME on first row from right side increase 4 stitches for saddle shoulder as follows: Increase 1 stitch BEFORE 1st and 3rd marker and increase 1 stitch AFTER 2nd and 4th marker – read INCREASE TIP -1. Remember to increase only on front piece and back piece and number of shoulder stitches stays the same. On next row from wrong side increase for saddle shoulder as follows: Increase 1 stitch BEFORE 4th and 2nd marker and increase 1 stitch AFTER 3rd and 1st marker – read INCREASE TIP-2. I.e. increase unevenly from right side and from wrong side so that the stitches lay nicely. Continue in the pattern like this, and increase on every row (i.e. from both right side and from wrong side) 24-28-30-32-32-32 times in total = 253-273-285-297-305-309 stitches. REMEMBER THE KNITTING TENSION! Work the increased stitches in pattern A.1. Make sure that A.1 fits over stitches from A.2, A.3 and A.4. After last increase piece measures approx. 8-8-9-10-10-10 cm from marker by the neck. Then increase for sleeves as explained below. SLEEVE INCREASE: Work in stocking stitch over stitches on sleeves, pattern the same way as before on body and 6 band stitches in garter stitch in each side towards mid front. AT THE SAME TIME on next row from right side increase 4 stitches for sleeves as follows: Increase 1 stitch AFTER 1st and 3rd marker and increase 1 stitch BEFORE 2nd and 4th marker. Remember; increase now only on sleeves but number of stitches on front piece and back piece stays the same. Work the increased stitches in stocking stitch. Increase like this on every other row (i.e. every row from right side) 26-28-32-34-30-28 times in total = 357-385-413-433-425-421 stitches. Piece now measures approx. 23-24-28-30-28-27 cm from marker in neck. YOKE INCREASE: This section only applies to sizes XL, XXL and XXXL, in sizes S, M and L the increases are done. Move the 4 markers from sleeve increase so that each of the 4 markers is in the outermost stitch in each side on front pieces and back piece. There are 90-82-78 stitches between stitches with marker on each sleeve. On next row increase 8 stitches for yoke by increasing both before and after each of the 4 stitches with marker - remember INCREASE TIP. Increase stitches on front pieces, back piece and both sleeves, and work the increased stitches in A.1 on back piece/front pieces and in stocking stitch on sleeves. Increase like this every other row 2-7-11 times in total = 449-481-509 stitches. ALL SIZES: = 357-385-413-449-481-509 stitches. When all increases are done, the piece measures approx. 23-24-28-31-32-33 cm from marker in neck. If the garment is shorter than this, continue as before without increases until correct measurements. Now divide piece for body and sleeves on next row as follows: Work first 55-60-63-68-75-80 stitches (front piece), slip the next 74-78-86-94-96-100 stitches on a thread for sleeve, cast on 8-8-10-12-14-16 new stitches under sleeve, work the next 99-109-115-125-139-149 stitches (back piece), slip the next 74-78-86-94-96-100 stitches on a thread for sleeve, cast on 8-8-10-12-14-16 new stitches, work the last 55-60-63-68-75-80 stitches (front piece). Finish body and sleeves separately. NOW MEASURE PIECE FROM HERE! BODY: = 225-245-261-285-317-341 stitches. Work A.1 back and forth with 6 band stitches in garter stitch in each side towards mid front, work the stitches that do not fit A.1 in the side in stocking stitch. Work until piece measures 21-22-20-19-20-21 cm from division. Knit 1 row from right side while increasing 46-50-52-58-64-68 stitches evenly = 271-295-313-343-381-409 stitches. Switch to circular needle size 2.5 mm. Work next row as follows from wrong side: 6 band stitches in garter stitch, * purl 1, knit 1 *, repeat from *-* until 7 stitches remain on needle, purl 1, and finish with 6 band stitches in garter stitch. Continue rib like this for 4 cm. Loosely cast off. Jacket measures approx. 52-54-56-58-60-62 cm from shoulder and down. SLEEVES: Slip the 74-78-86-94-96-100 stitches from stitch holder in one side of piece on double pointed needles or a short circular needle size 3 mm and pick in addition up 1 stitch in each of the 8-8-10-12-14-16 new stitches cast on under sleeve = 82-86-96-106-110-116 stitches. Insert 1 marker thread mid under sleeve, i.e. in the middle of the 8-8-10-12-14-16 stitches that were cast on under sleeves. Begin round at the marker thread and work stocking stitch in the round. Work in stocking stitch until sleeve measures 20-19-16-14-13-12 cm from division. 4 cm remain until finished measurements. Knit 1 round , and decrease at the same time 4-4-10-16-16-16 stitches evenly = 78-82-86-90-94-100 stitches. Switch to double pointed needles size 2.5 mm. Work rib in the round = knit 1/purl 1 for 4 cm. Loosely cast off. Sleeve measures approx. 24-23-20-18-17-16 cm from division. Work the other sleeve the same way. ASSEMBLY: Sew the buttons on to the left band. |
|||||||||||||||||||||||||
Diagram explanations |
|||||||||||||||||||||||||
|
|||||||||||||||||||||||||
 |
|||||||||||||||||||||||||
 |
|||||||||||||||||||||||||
 |
|||||||||||||||||||||||||
 |
|||||||||||||||||||||||||
 |
|||||||||||||||||||||||||
 |
|||||||||||||||||||||||||
Have you finished this pattern?Tag your pictures with #dropspattern #pinkpeonycardigan or submit them to the #dropsfan gallery. Do you need help with this pattern?You'll find 26 tutorial videos, a Comments/Questions area and more by visiting the pattern on garnstudio.com. © 1982-2026 DROPS Design A/S. We reserve all rights. This document, including all its sub-sections, has copyrights. Read more about what you can do with our patterns at the bottom of each pattern on our site. |
|||||||||||||||||||||||||


With over 40 years in knitting and crochet design, DROPS Design offers one of the most extensive collections of free patterns on the internet - translated to 17 languages. As of today we count 324 catalogues and 12290 patterns translated into English (UK/cm). 12290
We work hard to bring you the best knitting and crochet have to offer, inspiration and advice as well as great quality yarns at incredible prices! Would you like to use our patterns for other than personal use? You can read what you are allowed to do in the Copyright text at the bottom of all our patterns. Happy crafting!
Post a comment to pattern DROPS 232-26
We would love to hear what you have to say about this pattern!
If you want to leave a question, please make sure you select the correct category in the form below, to speed up the answering process. Required fields are marked *.