Comments / Questions (49)
![]() Bettina wrote:
Bettina wrote:
Wie kann ich die Raglanzunahmen im Vollpatent einarbeiten? In der Anleitung steht: ... 2 Maschen in der nächsten Masche (1 Linksmasche + Umschlag) wie folgt zunehmen: Den Umschlag und die Masche links zusammenstricken, jedoch beides noch nicht von der Nadel gleiten lassen, 1 Umschlag arbeiten und die Masche + Umschlag nochmals links zusammenstricken und von der linken Nadel gleiten lassen = 3 Maschen (= 2 Maschen zugenommen). Leider finde ich hierzu kein Video und verstehe es nicht.
07.09.2023 - 18:25DROPS Design answered:
Liebe Bettina, in diesem Video zeigen wir (für ein anderes Modell) wie diese Zunahme (ca 1:04) gearbeitet wird und wie diese Zunahmen (ca 4:14) bei der nächsten Runde gestrickt werden. Viel Spaß beim stricken!
08.09.2023 - 08:02
![]() Agneta Hofstedt Blom wrote:
Agneta Hofstedt Blom wrote:
Har fastnat på första ökningen raglan på mönster 38-7.stickar tills det är 3 m.kvar innan markör, jag har inte räknat med omslaget då ,men när jag gör ökningen bror det en maska över innan nästa markör stämmer det ?
25.05.2023 - 17:18DROPS Design answered:
Hei Agneta Det økes i 2. omgang i patentmønstret), strikker du slik: Strikk til det gjenstår 3 masker før masken med merke i. Så øker du i neste maske som er en vrangmaske med kast. Øk slik: Strikk kastet og masken vrang sammen, men vent med å løfte masken og kastet det strikkes i av pinnen, lag 1 kast om høyre pinne, strikk masken og kastet vrang sammen 1 gang til = 3 masker (= 2 masker økt). Slipp masken det ble strikket i av pinnen. På neste omgang strikkes de økte maskene inn i patentmønsteret – det er ingen patentkast i de 3 økte maskene, så på første omgang etter økningen strikkes rettmasken rett uten kast. mvh DROPS Design
30.05.2023 - 13:11
![]() Edith Salminen wrote:
Edith Salminen wrote:
Kan man göra denna tröja fast men garnet drops belle?
10.01.2023 - 10:16DROPS Design answered:
Hej Edith, ja det kan du, prøv garn-konverteraren, vælg DROPS Merino, antal g i din størrelse og 1 tråd, så får du Belle op som alternativ sammen med hvor mange g du skal købe :)
10.01.2023 - 11:48
![]() Michielsen Conny wrote:
Michielsen Conny wrote:
Is er een video met uitleg over het meerderen voor Rahman in averechts patentsteek. Ik begrijp de uitleg niet zo goed. Merci
01.11.2022 - 08:56DROPS Design answered:
Dag Conny,
In deze video kun je zien hoe er gemeerderd wordt in Engelse patentsteek. Hoewel er bij deze video recht (samen) gebreid wordt heb je wellicht toch iets aan de video. Het verplaatsen van de markeernaald is op jouw patroon niet van toepassing.
02.11.2022 - 14:44
![]() Michielsen Conny wrote:
Michielsen Conny wrote:
Is er een video met uitleg over het meerderen voor Rahman in averechts patentsteek. Ik begrijp de uitleg niet zo goed. Merci
01.11.2022 - 08:27
![]() Ola wrote:
Ola wrote:
Witam, kiedy rozpocząć okrążenie zaczynając rękawy? Jeśli robię to za 5 dodanymi oczkami to zamykanie oczek wypada na przełomie dwóch okrążeń (przed markerem wypada na "prawym" okrążeniu, ale już po wypada na "lewym" okrążeniu). Wg instrukcji oba powinny być zamknięte na prawej stronie. Natomiast, jeśli zaczynam okrążenie przed dodanymi oczkami to nie wychodzi mi wtedy prawidłowy ścieg (2 oczka z narzutem wypadają obok siebie). Dziękuję za odpowiedź!
23.10.2022 - 19:27DROPS Design answered:
Witaj Olu, przerabiając rękaw okrążenie zaczynamy na środku 5 oczek pod rękawem. Pozdrawiamy!
25.10.2022 - 08:33
![]() Hanneke wrote:
Hanneke wrote:
Maat 92: hals van 74 naar 68 steken: daarna 12+7+25+7+13=64 steken. Wat moet ik met het verschil?
08.10.2022 - 23:09DROPS Design answered:
Dag Hanneke,
Heb je de markeerdraden in de steken gedaan en niet tussen de steken? Mogelijk verklaart dit het verschil van 4 steken.
09.10.2022 - 18:20
![]() Ola wrote:
Ola wrote:
Witam, chciałabym wykonać sweter w rozmiarze 92-98, ale napotkałam problem już przy zamykaniu oczek przy kołnierzyku. Przy 74 oczkach należy zamknąć 6. 74/6= 12.33. Jednak zamykając 12 i 13 oczko nie wychodzi równy odstęp między zamkniętymi oczkami. Po 5 zamknięciu oczek przed końcem okrążenia pozostaje mi na drutach tylko 8 oczek, a nie 13 (suma wszystkich 69). Czy prawidłowym jest zamknięcie 7go i 8go oczka, aby uzyskać ich 68 wg wzoru? Dziękuję za odpowiedź!!
08.10.2022 - 11:28DROPS Design answered:
Witaj Olu, oczywiście tak zrób. Ta 'nieregularność' wogóle nie będzie widoczna. To równomierne zamykanie oczek jest prawie zawsze wykonywane w pewnym przybliżeniu, za wyjątkiem tych rzadkich sytuacji, gdy po podzieleniu ogólnej liczby oczek przez liczbę oczek do zamknięcia wychodzi nam liczba całkowita. Miłej pracy!
10.10.2022 - 09:47
![]() Manoa wrote:
Manoa wrote:
Merci pour votre réactivité et la clarté de vos explications !
04.10.2022 - 21:28
![]() Manoa wrote:
Manoa wrote:
Bonjour, Merci pour votre aide.Pour le rang 2 des côtes anglaises, si je fais la 1ère augmentation à 3 m. du 1er marqueur, je fais un jeté et glisse la maille du marqueur à l'envers. Si je tricote les 5 m. suivantes en m. anglaises comme avant, la 2ème augmentation n'est pas du tout centrée autour du marqueur : est-ce normal, svp ? Du coup, la 1ère augmentation du 2ème marqueur est presque juxtaposée à la 2ème augmentation du 1er marqueur... Est-ce normal, svp ?Merci bq,
26.09.2022 - 17:50DROPS Design answered:
Bonjour Manoa, tricotez jusqu'à ce qu'il reste 3 mailles avant la maille avec le marqueur, augmentez en tricotant 3 fois cette maille, tricotez les 2 mailles suivantes + celle avec le marqueur + les 2 mailles suivantes (= 5 mailles au total), et augmentez dans la maille suivante = vous avez ainsi augmenté de part et d'autre des 5 mailles du raglan. Bon tricot!
27.09.2022 - 09:36
The Outdoors#theoutdoorssweater |
|
 |
 |
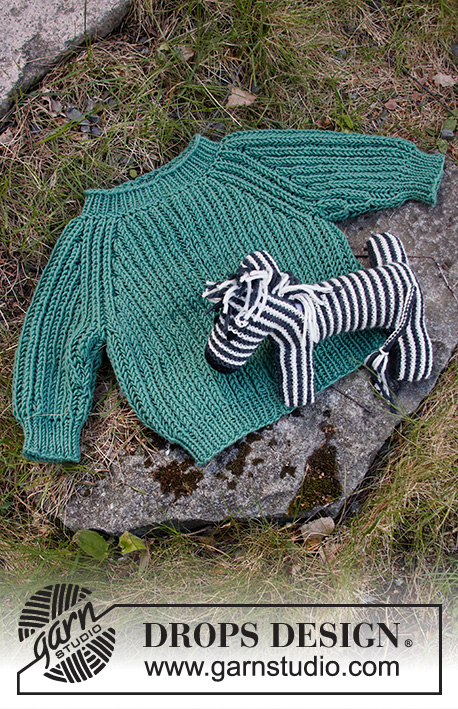
Knitted jumper for baby and kids with raglan in DROPS Merino Extra Fine. Piece is knitted top down with English rib. Size 12 month - 10 years
DROPS Baby & Children 38-7 |
|
|
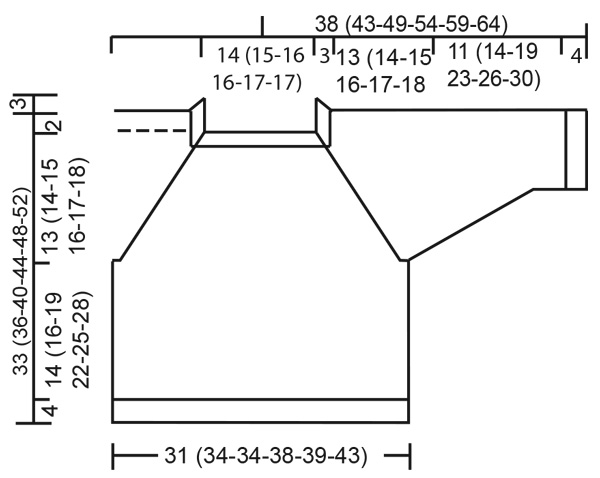
------------------------------------------------------- EXPLANATION FOR THE PATTERN: ------------------------------------------------------- DECREASE TIP-1 (evenly): To calculate how to decrease evenly, use the total number of stitches on row (e.g. 70 stitches) and divide stitches by number of decreases to be done (e.g. 10) = 7. In this example decrease by work every 6th and 7th stitch together. ENGLISH RIB: ROUND 1: * Knit 1, 1 yarn over, slip 1 stitch purlwise *, work from *-*. ROUND 2: * Make 1 yarn over, slip 1 stitch purlwise, purl together yarn over and slipped stitch *, work from *-*. ROUND 3: * Knit together yarn over and slipped stitch, 1 yarn over, slip 1 stitch purlwise *, work from *-*. Repeat rounds 2 to 3. ENGLISH RIB STITCH: When counting the stitches, the yarn overs are not counted as stitches. RAGLAN: All increases are done on 1 round where yarn over and stitch are purled together (i.e. 2nd round in English rib). INCREASE AS FOLLOWS: Work until 3 stitches remain before stitch with marker. Increase 2 stitches in next stitch (1 purl stitch + yarn over) as follows: Purl yarn over and stitch together but wait to slip stitch and yarn over off the needle, make 1 yarn over on right needle, purl stitch and yarn over together 1 more time = 3 stitches (= 2 stitches increased). Slip the stitch worked off the needle. Work the next 5 stitches in English rib as before. Increase 2 stitches in next stitch as explained above. Repeat at all markers (= 16 stitches increased in total on round). On next round work increased stitches in English rib - there are no English rib yarn overs in the 3 increased stitches, so on first round after increase knit knit stitch without yarn over. DECREASE TIP-2 (applies to sleeves): All decreases are done on 1 round where yarn over and stitch are knitted together (i.e. 3rd round in English rib). DECREASE 2 STITCHES BEFORE STITCH WITH MARKER AS FOLLOWS: Work until 3 stitches remain before purl stitch with marker, knit the next 3 stitches and associated yarn overs together (= 2 stitches decreased). DECREASE 2 STITCHES AFTER STITCH WITH MARKER (i.e. begin after purl stitch with marker): Slip first knit stitch and yarn over on to right needle as if to knit together, knit the next 2 stitches together (i.e. 1 purl + knit stitch and the yarn over), then pas the slipped stitch and yarn over, over the stitches worked together (= 2 stitches decreased). CAST-OFF TIP: To avoid a tight cast-off edge you may use a larger needle size. If this also is too tight, work a 1 yarn over after approx. every 4th stitch while casting off (cast off yarn overs as regular stitches). ------------------------------------------------------- START THE PIECE HERE: ------------------------------------------------------- JUMPER - SHORT OVERVIEW OF THE PIECE: Worked in the round on circular needle, top down. Work sleeves in the round on double pointed needles. NECK EDGE: Cast on 70 (74-76-76-80-80) stitches on a short circular needle size 3.5 mm with Merino Extra Fine. Knit 1 round, then work rib = knit 1/purl 1 for 3 cm. Knit 1 round while decreasing 10 (6-4-4-0-0) stitches evenly - read DECREASE TIP-1 = 60 (68-72-72-80-80) stitches. Purl 1 round. Insert a marker here (= beginning of round approx. mid back). NOW MEASURE PIECE FROM HERE! YOKE: Switch to circular needle size 4.5 mm. Then work ENGLISH RIB - read explanation above. When 1 round has been worked with English rib, insert 4 markers in piece without working (insert all markers in a knit stitch) - read ENGLISH RIB STITCH, as follows: Skip the first 10 (12-14-14-16-16) stitches, insert a marker in next stitch (= in transition between back piece and right sleeve), skip the next 7 stitches, insert a marker in next stitch (= in transition between right sleeve and front piece), skip the next 21 (25-27-27-31-31) stitches, insert a marker in next stitch (= in transition between front piece and left sleeve), skip the next 7 stitches, insert a marker in next stitch (= in transition between left sleeve and back piece), there are now 11 (13-13-13-15-15) stitches between last marker and beginning of round. REMEMBER THE KNITTING TENSION! There is now a marker in every transition between front/back and sleeves. Move the markers upwards when working, increase should be done on each side of every marker. Continue in the round with English rib, AT THE SAME TIME on next round (= 2nd round in English rib) begin increase for RAGLAN - read explanation above. Increase like this every 8th round 6 (6-6-7-7-8) times in total = 156 (164-168-184-192-208) stitches. When all increases are done, continue with English rib until piece measures 13 (14-15-16-17-18) cm from marker - finish after 2nd round in English rib. Now divide piece for body and sleeves as follows: Work the first 22 (24-24-28-28-32) stitches (= approx. half back piece), slip the next 33 (33-35-37-39-41) stitches on a stitch holder for sleeve and cast on 5 new stitches on needle (= in the side under sleeve), work the next 45 (49-49-55-57-63) stitches (= front piece), insert the next 33 (33-35-37-39-41) stitches on a stitch holder for sleeve and cast on 5 new stitches on needle (= in the side under sleeve), work the last 23 (25-25-27-29-31) stitches on round (= approx. half back piece). Finish body and sleeves separately. BODY: = 100 (108-108-120-124-136) stitches. Continue in the round with English rib. Work the new stitches cast on under sleeve without English rib yarn over on first round. Work until piece measures 14 (16-19-22-25-28) cm from division (approx. 4 cm remain before finished measurements, try the jumper on and work to desired length). Switch to circular needle size 3.5 mm. Work rib in the round (= knit 1/purl 1) - on first round work yarn overs together with stitches. When rib measures 4 cm, cast off with knit over knit and purl over purl stitch - read CAST-OFF TIP. Jumper measures approx. 33 (36-40-44-48-52) cm from shoulder and down. SLEEVES: Slip the 33 (33-35-37-39-41) stitches from stitch holder in one side of piece back on double pointed needles size 4.5 mm and pick in addition up 1 stitch in each of the 5 new stitches cast on in the side under sleeve = 38 (38-40-42-44-46) stitches. Continue in the round with English rib. On first round work stitches picked up under sleeve without English rib yarn overs. When sleeve measures 4 cm from division – adjust so that next round is 1 round where stitches are purled, insert a marker in the middle stitch under sleeve (= 1 stitch purl). On next round decrease 4 stitches under sleeve - read DECREASE TIP-2 = 34 (34-36-38-40-42) stitches. Repeat decrease when piece measures 7 (8-13-16-18-20) cm = 30 (30-32-34-36-38) stitches. When sleeve measures 11 (14-19-23-26-30) cm, switch to double pointed needles size 3.5 mm. Work rib (= knit 1/purl 1) for 4 cm. Cast off. Sleeve measures 15 (18-23-27-30-34) cm from division. Work the other sleeve the same way. |
|
 |
|
Have you finished this pattern?Tag your pictures with #dropspattern #theoutdoorssweater or submit them to the #dropsfan gallery. Do you need help with this pattern?You'll find 21 tutorial videos, a Comments/Questions area and more by visiting the pattern on garnstudio.com. © 1982-2026 DROPS Design A/S. We reserve all rights. This document, including all its sub-sections, has copyrights. Read more about what you can do with our patterns at the bottom of each pattern on our site. |
|


Post a comment to pattern DROPS Baby & Children 38-7
We would love to hear what you have to say about this pattern!
If you want to leave a question, please make sure you select the correct category in the form below, to speed up the answering process. Required fields are marked *.