
Popular categories
Looking for a yarn?


Comments / Questions (83)
María Elena wrote:
Hola, una pregunta: cuando se sepAra el cuerpo (boda) de las mangas (sleeve), y se agregan 10 nuevos puntos , qué sucede con los 5 puntos que cuánto se trabajaba el yoke separaban cada pieza del tejido? Se cierran o se dejan en suspenso o se agregan al Delantero o espalda!? Gracias
28.02.2017 - 13:18
![]() Angela Nowicki wrote:
Angela Nowicki wrote:
Danke!! Mit dem Video hab ich's sofort kapiert - alles eine Frage des räumlichen Vorstellungsvermögens. :)
20.01.2017 - 19:21
![]() Sidsel Gaarde wrote:
Sidsel Gaarde wrote:
Opskriften siger ... "afslut med 6 kantm. ret (= forstk.). Er det bare 6 retm.? Eller er det 6 pinde med kantm.?
03.12.2016 - 13:13DROPS Design answered:
Hej Sidsel. Det er 6 retmasker - og de 6 retmasker er kantmasker
06.12.2016 - 15:26
![]() Anita Mitlyng wrote:
Anita Mitlyng wrote:
The pattern states for the Large size, every 3/4" to increase 10 stitches and to do this a total of 8 times and then after all the increases the piece should be 8 ". I'm confused as this would then be 6". Am i reading this incorrectly or should I just continue knitting until it is 8 inches?
03.10.2016 - 22:36DROPS Design answered:
Dear Mrs Mitlyng, you are correct just continue until piece measures 8". Happy knitting!
04.10.2016 - 09:33
![]() Maria wrote:
Maria wrote:
Buongiorno, é possibile eseguire il modello con iferri dritti?grazie
28.09.2016 - 13:21DROPS Design answered:
Buongiorno Maria. Il maglione viene lavorato dall'alto verso il basso, in tondo e questo rende difficile adattare, in questa sede, le spiegazioni ad una lavorazione dal basso verso l'alto e in parti separate. Cambierebbe anche la struttura stessa del modello. Buon lavoro!
28.09.2016 - 14:28
![]() Delphine Dandois wrote:
Delphine Dandois wrote:
Ah d'accord. C'était tout bête. merci beaucoup pour vos explications. je pensais qu'il y avait quelque chose de particulier que je n'avais pas compris mais en fait c'était juste un point mousse classique. bien à vous
20.09.2016 - 14:38
![]() Delphine Dandois wrote:
Delphine Dandois wrote:
Donc je tricote 2 rangs endroit (=cote au point mousse) pour avoir l'aspect barre. Par contre, si je continue, comme c'est demandé ensuite, au point mousse (3eme rang), cela fait un point mousse classique et on ne verra donc pas les cotes (barres)?
20.09.2016 - 11:21DROPS Design answered:
On a un point mousse classique dès le début, mais on tricote d'abord 2 rangs avant de commencer les augmentations, quand on tricote 2 rangs end (1 sur l'end + 1 sur l'env), on obtient cette côte ou barre typique du point mousse et qui permet de compter les rangs ou les côtes (pour gagner du temps).
20.09.2016 - 12:42
![]() Delphine Dandois wrote:
Delphine Dandois wrote:
Je tricote donc 2 rang endroit pour obtenir une cote (barre). Par contre, si je continue au point mousse (3eme rang) ensuite, comme il est demandé, on ne verra pas de cote (barre), et ce sera un point mousse classique?
20.09.2016 - 11:14DROPS Design answered:
Bonjour Mme Dandois, au 4ème rang, tricotez à l'endroit sur l'envers = vous aurez un total de 2 côtes mousse. Et continuez ensuite ainsi. 1 côte mousse = 2 rangs endroit. Si vous tricotez 4 rangs, vous avez 2 côtes mousse et ainsi de suite. Et la "côte" ou barre se formera toujours lors du rang end sur l'envers (ou quand on tricote en rond, on répète 1 tour end, 1 tour env pour avoir 1 côte mousse). Bon tricot!
20.09.2016 - 12:41
![]() Delphine Dandois wrote:
Delphine Dandois wrote:
Ah d'accord, je comprends mieux: les cotes sont horizontales et pas verticales sur le tricot. Par contre, après avoir mis les marqueurs ils disent de tricoter au point mousse. donc entre deux, il n'y a pas de rang envers? et donc, on ne verra pas de cotes?
20.09.2016 - 10:26DROPS Design answered:
Oui tout à fait, ces côtes mousse sont horizontales, et on tricote au point mousse donc tout à l'endroit. Il n'y a pas de "côtes" de type m end/m env si c'est ce que vous pensiez, mais on tricote au point mousse donc tout à l'endroit. Bon tricot!
20.09.2016 - 10:42
![]() Delphine Dandois wrote:
Delphine Dandois wrote:
Merci pour votre réponse. Ce que je ne comprends pas c'est une cote au point mousse, c'est une m envers suivie de deux mailles endroit, si je ne me trompe pas. Si je fais deux rangs endroit c'est juste tricoter au point mousse?
20.09.2016 - 10:05DROPS Design answered:
Bonjour Mme Dandois, quand on tricote au point mousse, on va devoir tricoter 2 rangs (ou 2 tours) pour obtenir 1 "côte" (ou 1 "barre") - en allers et retours, on tricote 2 rangs end et on obtient cette côte (ou barre) point mousse. Donc pour obtenir 1 côte mousse, vous allez tricoter 2 rangs end. Bon tricot!
20.09.2016 - 10:10
|
|
Take It Easy#takeiteasysweater |
|
 |
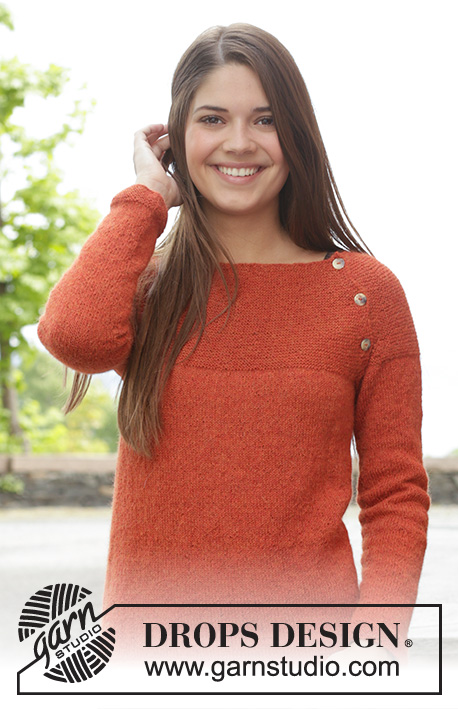 |
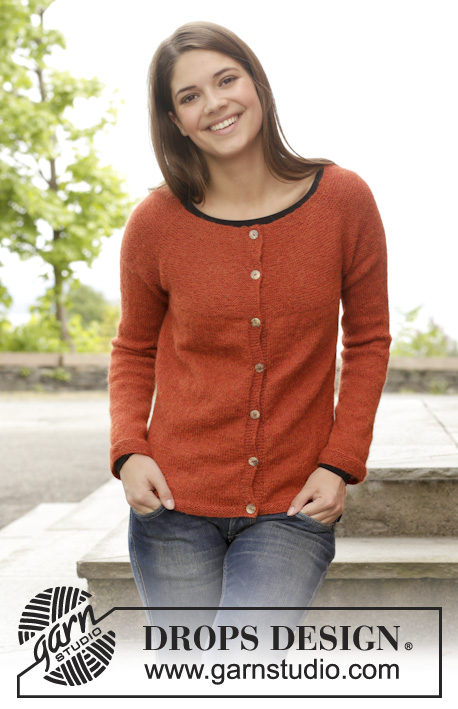
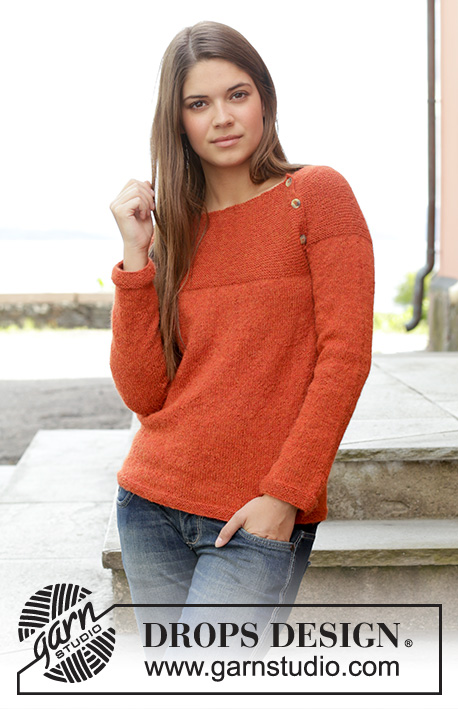
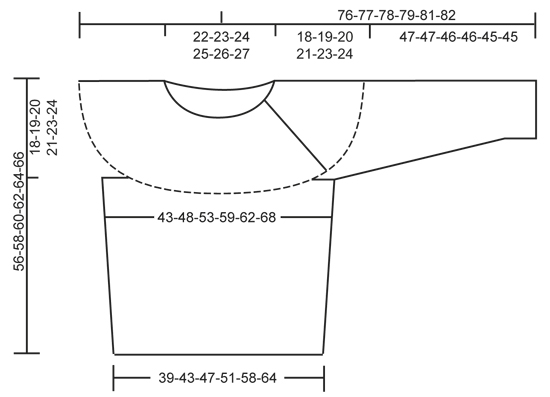
Knitted DROPS jumper in garter st with round yoke, worked top down in "Alpaca". Size: S - XXXL.
DROPS 158-3 |
|
|
GARTER ST (back and forth on needle): K all rows. 1 ridge = 2 rows K. GARTER ST (in the round on circular needle/double pointed needles): * K 1 round and P 1 round *, repeat from *-*. 1 ridge = 2 rounds. INCREASE TIP: Inc 1 st by making a YO. On next row K YO twisted (i.e. work in back loop of st instead of front) to avoid holes. DECREASE TIP: Dec 1 st before marker as follows: Work until 2 sts remain before marker, slip 1 st as if to K, K 1, psso. Dec 1 st after marker as follows: K 2 tog. BUTTONHOLES: Dec for buttonholes in band sts on left shoulder. 1 buttonhole = K tog third and fourth st from edge and make 1 YO. Dec for buttonholes when piece measures (measured from cast-on edge): SIZE S: 1, 8 and 15 cm SIZE M: 1, 9 and 17 cm SIZE L: 1, 9 and 17 cm SIZE XL: 1, 7, 13 and 19 cm SIZE XXL: 1, 8, 15 and 22 cm SIZE XXXL: 1, 8, 15 and 22 cm ---------------------------------------------------------- JUMPER: The piece is worked top down. YOKE: Worked back and forth on circular needle. Cast on 114-118-122-126-130-134 sts (incl 6 band sts in one side of piece) on circular needle size 3 mm with Alpaca. Work 1 ridge in GARTER ST - see explanation above. Insert 8 markers in piece from RS as follows: K 6, insert 1st marker, K 20 (= sleeve), insert 2nd marker, K 5, insert 3rd marker, K 24-26-28-30-32-34 (= back piece), insert 4th marker, K 5, insert 5th marker, K 20 (= sleeve), insert 6th marker, K 5, insert 7th marker, K 23-25-27-29-31-33, insert 8th marker, finish with K 6 band sts (= front piece). REMEMBER THE KNITTING TENSION! Now work piece in garter st. Remember BUTTONHOLES - see explanation above. Then inc 1 st – READ INCREASE TIP, after 1st-3rd-5th and 7th marker and before 2nd-4th-6th and 8th marker (= 8 sts inc). Repeat inc every 4th row 20-22-23-24-26-28 more times. AT THE SAME TIME when piece measures 4-3-2-2-2-1½ cm, inc as follows: Inc 4 sts evenly on back piece, 1 st on each sleeve and 4 sts evenly on front piece (= 10 sts inc). Repeat inc every 4-3-2-2-2-1½ cm 3-5-7-9-9-11 more times. When all inc are done there are 322-362-394-426-446-486 sts on needle. Piece measures approx. 18-19-20-21-23-24 cm. Work next row as follows from RS: Cast off the first 6 sts, slip the next 66-72-76-80-84-90 sts on a stitch holder for sleeve, cast on 10-10-10-12-12-12 new sts, insert 1 marker in the middle of the new sts, K 92-106-118-130-136-150 sts, slip the next 66-72-76-80-84-90 sts on a stitch holder for sleeve, cast on 10-10-10-12-12-12 new sts, insert 1 marker in the middle of the new sts, work the next 92-106-118-130-136-150 sts = 204-232-256-284-296-324 sts. NOW MEASURE PIECE FROM HERE! BODY: Work piece in the round on circular needle in stocking st. When piece measures 4 cm, dec 1 st on each side of markers in the side - READ DECREASE TIP (= 4 sts dec). Repeat dec every 8-4-4-3-7-10 cm 3-6-7-9-4-3 more times = 188-204-224-244-276-308 sts. When piece measures 36-37-38-39-39-40 cm, switch to circular needle size 2.5 mm. Work 5 ridges –see explanations above. Cast off. SLEEVE: Worked in the round on double pointed needles. Slip the 66-72-76-80-84-90 sts from stitch holder back on double pointed needles size 3 mm. Cast on 10-10-10-12-12-12 new sts under sleeve, insert 1 marker in the middle of the new sts = 76-82-86-92-96-102 sts. Work in stocking st. When piece measures 4 cm, dec 1 st on each side of marker. Repeat dec every 4-3-2½-2-2-1½ cm 9-12-13-15-16-18 more times = 56-56-58-60-62-64 sts. Work in stocking st until piece measures 44-44-43-43-42-42 cm. Switch to double pointed needles size 2.5 mm. Work in garter st. Cast off when piece measures 47-47-46-46-45-45 cm (shorter measurements in the larger sizes because of wider shoulders). Work the other sleeve the same way. ASSEMBLY: Sew tog under sleeves. Place band on the back of yoke and fasten. Sew on buttons. |
|
 |
|
Have you finished this pattern?Tag your pictures with #dropspattern #takeiteasysweater or submit them to the #dropsfan gallery. Do you need help with this pattern?You'll find 24 tutorial videos, a Comments/Questions area and more by visiting the pattern on garnstudio.com. © 1982-2026 DROPS Design A/S. We reserve all rights. This document, including all its sub-sections, has copyrights. Read more about what you can do with our patterns at the bottom of each pattern on our site. |
|


With over 40 years in knitting and crochet design, DROPS Design offers one of the most extensive collections of free patterns on the internet - translated to 17 languages. As of today we count 324 catalogues and 12290 patterns translated into English (UK/cm). 12290
We work hard to bring you the best knitting and crochet have to offer, inspiration and advice as well as great quality yarns at incredible prices! Would you like to use our patterns for other than personal use? You can read what you are allowed to do in the Copyright text at the bottom of all our patterns. Happy crafting!
Post a comment to pattern DROPS 158-3
We would love to hear what you have to say about this pattern!
If you want to leave a question, please make sure you select the correct category in the form below, to speed up the answering process. Required fields are marked *.