
Popular categories
Looking for a yarn?


Comments / Questions (105)
![]() Dóri wrote:
Dóri wrote:
A leírász számolása hibás, a bal elején az első 2 szaporítás után 28+12+14 tehát 54 szem van a tűn XXL méretben nem 14. Az összes méretnél hibás.
16.10.2025 - 15:56
![]() Elisa wrote:
Elisa wrote:
Buongiorno, sono già al diagrama A2, ma mi sono scoraggiata a continuare perché vedo che la parte posteriore si forma un rigonfiamento in centro dove si fanno le diminuzioni. Ho letto nei commenti che a qualcuno è successo lo stesso problema; il consiglio di bagnare la prenda ha funzionato? Non avendo un’immagine della parte posteriore non ci si può confrontare, sarebbe utile una immagine di schiena, al meno per capire come viene il capo finito. Grazie se qualcuno risponde!
18.05.2025 - 18:38
![]() Elisa wrote:
Elisa wrote:
Salve, innanzitutto,grazie per condividere gratuitamente i modelli, sono anni che compro i vostri bellissimi filati e lavoro i vostri modelli, ma spesso mi ritrovo a voler confrontre la parte posteriore del modello, e molti pochi modelli hanno le fotografie della parte dietro. Secondo me sarebbe molto utile!grazie
03.05.2025 - 17:35
![]() Gail wrote:
Gail wrote:
I have tried this pattern twice and want to love it, but no matter how I read the pattern I end up with the back piece staying virtually the same width, so the lace pattern starts to run down the side of the back, not the sides. The many double decreases keep the back from increasing as I go down. What am I missing?
27.01.2023 - 20:39DROPS Design answered:
Dear Gail, the stitch with the marker on the sides should be the middle stitch in diagram (the one with the double decrease) - after A.1 has been worked once, repeat A.1 the same way, the stitch with the marker should be still the middle stitch in A.1 and continue like this (remember to decrease on mid back). A.1 should stay nicely on the sides, same then when working A.2 and A.3. Happy knitting!
30.01.2023 - 08:27
![]() Maureen Maitland wrote:
Maureen Maitland wrote:
How do I prevent the bulging outwards at the mid-back decrease where lightly pressing did not help?
16.09.2020 - 00:29DROPS Design answered:
Dear Maureen, try wet-blocking the piece. Thoroughly soak it in lukewarm water, then press out as much water as you can (roll teh piece into a thick towel and press again) and then on a flat surface shape it into the form according to the drawing. Happy crafting!
17.09.2020 - 05:28
![]() Emmi wrote:
Emmi wrote:
Nun habe ich aufgegeben die Weste zu stricken. Im Rücken habe ich keine Beule mehr, aber dafür einen Sack. Also wieder alles aufgeribbelt. Nochmals stricke ich nicht. Schade.
06.08.2020 - 12:24DROPS Design answered:
Liebe Emmi, gerne können Sie Ihr DROPS Laden Ihr Strickstück zeigen (auch per Mail), sicher kann man dort weiterhelfen. Viel Spaß beim stricken!
06.08.2020 - 16:46
![]() Emmi wrote:
Emmi wrote:
Liebes Drops-Team, habe diese Weste gestrickt, aber leider ist im Rücken durch die Abnahmen in der Mitte eine Beule entstanden. Jetzt bleibt mir nur aufribbeln und nochmals versuchen. Soll ich besser in jeder 4. Reihe und dann in jeder 6. Reihe abnehmen?
13.06.2020 - 22:07DROPS Design answered:
Liebe Emi, am besten zeigen Sie Ihr Strickstück Ihrem DROPS Laden, so kann man Ihnen am besten weiterhelfen - gerne können Sie auch in unserem DROPS Workshop auch mal andere Drops-fans/Strickerinen fragen. Viel Spaß beim stricken!
15.06.2020 - 09:11
![]() Heidrun wrote:
Heidrun wrote:
Hallo, ich möchte dieses seitl. Muster gerne bei einem Pullover stricken. Ist es da sinnvoll, die hinteren Abnahmen aufzuteilen und hinten und vorne mittig anfangs jede 4. Reihe und später jede 8. Reihe abzunehmen? Leider sieht man auf dem Foto nur die Seite. Ist die Weste durch die Abnahmen hinten kürzer als vorne?
20.02.2020 - 10:26DROPS Design answered:
Liebe Heidrun, Rücken- und Vorderteile werden genauso lang, nur die Seiten werden (wegen Abnahmen) länger - siehe Maßskizze- leider können wir nicht jedes Modell nach jedem individuellen Wunsch umrechnen; wenden Sie sich bitte an Ihrem DROPS Laden, gerne bekommen Sie dort weitere Hilfe. Viel Spaß beim stricken!
20.02.2020 - 10:37
![]() Grosse, Uta wrote:
Grosse, Uta wrote:
Kann man auch die hintere mittige Abnahme weglassen?
02.07.2016 - 17:04DROPS Design answered:
Liebe Uta, wenn Sie die hintere Abnahme weglassen, erhalten Sie sehr viele Maschen und ich vermute, dass dies keine schöne Passform ergibt.
06.07.2016 - 08:41
![]() Vigdis wrote:
Vigdis wrote:
Vest: Nadine Jeg følger oppskriften, der det står at jeg skal felle 2 masker midt på ryggen annen hver omgang 32 ganger. Det blir da en bul på ryggen. Skal det være slik, eller er det feil i oppskriften?
30.06.2016 - 13:27DROPS Design answered:
Hej Vigdis. Der burde ikke komme nogen bule paa ryggen. Jeg kan desvaerre ikke se hvad du evt gör fejl.
10.11.2016 - 16:22
|
|||||||||||||
Nadine#nadinevest |
|||||||||||||
 |
 |
||||||||||||
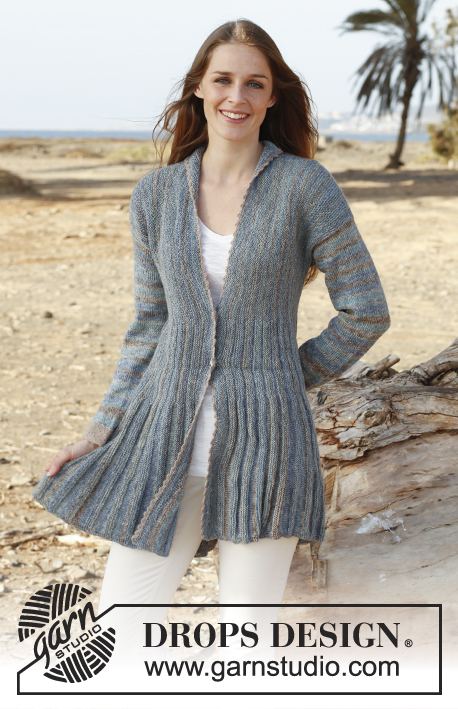
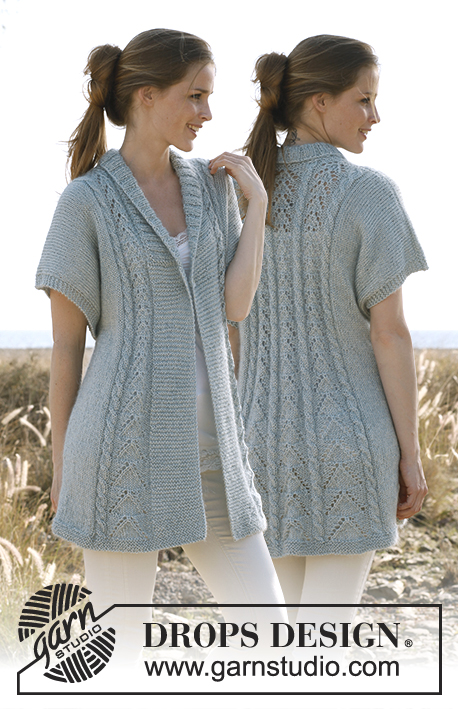
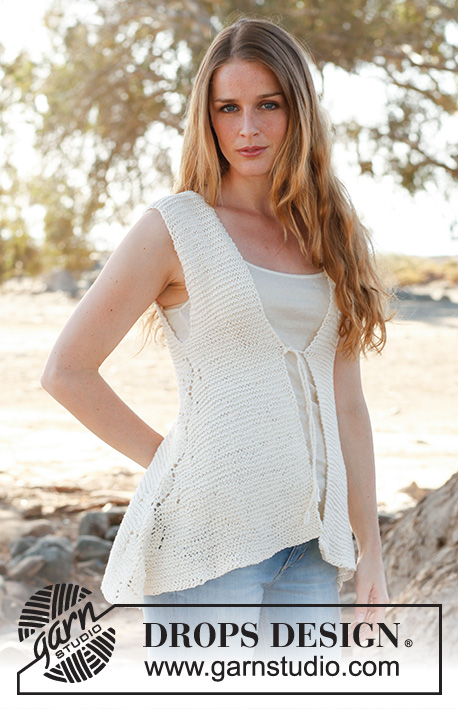
Knitted DROPS asymmetrical vest worked top down with lace pattern in the sides in ”Muskat”. Size: S - XXXL.
DROPS 145-2 |
|||||||||||||
|
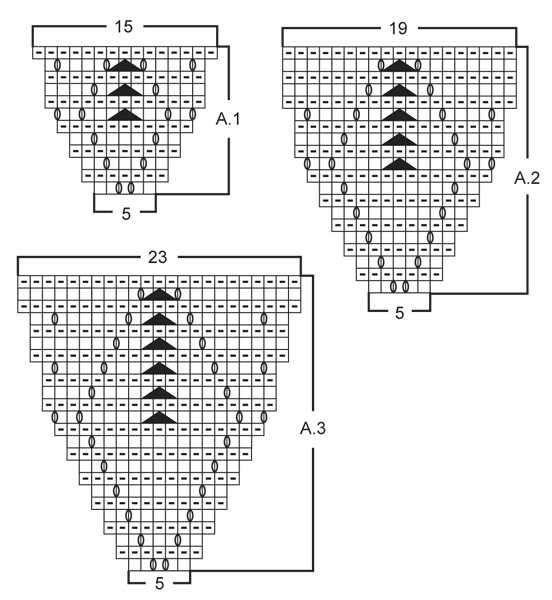
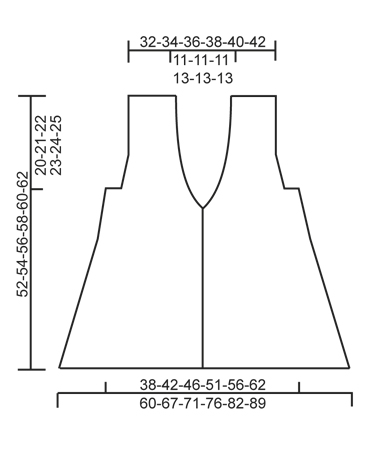
GARTER ST (back and forth on needle): K all rows. 1 ridge = 2 rows K. PATTERN: See diagrams A.1 to A.3. Diagrams show all rows in pattern seen from RS. DECREASE TIP (applies to mid back): All dec are done from RS. Beg 2 sts before marker, K 2 tog, slip 1 st as if to K, K 1, psso (= 2 sts dec mid back). MEASURING TIP: All length measurements should be done when piece is flat. -------------------------------------------------------- VEST: The piece is worked top down. Front and back piece is worked back and forth on needle separately down to and with armhole. Then all sts are slipped on the same circular needle. Then the piece is worked back and forth from mid front. LEFT FRONT PIECE: Worked back and forth on circular needle. Cast on 20-22-24-24-26-28 sts on circular needle size 5 mm with Muskat. Work in GARTER ST - see explanation above. REMEMBER THE KNITTING TENSION! When piece measures 6-8-10-6-8-10 cm – READ MEASURING TIP, inc 1 st for v-neck towards mid front by working 2 sts in first st at beg of row (seen from RS). Repeat inc every 2½ cm (i.e. every 5th ridge), 9-9-9-11-11-11 more times (= 10-10-10-12-12-12 inc in total). AT THE SAME TIME when piece measures 11-9-8-8-8-11 cm – READ MEASURING TIP, inc 1 st towards armhole side by working 2 sts in last st on row (seen from RS). Repeat inc every 3-2½-2-2-1½-1 cm, 2-4-6-7-10-13 more times (= 3-5-7-8-11-14 inc in total). When piece measures 20-21-22-23-24-25 cm (inc towards armhole should now be done), cast on 3-3-3-4-4-5 new sts at the end of row towards the side (not towards mid front). Armhole is now done and 6-6-5-7-7-7 sts have been inc for v-neck towards mid front (i.e. 4-4-5-5-5-5 inc remain for v-neck towards mid front). Piece measures approx. 20-21-22-23-24-25 cm and there are 32-36-39-43-48-54 sts. Slip the sts on 1 stitch holder. RIGHT FRONT PIECE: Work as left front piece but inc for v-neck at the end of row (seen from RS) and inc for armhole at beg of row (seen from RS). BACK PIECE: Left shoulder: Cast on 20-22-24-24-26-28 sts on circular needle size 5 mm with Muskat. Work 3 ridges in garter st, beg from RS. Cut the thread and put piece aside. Right shoulder: Cast on 20-22-24-24-26-28 sts on circular needle size 5 mm with Muskat. Work 3 ridges, beg from RS, then cast on 20-20-20-24-24-24 sts at the end of next row from WS = 40-42-44-48-50-52 sts. Work sts from left shoulder on to same circular needle = 60-64-68-72-76-80 sts. Continue to work in garter st back and forth on needle. AT THE SAME TIME when piece measures 11-9-8-8-8-11 cm from shoulder, inc 1 st in first and last st on row. Repeat inc in each side every 3-2½-2-2-1½-1 cm, 2-4-6-7-10-13 more times (= 3-5-7-8-11-14 inc in total in each side). When piece measures 20-21-22-23-24-25 cm (inc in each side should now be done), cast on 3-3-3-4-4-5 new sts at the end of the next 2 rows. Armholes are now done, piece measures approx. 20-21-22-23-24-25 cm and there are 72-80-88-96-106-118 sts on needle. Cut the thread. BODY: Slip sts from right and left front piece on to same circular needle as back piece = 136-152-166-182-202-226 sts. NOW MEASURE PIECE FROM HERE! Insert 2 markers in the piece; in the 32nd-36th-39th-43rd-48th-54th st from each side (= 72-80-88-96-106-118 sts between sts with markers on back piece). AT THE SAME TIME insert 1 marker mid back (i.e. in the middle of the 2 markers in the sides so that there are 36-40-44-48-53-59 sts on each side of this marker). Beg mid front and continue in garter st back and forth for 4-2-3-2-3-3 cm AT THE SAME TIME continue inc for v-neck in each side towards mid front as before. READ ALL OF THE FOLLOWING SECTION BEFORE CONTINUING! Work next row from RS as follows (continue inc for v-neck as before): Work in garter st until 2 sts remain before first st with marker (= in the side), work A.1 (= 5 sts), work in garter st until 2 sts remain before next marker (= mid back), dec 1 st on each side of marker – READ DECREASE TIP (= 2 sts dec), work in garter st until 2 sts remain before next marker (= in the side), work A.1 (= 5 sts) and then work in garter st the rest of row. Continue pattern like this (note the inc in A.1 – see diagram and continue the inc for v-neck until 10-10-10-12-12-12 inc in total have been done in each side towards mid front), AT THE SAME TIME dec 2 sts mid back every other row (i.e. every row from RS), 31-36-36-36-36-38 more times (= 32-37-37-37-37-39 dec in total mid back) and then every 4th row (i.e. every other row from RS) 10-10-10-12-12-12 times in total. When A.1 has been worked 2-3-3-2-2-2 times in total vertically, work A.2 in each side (instead of A.1, continue the other sts as before). When A.2 has been worked 2-2-2-3-3-2 times in total vertically, work A.3 in each side (instead of A.2). When A.3 has been worked 2-2-2-2-2-3 times in total vertically and after last dec mid back, there are 228-254-270-290-310-338 sts on needle and piece measures approx. 32-33-34-35-36-37 cm from where all sts were put tog. K 1 row from RS while AT THE SAME TIME working 1st row in A.3 in each side so that the pattern is finished nicely, then LOOSELY cast off with K from WS. Now piece measures approx. 52-54-56-58-60-62 cm measured straight down from shoulder (the sides are longer because of inc to give extra width and length). ASSEMBLY: Sew shoulder seams. TIES: Cut 2 threads Muskat of approx. 100-120 cm each. Place the 2 threads tog, pull them through next to last st on one front piece (in the transition where inc for v-neck ends). Make a knot in one end of the 2 threads. Twine the threads tog until they resist, fold them double so that they twine. Make a knot at the end. Repeat on the other front piece. Tie the vest tog mid front. |
|||||||||||||
Diagram explanations |
|||||||||||||
|
|||||||||||||
 |
|||||||||||||
 |
|||||||||||||
Have you finished this pattern?Tag your pictures with #dropspattern #nadinevest or submit them to the #dropsfan gallery. Do you need help with this pattern?You'll find 5 tutorial videos, a Comments/Questions area and more by visiting the pattern on garnstudio.com. © 1982-2026 DROPS Design A/S. We reserve all rights. This document, including all its sub-sections, has copyrights. Read more about what you can do with our patterns at the bottom of each pattern on our site. |
|||||||||||||


With over 40 years in knitting and crochet design, DROPS Design offers one of the most extensive collections of free patterns on the internet - translated to 17 languages. As of today we count 324 catalogues and 12290 patterns translated into English (UK/cm). 12290
We work hard to bring you the best knitting and crochet have to offer, inspiration and advice as well as great quality yarns at incredible prices! Would you like to use our patterns for other than personal use? You can read what you are allowed to do in the Copyright text at the bottom of all our patterns. Happy crafting!
Post a comment to pattern DROPS 145-2
We would love to hear what you have to say about this pattern!
If you want to leave a question, please make sure you select the correct category in the form below, to speed up the answering process. Required fields are marked *.