
Popular categories
Looking for a yarn?


Comments / Questions (51)
![]() Marta wrote:
Marta wrote:
Perché non sei trovano più le spiegazioni con i ferri dritti ma sempre e solo quelli circolari? Pensate un po' anche alle vecchie generazioni che non hanno la possibilità di imparare i nuovi metodi. Grazie.
05.03.2026 - 06:49DROPS Design answered:
Buonasera Marta, i ferri circolari non sono un nuovo metodo, ma sono molto diffusi nei paesi al di fuori dell'Italia. Il fatto che i modelli riportino i ferri circolari non significa necessariamente che siano lavorati in tondo. Nei modelli lavorati in piano può utilizzare i ferri dritti. Buon lavoro!
06.03.2026 - 19:23
![]() Barbara wrote:
Barbara wrote:
Bei den verkürzten Reihen beim wenden den faden anziehen oder mit loch zurückschicken?
13.09.2025 - 17:06DROPS Design answered:
Liebe Barbara, der Faden wird zwar angezogen, aber in dieser Anleitung kann das Loch dekorativ erwünscht sein, wie auch auf den Fotos zu sehen. Das bleibt aber letztendlich Ihrem Geschmack überlassen, je nachdem auch, wie groß oder klein das Loch individuell bei Ihnen ausfällt. Sie könnten es an einem Probestück ausprobieren. Viel Spaß beim Weiterstricken!
16.09.2025 - 10:10
![]() Cheryl Ennis wrote:
Cheryl Ennis wrote:
I’m just about up to the sleeve. Where it says to measure the piece …” at the bottom (stop after 1 row worked from RS)” what does that mean? I have been working the 6 short rows. Do I stop at the end of the 6th row? Or just randomly in the middle of my 6 rows when I get to the correct width?
24.05.2024 - 03:14DROPS Design answered:
Hi Cheryl, You continue the short rows to the correct length, then stop after a row from the wrong side. Happy knitting!
24.05.2024 - 06:36
![]() Noemí wrote:
Noemí wrote:
Buena noche, entiendo que se deben hacer 4 vueltas de ida y vuelta , tejiendo todos los puntos, después cuántas veces se hacen vueltas acortadas? Gracias Saludos
17.11.2020 - 03:02DROPS Design answered:
Hola Noemi! No se cuantas veces exactamente tienes que hacer vueltas acortadas. Debes hacerlo hasta que la pieza mida 6-6½-7-7½-8-8½ cm en la parte de arriba (= lado del escote). Buen trabajo!
19.11.2020 - 09:38
![]() Marie Henry wrote:
Marie Henry wrote:
I don’t understand how to work until 1st marker, turn, tighten thread and work back, work until 2nd marker, turn, tighten thread and work back, work all sts, turn and work back. I really like the vest but I am confused about the turn then work to 2nd marker. I really tried before I had to ask question. Thank you so very much, I hope you answer my question
30.09.2019 - 02:49DROPS Design answered:
Hi Marie, You work to the first marker, turn and work back to where you started, turn, work to the second marker, turn and work back to where you started, turn, work all stitches, turn and work back to where you started. Hope this helps. Happy knitting!
30.09.2019 - 07:34
![]() Teresa wrote:
Teresa wrote:
Hola! No entiendo muy bien cómo hacer las vueltas cortas en este modelo. ¿Cuántas veces hay que girar la labor entre marcadores antes de tejer de nuevo una vuelta completa? Gracias de antemano por su respuesta
04.04.2017 - 13:07DROPS Design answered:
Hola Teresa. este modelo se trabaja de lado a lado con vueltas cortas a lo largo de toda la prenda. Las filas cortas se trabajan como sigue: fila 1 - trabajamos hasta MP1, filas 2 - trabajamos hasta MP2, filas 3 y 4 trabajamos sobre todos los pts.
14.04.2017 - 13:00Jen wrote:
I assume this pattern is in two pieces although pattern does not say this.
31.10.2015 - 06:46DROPS Design answered:
Dear Jen, the vest is worked in once piece starting from mid on left front band (casting on row) and ending on mid on right front band (casting off row). Sleeves are then worked while sts for bottom of body are slipped in a st holder/thread. Happy knitting!
31.10.2015 - 18:11Sara wrote:
با سلام پترنها را به فارسی تغییر بدهید با تشکر بسیار
09.12.2014 - 08:17Sara wrote:
Please farsi change language
09.12.2014 - 08:14
![]() Petra M wrote:
Petra M wrote:
Moin ein Gruß aus dem Norden.Ich komme mit dieser Anleitung nicht klar. 1. verstehe ich den Rapport nicht. 2. Bei einer verkürzten Reihe bis zur 2. Markierung was mache ich mit den restlichen 2 bei mir 3 Maschen.Zumal eine verkürzte Reihe nach diesem Muster bei mir oben 9,5 cm ergeben im unteren Teil aber nur 17 cm muß man die verkürzte Reihe 2mal stricken um auf 23,5 cm zu kommen? Danke für eine schnelle Antwort Gruß Petra
05.03.2014 - 19:50DROPS Design answered:
Liebe Petra, es sind tatsächlich noch 3 M übrig, das wurde nun korrigiert. Sie stricken erst bis zum 1. Markierer, dann wenden Sie mitten in der R und stricken zurück. Dann stricken Sie bis zum 2. Markierer, wenden wieder und stricken wieder zurück. Dann stricken Sie 1 R über ALLE M, d.h. auch über die letzten 3 M, und wieder zurück. Sie wdh. das alles so lange, bis Sie das angegebene Maß erhalten haben.
06.03.2014 - 01:13
|
|
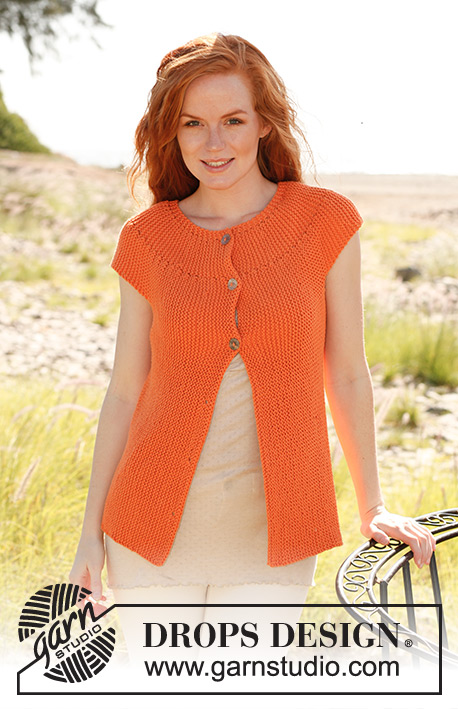
California Sun#californiasunvest |
|
 |
 |
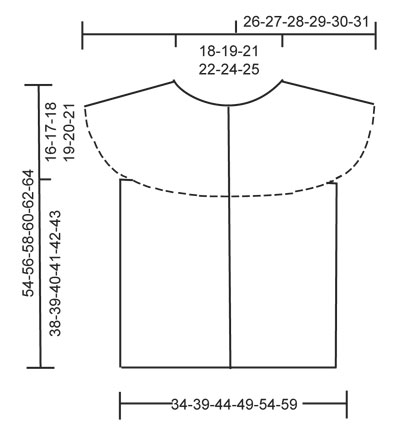
Knitted DROPS vest in garter st worked from side to side in "Paris". Size XS - XXL
DROPS 139-19 |
|
|
SHORT ROWS: * Work until 1st marker, turn, tighten thread and work back, work until 2nd marker, turn, tighten thread and work back, work all sts, turn and work back *, repeat from *-*. 1 repetition = 2 rows at the top and 6 rows at the bottom. ---------------------------------------------------------- VEST: Worked back and forth on needle from mid front on left band. The entire piece is worked K on all rows (= garter st). All measurements should be done when piece is flat. Cast on 92-95-98-102-105-109 sts on needle size 5 mm with Paris. K 4 rows over all sts (1st row = RS). Insert 2 markers in the piece as follows (from RS): 1st marker after 79-81-83-86-88-91 sts and 2nd marker after a total of 89-92-95-99-102-106 sts (= 3 sts after last marker at the top by neck). Then work SHORT ROWS – see explanation above - until piece measures 6-6½-7-7½-8-8½ cm at the top (= by neck) and approx. 16-17½-19-20½-22-23½ cm at the bottom (adjust after 1 row from RS). REMEMBER THE KNITTING TENSION! Insert a marker at the top by neck – NOW MEASURE PIECE FROM HERE! Work the top 27-29-30-32-34-36 sts (= sleeve), slip the bottom 65-66-68-70-71-73 sts on a stitch holder (do not work them first). Continue working short rows as before over sleeve (but now there are only 14-15-15-16-17-18 sts before 1st marker) until piece measures approx. 7-7½-8-8½-9-9½ cm from marker at top by neck and approx. 21-22½-24-25½-27-28½ cm at the bottom (= over sleeve), finish after 1 row from WS, cut the thread. Slip sts on another stitch holder and slip sts from the first stitch holder back on needle = 65-66-68-70-71-73 sts. K back and forth (beg from WS) over these sts for 4-6-8-10-12-14 cm (finish after 1 row from WS). Now work all sts back on needle (1st row = RS) = 92-95-98-102-105-109 sts. Move the measurement marker that was inserted at the top by neck to where you are now – NOW MEASURE PIECE FROM HERE! Work 1 row from WS and continue with short rows as before until piece measures approx. 10-11-12-13-14-15 cm from marker at the top by neck (and approx. 30-33-36-39-42-45 cm at the bottom (finish after 1 row from RS which is worked over all sts)). Move the measurement marker that was inserted at the top by neck to where you are now – NOW MEASURE PIECE FROM HERE! Work the top 27-29-30-32-34-36 sts (= sleeve), slip the bottom 65-66-68-70-71-73 sts on a stitch holder (do not work them first). Continue working short rows as before over sleeve until piece measures approx. 7-7½-8-8½-9-9½ cm from marker at top by neck and approx. 21-22½-24-25½-27-28½ cm at the bottom (= over sleeve), finish after 1 row from WS, cut the thread. Slip sts on another stitch holder and slip sts from the previous stitch holder back on needle = 65-66-68-70-71-73 sts. K back and forth (beg from WS) over these sts for 4-6-8-10-12-14 cm (finish after 1 row from WS). Now work all sts back on needle (1st row = RS) = 92-95-98-102-105-109 sts. Move the measurement marker that was inserted at the top by neck to where you are now – NOW MEASURE PIECE FROM HERE! K 1 row from WS over all sts. Then work short rows as before over all sts until piece measures approx. 5-5½-6-6½-7-7½ cm from marker at the top by neck and approx. 15-16½-18-19½-21-22½ cm at the bottom. Short rows are now finished. On next row from RS, cast off for 3 button holes as follows: Work 55-57-60-62-63-65 sts, K 2 tog, 1 YO, work 18-18-19-20-21-22 sts, K 2 tog, 1 YO, work 10-11-12-13-14-15 sts, K 2 tog, 1 YO and work the remaining 3 sts. K 3 rows over all sts before loosely casting off. ASSEMBLY: Sew on buttons. |
|
 |
|
Have you finished this pattern?Tag your pictures with #dropspattern #californiasunvest or submit them to the #dropsfan gallery. Do you need help with this pattern?You'll find 7 tutorial videos, a Comments/Questions area and more by visiting the pattern on garnstudio.com. © 1982-2026 DROPS Design A/S. We reserve all rights. This document, including all its sub-sections, has copyrights. Read more about what you can do with our patterns at the bottom of each pattern on our site. |
|


With over 40 years in knitting and crochet design, DROPS Design offers one of the most extensive collections of free patterns on the internet - translated to 17 languages. As of today we count 324 catalogues and 12290 patterns translated into English (UK/cm). 12290
We work hard to bring you the best knitting and crochet have to offer, inspiration and advice as well as great quality yarns at incredible prices! Would you like to use our patterns for other than personal use? You can read what you are allowed to do in the Copyright text at the bottom of all our patterns. Happy crafting!
Post a comment to pattern DROPS 139-19
We would love to hear what you have to say about this pattern!
If you want to leave a question, please make sure you select the correct category in the form below, to speed up the answering process. Required fields are marked *.