
Popular categories
Looking for a yarn?


Comments / Questions (64)
![]() Allinson Sherratt wrote:
Allinson Sherratt wrote:
Further to your answer to my earlier question, I would confirm I did do a tension square & it was fine. I'm mainly concerned that I'm interpreting the pattern correctly IE am I correct to increase the yo marker increases on the right side only - for the largest side this would equate to 76 rows. Thanks
06.08.2021 - 14:04DROPS Design answered:
Dear Allinson, you are right, you only increase on the right side. About the amount of rows to work, you need to check the measurements for your sizes with the ones in the diagram below the pattern; but there should be 76 rows, yes. The texture of the work should be loose and light.
07.08.2021 - 11:13
![]() Allinson Sherratt wrote:
Allinson Sherratt wrote:
If you only increase around the markers on every right sided row, you knit 38 X 2(for the largest size), 76 rows in total. I have used 6 balls of Muskat so far & need to knit 30 more rows. Can you please confirm the quantity of yarn required ?
06.08.2021 - 12:41DROPS Design answered:
Dear Allison, the amount of yarn we use dto knit the modell is stated in the pattern. However the amount of yarn a knitter catually uses depends on many factors, mostly on the gauge she is knitting with. If you knit with gauge given, the amount of yarn should be enough. Happy stitching!
06.08.2021 - 13:15
![]() Nathalie wrote:
Nathalie wrote:
Buongiorno, non ho capito il passaggio del retro dx e sx . Si ripete spalla destra, immagino ci sia un errore e volevo capire se tutte e due le spalle e’ corretto lavorarle in modo diverso Io per le due parti davanti ho lavorato i due pezzi insieme sullo stesso ferro Posso farlo anche per il dietro? Grazie mille ♥️
06.05.2020 - 11:59DROPS Design answered:
Buongiorno Nathalie, abbiamo corretto il testo. Deve lavorare prima la spalla sinistra e poi la destra, e quando le viene chiesto unirà le maglie della spalla sinistra. Buon lavoro!
06.05.2020 - 12:40
![]() Laura Crockarell wrote:
Laura Crockarell wrote:
When doing the increases for the arm hole from the WS, should i still do a Knit front and back or another type increase stitch?
24.03.2019 - 23:15DROPS Design answered:
Dear Mrs Crockarell, when increasing from the WS you can purl front and back to keep the same kind of increase -seen from RS all the way. Happy knitting!
25.03.2019 - 12:12
![]() Debbie Owen wrote:
Debbie Owen wrote:
When doing the YO, do we need to move the marker? I am not but do have the correct increases each time. Marker started at 37 and after 2 rows of increases it is now in 39. Is that correct.
25.04.2018 - 16:18DROPS Design answered:
Dear Mrs Owen, marker should stay in the same st all the way (just move it upwards when working), ie after 2 rows increase you have increased 2 sts and there are now 38 sts before marker (= marker is in the 39th st) in 5th size. Happy knitting!
25.04.2018 - 16:39
![]() Connie Ruebling wrote:
Connie Ruebling wrote:
While making this vest I have noticed by looking at the finished projects, there are two different ways people are knitting the yarn over increases. The pattern says in the body to increase in the 24-42nd stitch depending on your size in from each side. As you continue, that number does not stay the same. The next knit row after you have purled back, the increase will be in the 25-43rd stitch, then the 26-44th stitch and so on. Not the 24-42nd stitch throughout.
17.06.2015 - 21:18DROPS Design answered:
Dear Mr Ruebling, the marker on body has to be inserted in the 24th st in each side, and inc are done each side of the marker, so that you will have 23 sts for front piece before 1st inc, 24 sts after 1st inc and so on. Let marker follow this st and inc each side of this st will make the front pieces inc with 1 st and back piece with 2 sts on each inc row. Happy knitting!
18.06.2015 - 09:08
![]() Tamila wrote:
Tamila wrote:
I have made it, and mine curls so much being stockinette stitch. The picture with the model doesn't seem to curl so much. Is that because of blocking? Or is there something I can do to keep it from curling. I tried doing a rib edge, but didn't like it, and it still curled some.
05.05.2015 - 18:08DROPS Design answered:
Dear Tamila, blocking will prevent curling, you can also add a crocheted edge.
06.05.2015 - 09:17
![]() Neuling wrote:
Neuling wrote:
Hallo liebes Drops-Team! Sie schreiben in der Anleitung "...glatt stricken...". Meinen Sie damit glatt rechts, also Vorderseite rechte Maschen, Rückseite linke Maschen. Oder meinen Sie damit wirklich Vorder- und Rückseite rechte Maschen? Jetzt schon vielen lieben Dank für Ihre Antwort.
23.09.2014 - 16:23DROPS Design answered:
"glatt" bedeutet bei uns immer glatt rechts. Gutes Gelingen!
23.09.2014 - 22:16
![]() Cherry wrote:
Cherry wrote:
Hallo liebes Drops-Team! Ich habe gerade das linke Vorderteil gestrickt und es rollt sich an den Seiten sehr ein. Ist das so gewollt (auf dem Bild ist das für mich nicht ersichtlich!)oder sollte ich einfach ein/zwei Maschen am Rand als kraus rechts dazustricken (oder einfach von den anfänglichen 17 Maschen vier als Randmaschen (kraus rechts) einplanen - also auf jeder Seite 2?)???? Für eine Antwort wäre ich sehr dankbar.
02.08.2014 - 11:39DROPS Design answered:
Sie können die Weste nach dem Stricken anfeuchten und spannen oder unter feuchten Tüchern trocknen lassen, dann rollen sich die Ränder weniger stark. Sie können ein Probestück stricken und ausprobieren, wie stark es sich nach solch einer Behandlung noch einrollt. Falls das nicht reicht, können Sie wie von Ihnen vorgeschlagen ein paar Maschen am Rand kraus rechts stricken statt glatt rechts (nicht zusätzlich), ich würde 3-4 M kraus re pro Seite stricken.
04.08.2014 - 13:48
![]() Heike König wrote:
Heike König wrote:
150 g Wolle haben für die Größe S nicht ausgereicht. Ich habe noch 100 g dazubestellt.
01.06.2014 - 16:23
|
|
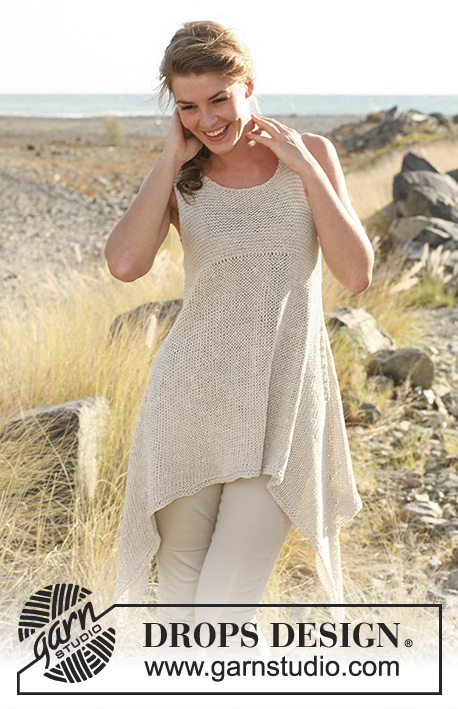
Take Me To Spain#takemetospainvest |
|
 |
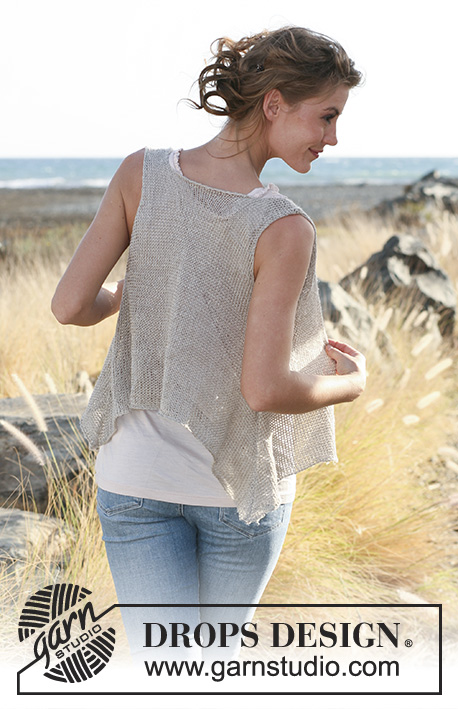 |
Knitted DROPS asymmetric vest, worked top down in ”Lin” or ”Muskat”. Size S-XXXL.
DROPS 129-15 |
|
|
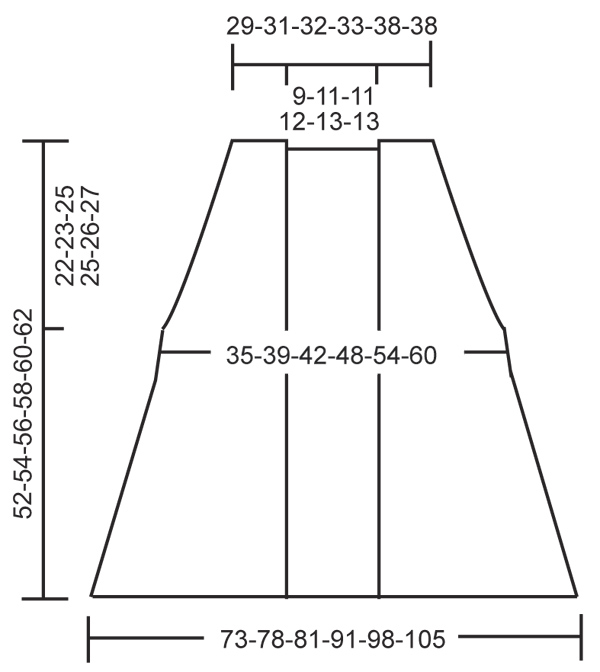
INCREASE TIP: Inc by making 1 YO on each side of st with marker in each side as follows: Work in stocking st until marker, 1 YO, work st with marker in stocking st, 1 YO. P YOs on next row to make holes. -------------------------------------------------------- The piece is worked top down. Front and back piece are worked back and forth separately down to and with armhole. Then all sts are slipped on the same circular needle. Then the piece is worked back and forth from mid front. LEFT FRONT PIECE: Worked back and forth on circular needle. Cast on 17-17-18-18-21-21 sts on circular needle size 5 mm with Lin. Work in stocking st. When piece measures 2 cm, inc 1 st towards armhole side by working 2 sts in the last st (seen from RS). Repeat inc in outermost st towards the side on every 9th-7th-6th-4th-4th-3rd row (i.e. in last st from RS or in first st from WS) a total of 6-8-10-14-15-20 times = 23-25-28-32-36-41 sts. REMEMBER THE KNITTING TENSION! When all inc towards the side are done, the piece measures approx. 22-23-25-25-26-27 cm. Slip the sts on a stitch holder. RIGHT FRONT PIECE: Work as on left front piece but with inc in the opposite side. BACK PIECE: Left shoulder: Cast on 17-17-18-18-21-21 sts on circular needle size 5 mm with Lin. Work 5 rows in stocking st with start from RS. Cut the thread and put piece aside. Right shoulder: Cast on 17-17-18-18-21-21 sts on circular needle size 5 mm with Lin. Work 5 rows in stocking st with start from RS, then cast on 16-18-18-20-22-22 sts at the end of next row from WS = 33-35-36-38-43-43 sts. Work sts from left shoulder on to same needle = 50-52-54-56-64-64 sts. Continue in stocking st. AT THE SAME TIME when piece measures 2 cm from shoulder, inc 1 st in first and last st on needle. Repeat inc in each side on every 9th-7th-6th-4th-4th-3rd row a total of 6-8-10-14-15-20 times = 62-68-74-84-94-104 sts. When all inc are done, the piece measures approx. 22-23-25-25-26-27 cm. Cut the thread. BODY: Slip sts from right and left front piece on to same circular needle as back piece. Now work piece back and forth with start from mid front = 108-118-130-148-166-186 sts. Insert 2 markers in the piece; in 24th-26th-29th-33rd-37th-42nd st in from each side (back piece = 60-66-72-82-92-102 sts). Continue in stocking st for 2 cm, piece now measures approx. 24-25-27-27-28-29 cm. On next row from RS, inc 1 st on each side of st with marker in each side - READ INCREASE TIP! Repeat inc on every row from RS until finished measurements = approx. 32-33-33-36-37-38 rows with inc (approx. 28-29-29-31-32-33 cm). After all inc there are approx. 236-250-262-292-314-338 sts on needle. LOOSELY cast off. Now piece measures approx. 52-54-56-58-60-62 cm measured straight down from shoulder (the sides are longer because of inc to give extra width and length). ASSEMBLY: Sew shoulder seams. |
|
 |
|
Have you finished this pattern?Tag your pictures with #dropspattern #takemetospainvest or submit them to the #dropsfan gallery. Do you need help with this pattern?You'll find 14 tutorial videos, a Comments/Questions area and more by visiting the pattern on garnstudio.com. © 1982-2026 DROPS Design A/S. We reserve all rights. This document, including all its sub-sections, has copyrights. Read more about what you can do with our patterns at the bottom of each pattern on our site. |
|


With over 40 years in knitting and crochet design, DROPS Design offers one of the most extensive collections of free patterns on the internet - translated to 17 languages. As of today we count 324 catalogues and 12290 patterns translated into English (UK/cm). 12290
We work hard to bring you the best knitting and crochet have to offer, inspiration and advice as well as great quality yarns at incredible prices! Would you like to use our patterns for other than personal use? You can read what you are allowed to do in the Copyright text at the bottom of all our patterns. Happy crafting!
Post a comment to pattern DROPS 129-15
We would love to hear what you have to say about this pattern!
If you want to leave a question, please make sure you select the correct category in the form below, to speed up the answering process. Required fields are marked *.