
Popular categories
Looking for a yarn?


Comments / Questions (32)
![]() Gretchen wrote:
Gretchen wrote:
Are there instructions for the collar?
10.10.2025 - 22:38DROPS Design answered:
Dear Gretchen, the shawl collar is explained inside the front piece and back piece sections. In the LEFT FRONT PIECE the shawl collar is explained as follows: "Work the first 51-52-53-53-54-55 sts at the side (= sleeve + shoulder) and slip them on a stitch holder. Work the remaining 11-11-11-12-12-12 sts towards front edge and beg next row from mid front (= from WS). Continue in moss st on the 11-11-11-12-12-12 sts, AT THE SAME TIME work shortened rows as follows (first row = from WS): * work back and forth on the first 6 sts, work back and forth on all sts *, repeat from *-* for approx 7-7-7-8-8-8 cm, measured on the shorter side. " Happy knitting!
12.10.2025 - 19:03
![]() Marchandet wrote:
Marchandet wrote:
Bonjour Kalidou est en rupture des bouton du modèle BOUTONS DROPS MOTHER-OF-PEARL, n°540 : 2. Quel diamètre font ils Et si aviez une sujection où les trouver Merci d'avance Cordialement
24.09.2024 - 21:28DROPS Design answered:
Bonjour Mme Marchandet, ils mesurent 34 mm - cf descriptif ; retrouvez tous les boutons ici. Bon tricot!
25.09.2024 - 08:28
![]() Helen Freeman wrote:
Helen Freeman wrote:
Is it possible to knit this cardigan without circular needles?
17.06.2024 - 07:21DROPS Design answered:
Dear Mrs Freeman, sure, pieces are worked here on circular needles here to get enough room for all stitches. Read more here. Happy knitting!
17.06.2024 - 09:04
![]() Sara Pompei wrote:
Sara Pompei wrote:
Buonasera, ho una domanda: per la taglia xl o xxl quanto Belle (1 capo) ci vorrebbe? grazie
14.04.2024 - 22:16DROPS Design answered:
Buonasera Sara, DROPS Belle e Snow hanno caratteristiche e spessori completamente diversi e il lavoro ne uscirebbe snaturato. Nel nostro sito può trovare tanti altri modelli lavorati in DROPS Belle. Buon lavoro!
17.04.2024 - 17:00
![]() Jaqueline Berganton wrote:
Jaqueline Berganton wrote:
Não compreendi a parte das mangas, faço-as separadas das frentes? Ou tricoto tudo junto? Neste caso, esses aumentos de 10 em 10 serão feitos na continuação da lateral, é isso mesmo?
10.05.2021 - 17:02
![]() Eve wrote:
Eve wrote:
Bonjour je ne comprends pas : tricoter 2 rangs sur les 6 premières mailles, tricoter 2 rangs sur toutes les mailles merci
09.05.2020 - 13:50DROPS Design answered:
Bonjour Eve, c'est ce qu'on appelle des rangs raccourcis, pour qu'ainsi vous tricotiez plus de rangs sur les premières mailles (extérieur du col) que sur les dernières (intérieur du col cousu le long de l'encolure dos). Vous tricotez donc ainsi: tricotez 6 mailles, tournez et tricotez le rang retour, tournez tricotez toutes les mailles, tournez tricotez le rang retour sur toutes les mailles, répétez ces 4 rangs jusqu'à ce que le col mesure 7/8 cm (cf taille) du côté le plus court (le col mesurera approx. le double de l'autre côté car vous aurez tricoté le double de rangs). Bon tricot!
11.05.2020 - 09:18
![]() Eve wrote:
Eve wrote:
Bonjour, pourriez vous me préciser combien de cm je dois obtenir en largeur pour le devant gauche merci
06.05.2020 - 13:12DROPS Design answered:
Bonjour Eve, nous n'avons pas ces mesures, mais vous pouvez la calculer d'après votre nombre de mailles pour votre taille et l'échantillon (on a environ le même nombre de mailles en largeur en jersey et au point de riz pour la même largeur). Si votre échantillon jersey est juste, et que vous conservez cette même tension, vous obtiendrez le même effet que sur la photo, toutes tailles confondues. Bon tricot!
06.05.2020 - 13:32
![]() Eve wrote:
Eve wrote:
Bonjour je viens de monter les mailles du devant j'ai l impression que c est très grand, j obtient 32cm sur le patron la largeur totale du devant fait 44cm et pourtant mon échantillon est bon dois je diminuer le nombre de mailles ? Merci
30.04.2020 - 19:47DROPS Design answered:
Bonjour Eve, si votre échantillon est juste, alors vous aurez les mêmes mesures que dans le schéma, les 44 cm correspondent à la largeur totale de la veste (= dos). Retrouvez ici comment lire les mesures du schéma. Bon tricot!
04.05.2020 - 09:46
![]() Ida wrote:
Ida wrote:
Ik wil dit patroon breien met Drops Nepal, met 5mm naalden. Hoe kan ik het beste tellen hoeveel st moet ik opzetten? Ik kan niet met grotere naalden breien.
02.03.2020 - 17:50DROPS Design answered:
Dag Ida,
Je maakt een proeflapje en dan tel je hoeveel steken er in 10 cm breit. Op basis van de stekenverhouding van het patroon en het aangegeven aantal steken dat je op moet zetten kun je dan uitrekenen hoeveel je op moet zetten voor jouw stekenverhouding.
04.03.2020 - 21:00
![]() Mauvillain wrote:
Mauvillain wrote:
Bonjour. Je voulais savoir combien de pelotes étaient nécessaire pour tricoter ce modèle taille L? Merci
04.01.2020 - 16:31DROPS Design answered:
Bonjour Mme Mauvillain, la quantité nécessaire pour chaque taille se trouve sous l'en-tête, dans l'ordre indiqué pour la taille. Retrouvez ici plus d'infos sur les quantités. Bon tricot!
06.01.2020 - 07:55
|
|
Nola#nolacardigan |
|
 |
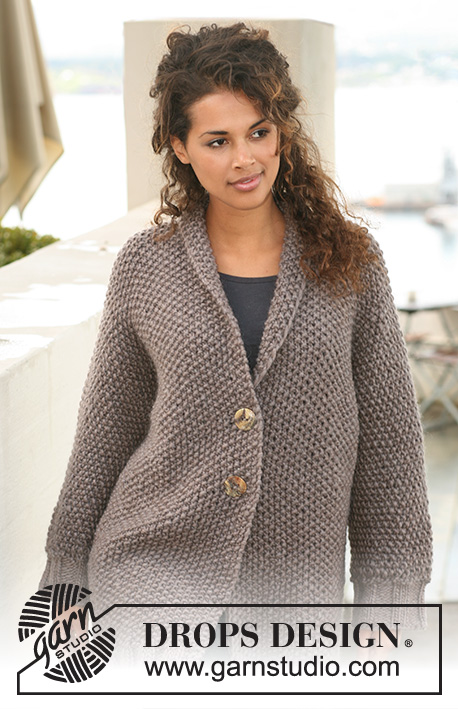 |
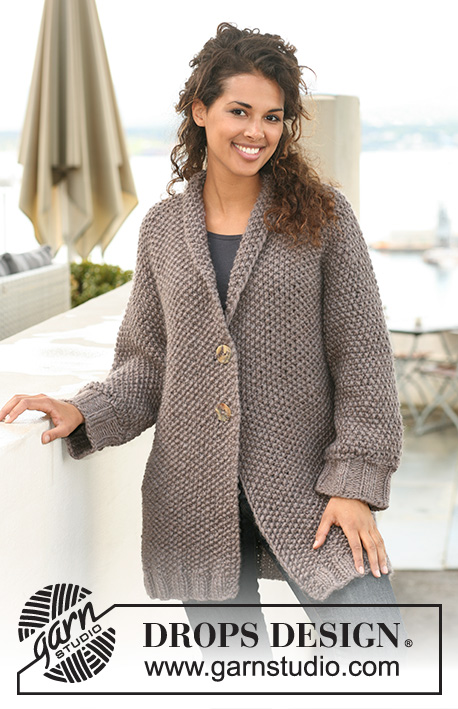
DROPS jacket in moss st in ”Snow”. Size S to XXXL.
DROPS 122-11 |
|
|
GARTER ST (back and forth on needle): K all rows. MOSS ST: Row 1: * K1, P1 *, repeat from *-*. Row 2: K over P and P over K. Repeat Row 2. INCREASING TIP: Inc 1 st by making 1 YO. On next row K YO into back of loop to avoid a hole. BUTTONHOLES: Make buttonholes on right front piece. 1 buttonhole = cast off 3rd and 4th st towards front edge and cast on 2 new sts on next row. Make buttonhole when piece measures: Size S: 39 and 47 cm. Size M: 40 and 48 cm. Size L: 41 and 49 cm. Size XL: 42 and 50 cm. Size XXL: 43 and 51 cm. Size XXXL: 44 and 52 cm. ---------------------------------------------------------- The jacket is worked in one piece, back and forth on circular needle in order to fit in all sts. Beg at the bottom on left front piece. LEFT FRONT PIECE: Cast on 40-46-46-46-52-52 sts (includes 1 edge st at the side) on needle size 9 mm with Snow. Continue as follows (first row = RS): 1 edge st, * P3, K3 *, repeat from *-* and finish with 3 GARTER STS - see above. When rib measures approx 6 cm continue in MOSS ST - see above – with 1 edge st at the side, AT THE SAME TIME on first row dec 9-13-11-9-12-9 sts evenly = 31-33-35-37-40-43 sts. Continue in moss st until piece measures 62 cm. REMEMBER THE KNITTING TENSION! Insert a marker in piece. Now cast on 10 sts at the end of every row from WS for sleeve. Repeat the inc a total of 2 times. Then at the end of next row from WS cast on 11-10-9-8-6-4 sts = 62-63-64-65-66-67 sts. Continue in moss st on all sts until piece measures 20-21-22-23-24-25 cm from marker (adjust so that next row is from RS). Now insert a new marker in piece (= mid shoulder). Work the first 51-52-53-53-54-55 sts at the side (= sleeve + shoulder) and slip them on a stitch holder. Work the remaining 11-11-11-12-12-12 sts towards front edge and beg next row from mid front (= from WS). Continue in moss st on the 11-11-11-12-12-12 sts, AT THE SAME TIME work shortened rows as follows (first row = from WS): * work back and forth on the first 6 sts, work back and forth on all sts *, repeat from *-* for approx 7-7-7-8-8-8 cm, measured on the shorter side. Cast off. RIGHT FRONT PIECE: Work right front piece in the same way, but mirrored. Make sure to have 3 garter sts towards front edge and P3 + 1 edge st at the side when working rib. NOTE! Remember BUTTONHOLES - see above. BACK PIECE: Slip sts from left front piece back on needle = 51-52-53-53-54-55 sts. Work 2 rows moss st on sts on needle. Put piece aside. Slip sts from right front piece back on needle = 51-52-53-53-54-55 sts. Work 2 rows moss st on sts on needle. Now slip both front pieces on the same needle and cast on 12-12-12-14-14-14 sts between the 2 pieces = 114-116-118-120-122-124 sts. Continue in moss st back and forth on all sts until piece measures approx 16-17-18-19-20-21 cm from marker on shoulder (adjust to front piece). Now cast off 11-10-9-8-6-4 sts each side. Then cast off at the beg of every row each side: 10 sts 2 times = 52-56-60-64-70-76 sts. Insert a marker in piece. Continue in moss st until piece measures 56 cm from marker (adjust to front piece). On next row from WS inc 13-15-17-19-19-19 sts evenly - see INCREASING TIP = 65-71-77-83-89-95 sts. Continue in rib as follows (from RS): 1 edge st, * K3, P3 *, repeat from *-* and finish with K3 and 1 edge st. Continue until rib measures 6 cm. Cast off with K over K and P over P. SLEEVE EDGES: Worked back and forth on needle. Pick up 44-44-50-50-56-56 sts inside 1 edge round sleeve. K 1 row from WS, K 1 row from RS and continue in rib K3/P3 with 1 edge st each side until rib measures approx 8 cm. Cast off with K over K and P over P. ASSEMBLY: Sew sleeve and side seams inside 1 edge st. Sew collar tog mid back and sew to neck on back piece. Sew on buttons. |
|
 |
|
Have you finished this pattern?Tag your pictures with #dropspattern #nolacardigan or submit them to the #dropsfan gallery. Do you need help with this pattern?You'll find 14 tutorial videos, a Comments/Questions area and more by visiting the pattern on garnstudio.com. © 1982-2026 DROPS Design A/S. We reserve all rights. This document, including all its sub-sections, has copyrights. Read more about what you can do with our patterns at the bottom of each pattern on our site. |
|


With over 40 years in knitting and crochet design, DROPS Design offers one of the most extensive collections of free patterns on the internet - translated to 17 languages. As of today we count 324 catalogues and 12290 patterns translated into English (UK/cm). 12290
We work hard to bring you the best knitting and crochet have to offer, inspiration and advice as well as great quality yarns at incredible prices! Would you like to use our patterns for other than personal use? You can read what you are allowed to do in the Copyright text at the bottom of all our patterns. Happy crafting!
Post a comment to pattern DROPS 122-11
We would love to hear what you have to say about this pattern!
If you want to leave a question, please make sure you select the correct category in the form below, to speed up the answering process. Required fields are marked *.