
Popular categories
Looking for a yarn?


Comments / Questions (4)
![]() Lotta wrote:
Lotta wrote:
Kan ni göra en tutorial på hur man gör när man ska vända och få färre rutor (efter dom 16 längs varje yttersida)? Förstår inte hur jag ska göra.
06.07.2021 - 20:16DROPS Design answered:
Hej Lotta, vi har flere tutorials med kærlighedsknuder. Klik på videoen nederst og klik på kärleksknutar, så ser du også den anden :)
12.07.2021 - 15:21
![]() Rinat wrote:
Rinat wrote:
Hi, I'm new to crochet. I've learned how to make the Love knot in a square. Unfortunately I am completely lost in this pattern. How do I get it diagonal?
21.06.2021 - 08:31DROPS Design answered:
Dear Rinat, you should follow this video - it will be added in the matching section. Happy crocheting!
21.06.2021 - 08:45
![]() Laura wrote:
Laura wrote:
Going Green
17.01.2021 - 22:33
![]() Laura wrote:
Laura wrote:
Farmer's Market
17.01.2021 - 22:33
|
|||||||
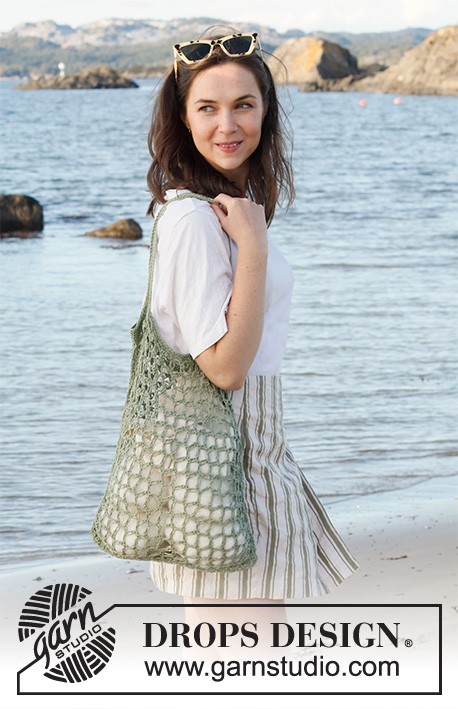
Snack Sack#snacksackbag |
|||||||
 |
 |
||||||
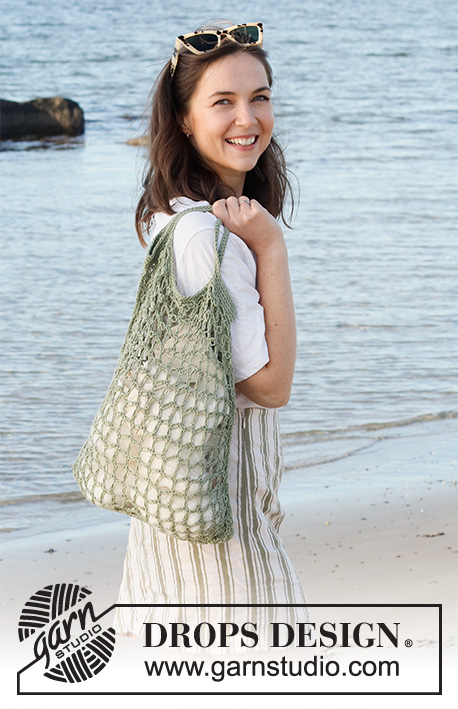
Crocheted shopping bag with love knots in DROPS Belle.
DROPS 221-27 |
|||||||
|
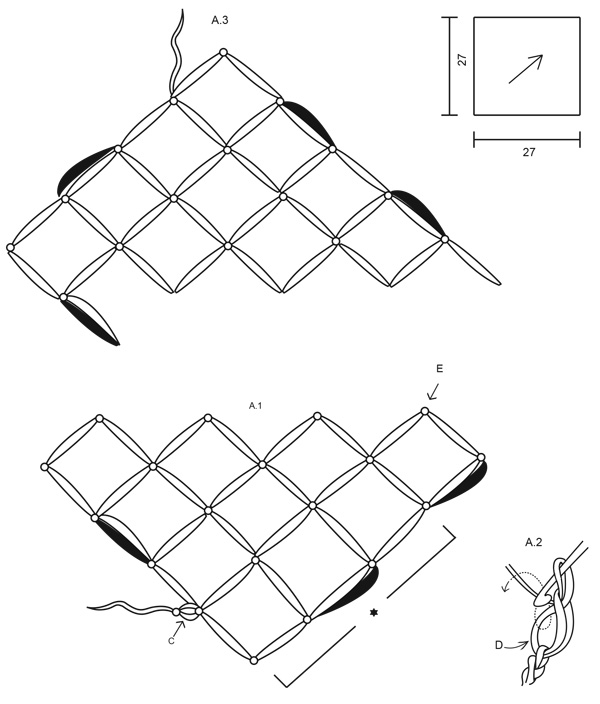
------------------------------------------------------- EXPLANATIONS FOR THE PIECE: ------------------------------------------------------- PATTERN: See diagrams A.1, A.2 and A.3. CHAIN STITCH: If you work outermost on the hook the chain stitch will often be too tight; 1 chain stitch should be as long as 1 double crochet is wide. CROCHET TIP: Keep hold of the chain (= point D) when working; it helps give the love knot a round and airy shape. ------------------------------------------------------- START THE PIECE HERE: ------------------------------------------------------- SHOPPING BAG – SHORT OVERVIEW OF THE PIECE: The piece is worked back and forth in 2 sections, from one corner up to the opposite corner – see sketch. The 2 sections are then worked together. An edge is crocheted around the top to finish at the same time as you work the handles. BAG: See illustrations A.1 to A.3 and sketch. Read CHAIN STITCH in explanations above. ROW 1: Work 1 chain stitch (= C in A.1) with hook size 3 mm and Belle. Work 1 love knot as follows: * Pull the stitch on the hook until it is 0.5 cm to 1 cm in length, make 1 yarn over, pull the strand through the stitch, insert the hook through the chain (see A.2 - chain = D in A.2) at the back of the long stitch – read CROCHET TIP, make 1 yarn over, pull the strand through the chain (= 2 stitches on the hook), make 1 yarn over, pull the strand through the 2 stitches on the hook *, work from *-* 3 more times (= 4 love knots) and form them into a square with 1 double crochet in the first chain stitch worked (= C). ROW 2: Turn the piece, work 3 love knots, 1 double crochet in the 3rd love knot from row 1, work 3 love knots and 1 double crochet in the 2nd love knot from row 1 (= 2 squares on the row). ROW 3: Turn, work 1 love knot and fasten with 1 double crochet in the 2nd love knot from the previous row (the last square worked) – you have turned (= black square in the diagrams) and are ready to continue this row: Work 3 love knots, 1 double crochet in the top of the last square from the previous row, 2 love knots, 1 double crochet in the top of the next square, 3 love knots, 1 double crochet in the first love knot in the first square on the previous row (= 3 squares on the row). REMEMBER THE CROCHET TENSION! ROW 4: Turn, work 1 love knot and fasten with 1 double crochet in the 2nd love knot in the last square on the previous row - you have turned and are ready to continue this row: Work 3 love knots, 1 double crochet in the top of the last square on the previous row, 2 love knots, 1 double crochet in the top of the next square, 2 love knots, 1 double crochet in the top of the next square, 3 love knots, 1 double crochet in the first love knot in the first square on the previous row (= 4 squares on the row). Continue like this, turning after each row as described in row 3 and working so there is 1 more square on each row. There are 3 love knots in each side and 2 love knots on the rest of the row (each square has 4 love knots). Work until you have 16 squares along each side of the piece; do not work the last love knot (= the one you turn with). Finish at point E. The piece measures approx. 32 cm along the sides - see stars in the diagrams for measuring. Continue with A.3 (with love knots and turning as shown); in this way you get 1 less square on each side of each row. Continue like this until there is 1 square left, Cut and fasten the strand. Piece measures approx. 32 x 32 cm. Work 1 more section in the same way. ASSEMBLY: Lay the 2 sections on top of each other, edge to edge. Use hook size 3 mm and Belle. Start with 1 double crochet through the outermost knot on both layers, then work through both layers as follows: * 3 chain stitches, skip to the next knot and work 1 double crochet in the knot *, work from *-* until the sections have been worked together on 3 sides, finish with 1 double crochet in the last corner. Now work an edge around the opening at the same time as you work the handles as follows – do not cut the strand. EDGE AND HANDLES: ROUND 1: * Work 3 chain stitches (= chain-space), skip to the next knot, work 1 double crochet in the knot *, work from *-* around the opening and finish with 1 slip stitch in the double crochet at the beginning of the round. There are 32 chain-spaces on the round. ROUND 2: Work 1 chain stitch, then 3 double crochets around each chain-space to the end of the round. Finish with 1 slip stitch in the chain stitch at the beginning of the round = 96 double crochets (the chain stitch at the beginning of the round is in addition to these stitches). ROUND 3: Work 1 chain stitch, then 1 double crochet in each double crochet to the end of the round, finish with 1 slip stitch in the first chain stitch. ROUND 4.: Work 1 chain stitch, then 1 double crochet in each of the first 12 double crochets, work 84 chain stitches for the handle, skip 24 double crochets, work 1 double crochet in each of the next 24 double crochets, work 84 chain stitches for the handle and skip 24 double crochets, work 1 double crochet in each of the last 12 double crochets and finish with 1 slip stitch in the first chain stitch. ROUND 5: Work 1 chain stitch, * 1 double crochet in each double crochet as far as the handle, work 1 double crochet in each chain stitch on the handle *, work from *-* and finish with 1 double crochet in each of the remaining double crochets. Finish with 1 slip stitch in the first chain stitch. ROUND 6: Work 1 chain stitch, 1 double crochet in each double crochet on the round and finish with 1 slip stitch in the first chain stitch. Cut and fasten the strand. |
|||||||
Diagram explanations |
|||||||
|
|||||||
 |
|||||||
Have you finished this pattern?Tag your pictures with #dropspattern #snacksackbag or submit them to the #dropsfan gallery. Do you need help with this pattern?You'll find 6 tutorial videos, a Comments/Questions area and more by visiting the pattern on garnstudio.com. © 1982-2026 DROPS Design A/S. We reserve all rights. This document, including all its sub-sections, has copyrights. Read more about what you can do with our patterns at the bottom of each pattern on our site. |
|||||||


With over 40 years in knitting and crochet design, DROPS Design offers one of the most extensive collections of free patterns on the internet - translated to 17 languages. As of today we count 324 catalogues and 12272 patterns translated into English (UK/cm). 12272
We work hard to bring you the best knitting and crochet have to offer, inspiration and advice as well as great quality yarns at incredible prices! Would you like to use our patterns for other than personal use? You can read what you are allowed to do in the Copyright text at the bottom of all our patterns. Happy crafting!
Post a comment to pattern DROPS 221-27
We would love to hear what you have to say about this pattern!
If you want to leave a question, please make sure you select the correct category in the form below, to speed up the answering process. Required fields are marked *.