
Leder du efter et garn?


Kommentarer / Spørgsmål (34)
![]() Joana skrev:
Joana skrev:
Hi! I can’t understand this part: Continuing bind off for armhole on every other row: 3 sts 1 (1-2) times, 2 sts 2 (2-2) times, 1 st 1 (2-3) times = 56 (59-59) sts. I work only with the two pieces of front side? How? Sorry and thank you so much for your answers
21.04.2019 - 14:16DROPS Design svarede:
Hi Joanna, You are working each front piece separately and at the armhole end of every second row on each front piece bind off as follows, depending on the size you are working; so for example in size S you bind off 3 stitches one time, then 2 stitches 2 times and 1 stitch 1 time with a row between each bind-off row where you do not bind off. Hope this helps and happy knitting!
21.04.2019 - 15:04
![]() Joana Dinis skrev:
Joana Dinis skrev:
When you said : work the first 64 (68-72) sts, bind off the next 4 sts, it means a decrease? in the 4 sts? like knitting 2 sts together? for four times? thank uu
12.04.2019 - 23:35DROPS Design svarede:
Dear Joana, you have to cast off these 4 sts for the armhole, so you have to work them not as a decrease but as when you finish the work. Happy knitting!
13.04.2019 - 09:12
![]() Joana Dinis skrev:
Joana Dinis skrev:
Sorry i cant understand this part, 64 (68-72) sts front piece, bind off 4 sts for armhole, 126 (134-142) sts back piece, bind off 4 sts for armhole, 64 (68-72) sts front piece.
31.03.2019 - 13:15DROPS Design svarede:
Dear Mrs Dinis, on this row you will bind off the stitches for armhole dividing front and back pieces: work the first 64 (68-72) sts, bind off the next 4 sts for armhole, work the next 126 (134-142) sts for back piece, bind off the next 4 sts for armhole = 64 (68-72) sts remain for 2nd front piece, work these stitches and continue now each piece separately. Happy knitting!
01.04.2019 - 13:08
![]() Joana Dinis skrev:
Joana Dinis skrev:
When i need to do the hole for the buttons? and im starting with 262 sts, and its look like the whole body (front and back) is it right? i dont understand because you divide each part, and my work with 262 points looks like the whole body except the sleeves...
27.03.2019 - 23:03DROPS Design svarede:
Dear Mrs Dinis, buttonholes will be created when you will work the right front edge - see Assembly at the bottom of the pattern. You are right, you are first working whole body (= front pieces + back piece) in one piece until armholes, then you will divide and work each front piece and back piece separately. Happy knitting!
01.04.2019 - 09:14
![]() Joana Dinis skrev:
Joana Dinis skrev:
But what means 1 edge stitch? how i work an edge stich? sorry im begginer
11.03.2019 - 20:02DROPS Design svarede:
Dear Mrs Dinis, you can work the edge stitches in stocking stitch or in garter stitch. Happy knitting!
12.03.2019 - 09:41
![]() Joana Dinis skrev:
Joana Dinis skrev:
Which means this: (...) and continue knitting pattern with 1 edge sts on each side mid front ?
05.03.2019 - 16:43DROPS Design svarede:
Dear Mrs Dinis, you work as follows: 1 edge stitch, *K4, P4*, repeat from *-* until 1 stitch remains, 1 edge stitch. Happy knitting!
06.03.2019 - 08:47
![]() Heather skrev:
Heather skrev:
I am using the recommended Safron Cotton yarn but am struggling with the ribbing. It\'s not stretchy or springing closed. I know this can be an issue with cotton vs animal fibers but mine so far doesn\'t look nearly as tight as even the photo in the pattern. I\'ve even gone down a needle size (using #3 vs #4 in order to get gauge) yet my ribbing still looks flat. Do you have any tips to fix this....or know how the person who knitted the sweater in the photo achieved this tighter rib?
20.05.2018 - 05:46
![]() Micheline Girarad skrev:
Micheline Girarad skrev:
What does MID UNDER ARM mean? I do not understand that term. Thanks
03.04.2018 - 16:40DROPS Design svarede:
Dear Mrs Girarad, this is the place where there should be a seam when working sleeve back and forth, and that's the transition of round when working in the round. Happy knitting!
03.04.2018 - 17:08
![]() Micheliine Girard skrev:
Micheliine Girard skrev:
I have trouble understand the term NCREASE MID UNDER ARM . Also, 2 sts 33 times alternating on every 3rd and 4th round. Does that mean on both sides of the needle?
03.04.2018 - 01:25DROPS Design svarede:
Dear Mrs Girard, see increase mid under arm in previous answer - increase 33 times alternately on every 3rd and 4th round as follows: work 1 round with inc, *2 rounds without inc, 1 round with inc, 3 rounds without inc, 1 round with inc*, and repeat from *-* until you have inc a total of 33 times and you get 116 sts. Happy knitting!
03.04.2018 - 10:10
![]() Micheline Girard skrev:
Micheline Girard skrev:
Need help understanding the term in the Sleeve pattern: ''at the same time, inc. MID UNDER ARM. What does that mean exactly? I wait till I am half way to the end of the sleeve or what? Also, do I increase both sides of the sleeve, when it says 2 sts. 33 times alternating on every 3rd and 4th round.
03.04.2018 - 01:23DROPS Design svarede:
Dear Mrs Girard, you will increase mid under arm by working until 1 st remain before beg of round, inc 1 st, work last st on round, (marker beg of round), work 1 st and inc 1 st = you have inc 2 sts mid under arm (ie on each side of beg of round). Happy knitting!
03.04.2018 - 10:09
|
|
Sandy Beach |
|
 |
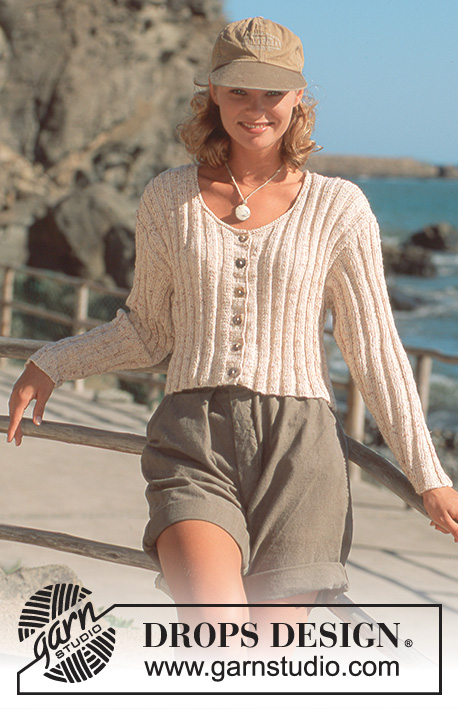 |
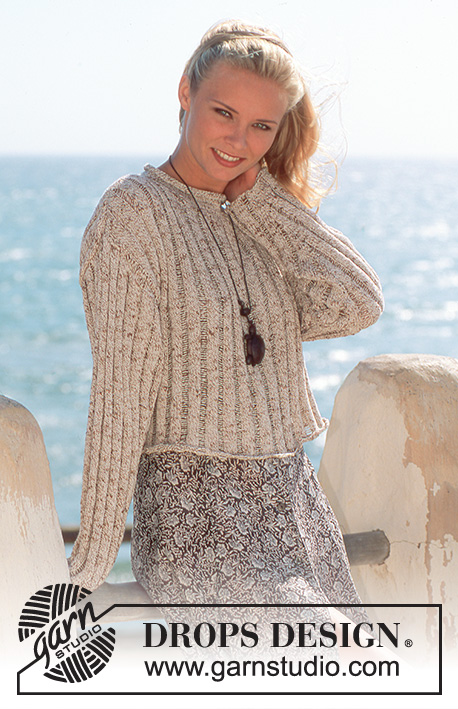
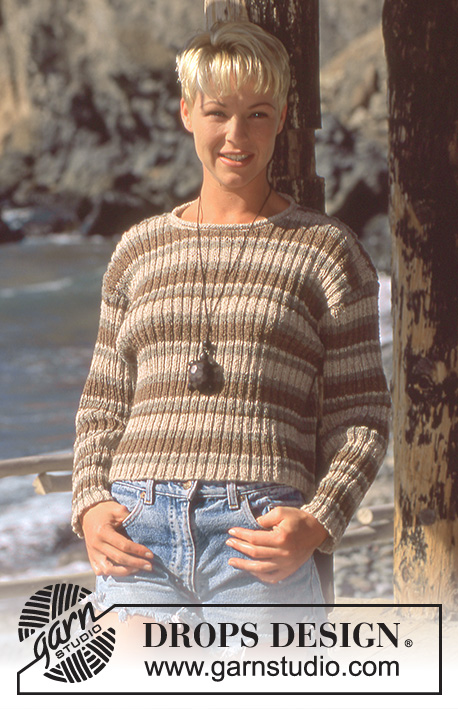
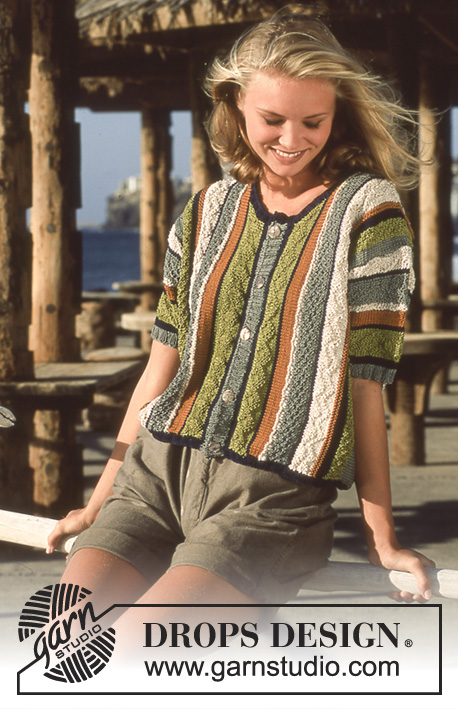
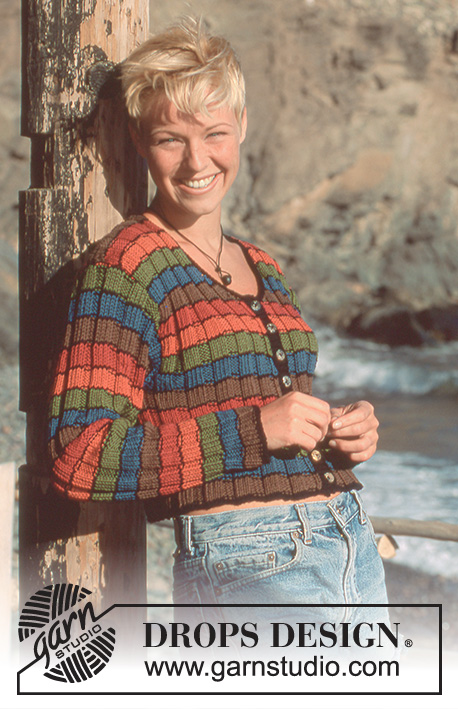
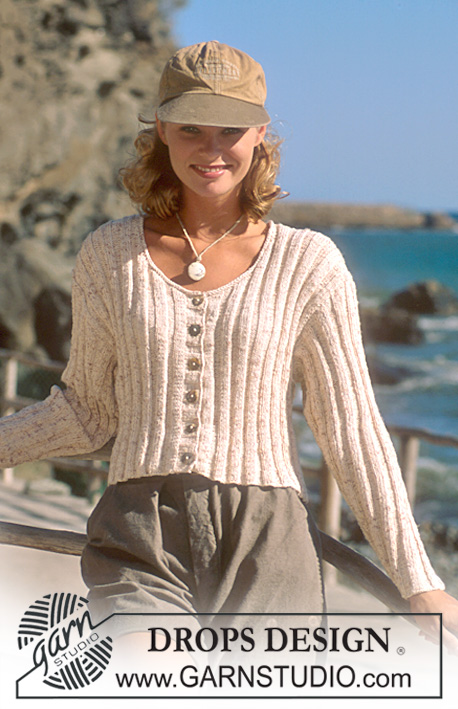
Ribstrikket jakke i Safran
DROPS 41-23 |
|
|
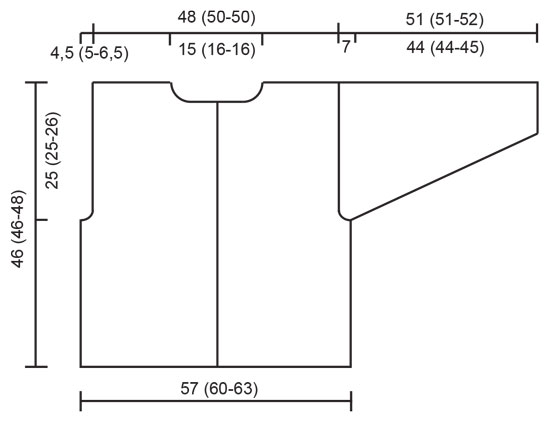
Mønster: * 4 r, 4 vr *, gentag fra *-*. Ryg- og forstykke: Jakken strikkes frem og tilbage på rundp. Slå 262 (278-294) m op (inkl 2 kantm) på rundp 3,5 med natur og strik Mønster opover med 1 kantm i hver side mod midt foran. Husk på strikkefastheden. Når arb måler 21 (21-22) cm strikkes næste p således: 64 (68-72) m forstk, luk 4 m af til ærmegab, 126 (134-142) m rygstk, luk 4 m af til ærmegab, 64 (68-72) m forstk. Hver del strikkes færdig for sig. Forstk: = 64 (68-72) m. Luk derefter af til ærmegab på hver 2.p: 3 m x 1 (1-2), 2 m x 2 (2-2), 1 m x 1 (2-3) = 56 (59-59) m. Når arb måler 29 (29-31) cm lukkes der af til hals på hver 2.p: 2 m x 7 og derefter på hver 4.p: 1 m x 4 (5-5). Luk af når arb måler 46 (46-48) cm. Rygstk: = 126 (134-142) m. Luk derefter af til ærmegab som på forstk = 110 (116-116) m. Når arb måler 44 (44-46) cm lukkes de midterste 30 (32-32) m af til hals. Derefter lukkes der 2 m af i hver side på næste p mod halsen. Luk af når arb måler 46 (46-48) cm. Ærme: Slå 50 (50-50) m op på strømpep 3,5 med natur og strik Mønster opover (sørg for at få 4 r m midt på ærmet). Samtidig tages der ud midt under ærmet: 2 m x 33 (33-35) på skiftevis hver 3. og 4.omg = 116 (116-120) m. Når arb måler 44 (44-45) cm lukkes der 6 m af midt under ærmet og der strikkes færdig frem og tilbage på p. Luk derefter af til ærmekuppel i hver side på hver 2.p: 4 m x 9, luk af. Arb måler ca 51 (51-52) cm. Montering: Sy skuldersømmen. Saml ca 84 m op (delbart med 8 m + 4 m) langs venstre forstk på rundp 3 med natur og strik 3 cm Mønster frem og tilbage på p. Gentag langs højre forstk, men efter 1 cm strikkes der 6 knaphuller jævnt fordelt på p - 1 knaphul = luk 3 m af og slå 3 nye m op over de aflukkede m på næste p. Saml ca 110-120 m op rundt i halsen på rundp 3 med natur og strik 2 p retstrik frem og tilbage på p, luk af. Sy ærmerne og knapperne i. |
|
 |
|
Har du lavet denne opskrift?Så tagger du dine billeder med #dropspattern eller send dem til #dropsfan galleriet. Behøver du hjælp med opskriften?Du finder 17 instruktionsvideoer, kommentarer/spørgsmål og mere i opskriften på www.garnstudio.com © 1982-2026 DROPS Design A/S. Alle rettigheder er reserveret. Dette dokument med tilhørende underdokumenter har copyright. Læs mere om hvad du kan gøre med vore opskrifter, nedert i alle vore opskrifter på hjemmesiden. |
|


Med over 40 år i strikke- og hæklebranchen tilbyder DROPS Design en af de mest omfattende kollektioner med gratis opskrifter på internettet - oversat til 17 sprog. Dags dato har vi 324 kataloger og 12290 opskrifter på Dansk.
Vi arbejder hårdt for at kunne tilbyde Dig det bedste man kan få af strik og hækling, inspiration og gode råd men også kvalitetsgarn til fantastiske priser! Vil du bruge vore opskrifter til andet end for privat brug? Du kan læse om hvilke regler som gælder under teksten Copyright nederst på siden i alle vore opskrifter. God fornøjelse!
Kommentere opskrift DROPS 41-23
Vi vil gerne høre din mening om denne model!
Hvis du ønsker at stille et spørgsmål, så husk at vælge rigtig kategori i menuen under - det vil give dig hurtigere svar. Obligatoriske felter er markeret med *.