
Populaarsed kategooriad
Otsid lõnga?


Kommentaarid / Küsimused (93)
![]() Emiliep kirjutas:
Emiliep kirjutas:
Je veux dire que je pense que le diagramme est faux car à partir du 10 ème rang on a plus que 6 rangs à faire en A1a alors qu'il y a 7 lignes d'ajourés au centre pour arriver à 9 arceaux ?
20.05.2018 - 22:14DROPS Design vastas:
Bonjour Emiliep, au dernier rang de A.1a, on crochète le 17ème symbole (carré dans la légende, mais rectangle dans le diagramme). Bon crochet!
22.05.2018 - 08:48
![]() Emiliep kirjutas:
Emiliep kirjutas:
Je dis ça car à compter du rang 10 il reste 6 rang à faire pour 10 motifs centraux ?
20.05.2018 - 21:54
![]() Emiliep kirjutas:
Emiliep kirjutas:
Bonjour, le diagramme est A1b est faux, non ? il comporte une ligne de plus que le A1a sur les motifs centraux ?
20.05.2018 - 21:46DROPS Design vastas:
Bonjour Emiliep, je compte bien 16 rangs pour A.1b et autant pour A.1a. Bon crochet!
22.05.2018 - 08:46Nourhan Osama kirjutas:
Continue A.3 in the round (repeat the 9 rounds vertically) until square measures 68-70-72-74-76-78 cm in the part of jacket , do you mean about vertically that i work in 2 corner back and forth OR in the 4 corner like before ?thanks and sorry for more question
15.05.2018 - 07:55DROPS Design vastas:
Dear Mrs Osama, you continue working A.3, ie you repeat the 9 rows in A.3 (= in height) over all sts in the round until square measures 68-70-72-74-76-78 cm x 68-70-72-74-76-78 cm. Happy crocheting!
15.05.2018 - 09:41Nourhan Osama kirjutas:
I am sorry , but i don't understand about the measures ,, like the first in Jacket ( When entire diagram A.2a and A.2b have been worked, square measures approx. 36 x 36 cm / 14 1/4" x 14 1/4''.) what this numbers /14 1/4" * 14 1/4" is refers to ?
14.05.2018 - 06:33DROPS Design vastas:
Hi Nourham, The first measurement (36 x 36) is in centimetres, the second measurement (14 1/4 x 14 1/4) is in inches. Happy crocheting!
14.05.2018 - 08:09Nourhan Osama kirjutas:
In round 17 you begin with a rectangle 4 chain stitches but i don't see it in the picture of jacket you are done,, can i dispensing this rectangle ??
07.05.2018 - 10:21DROPS Design vastas:
Dear Mrs Osama, this is the 17th symbol under diagram text (which looks like a square there), ie: round begins with 4 chain stitches and finishes with 1 slip stitch in 4th chain stitch at beginning of round Fasten off. Begin next round around chain space between the last treble group worked - fasten yarn with 1 slip stitch in chain space. Happy crocheting!
07.05.2018 - 10:48
![]() Mary Houlihan kirjutas:
Mary Houlihan kirjutas:
Would you say this pattern is only for the ‘experienced’ crocheter?
05.05.2018 - 02:22DROPS Design vastas:
Dear Mary, I would say this is for the intermediate. As it appears to be complicated, and there are a number of stitches and stitch combinations to follow, and you have to be able to read the chart. However the chart you help you visually what stitch / stitch combination goes where, and the most complicated stitch is a triple trble, and two trebles worked together. There are turtorials to help you (links on the left, just below the picture, and do not forget, you can always ask for help on person in the store you bought your DROPS yarn from. Happy Crafting!
06.05.2018 - 08:57
![]() Evelyne kirjutas:
Evelyne kirjutas:
Bonjour j'essaie desperement de faire ce modèle et pour une novice comme moi je ne parviens pas à comprendre le diagramme existe t'il des explications plus détaillées? Merci pour votre réponse
03.05.2018 - 16:10DROPS Design vastas:
Bonjour Evelyne, n 'hésitez pas à poser vos questions ici, ou, pour toute aide complémentaire individuelle, merci de contacter le magasin où vous avez acheté votre fil. Bon tricot!
04.05.2018 - 08:27
![]() Sue Towler kirjutas:
Sue Towler kirjutas:
Hi,I\'m really confused with your chart. I have 16 stitches after round 3, but your symbol says I should have 14? Also, why is there a space between the treble stitches on round 4? You have 3 then a big gap before making 11 more. It doesn\\\'t look like the crochet charts I\\\'m used to.
02.05.2018 - 18:28DROPS Design vastas:
Dear Mrs Towler, at the end of row 3 you should have *5 ch, 11 tr in the ch-space and 3 tr in 4-ch-space* x 4. (= 4 repeats of A.1) + the 3 ch from beg of round. There are some gaps in the chart due to the placement of symbols, simply follow symbols in diagram as they appear. For any individual assistance reading diagrams, you are welcome to contact the store where you bought your yarn. Happy crocheting!
03.05.2018 - 09:05Nourhan Osama kirjutas:
My queastion about the step between 5th and 6th round .....in th 5th round in figure A.1b i will make 3 chains 12 times between every single crochet in stitches ,, but do i make 3 chain then slip stitch it or make single crochet ? and Then i finish it,,and go above the 5 chain stitches do i make slip stitches in it also or make 5 chain st ?
28.04.2018 - 22:28DROPS Design vastas:
Dear Mrs Osama, on round 5 you repeat only 11 times (1 sc, 3 ch), then work 1 sc in last ch-space and work now 5 ch and repeat round from beg: (1 sc, 3 ch) x 11, 1 sc in last ch-space, 5 ch. At the end of round, after the last 5 ch, work 1 sl st in 1st ch from beg of round, then work sl st to the first ch-space (as at the beg of round 4). Happy crocheting!
30.04.2018 - 10:24
|
|||||||||||||||||||||||||||||||||||||||||||||||||||||||||||||||||||||||||||||||||||||
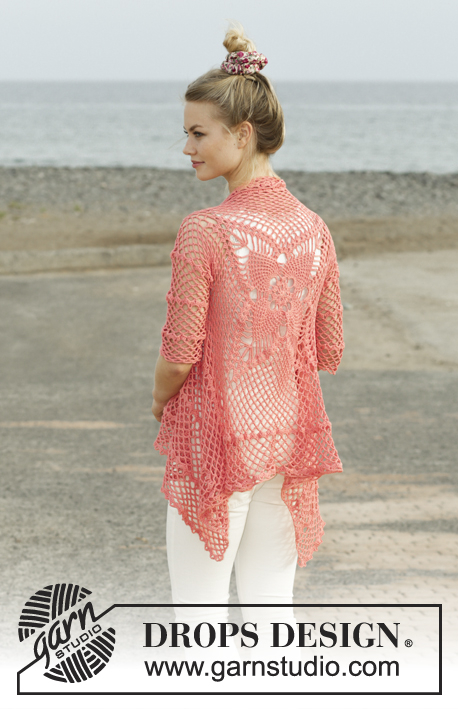
Butterfly Queen#butterflyqueenjacket |
|||||||||||||||||||||||||||||||||||||||||||||||||||||||||||||||||||||||||||||||||||||
 |
 |
||||||||||||||||||||||||||||||||||||||||||||||||||||||||||||||||||||||||||||||||||||
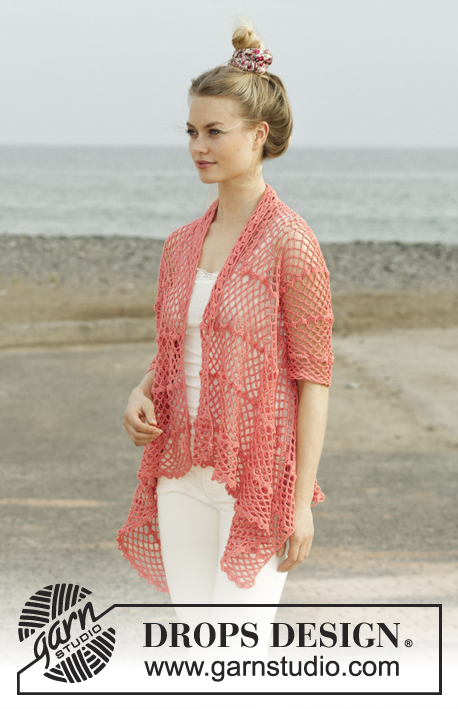
DROPS Flora lõngast heegeldatud pitsmustriga jakk suurustele S kuni XXXL
DROPS 186-11 |
|||||||||||||||||||||||||||||||||||||||||||||||||||||||||||||||||||||||||||||||||||||
|
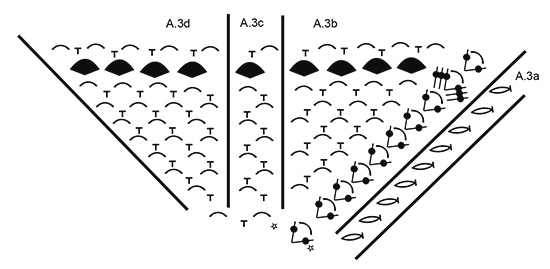
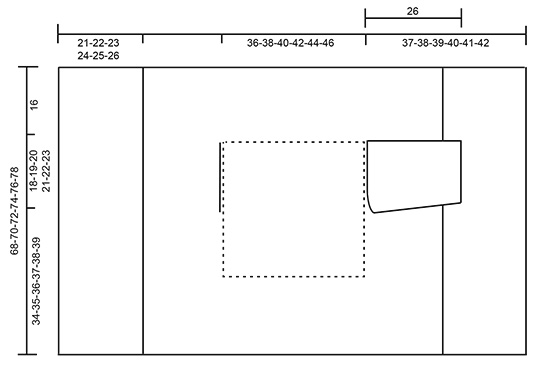
JUHEND MUSTER Vaata skeeme A.1 kuni A.4. HEEGELDAMISE INFO (skeem A.4) Asenda esimene kinnissilmus 1 ahelsilmusega. Asenda esimene kolmekordne sammas 5 ahelsilmusega. KAHANDAMISE NIPP (varruka siseküljel) Tee 5 ahelsilmust, jäta vahele 1 kinnissilmus + 1 ahelsilmustest kaar, tee 1 kinnissilmus ümber järgmise ahelsilmustest kaare + 1 ahelsilmustest kaar (= 1 mustrikordus kahandatud), jätka mustriga nagu enne, kuni jääb 1 ahelsilmustest kaar + 1 kinnissilmus eelmisel real, jäta need vahele, lõpus tee 1 kahekordne sammas esimesse ahelsilmusesse rea alguses (= 1 mustrikordus kahandatud). ---------------------------------------------------------- KAMPSUN Heegeldatakse ringselt seljaosa keskelt alustades, väljapoole siis jätka edasi-tagasi hõlmadega. Varrukad tehakse edasi-tagasi, pärast õmmeldakse kokku. Tee 4 ahelsilmust Flora lõngaga ja 3,5 mm heegelnõelaga, ning ühenda ringiks 1 aassilmusega esimesse ahelsilmusesse. Siis heegelda ringselt skeemi A.1b kokku 4 korda ringil (skeem A.1a näitab, kuidas ring algab ja lõppeb ning tehakse lisaks skeemile A.1b). JÄLGI HEEGELDAMISE TUGEVUST! Kui skeemid A.1a ja A.1b on tehtud, katkesta lõng. Alusta järgmist ringi ümber ahelsilmustest kaare viimase sambagrupi vahel, kinnita lõng 1 aassilmusega sellesse ahelsilmustest kaarde. Nüüd heegelda ringselt skeemi A.2 järgmiselt: * tee skeemi A.2b, korda skeemi A.2c kokku 6 korda laiuses, tee skeemi A.2d *, korda * kuni * kokku 4 korda ringil – skeem A.2a näitab, kuidas ring algab ja lõppeb ning tehakse lisaks skeemile A.2b/c/d. Kui skeemid A.2a ja A.2b on tehtud, on ruudu läbimõõt umbes 36 x 36 cm. Nüüd on 14 ahelsilmustest kaart igal küljel ja 4 nurka ahelsilmustest kaartega (1 ühekordne sammas + 6 ahelsilmust + 1 ühekordne sammas). LOE JÄRGNEV LÄBI ENNE JÄTKAMIST! Jätka nii: * tee skeemi A.3b ümber nurga ahelsilmustest kaare, korda skeemi A.3c kuni jääb 1 ahelsilmustest kaar enne nurka, tee skeemi A.3d ümber järgmise ahelsilmustest kaare *, korda * kuni * kokku 4 korda ringil – skeem A.3a näitab, kuidas ring algab ja lõppeb ning tehakse lisaks skeemile A.3b/c/d. SAMAL AJAL, kui töö kõrgus on umbes 36-38-40-42-44-46 cm x 36-38-40-42-44-46 cm, tee käeaugud järgmiselt: heegelda skeemi A.3 nagu enne kuni esimese nurgani, heegelda ümber ahelsilmustest kaare nagu enne. Nüüd tee ahelsilmuseid kuni järgmise külje keskele (st. külg 1. ja 2. nurga vahel) järgmiselt: tee 1 ahelsilmus iga vahelejäetud ahelsilmuse/ kinnissilmuse kohta. Siis jätka mustriga nagu enne, kuni poole küljeni 3. ja 4. nurga vahel. Tee ahelsilmuseid kuni 4. nurgani järgmiselt: tee 1 ahelsilmus iga vahelejäetud ahelsilmuse/ kinnissilmuse kohta, heegelda ümber nurga ahelsilmustest kaare, ning lõpeta ülejäänud ring nagu enne. Järgmisel ringil heegelda skeemi A.3 nagu enne kõigil silmustel (st. säti muster käeaugu ahelsilmuste kohale nii, et ringi muster ilusti jookseks). Jätka ringselt skeemi A.3 (korda 9 ringi vertikaalselt), kuni töö mõõt on umbes 68-70-72-74-76-78 cm x 68-70-72-74-76-78 cm (st. umbes 16 cm käeaugust kõikidel suurustel) – lõpeta pärast sammastegrupi ringi. Katkesta lõng ja paigalda 1 silmusemärkija (küljele 1. ja 2. nurga vahele). ESIOSA Nüüd heegelda edasi-tagasi 1. ja 2. nurga vahel. NB! Ära tee kasvatusi. Loe HEEGELDAMISE INFOT! Tee skeemi A.4a ümber nurga, korda skeemi A.4b kuni jääb 1 ahelsilmustest kaar enne nurka, tee skeemi A.4c ümber selle ahelsilmustest kaare ja ümber nurga. Jätka mustriga nagu näidatud skeemil ning korda skeemi A.4 vertikaalselt, kuni sammastegrupi rida on tehtud 2 korda kokku vertikaalselt; siis korda ainult ahelsilmustest kaartega ridu, kuni töö pikkus on umbes 19-20-21-22-23-24 cm silmusemärkijast, siis heegelda sammastegrupi rida 1 kord kõikidel suurustel. Töö pikkus on 21-22-23-24-25-26 cm silmusemärkijast. Katkesta ja kinnita lõng. Heegelda samamoodi teine hõlm (st. edasi-tagasi 3. ja 4. nurga vahele). VARRUKAD Heegelda varrukad käeaugu külge edasi-tagasi, ülevalt alla ning õmble pärast kokku. Alusta varruka alt ja heegelda järgmiselt: Loe HEEGELDAMISE INFOT! Tee skeemi A.4a ümber esimese ahelsilmustest kaare, korda skeemi A.4b kokku 15-16-17-18-19-20 korda laiuses (jaga muster A.4b ühtlaselt ümber käeaugu, st. kas tee 2 ahelsilmustest kaart ühte kaarde või jäta 1 kaar vahele), tee skeemi A.4c ümber viimase 2 ahelsilmustest kaare. Jätka skeemiga A.4 edasi-tagasi, SAMAL AJAL, kui töö pikkus on 4 cm (järgmine rida tee ahelsilmuseid/kinnissilmuseid), kahanda 1 mustrikordus mõlemal küljel - loe KAHANDAMISE NIPPI. Kahanda nii umbes iga 8-8-8-6-6-6 cm järel kokku 3-3-3-4-4-4 korda = 12-13-14-15-16-17 ahelsilmustest kaart 6 silmusega pärast viimast kahandust. Jätka niimoodi heegeldamist, kuni töö on umbes 28 cm kõikidel suurustel, lõpeta pärast ahelsilmustest kaartega rida. Katkesta ja kinnita lõng. Tee teine varrukas samamoodi. VIIMISTLUS Õmble kokku varruka alune õmblus läbi ääresilmuste – jälgi, et õmblus ei jääks kiskuma. |
|||||||||||||||||||||||||||||||||||||||||||||||||||||||||||||||||||||||||||||||||||||
Skeemi seletused |
|||||||||||||||||||||||||||||||||||||||||||||||||||||||||||||||||||||||||||||||||||||
|
|||||||||||||||||||||||||||||||||||||||||||||||||||||||||||||||||||||||||||||||||||||
 |
|||||||||||||||||||||||||||||||||||||||||||||||||||||||||||||||||||||||||||||||||||||
 |
|||||||||||||||||||||||||||||||||||||||||||||||||||||||||||||||||||||||||||||||||||||
 |
|||||||||||||||||||||||||||||||||||||||||||||||||||||||||||||||||||||||||||||||||||||
 |
|||||||||||||||||||||||||||||||||||||||||||||||||||||||||||||||||||||||||||||||||||||
Kas oled teinud seda mustrit?Lisa oma piltidele viide #dropspattern #butterflyqueenjacket või saada link projektile meie #dropsfan galeriisse. Vajad abi selle mustriga?Garnstudio.com kodulehel on 12 õppevideot, küsimuste/vastuste osa ja muudki. © 1982-2026 DROPS Design A/S. Kõik õigused kaitstud. See dokument, ning selle alajaotused on kaitsud autoriõigustega. Loe rohkem, mida meie mustritega võib teha, iga mustrilehe alt meie kodulehel. |
|||||||||||||||||||||||||||||||||||||||||||||||||||||||||||||||||||||||||||||||||||||


Tegeledes üle 40 aasta kudumise ja heegeldamise disainidega, pakub DROPS Design ühte suurimat tasuta mustrite kollektsiooni internetis - tõlgituna 17 keelde. Tänaseks on meil 324 kataloogi ja 12290 mustrit - millest 9431 on tõlgitud Eesti keelde.
Me anname endast parima, et tuua teieni kõike mida kudumine ja heegeldamine võib pakkuda - inspiratsiooni, nõuandeid ning ka kvaliteetseid lõngu parima hinnaga! Soovid kasutada mustreid muukski, kui ainult oma tarbeks? Loe infot meie Copyright osas iga lehekülje all. Rõõmsat loomist!
Jäta kommentaar mustrile DROPS 186-11
Ootame kommentaare selle mustri kohta!
Kui soovid midagi küsida, siis kiiremaks vastuse saamiseks veendu, et valid õige kategooria alloleval formil. Vajaliku väljad *.