
Populaarsed kategooriad
Otsid lõnga?


Kommentaarid / Küsimused (57)
![]() Michelle kirjutas:
Michelle kirjutas:
Bonjour. Ce modèle m interesse... j aimerais savoir si dans le dos vu qu il n y a pas de photo du dos. il y a de la dentelle ou est ce du jersey? merci 😁😁
25.09.2020 - 13:13DROPS Design vastas:
Bonjour Michelle, le point fantaisie ajouré est le même dans le dos que devant. Bon tricot!
25.09.2020 - 14:38
![]() Richard kirjutas:
Richard kirjutas:
HELP! I am in need of 3 x 50g balls of 'Drops Cotton Merino' - Colour 17- Dye Lot 52848. Any help or suggestions, gratefully received. Also, If I make a hat using Cotton Merino, but the pattern calls for 'Fingering Merino' will it make much difference?? Thank you. Richard.
27.01.2020 - 13:12DROPS Design vastas:
Dear Richard, please contact your DROPS store (and more stores if necessary) or even our DROPS Workshop - CottonMerino is a 8 ply/Dk/Worsted yarn - see shadecard - see here all patterns you can use for Cotton Merino. Happy knitting!
27.01.2020 - 14:24
![]() Richard kirjutas:
Richard kirjutas:
Sorry, the last comment should read with "I placed the marker to the side (on my RIGHT)!" Thanks.
24.01.2020 - 15:28
![]() Richard kirjutas:
Richard kirjutas:
Hi, Thanks for your replies & I've mastered the difficult start - as you say, with double-pointed needles. The raglan decreasing is another matter. As I look at the sleeve (to my left), I have placed a marker on the stitch nearest to the side. I have then placed another marker on the 1st stitch of the side (which is to my left). Now, you say to start 3 stitches before this marker- yes? Where to I start on the sleeve decrease, please.
24.01.2020 - 15:25DROPS Design vastas:
Dear Richard, you should have 1 marker between each piece; so if you look at the sleeve, there is 1 marker at the end of body (either back or front piece) = before the first stitch on sleeve and 1 marker at the end of sleeve, after the last stitch on sleeve = before the first stitch on front/back piece. Start 3 sts before the first of these 2 markers, K2 tog, = 1 stitch remain before marker, work this stitch + the next st (= first after marker) and dec = there are 2 sts decreased at the marker and K2 between the dec (with marker in the middle of these K2). Repeat at each marker. Happy knitting!
24.01.2020 - 16:04
![]() Richard kirjutas:
Richard kirjutas:
Hi, once more. I've placed markers at the sleeves & sides & now trying to knit the raglan decreases! I understand the pattern for instructions for the sides, but starting 3 stitches before the marker (does this include the marker), I end up, after the decrease, taking the first stitch of the sleeve. Your assistance once again would be very much appreciated. Thank you. Richard.
24.01.2020 - 12:29DROPS Design vastas:
Dear Richard, there should be 1 stitch on each side of marker on each piece between the raglan decreases, ie you will work at each transition: K2 tog (1 dec), K2 (= Knit the stitch before marker + the stitch after marker), slip 1 as if to K, K1, psso. So starting at the transition between back and one sleeve, you will start (and end) round with K1, Hope it helps, Happy knitting!
24.01.2020 - 14:23
![]() Richard kirjutas:
Richard kirjutas:
Good morning. I have completed the body & both sleeves. But now that I have joined them on one needle, I find that when trying to knit the sleeves, the stitches are stretched (almost impossible to do)! I've had to use double-pointed needles to help me out! I don't remember having this trouble when I made the first one of this pattern (in size medium). Please can you help. Thanks. Richard.
24.01.2020 - 10:15DROPS Design vastas:
Dear Richard, that's right, the first few rounds at the beginning of yoke can be somewhat tricky, you can use the double pointed needles or circular needles if you like to, after few rounds, all stitches will have enough place on the circular needle to work them on the round. Happy knitting!
24.01.2020 - 14:08
![]() Richard kirjutas:
Richard kirjutas:
Thank you for the reply to my question. I sent a sketch via email, showing how I was knitting the round. So, from what you are saying, I have to knit A1 (1st row), (only for the complete round)! Then for the next round, I have to knit A1 (2nd row), for the complete round! Then 3rd row, 4th row & so on.... This makes sense. Please can you confirm this for me.. Thanks a million. Richard.
13.01.2020 - 20:17DROPS Design vastas:
Dear Richard, that's how you should work the diagrams (row 1 in A.1 on all diagrams, then row 2 in A.1 on all diagrams and so on). Happy knitting!
14.01.2020 - 07:50
![]() Richard kirjutas:
Richard kirjutas:
Good morning, again. Continuing from the two Ridge rows, I began the round, as per your instructions. But, I find that the *A1* pattern, repeats 3 times (2 with odd row numbers, 1 even row number. in the first half, up to 124 stitches. But for the continuing *A1* pattern, there is only 1 odd number row! But, there are 2 even row numbers! Is this so? Please. Richard. I have made a drawing which explains better. If I may upload it.
13.01.2020 - 11:03DROPS Design vastas:
Dear Richard, not sure I'm getting this properly, when working A.1 in the round, you should work same round in each diagram all the round = round 1 A.1 when working round 1 on yoke, then work round 2 in A.1 and so on. What do I misunderstand?
13.01.2020 - 11:34
![]() Richard kirjutas:
Richard kirjutas:
Sadly, (Hi again). I'm still struggling after completing the two ridges! It is written that I knit 20, purl 3 (23 stitches), then *A1 (22 stitches, purl 6! (A1 = 10 rows @22 stitches) = 220 stitches. But adding the first 23 stitches to the 220 stitches = 243 stitches? Yet it is written, that I then purl 6! Doing this gives a total of 249 stitches! What am I doing wrong please? Forgive me, I am nearly 78 years old. Have a good day.
09.01.2020 - 12:22DROPS Design vastas:
Dear Richard, you should work the 248 sts in size L as follows: knit 20, purl 3, *A.1 (= 22 sts), purl 6*, repeat from *-* a total of 2 times (= 28 sts x 2= 56 sts), A.1 (= 22 sts), purl 3, knit 40 , purl 3, repeat from *-* (= 56 sts), A.1 (= 22 sts), purl 3, knit 20 = 20+3 + 56+22 + 3+40+3 + 56+22 +3+20=248 sts. Try to add markers between each section, it can help you to check the number of stitches. Happy knitting!
09.01.2020 - 14:07
![]() Richard kirjutas:
Richard kirjutas:
Hi (once again). This should be the last for awhile. I understand the A1 block now, working from the bottom up! But, please tell me: Do I follow the pattern from left to right or right to left?? I ask this, because, I am reading the block from right to left! I don't believe it makes much difference (but, there again, you are the Expert). Thank you. Richard.
07.01.2020 - 22:07DROPS Design vastas:
Dear Richard, diagrams are read bottom up starting from the right corner to the left, ie you will read every row in diagrams from the right towards the left (since you are working in the round) - read more about diagrams here (link is now working). Happy knitting!
08.01.2020 - 09:04
|
|||||||||||||||||||
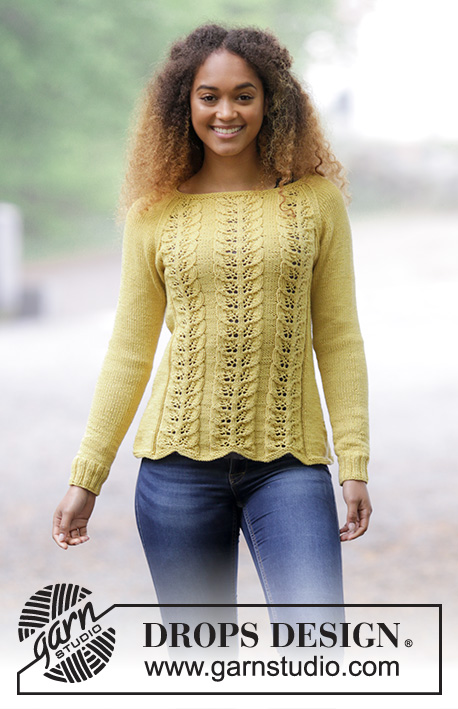
Lemon Parfait#lemonparfaitsweater |
|||||||||||||||||||
 |
 |
||||||||||||||||||
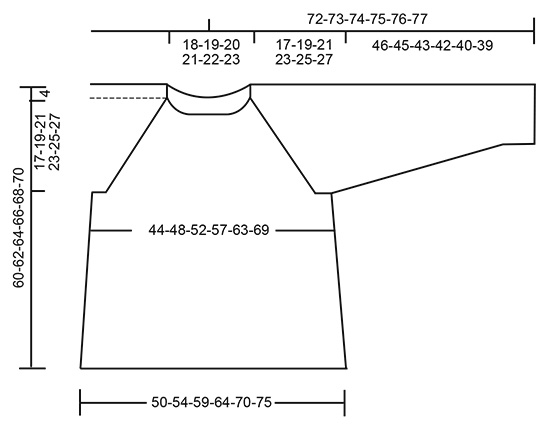
DROPS Cotton Merino lõngast kootud lehemustriga ja raglaan varrukatega džemper suurustele S kuni XXXL
DROPS 180-1 |
|||||||||||||||||||
|
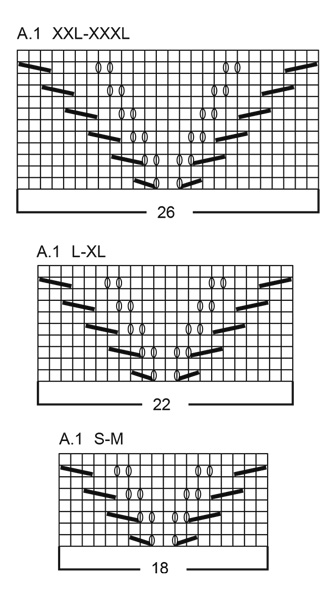
JUHEND RIPSKUDE/RIPSIVALL (ringselt kududes) 1 ripsivall = 2 ringi ripskoes. Koo 1 ring parempidi silmuseid ja 1 ring pahempidi silmuseid, korda neid kahte ringi. MUSTER Vaata skeemI A.1. Vali suurusele sobiv skeem. KAHANDAMISE NIPP (külg) Alusta 3 silmust enne silmusemärkijat küljel: koo 2 parempidi kokku, 2 parempidi (silmusemärkija on nende silmuste vahel), koo 2 ületõstmisega kokku (tõsta 1 silmus kudumata, 1 parempidi, tõsta kudumata silmus üle äsja kootud silmuse). KASVATAMISE NIPP Kasvata varruka siseküljel järgmiselt: alusta 1 silmus enne silmusemärkijat, tee 1 õhksilmus, 2 parempidi (silmusemärkija on nende 2 silmuse keskel), 1 õhksilmus. Järgmisel ringil koo õhksilmused keerdsilmustena, et ei jääks auke. RAGLAAN Kahanda 2 silmust igal varrukate ja kehaosa ülemineku kohal (igal raglaanijoonel). Alusta 3 silmust enne silmusemärkijat: koo 2 parempidi kokku, 2 parempidi (silmusemärkija on nende silmuste vahel), koo 2 ületõstmisega kokku (tõsta 1 silmus kudumata, 1 parempidi, tõsta kudumata silmus üle äsja kootud silmuse). KUDUMISE NIPP Kui koetihedus ei ole vertikaalselt (kõrguses) õige, jäävad raglaani kahandused lühikeseks ja käeaugud liiga väikeseks. Selle vältimiseks koo aegajalt lisaringe ilma kahandusteta. ---------------------------------------------------------- KEHAOSA Kootakse ringselt ringvarrastega alt üles. Loo 212-228-248-268-292-316 silmust 4 mm ringvarrastele Cotton Merino lõngaga. Koo 2 RIPSIVALLI (4 ringi ripskoes) - vaata ülevalt. Jätka nii: koo 17-21-20-25-25-31 parempidi silmust, 3 pahempidi silmust, * skeemi A.1 (= 18-18-22-22-26-26 silmust), 6 pahempidi*, korda * kuni * kokku 2 korda, koo skeemi A.1, 3 pahempidi silmust, koo 34-42-40-50-50-62 parempidi silmust, 3 pahempidi, * koo skeemi A.1, 6 pahempidi *, korda * kuni * kokku 2 korda, skeemi A.1, 3 pahempidi, 17-21-20-25-25-31 parempidi. Paigalda 1 silmusemärkija ringi algusesse ja teine pärast 106-114-124-134-146-158 silmust = küljed. Jätka niimoodi mustriga. JÄLGI KOETIHEDUST! Kui töö kõrgus on 8 cm, kahanda 1 silmus mõlemal pool mõlemat silmusemärkijat külgedel – loe KAHANDAMISE NIPPI = 4 silmust kahandatud. Kahanda nii iga 4,5 cm järel kokku 7 korda kõikidel suurustel = 184-200-220-240-264-288 silmust ringil. Kui töö pikkus on 39-39-39-39-39-39 cm, koo maha 8-8-10-10-12-14 silmust mõlemal küljel (= 4-4-5-5-6-7 silmust mõlemal pool silmusemärkijaid mõlemal küljel). Nüüd on seljaosal ja esiosal 84-92-100-110-120-130 silmust. Pane töö kõrvale ja koo varrukad. VARRUKAD Kootakse ringselt sukavarrastega, võta vajadusel lühikesed ringvardad, kui silmuseid on rohkem. Loo 48-52-56-56-60-64 silmust 3,5 mm sukavarrastele Cotton Merino lõngaga. Koo 1 ring parempidi, siis koo soonikut 2 parempidi/2 pahempidi. Kui töö kõrgus on 6 cm, võta 4 mm sukavardad. Koo 1 ring parempidi silmuseid, SAMAL AJAL kahanda 4-6-8-6-8-10 silmust ühtlaste vahedega ringil = 44-46-48-50-52-54 silmust. Paigalda 1 silmusemärkija ringi algusesse = varruka sisekülg. Jätka parempidises koes. Kui töö kõrgus on 10-7-7-10-7-7 cm, kasvata 2 silmust varruka siseküljel – loe KASVATAMISE NIPPI. Kasvata nii iga 3-2,5-2-1,5-1,5-1,5 cm järel kokku 12-15-18-19-20-21 korda = 68-76-84-88-92-96 silmust. Kui töö kõrgus on 46-45-43-42-40-39 cm (lühemad mõõdud suurematel suurustel kuna passe on pikem), koo maha keskmised 8-8-10-10-12-14 silmust varruka siseküljel = 60-68-74-78-80-82 silmust. Pane töö kõrvale ja koo teine varrukas. PASSE Tõsta varrukad kehaosaga samale ringvardale, käeaukudesse = 288-320-348-376-400-424 silmust. Paigalda silmusemärkija iga varrukate ja kehaosa ülemineku kohta (= 4 silmusemärkijat). Jätka mustriga nagu enne ja tee RAGLAANI kahandused - vaata ülevalt. Kahanda igal 4. ringil 5-5-6-6-6-7 korda, siis igal teisel ringil 14-16-18-21-23-24 korda = kokku 19-21-24-27-29-31 korda (silmused, mis ei lähe kahandamise tõttu skeemi A.1 mustrisse, koo parempidises koes). Pärast kõiki raglaanikahandusi on vardal 136-152-156-160-168-176 silmust. Koo 2 ripsivalli (4 ringi ripskoes), aga esimesel ringil koo mõlema varruka 22-26-26-24-22-20 silmust kahekaupa kokku, lisaks kahanda 18-28-26-28-34-40 silmust ühtlaste vahedega ringil = 96-98-104-108-112-116 silmust jääb vardale. Koo silmused maha parempidi. VIIMISTLUS Õmble kokku avad kaenlaaugus. |
|||||||||||||||||||
Skeemi seletused |
|||||||||||||||||||
|
|||||||||||||||||||
 |
|||||||||||||||||||
 |
|||||||||||||||||||
Kas oled teinud seda mustrit?Lisa oma piltidele viide #dropspattern #lemonparfaitsweater või saada link projektile meie #dropsfan galeriisse. Vajad abi selle mustriga?Garnstudio.com kodulehel on 27 õppevideot, küsimuste/vastuste osa ja muudki. © 1982-2026 DROPS Design A/S. Kõik õigused kaitstud. See dokument, ning selle alajaotused on kaitsud autoriõigustega. Loe rohkem, mida meie mustritega võib teha, iga mustrilehe alt meie kodulehel. |
|||||||||||||||||||


Tegeledes üle 40 aasta kudumise ja heegeldamise disainidega, pakub DROPS Design ühte suurimat tasuta mustrite kollektsiooni internetis - tõlgituna 17 keelde. Tänaseks on meil 324 kataloogi ja 12290 mustrit - millest 9431 on tõlgitud Eesti keelde.
Me anname endast parima, et tuua teieni kõike mida kudumine ja heegeldamine võib pakkuda - inspiratsiooni, nõuandeid ning ka kvaliteetseid lõngu parima hinnaga! Soovid kasutada mustreid muukski, kui ainult oma tarbeks? Loe infot meie Copyright osas iga lehekülje all. Rõõmsat loomist!
Jäta kommentaar mustrile DROPS 180-1
Ootame kommentaare selle mustri kohta!
Kui soovid midagi küsida, siis kiiremaks vastuse saamiseks veendu, et valid õige kategooria alloleval formil. Vajaliku väljad *.