
Populaarsed kategooriad
Otsid lõnga?


Kommentaarid / Küsimused (259)
![]() Piolot Martine kirjutas:
Piolot Martine kirjutas:
Bonjour je souhaiterais faire ce plaid pourriez me dire comment repartir les augmentations sur chaque carres .... merci pour l'aide apportée
14.10.2025 - 17:26DROPS Design vastas:
Bonjour Mme Piolot, utilisez la petite calculatrice que vous trouverez soit juste sous Explications (après les liens vers la laine et les aiguilles) ou bien cliquez sur la petite calculette dans le coin en bas à droite de la fenêtre. Retrouvez également la technique décrite ici. Bon tricot!
15.10.2025 - 09:07
![]() Karine kirjutas:
Karine kirjutas:
Bonjour, J'aimerais faire cette jolie couverture, mais je ne comprends pas comment on peut relever un si grand nombre de mailles pour les bordures. Mon câble le plus long mesure un mètre. Pardon si ma question est naïve, mais je n'ai jamais réalisé d'ouvrage aussi grand. Merci
09.09.2025 - 12:15DROPS Design vastas:
Bonjour Karine, c'est une des raisons pour lesquelles on utilise une aiguille circulaire, on a beaucoup plus de place que sur des aiguilles droites; vos mailles seront un peu plus serrées car effectivement plus de longueurs que votre câble mais vous pourrez tricoter simplement en tournant à la fin de chaque rang. Bont ricot!
11.09.2025 - 11:46
![]() Anita S Aase kirjutas:
Anita S Aase kirjutas:
Hva er størrelsen på hver rute?
20.07.2025 - 19:00DROPS Design vastas:
Hei Anita. Det er det ikke opplyst om. Men du kan regne det ut fra oppgitt mål på teppet minus kanten (ca 22-23 cm). mvh DROPS Design
31.07.2025 - 13:49
![]() Tineke kirjutas:
Tineke kirjutas:
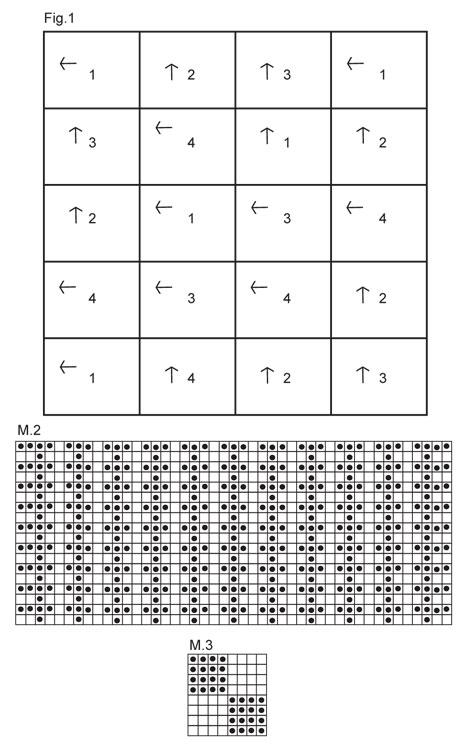
Vierkant 2 moet 1 cm korter dan vierkant 1.moet vierkant 1 dan in de breedte of lengte gemeten worden want vierkant 1 zit in de breedte in de deken verwerkt.
10.07.2025 - 19:29DROPS Design vastas:
Dag Tineke,
De pijltjes onderaan in het overzicht geven aan in welke richting de vierkanten zijn gebreid. De rand waar de pijl naar toe wijst is de afkantrand.
11.07.2025 - 20:48
![]() Haas kirjutas:
Haas kirjutas:
Sind bei den 4 Mustern die Hin- und Rückreihen gezeichnet oder nur die Hinreihen und die Rückreihen werden gestrickt wie sie erscheinen ?
13.03.2025 - 08:39DROPS Design vastas:
Liebe Frau Haas, die Diagramme zeigen alle Reihen, die Hin- sowie die Rückreihen, so lesen Sie bein den Hinreihen rechts nach links und bei den Rückreihen (siehe "auf der Rückseite" unter Zeichenerklärung) von links nach rechts. Viel Spaß beim Stricken!
13.03.2025 - 15:57
![]() Jacqueline Landais kirjutas:
Jacqueline Landais kirjutas:
Pourquoi les carrés 2,3,4 doivent mesurer 1 cm que le carré 1
23.02.2025 - 21:35DROPS Design vastas:
Bonjour Mme Landais, tous les carrés doivent avoir la même taille pour qu'ils puissent s'assembler entre eux, ainsi, ils commencent tous et se terminent tous par 38 mailles. Le nombre de mailles du point fantaisie va en revanche pouvoir varier en raison de chaque motif qui va plus ou moins resserrer en largeur. Bon tricot!
24.02.2025 - 09:26
![]() Anke Brion kirjutas:
Anke Brion kirjutas:
Das Muster 1 ist bei mir viel zu lang wenn man davon ausgeht das das Diagramm die Vorderseite zeigt. Was mache ich falsch?
16.02.2025 - 14:27DROPS Design vastas:
Liebe Frau Brion, die Diagramme zeigen alle Reihen (die Hin- sowie die Rückreihen) von der Vorderseite gesehen. Hinreihen lesen Sie rechts nach links und Rückreihen lesen Sie links nach rechts. Viel Spaß beim Stricken!
17.02.2025 - 09:46
![]() JANICE kirjutas:
JANICE kirjutas:
Can this blanket be knitted using half Brushed Alpaca and Silk and the other half of the squares knitted in Nepal yarn. If this is possible how much of each yarn type would I need to purchase? Thanks!
09.01.2025 - 22:18DROPS Design vastas:
Dear Janice, as both yarns belong to yarn group C you could also work some squares with Brushed Alpaca Silk (as long a you get same tension) to play with textures, but unfortunately we only have the total weight of yarn required for the whole blanket, not for each square; you might get help from your yarn store. Happy knitting!
10.01.2025 - 09:03
![]() Astrid Strijbos kirjutas:
Astrid Strijbos kirjutas:
Is dit ook een patroon voor BEGINNERS?
13.12.2024 - 17:05
![]() Ingrid kirjutas:
Ingrid kirjutas:
Bevor ich starte, würde ich gerne wissen, warum ich mit 38 M starte und dann z.B. bei Viereck 1 auf 50 Maschen zunehmen muss? Wird das nicht unten zu eng und überhaupt ein Quadrat?
27.11.2024 - 21:21DROPS Design vastas:
Liebe Ingrid, man braucht mehr Maschen für Zöpfe als für Krausrechts/Glattrechts für die selbe Breite, deshalb muss man nach den Krausrippen zunehmen. So hat das Quadrat die richtige Breite. Deshalb haben auch alle Quadrate nicht die selbe Maschenanzahl, da die verschiedene Muster nicht alle gleich sein. Viel Spaß beim Stricken!
28.11.2024 - 10:06
|
||||||||||||||||
Warm Hug#warmhugblanket |
||||||||||||||||
 |
 |
|||||||||||||||
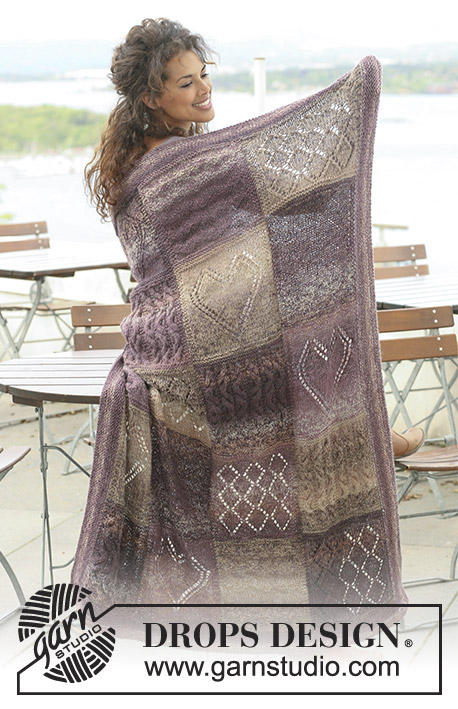
Kootud DROPS erinevate mustritega ruutudest tekk lõngast ”Nepal”.
DROPS 124-3 |
||||||||||||||||
|
MUSTER Vaata skeeme M.1 kuni M.4. Skeem on antud vaadatuna töö paremalt poolt. RIPSKUDE(edasi-tagasi kududes): koo kõik read parempidi. -------------------------------------------------------- TEKK Iga ruut kootakse edasi-tagasi. Koo igat ruutu 5 tk = kokku 20 ruutu. 1.RUUT Loo 38 silmust. Koo 1 rida parempidi töö PP-l ja 1 rida parempidi töö VP-l. Nüüd koo 1 rida töö PP-l parempidi, SAMAL AJAL kasvata võrdsete vahedega 12 silmust (ära kasvata kahel ääresilmusel mõlemal äärel) = 50 silmust. Koo 1 rida töö VP-l pahempidi ja jätka skeemi M.1 mustri järgi. Pärast ühte skeemi M.1 mustrikordust koo 1 rida töö PP-l parempidi, SAMAL AJAL kahanda võrdsete vahedega 12 silmust (ära kahanda mõlema ääre kahte silmust) = 38 silmust. Koo 1 rida parempidi töö VP-l ja 1 rida parempidi töö PP-l. Nüüd koo silmused töö VP-l maha parempidi. 2. RUUT Loo 38 silmust. Koo 1 rida töö PP-l parempidi ja 1 rida töö VP-l parempidi. Nüüd koo 1 rida töö PP-l parempidi, SAMAL AJAL kasvata võrdsete vahedega 7 silmust (ära kasvata kahel ääresilmusel mõlemal äärel) = 45 silmust. Koo töö VP-l 1 rida pahempidi ja jätka kudumist skeemi M.2 mustri järgi, kuni ruudu kõrgus on u 1 cm vähem, kui 1. RUUDU kõrgus. Koo 1 rida töö PP-l parempidi, SAMAL AJAL kahanda võrdsete vahedega 7 silmust (ära kahanda mõlema ääre kahte silmust) = 38 silmust. Koo 1 rida töö VP-l parempidi ja 1 rida töö PP-l parempidi. Nüüd koo silmused töö VP-l maha parempidi. 3.RUUT Loo 38 silmust. Koo 1 rida töö PP-l parempidi ja 1 rida töö VP-l parempidi, 1 rida töö PP-l parempidi ja 1 rida töö VP-l pahempidi. Nüüd jätka skeemi M.3 mustri järgi, 1 ääresilmus ripskoes mõlemal küljel, kuni ruudu kõrgus on 1 cm vähem kui 1. RUUDUL (säti nii, et muster oleks täpselt poole peal või lõppenud). Koo 1 rida töö PP-l parempidi ja 1 rida töö VP-l parempidi, 1 rida töö PP-l parempidi. Nüüd koo silmused töö VP-l maha parempidi. 4. RUUT Loo 38 silmust. Koo 1 rida töö PP-l parempidi ja 1 rida töö VP-l parempidi. Nüüd koo 1 rida töö PP-l parempidi, SAMAL AJAL kasvata võrdsete vahedega 18 silmust (ära kasvata kahel ääresilmusel mõlemal äärel) = 56 silmust. Koo 1 rida töö VP-l pahempidi ja koo skeemi M.4 mustri järgi, kuni ruudu kõrgus on 1 cm vähem, kui 1. RUUDUL (säti nii, et viimasest palmikukeerust oleks möödas 3 rida). Koo töö PP-l 1 rida parempidi, SAMAL AJAL kahanda võrdsete vahedega 18 silmust (ära kahanda mõlema ääre kahte silmust) = 38 silmust. Koo 1 rida töö VP-l parempidi ja 1 rida töö PP-l parempidi. Nüüd koo silmused töö VP-l maha parempidi. ÜHENDAMINE Õmble ruudud kokku nagu näidatud joonisel 1. Number näitab, millise ruuduga on tegemist ja nool näitab kudumise suunda. Õmble ruudud ääresilmuseid pidi kokku, nii väldid paksu õmblust. ÄÄR Kootakse ripskoes, st. kõik read parempidi. Korja üles silmused teki lühemal küljel. Korja üles 1 silmus iga silmuse kohta ja 1 silmus ruutude ühenduskohtadel. Koo edasi-tagasi ripskoes, kuni ääre kõrgus on u 4 cm. Koo silmused maha. Koo teisele lühemale küljele samasugune äär. Korja samal viisil üles silmused teki pikemal küljel, samuti korja üles silmused just kootud 8 cm äärtelt. Koo edasi-tagasi kuni ääre kõrgus on 4 cm. Koo silmused maha. Korda sama teki teise pikema küljega. |
||||||||||||||||
Skeemi seletused |
||||||||||||||||
|
||||||||||||||||
 |
||||||||||||||||
 |
||||||||||||||||
Kas oled teinud seda mustrit?Lisa oma piltidele viide #dropspattern #warmhugblanket või saada link projektile meie #dropsfan galeriisse. Vajad abi selle mustriga?Garnstudio.com kodulehel on 14 õppevideot, küsimuste/vastuste osa ja muudki. © 1982-2026 DROPS Design A/S. Kõik õigused kaitstud. See dokument, ning selle alajaotused on kaitsud autoriõigustega. Loe rohkem, mida meie mustritega võib teha, iga mustrilehe alt meie kodulehel. |
||||||||||||||||


Tegeledes üle 40 aasta kudumise ja heegeldamise disainidega, pakub DROPS Design ühte suurimat tasuta mustrite kollektsiooni internetis - tõlgituna 17 keelde. Tänaseks on meil 324 kataloogi ja 12239 mustrit - millest 9380 on tõlgitud Eesti keelde.
Me anname endast parima, et tuua teieni kõike mida kudumine ja heegeldamine võib pakkuda - inspiratsiooni, nõuandeid ning ka kvaliteetseid lõngu parima hinnaga! Soovid kasutada mustreid muukski, kui ainult oma tarbeks? Loe infot meie Copyright osas iga lehekülje all. Rõõmsat loomist!
Jäta kommentaar mustrile DROPS 124-3
Ootame kommentaare selle mustri kohta!
Kui soovid midagi küsida, siis kiiremaks vastuse saamiseks veendu, et valid õige kategooria alloleval formil. Vajaliku väljad *.