
Populaarsed kategooriad
Otsid lõnga?


Kommentaarid / Küsimused (59)
![]() Kayla kirjutas:
Kayla kirjutas:
It looks like there's a typo in the dimensions. Instead of 16 1/2", should it not say 46 1/2"?
04.04.2014 - 22:42DROPS Design vastas:
Dear Kayla, you are correct, this will be updated asap. Thank you. Happy knitting!
05.04.2014 - 10:08
![]() Melanie kirjutas:
Melanie kirjutas:
I'm starting row 34, a WS row, in M.1 and I am confused about moving the thread forward and back as directed. Since it's a WS row I should be purling and slipping every other stitch but the part about placing thread towards me, it's already there because I'm purling the stitch before and then place it away from me after I slip the stitch, but the next stitch is a purl so it needs to be in front again and nothing is accomplished? Also, should the stitches be slipped knitwise or purlwise?
05.09.2013 - 15:41DROPS Design vastas:
Dear Melanie, text to this last symbol has been edited so that you should slip 1 st as if to P. Thank you, happy knitting!
06.09.2013 - 09:45Nashwaahmed kirjutas:
Sorry again but the video u posted is for sleeves knitted back and forth in a needle, this pattern calls for sleeves knitted in the round so when i do what u shown in the video those bounded off stitches "in the round" kinda tighten the work while knitting and they are not smooth in that specific part of the jacket so kindly i need a way to make the knitting smoother at this area thanks :)
26.08.2013 - 19:46DROPS Design vastas:
Dear Mrs Nashwaahmed, sorry for bad video in last answer, the correct one has been added under the tab "videos" on the right side of the picture. To help you on the first rows, you may like to let sts for sleeves on another circular needle or dpn and let them then take all on the same after some more rows. Happy knitting!
28.08.2013 - 10:43
![]() Sara kirjutas:
Sara kirjutas:
This would be easier as a seamless top-down construction.
10.08.2013 - 05:32Nashwaahmed kirjutas:
I want to ask a question about the M.1 pattern there is a symbol for p2tog which is an X over two squares if i worked on the right side does this mean if i worked on the wrong side it will be K2tog?
08.08.2013 - 22:51DROPS Design vastas:
Dear Mrs Nashwaahmed, you are correct, from WS it should be K2 tog, diagram text has been edited, thank you. Happy knitting!
09.08.2013 - 11:04Nashwaahmed kirjutas:
In the body piece, when i cast off for the arm hole for the small size, 34 sts left for the left front part, and 36 sts were left for the right front part is that ok or there is something wrong and i didn't cast off right ?
04.08.2013 - 23:33DROPS Design vastas:
Dear Mrs Nashwaahmed, in the small size you should have before binding off for armhole : 39 sts for each front piece + 69 sts for back piece (=147 sts), and after binding off for armhole : 35 sts for each front piece + 61 sts for back piece = a total of 131 sts. Happy knitting !
05.08.2013 - 09:27
![]() Debbie Russell kirjutas:
Debbie Russell kirjutas:
In the key for pattern #113-17 there is a symbol that means "work 2 stitches in 1 stich." Is this a knit front and back? Or a make 1? And if not, can anyone tell me how you're supposed to work it? Thanks!
07.01.2013 - 21:26DROPS Design vastas:
Dear Mrs Russel, you are correct, it means to work st first in front loop then in back loop. Happy knitting!
08.01.2013 - 08:43
![]() Vicki kirjutas:
Vicki kirjutas:
In drops pattern 113-17 does 'wk 2sts in one' mean the same as increase 1st? Thanks
11.09.2012 - 01:48
![]() Nancy Beamer kirjutas:
Nancy Beamer kirjutas:
I have just completed the sleeves and I'm not sure how the bind off is done. I am doing the magic loop.
22.08.2012 - 23:46
![]() Ballardtoad kirjutas:
Ballardtoad kirjutas:
Oh! Thank you so much for the help and for responding so quickly!! Best wishes -
14.07.2012 - 17:36
|
||||||||||||||||||||||||||||||||||
Avery#averycardigan |
||||||||||||||||||||||||||||||||||
|
|
||||||||||||||||||||||||||||||||||
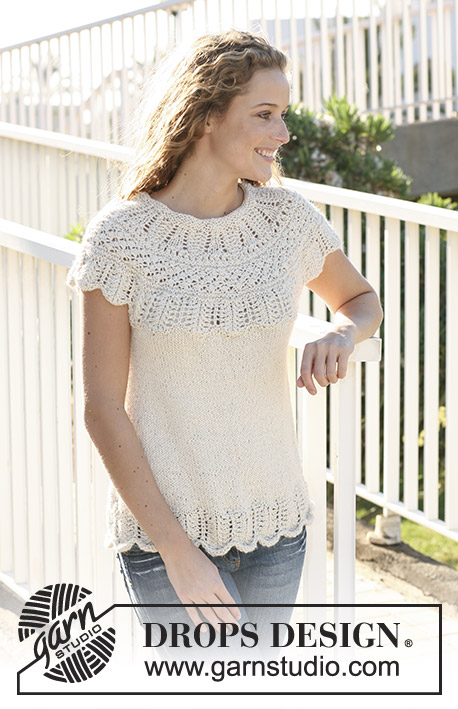
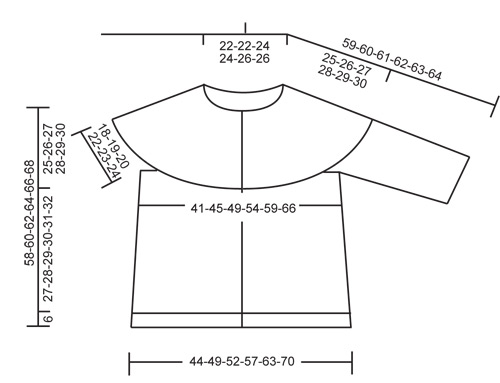
DROPSi mustrilise ümara passeosaga kampsun ”Silke Alpaca” lõngast. Suurus S - XXXL.
DROPS 113-17 |
||||||||||||||||||||||||||||||||||
|
PÄRLKUDE 1. RIDA: * 1 ph, 1 pr *, korda alates *-* ja lõpetuseks 1 ph. 2. RIDA: parempidised silmused koo pahempidi ning pahempidised silmused koo parempidi Korda 2. rida. RIPSKUDE (edasi-tagasi kududes): koo kõik read parempidi. RIPSKUDE (ringselt): koo 1 ring pr, 1 ring ph. MÕÕTMISE NIPP Lõnga raskuse tõttu tuleks kudum mõõtmiseks rippuma panna. NÖÖPAUGUD Tee nööpaugud parema esiosa esiliistule. 1 nööpauk = koo maha kolmas silmus serva poolt ja tagasireal koo selle asemele 1 uus silmus. Tee nööpaugud kui on kootud: SUURUS S: 7, 16, 26, 36, 46 ja 56 cm. SUURUS M: 7, 15, 23, 31, 40, 49, ja 58 cm. SUURUS L: 7, 15, 24, 33, 42, 51 ja 60 cm. SUURUS XL: 7, 16, 25, 34, 43, 52 ja 62 cm. SUURUS XXL: 7, 15, 23, 31, 39, 47, 55 ja 64 cm. SUURUS XXXL: 7, 15, 23, 31, 39, 47, 55 ja 64 cm. MUSTER Vaata skeemi M.1. Skeem on antud vaadatuna töö paremalt poolt. Jälgi skeemil oma suurust. --------------------------- KEHAOSA Koo ringvarrastel edasi-tagasi. Loo 4,5 mm ringvarrastele üles 159-173-187-203-223-245 s (k.a 5 esiliistu silmust mõlemal pool esiservas). Koo 1 rida pahempidi töö VP ja jätka PÄRLKOES – vaata ülevalt – koos 5 esiliistu silmusega mõlemal pool servas RIPSKOES – vaata ülevalt. Esiliist on läbivalt kootud ripskoes. Kui on kootud 6 cm pikkune, jätka parempidises koes, esiliistu silmuseid koo nagu enne. Paigalda 2 silmusemärkijat (SM), 42-45-49-53-58-63 s jääb kamspuni esiosa silmusteks (seljaosa = 75-83-89-97-107-119 s). Ära unusta NÖÖPAUKE parema hõlma esiliistul – vaata ülevalt. Kui on kootud 10 cm, kahanda 1 s mõlema SM-i mõlemalt poolt (= 4 s kahandatakse real) ja korda kahandusi iga 9-9,5-10-10,5-11-11,5 cm järel kokku 3 korda = 147-161-175-191-211-233 s. Kahanda kududes 2 s pr kokku. Jätka kuni on kootud 33-34-35-36-37-38 cm – VAATA MÕÕTMISE NIPPI! Nüüd koo mõlemal küljel maha 8 s (= 4 s mõlemal pool mõlemat SM-i) = 131-145-159-175-195-217 s jääb vardale. Aseta kudum kõrvale ja koo varrukad. VARRUKAD Koo ringselt sukavarrastel. Loo 4,5 mm sukavarrastele ülesse 49-51-51-55-57-59 s. Koo 6 ringi ripskoes – vaata ülevalt. Aseta SM ringi algusesse (= varruka siseküljel). Kui on kootud 10 cm, kasvata 1 s mõlemal pool SM-i ja korda kasvatusi iga 9-4,5-2-1,5-1,5-1 cm järgi kokku 2-3-5-6-7-8 korda = 53-57-61-67-71-75 s. Kui on kootud 23-23-22-22-21-21 cm (vähem suurematel suurustel, kuna laiem õlg), koo käeaugu jaoks maha 4 s mõlemal pool SM-i = 45-49-53-59-63-67 s. Aseta varrukas kõrvale ja koo teine varrukas. PASSE Aseta varrukad kehaosaga samale 4,5 mm ringvardale, sinna kus kudusid käeaugu jaoks maha = 221-243-265-293-321-351 s. Koo 1 rida pr töö PP (esiliist nagu enne), SAMAL AJAL kahanda ühtlaste vahedega 11-13-15-3-11-21 s = 210-230-250-290-310-330 s. Koo 1 rida pr töö VP ja jätka skeemiga M.1 töö PP (vaata skeemilt oma suurust), tehes 5 ripskoes silmust mõlemal pool servas. Pärast 1 vertikaalset mustrikordust M.1 on real 100-109-118-122-130-138 s. Koo 1 rida pr töö PP, SAMAL AJAL kahanda ühtlaste vahedega 8-17-20-24-24-32 s = 92-92-98-98-106-106 s. Koo 5 rida pr kõiki silmuseid ja koo lõdvalt maha. ÜHENDAMINE Õmble kokku avad käe all. Õmble ette nööbid. |
||||||||||||||||||||||||||||||||||
Skeemi seletused |
||||||||||||||||||||||||||||||||||
|
||||||||||||||||||||||||||||||||||
 |
||||||||||||||||||||||||||||||||||
 |
||||||||||||||||||||||||||||||||||
Kas oled teinud seda mustrit?Lisa oma piltidele viide #dropspattern #averycardigan või saada link projektile meie #dropsfan galeriisse. Vajad abi selle mustriga?Garnstudio.com kodulehel on 26 õppevideot, küsimuste/vastuste osa ja muudki. © 1982-2026 DROPS Design A/S. Kõik õigused kaitstud. See dokument, ning selle alajaotused on kaitsud autoriõigustega. Loe rohkem, mida meie mustritega võib teha, iga mustrilehe alt meie kodulehel. |
||||||||||||||||||||||||||||||||||


Tegeledes üle 40 aasta kudumise ja heegeldamise disainidega, pakub DROPS Design ühte suurimat tasuta mustrite kollektsiooni internetis - tõlgituna 17 keelde. Tänaseks on meil 325 kataloogi ja 12298 mustrit - millest 9442 on tõlgitud Eesti keelde.
Me anname endast parima, et tuua teieni kõike mida kudumine ja heegeldamine võib pakkuda - inspiratsiooni, nõuandeid ning ka kvaliteetseid lõngu parima hinnaga! Soovid kasutada mustreid muukski, kui ainult oma tarbeks? Loe infot meie Copyright osas iga lehekülje all. Rõõmsat loomist!
Jäta kommentaar mustrile DROPS 113-17
Ootame kommentaare selle mustri kohta!
Kui soovid midagi küsida, siis kiiremaks vastuse saamiseks veendu, et valid õige kategooria alloleval formil. Vajaliku väljad *.