
Populaarsed kategooriad
Otsid lõnga?


Kommentaarid / Küsimused (113)
![]() Annie kirjutas:
Annie kirjutas:
Make all incs on right side rows, inc by P 2 sts into 1 P stitch. Does that mean increasing by two purl stitches anywhere, where there is a purl stitch across the row? Thanks
12.01.2018 - 22:11DROPS Design vastas:
Dear Annie, it basically means that you should do the increases on rows you are knitting from the right side. Also, in the rows you do the increases, they are done in every purled segment. The pattern does not specify where, so you can do them anywhere in the purled segment, however I would suggest you do them alternately at the beginning and at the end of each segment with purls. Happy Knitting!
13.01.2018 - 10:01
![]() Andrea kirjutas:
Andrea kirjutas:
So once we get to the inc on RS, just to clarify, are we then going k2 p2/3/4/5 on RS to p2 k2/3/4/5 on WS?
15.11.2017 - 06:26DROPS Design vastas:
Dear Andrea, that's correct, the increase are done in the P-sections seen from RS, so that the number of P sts from RS and K sts from wS will inc (and then decrease on the 2nd half of headband). Happy knitting!
15.11.2017 - 08:55Katharina Splettstößer kirjutas:
Diese Anleitung ist nicht gut übersetzt! Anleitung: "Wenn die Arb. 8 cm mißt, alle 1 li. auf 2 li aufnehmen." Hä? Eine völlig unübliche Ausdrucksweise und irreführend. Gemeint ist wohl: Re M re str, aus jeder li M 2 M herausstricken (englisch pfb) 24 M. Wenn die Arb. 14 cm mißt, 1. M re, dann *aus der 1. li M 2 M herausstricken (pfb), 1 M li, 1 M re * 29 M Vielen Dank für die vielen kostenlosen Drops Anleitungen! Katharina
07.10.2017 - 22:09DROPS Design vastas:
Liebe Frau Splettstößer, danke für Ihre Rückmeldung, Anleitung wurde überarbeitet. Viel Spaß beim stricken!
09.10.2017 - 10:29
![]() Mollie kirjutas:
Mollie kirjutas:
My daughter wants a headband like this, but wants ties at the end (maybe cord?). Do you have a pattern like that, or any idea how I could make that?? Thanks!!
02.06.2017 - 14:15DROPS Design vastas:
Dear Mollie! Thank you for your comment, this pattern is a favorite of ours to. If I would want to make this with ties, insted of sewing up at the ends, I would just turn about 0,5 -1 cm the casting on and casting off edges toward the wrong side, sew the edge down with a few stitches. Then make a tie and bull it through the casing I just seved, and tie with the two and two tie-ends held together. I hope this helps. Happy knitting!
08.06.2017 - 07:00
![]() Iris kirjutas:
Iris kirjutas:
Hallo, leider komme ich mit den Abnahmen für die 2. Hälfte des Stirnbandes nicht zurecht. Muss ich linke oder rechte Maschen für die Abnahmen zusammenstricken? LG Iris
14.10.2016 - 08:25DROPS Design vastas:
Liebe Iris, Sie müssen die linke Maschen abenehmen, und dies wird spiegelverkehrt gemacht, dh: 1. Abnahme 3 cm nach der Markierung, 2. Abnahme 6 cm nach der Markierung, 3. Abnahme 10 cm nach der Markierung und letzte Abnahme 16 cm nach der Markierung = es bleiben 19 M (2 M re, 1 M li).
14.10.2016 - 09:30
![]() Christina kirjutas:
Christina kirjutas:
Ich habe ein Stirnband mit Brushed Alpaca Silk gemacht - wunderschön und federleicht! Leichter wäre es allerdings geworden, wäre in der Beschreibung angegeben, wie die Rückreihen zu stricken sind. So musste ich es mir aus den Kommentaren raussuchen. Aber das Ergebnis ist super.
18.07.2016 - 11:13
![]() Gail Thorpe kirjutas:
Gail Thorpe kirjutas:
Can you tell me which Alaska brown is featured in this pattern? Thank you!
02.05.2016 - 20:07DROPS Design vastas:
Dear Mrs Thorpe, in this pattern it's used Alaska colour n° 50, dark brown. Happy knitting!
02.05.2016 - 20:11France kirjutas:
Bonjour est ce possible d'avoir le patron du bandeau en Français. Merci
11.02.2016 - 05:53DROPS Design vastas:
Bonjour France, vous pouvez obtenir les explications en français de tous nos modèles en cliquant sur la flèche sous la photo, sélectionnez "français" - voir ici Bon tricot!
11.02.2016 - 10:49
![]() Christine Fabiani kirjutas:
Christine Fabiani kirjutas:
Hi! Thanks so much for this pattern. It will be perfect for Knots of Love's brain surgery patients. Knots of Love donates over 1,000 pieces EVERY WEEK to chemo patients and blankets to fragile new lives in incubators. Much love and many blessings, Christine M. Fabiani
17.01.2016 - 17:05Amanda kirjutas:
"bind off an sew"
21.12.2015 - 17:40
|
|
Saturn Rings |
|
|
|
|
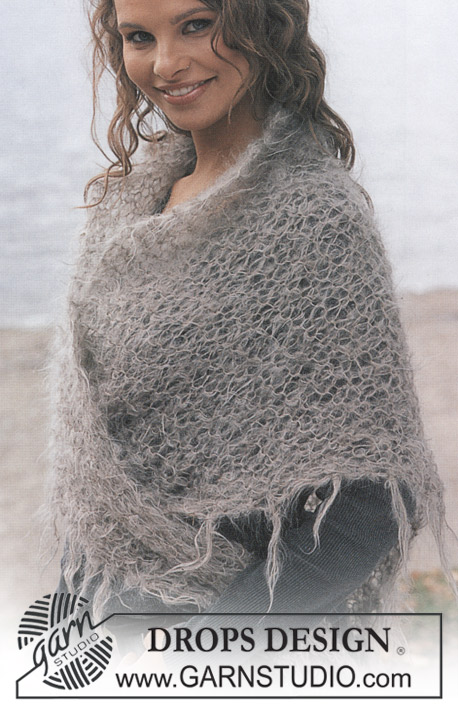
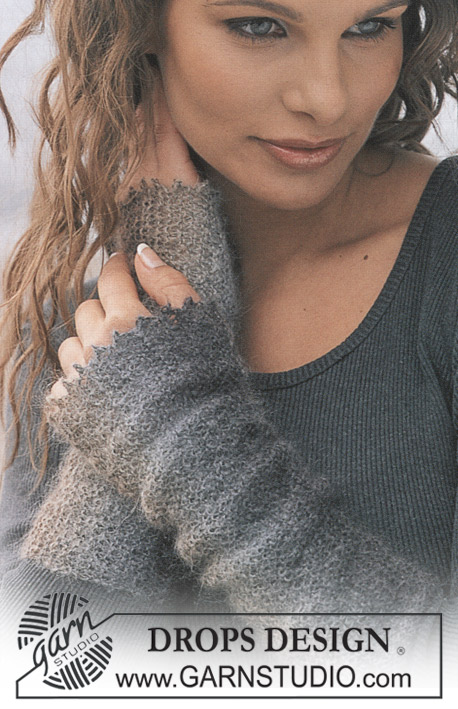
DROPSi peapael lõngast "Alaska" ja sall lõngast "Vienna"
DROPS 86-10 |
|
|
PEAPAEL Alusta tagant keskelt ja loo 19 s. Koo soonikut järgmiselt: 1. RIDA (PP): 1 ääresilmus ripskoes,* 2 pr, 1 ph*, korda kokku 5 korda ja lõpeta rida, tehes 2 pr ja 1 ripskoes ääresilmus. 2. RIDA(VP): 1 ääresilmus ripskoes,* 2 ph, 1 pr*, korda kokku 5 korda ja lõpeta rida, tehes 2 ph ja 1 ripskoes ääresilmus. Tee kõik kasvatused parempoolsetel ridadel. Kui töö on 8 cm, kasvata kõik 1 ph-d 2ph-ks = 24 s varrastel. Kui töö on 14 cm, kasvata kõik 2 ph-d 3 ph-ks = 29 s varrastel. Kui töö on 18 cm, kasvata kõik 3 ph-d 4ph-ks = varrastel on 34 s. Kui töö on 21 cm, kasvata kõik 4 ph-d 5ph-ks = 39 s varrastel. Kui töö on 24 cm, kinnita üks silmusemärkija (SM) keset laubaosa. Siit alates koo peegelpildis, mõõda SM-st. Tee kõik kahandused töö pahemal pool. Kui töö on 3 cm, kahanda kõik 5ph-d 4ph-ks = 34 s. Kui töö on 6 cm, kahanda kõik 4ph-d 3ph-ks = 29 s. Kui töö on 10 cm, kahanda kõik 3ph-d 2ph-ks = 24 s. Kui töö on 16 cm, kahanda kõik 2ph-d 1ph-ks = 19 s. Kui töö on 48 cm, silma (õmble) viimane rida ülesloomise ääre külge kinni. --------------------------------- SALL Loo 4 s ja koo ripskoes, kasvatades 1 s ühel küljel igal teisel real. Kasvata kududes ühte silmusesse 2 s. Jätka kasvatamist, kuni on 50 s, tükk on nüüd u. 102 cm. Nüüd kahanda samal küljel, kus kasvatasid – kahanda igal teisel real kududes äärmised 2 silmust 2 kokku. Jätka kahandamist kuni jääb 4 s, tükk on u. 205 cm, koo maha. NARMAD Kinnita narmad mõlemale küljele u 4-5 cm vahedega – alusta alumisest nurgast. Lõika 6 juppi 35 cm pikad, voldi pooleks, tõmba aas läbi silmuse ja tõmba otsad läbi. |
|
Kas oled teinud seda mustrit?Lisa oma piltidele viide #dropspattern või saada link projektile meie #dropsfan galeriisse. Vajad abi selle mustriga?Garnstudio.com kodulehel on 16 õppevideot, küsimuste/vastuste osa ja muudki. © 1982-2026 DROPS Design A/S. Kõik õigused kaitstud. See dokument, ning selle alajaotused on kaitsud autoriõigustega. Loe rohkem, mida meie mustritega võib teha, iga mustrilehe alt meie kodulehel. |


Tegeledes üle 40 aasta kudumise ja heegeldamise disainidega, pakub DROPS Design ühte suurimat tasuta mustrite kollektsiooni internetis - tõlgituna 17 keelde. Tänaseks on meil 324 kataloogi ja 12290 mustrit - millest 9431 on tõlgitud Eesti keelde.
Me anname endast parima, et tuua teieni kõike mida kudumine ja heegeldamine võib pakkuda - inspiratsiooni, nõuandeid ning ka kvaliteetseid lõngu parima hinnaga! Soovid kasutada mustreid muukski, kui ainult oma tarbeks? Loe infot meie Copyright osas iga lehekülje all. Rõõmsat loomist!
Jäta kommentaar mustrile DROPS 86-10
Ootame kommentaare selle mustri kohta!
Kui soovid midagi küsida, siis kiiremaks vastuse saamiseks veendu, et valid õige kategooria alloleval formil. Vajaliku väljad *.