
Categorias populares
Procura um fio?


Comentários / Perguntas (16)
![]() Catherine escreveu:
Catherine escreveu:
Il y a un problème dans vos explications du bonnet. Si je tricote comme écrit « « 14cm de revers », puis 15 cm droit avant 39 tours de diminution, le bonnet ne peut pas mesurer « in fine » 26 cm comme écrit dans la dernière ligne ni « 12cm de revers »!!!
28.09.2025 - 09:46DROPS Design respondeu:
Bonjour Catherine, les 39 tours de diminutions doivent mesurer environ 9 cm + 15 cm à partir du marqueur = 24 cm; si on ajoute les 14 cm du début = 38 cm, on retourne les 12 cm du bas = 26 cm avec le revers. Bon tricot!
30.09.2025 - 16:57
![]() Catherine escreveu:
Catherine escreveu:
Bonjour, quand on retourne l’ouvrage et que l’on doit tricoter dans le sens inverse comment éviter un trou dans le tricot? Merci
23.09.2025 - 10:41DROPS Design respondeu:
Bonjour Catherine, vous pouvez simplement serrer le fil pour éviter un trou ou bien utiliser une des techniques de rangs raccourcis - retrouvez ici, en vidéo comment nous procédons. Bon tricot!
24.09.2025 - 16:42
![]() Pam escreveu:
Pam escreveu:
Hello, I am not understanding why there is a wrong side in this pattern. If it’s knit in the round every row is the right side? I’ve read some of the other comments which seem to imply that the orientation is vertical so maybe I’m not understanding that. Is there a idea explaining this please? Thank you.
30.12.2024 - 19:13
![]() Lourdes escreveu:
Lourdes escreveu:
Hola Llegue a la parte de las disminuciones del gorro, cuando leo los tips de disminución resultan 2 puntos disminuidos en cada vuelta, pero en las indicaciones dice que se disminuyen 4. No lo comprendo. Que estoy haciendo mal? Gracias
28.05.2023 - 07:51DROPS Design respondeu:
Hola Lourdes, se disminuye 1 punto antes y 1 punto después de cada marcapuntos, tal y como se indica en el TIP-1 PARA LAS DISMINUCIONES. Como tienes dos marcapuntos en la vuelta, entonces trabajas las disminuciones 2 veces en la vuelta = 4 disminuciones en total.
28.05.2023 - 19:02
![]() Jacqui escreveu:
Jacqui escreveu:
I’m having a problem with decreasing on the hat. I decrease on the k/p row as instructed but in the next row, knitting the English/fisherman stitch into the row below (where that stitch is one of the reduced ones), causes me to have a dropped/loose stitch. Can you please explain what I need to do to avoid this? Thanks!
26.02.2023 - 15:51DROPS Design respondeu:
Dear Jacqui, on next round make sure you are inserting the needle into all stitches from previous round to avoid loosing one of the decreased stitches. Happy knitting!
27.02.2023 - 10:54
![]() Elin escreveu:
Elin escreveu:
Kan ni skriva hur man ska sticka varven från varv 2. Är det så här varv2 1 rät, 1 rät upprepa Varv 3 1 rät 1 avig upprepa Varv4 1 patent 1 rät upprepa
21.05.2022 - 19:18DROPS Design respondeu:
Hei Elin. Tenker du på luen eller pulsvantene? Luen strikkes rundt og pulsvantene strikkes frem og tilbake, og når du strikker etter diagram, husk å lese diagramikon forklaringen til hvordan maskene skal strikkes (patentmasken strikkes ulikt på luen og pulsvantene). Når det strikkes RÄTSTICKNING er det også forskjellige forklaringer på om det strikkes luen eller pulsvarmere. Forklaringen står øverst i oppskriften. mvh DROPS Design
23.05.2022 - 08:59
![]() Ellie escreveu:
Ellie escreveu:
What does it mean from the first Garter Stitch? Sorry I still don't get it. A chart is read from right to left and left to right on the next row (purl row). Why your pattern is written vertically? Instead of repeating the same exact thing it is written in the pattern, can you explicitly express, like Knit All, Knit 1, Purl all row in the third, etc. Can't understand. I've read some patterns and your pattern is impossible to understand, especially this one.
20.01.2022 - 18:57DROPS Design respondeu:
Dear Ellie, correct, you have to repeat the stitches between * and * all around the round, and repeat these rounds as shown in the chart - maybe this lesson could help you better?
21.01.2022 - 09:07
![]() Ellie Wakamatsu escreveu:
Ellie Wakamatsu escreveu:
Hat question: "When A.1 has been worked vertically, repeat the last 2 rounds in A.1.", what does it mean? Is it that I almost measure 14 cm for the rim portion before flipping it to inside out, the last 2 rounds in A1, so according to the pattern, K, K1B four times, then K2, and I keep doing that an entire row, then do the purl version. I do that 2 times (Garter Stitch, meaning 2 rows of knit and purl of a ridge?) for 4 rows (knit, purl x 2 Garter stitch/ridge rows)?
20.01.2022 - 13:53DROPS Design respondeu:
Dear Mrs Wakamatsu, this means you will repeat the round 3 and 4 described in the previous answer; and yes, work until piece measures 14 cm before flipping inside out and work : 3 sts in garter st (alternately K or P in height) and A.1 as previously. Hope this will help. Hpapy knitting!
20.01.2022 - 17:16
![]() Ellie escreveu:
Ellie escreveu:
Hi, can you please confirm if I understand this part of this hat pattern correctly? * A.1 (= 1 stitch), 1 stitch in GARTER STITCH - read explanation above * This above line means, A1, first so I do Knit, Knit one below four times, knit 2. Is this correct? What does it mean 1 stitch in Garter stitch? You mean knit in pattern (K, K1B x 4, K2), then on the next is purl row, since it is Garter stitch, so the pattern would look (P, P1B x4, P2)?
20.01.2022 - 13:44DROPS Design respondeu:
Dear Ellie, on first round repeat: *A.1 (= K1), 1 st in garter st (= K1)*; on 2nd round, repeat *A.1 (= K1), 1 st in garter st (= P1)*, on 3rd round repeat *A.1 (= Knit 1 below), 1 st in garter st (= K1)*, on 4rd round repeat *A.1 (= K1), 1 st in garter st (= P1)*. Repeat then round 3 and 4. Happy knitting!
20.01.2022 - 17:13
![]() Ruta escreveu:
Ruta escreveu:
Już widzę, że robiłam źle robiąc na około, proszę skasować mój poprzedni komentarz
25.12.2021 - 21:35
|
||||||||||
Chill of Dawn#chillofdawnset |
||||||||||
 |
 |
|||||||||
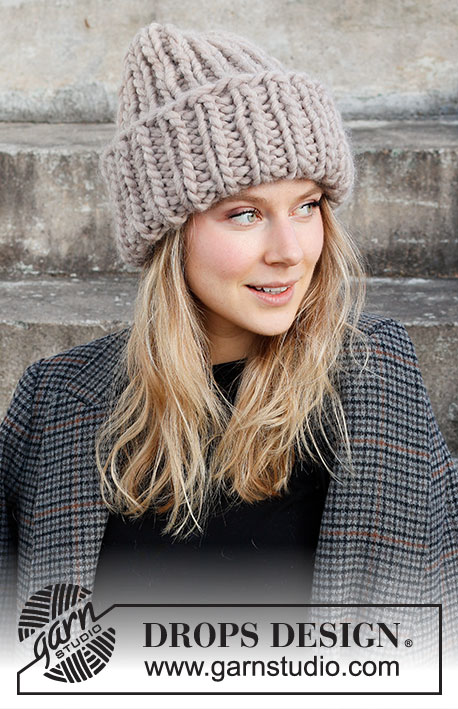
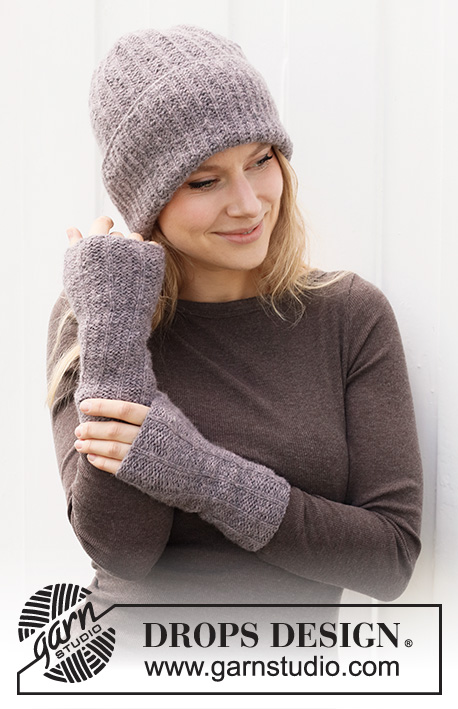
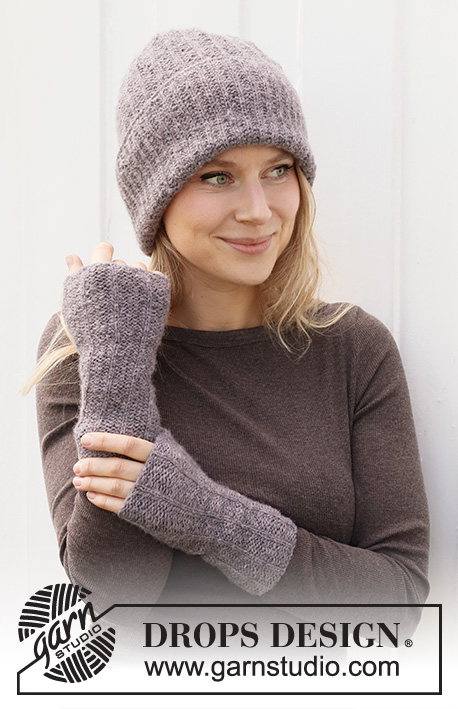
Gorro hipster / beanie e punhos tricotados em DROPS Sky, em ponto jarreteira e malhas em canelado inglês.
DROPS 214-15 |
||||||||||
|
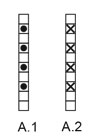
------------------------------------------------------- TÉCNICAS USADAS: ------------------------------------------------------- PONTO JARRETEIRA (em redondo): 1 barra jarreteira = 2 carreiras, ou seja tricotar 1 volta meia e 1 volta liga. PONTO JARRETEIRA (em idas e voltas): Tricotar todas as carreiras em meia. 1 barra jarreteira = tricotar 2 carreiras meia. PONTO FANTASIA: Gorro: Ver diagrama A.1. Punhos: Ver diagrama A.2. Os diagramas mostram todas as carreiras do motivo, vistas pelo direito. DIMINUIÇÕES-1 (gorro): Diminuir nas carreiras que se tricotam como a última carreira de A.1 da seguinte maneira: Diminuir da seguinte maneira depois do marcador: Tricotar a malha com o marcador e as 7 malhas seguintes como antes, deslizar 1 malha em meia, 1 malha meia, passar a malha deslizada por cima da malha tricotada (= diminui-se 1 malha). Diminuir da seguinte maneira antes do marcador: Tricotar até restarem 9 malhas antes do marcador, tricotar as 2 malhas seguintes juntamente em meia (= diminui-se 1 malha) DIMINUIÇÕES-2 (punhos): Para diminuir 1 malha, tricotar 2 malhas juntamente em meia pelo direito. AUMENTOS (punhos): Para aumentar 1 malha, fazer 1 laçada. Na carreira seguinte, tricotar a laçada torcida em meia para evitar buracos. DICA PARA ARREMATAR: Para evitar que as malhas arrematadas fiquem demasiado apertadas, pode-se arrematar com uma agulha um tamanho acima. Se as malhas arrematadas continuarem apertadas, fazer 1 laçada depois de cerca de cada 4.ª malha e arrematar as laçadas como malhas normais. ------------------------------------------------------- A PEÇA COMEÇA AQUI: ------------------------------------------------------- GORRO - SUMÁRIO DA PEÇA: Tricota-se em redondo com a pequena agulha circular; continuar com as agulhas de pontas duplas quando necessário. GORRO: Montar 104-112 malhas na agulha circular 3,5 mm em Sky e tricotar 1 volta meia. Tricotar então da seguinte maneira: * A.1 (= 1 malha), 1 malha em ponto jarreteira - ver acima*, repetir de * a * em toda a carreira. MANTER A MESMA TENSÃO DA INDICADA PARA A AMOSTRA! Quando A.1 estiver terminado, repetir as 2 últimas carreiras de A.1. Quando a peça medir 14 cm, virar a peça para que o avesso fique, então, pelo direito (faz-se isto para que a bainha fique pelo direito quando for dobrada). Colocar 1 marcador aqui. MEDIR A PARTIR DAQUI! Tricotar então na direcção oposta da seguinte maneira: *3 malhas em ponto jarreteira, A.1 (= 1 malha) *, repetir de * a * em toda a carreira. Quando a peça medir 14-15 cm a partir do marcador, colocar 2 novos marcadores da seguinte maneira: o 1.º marcador na primeira malha em canelado inglês da carreira, saltar as 51-55 malhas seguintes e colocar o marcador seguinte na malha seguinte (= 51-55 malhas entre as malhas com um marcador). Na carreira seguinte, começar a diminuir - ver DIMINUIÇÕES-1 (= diminui-se 4 malhas). Diminuir desta maneira 16-18 vezes a cada 2 carreiras = 40-40 malhas. Tricotar então em ponto meia e diminuir da seguinte maneira: CARREIRA 1: *2 malhas meia, 2 malhas tricotadas juntamente em meia (= diminui-se 1 malha) *, repetir de * a * em toda a carreira (= diminui-se 10 malhas) = 30-30 malhas. CARREIRA 2: Tricotar 1 volta meia. CARREIRA 3: Tricotar todas as malhas juntamente em meia, 2 a 2 = 15-15 malhas. Cortar o fio e passá-lo pelas restantes malhas, franzir e costurar. O gorro mede cerca de 24-26 cm, incluindo os 12 cm de virola. ------------------------------------------------------- PUNHOS - SUMÁRIO DA PEÇA: Tricotam-se em idas e voltas na agulha circular, com uma costura. PUNHOS: Montar 43-47 malhas na agulha circular 3,5 mm em Sky. Tricotar da seguinte maneira (1.ª carreira = pelo direito): 11-13 malhas em ponto jarreteira – ver acima -, * A.2 (= 1 malha), 4 malhas em ponto jarreteira *, repetir de * a * 4 vezes ao todo, A.2 por cima da malha seguinte, 11-13 malhas em ponto jarreteira. Continuar em idas e voltas desta maneira. MANTER A MESMA TENSÃO DA INDICADA PARA A AMOSTRA! Quando A.2 tiver sido tricotado em altura, repetir as 2 últimas carreiras do diagrama até ao fim, e quando a peça medir 4 cm, diminuir 2 malhas da seguinte maneira: tricotar 3 malhas em ponto jarreteira como antes, diminuir 1 malha – ver DIMINUIÇÕES-2, tricotar como antes até restarem 5 malhas, diminuir 1 malha, tricotar 34 malhas em ponto jarreteira como antes. Repetir estas diminuições quando a peça medir 6 cm = 39-43 malhas. Quando a peça medir 8 cm, diminuir 1 malha em ponto jarreteira em cada secção de 4 malhas em ponto jarreteira = 35-39 malhas. Tricotar até a peça medir 14 cm. Aumentar, então, 2 malhas da seguinte maneira: tricotar 3 malhas em ponto jarreteira como antes, aumentar 1 malha – ver AUMENTOS -, tricotar como antes até restarem 3 malhas, aumentar 1 malha e terminar com 3 malhas em ponto jarreteira como antes. Repetir estes aumentos quando a peça medir 18 cm = 39-43 malhas. Continuar desta maneira até a peça medir 22 cm. Arrematar em meia pelo avesso - Ver DICA PARA ARREMATAR. Cortar o fio mantendo comprimento suficiente para a montagem. Costurar nas malhas ourela em ponto jarreteira. Tricotar o outro punho da mesma maneira. |
||||||||||
Explicações do diagrama |
||||||||||
|
||||||||||
 |
||||||||||
Terminou este projecto?Então, identifique as suas fotos com as tags #dropspattern #chillofdawnset ou mostre-as na galeria #dropsfan. Precisa de ajuda para este modelo?Encontrará 19 turotiais em vídeo, uma rubrica Comentários/Perguntas e muito mais ao visitar a página do modelo em www.garnstudio.com © 1982-2026 DROPS Design A/S. Todos os direitos reservados. Este documento, incluuindo as suas su-secções, tem copyrights. Saia mais o que pode fazer com os nossos modelos no fim de cada uma das páginas do nosso site. |
||||||||||


Com mais de 40 anos no design de modelos de tricô e de croché, a DROPS Design oferece uma das mais vastas colecções demodelos gratuitos na Internet - traduzidos em 17 línguas. Neste dia de hoje, temos 324 catálogos e 12290 modelos - dos quais 12271 estão traduzidos em português.
Trabalhamos com muito empenho para lhe proporcionar o melhor que o tricô e o croché têm para oferecer, para lhe fornecer inspiração e conselhos bem como fios da mais elevada qualidade a preços incríveis! Gostaria de usar os nossos modelos para outros fins que não uso pessoal? Pode ler o que lhe é permitido fazer no Copyright texto que se encontra na parte de baixo de todos os nossos modelos. Bom tricô! Bom croché!
Deixe um comentário acerca do modelo DROPS 214-15
Gostaríamos muito de saber o que tem a dizer-nos acerca deste modelo!
Se deixar uma pergunta acerca do modelo, certifique-se de que escolhe a categoria adequada no formulário abaixo para acelerar o processo relativo à resposta. Os campos obrigatórios estão assinalados com um *.