
Categorias populares
Procura um fio?


Comentários / Perguntas (24)
![]() Conni Jørgensen escreveu:
Conni Jørgensen escreveu:
Hvorfor står der i opskriften “ der er rettelser- klink her” - men linket virker ikke.
02.08.2024 - 22:43DROPS Design respondeu:
Hej Conni, Jo når du klikker på linket ser du at vi har skrevet at det er 1 kantmaske retstrik i hver side :)
06.08.2024 - 14:01
![]() Ruth escreveu:
Ruth escreveu:
Hallo, wenn ich den Rand kraus rechts stricke, rollt er sich ein. Was kann ich gegen das Einrollen tun? // Hi there, I am doing a garter stitch at the end of each row. The cardigan now rolls itself inwards at the end of each row. What can I do about it? Thanks, best, Ruth
09.12.2023 - 09:41DROPS Design respondeu:
Liebe Ruth, danach werden Sie die Maschen für die Blende auffsassen, dann wird der Rand nicht mehr rollen. Viel Spaß beim stricken!
11.12.2023 - 10:02
![]() Jane Milton escreveu:
Jane Milton escreveu:
I'm knitting thin in the smallest size. After the yoke A1 pattern, and I have begun the body, the instructions say to knit 3cm then do the increases. Then it says to increase every 7cm three times. in my counting, this means that there would be 3+21 cm, a total of 24 cms. However, the instructions say to continue after the last increase until piece measures 19cm. I'm confused as that is a 5cm difference! Can you please clarify the instructions for me?
17.02.2023 - 23:08DROPS Design respondeu:
Dear Jane, you increase for the first time when the piece measures 3 cm and every 7 cm 2 more times (so you have increased 3 times in total; 138 + 12 (= 4 increases 3 times) = 150 sts. So, after the increases, the piece will measure 3+7+7= 17 cm. That is, you will have to work 2 cm more after the last increase. Happy knitting!
19.02.2023 - 22:22
![]() Poonam Kirpal escreveu:
Poonam Kirpal escreveu:
How much should be the length of the bodice after A1 pattern for adults say Height 5 ft 3 inches
06.06.2022 - 12:23DROPS Design respondeu:
Dear Poonam, we don't make custom patterns. You can check a similar pattern for adults here: https://www.garnstudio.com/pattern.php?id=7107&cid=19. Happy knitting!
06.06.2022 - 13:33
![]() Marie escreveu:
Marie escreveu:
Placer 1 marqueur de chaque côté, au milieu des 6 nouvelles m montées. Continuer en jersey avec 1 m point mousse de chaque côté. À 3 cm, augmenter 1 m de chaque côté des marqueurs (= 4 augmentations). je ne comprends pas pour les marqueurs et augm, doit on poser un marq, 3mailles,un marqueur,3 mailles ,1marqueurs,les augmentations se font au mileu des 6 m? Merci pour votre aide
26.01.2022 - 17:07DROPS Design respondeu:
Bonjour Marie, cette leçon montre comment tricoter un pull de haut en bas; et notamment à partir de la photo 17 comment reprendre les manches, monter les mailles sous la manche (18A) et diminuer (21, 22) au milieu sous la manche (cf cette vidéo). Bon tricot!
26.01.2022 - 17:19
![]() Marianne Plaskett escreveu:
Marianne Plaskett escreveu:
I can see the rows where I have to increase the number of stitches but there is no instruction on how many stitches need to be increased. I have read the pattern several times and cannot find the details about increasing.
19.02.2021 - 13:20DROPS Design respondeu:
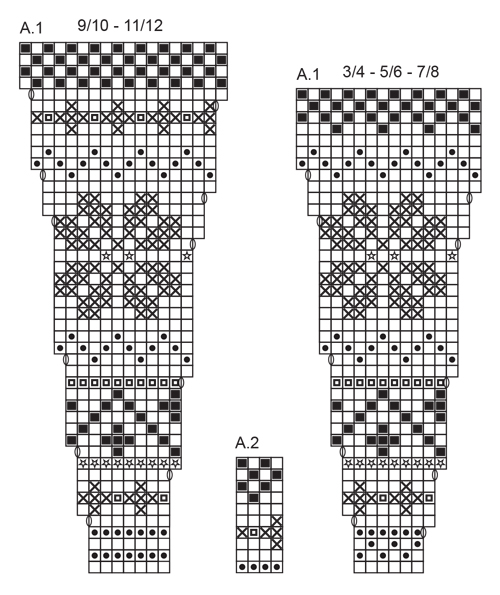
Dear Mrs Plasket, when working diagram A.1, the increases are drawn in the diagram (with the last symbole = a yarn over made either at the beg or at the end of a repeat). This means you just have to work the diagram appropriate to the size increasing as the diagram is showing. Hope this helps. Happy knitting!
19.02.2021 - 15:09
![]() Berit Forsberg Tripkou escreveu:
Berit Forsberg Tripkou escreveu:
I can not print the whole diagram for DROPS Children 27-5. It is just coming the first 11 rows, That is making the whole knitting a little bit complex. It is not easy to read the pattern if I take a photo from the picture at the computer,,, So can you tell me what is wrong. I have tried 2 times to print the whole diagram...
31.10.2020 - 20:05DROPS Design respondeu:
Dear Mrs Forsberg Tripkou, we could print this pattern succesfully (in Swedisch and in English) - remember to check that some previous settings weren't savec and do not allow you to print all pages. Happy knitting!
02.11.2020 - 08:07
![]() Mary escreveu:
Mary escreveu:
I’m on row 12 in A1 size 7/8 the pattern does not work for me if I finish the previous row with the last two stitches being the first stitch in diagram and a garter stitch. Any tips as to what I’m doing wrong?
12.02.2020 - 12:54DROPS Design respondeu:
Dear Mary, do you have 10 sts in each A.1 (= 1 edge st, 15 x 10 sts (A.1), 1st st in A.1, 1 edge st = 153 sts on needle)? 12th row should be a WS row, this means you work: 1 edge st, 1st st in A.1 (= P with off-white), then repeat A.1 (= P1 with beige, P2 with off white, P3 with beige, P2 with off white, P1 with beige, P1 with off white) , 1 edge st in garter st. Hope this can help you. Happy knitting!
12.02.2020 - 14:38
![]() Götze Sigrid escreveu:
Götze Sigrid escreveu:
Könnte ich die Wolle bei Ihnen kaufen für diesen Pulli in Gr. 104. Gleiche Farbe wie angegeben.
13.11.2019 - 12:58DROPS Design respondeu:
Liebe Frau Götze, hier finden Sie einen DROPS Laden in Deutschlang, wo Sie die Wolle finden können. Viel Spaß beim stricken!
13.11.2019 - 13:59
![]() Evelyn escreveu:
Evelyn escreveu:
I am trying to knit this pattern, however, I don’t understand the first parts of starting the chart. IE; knit 1 edge stitch, A1 chart.....(finish with a knit first stitch from chart and 1 edge stitch. I have tried and the second row doesn’t work.
06.04.2019 - 05:40DROPS Design respondeu:
Dear Evelyn, for the jacket from RS work: 1 edge st in garter stitch, then repeat A.1 (reading diagram from the bottom corner on the right side towards the left) until 2 stitches remain, work now the first stich in A.1 (the stitch on the right side) and finish with 1 edge stitch. From WS work the first stitch in A.1 (the one on the right side), then repeat A.1 reading from the left towards the right. Learn more about reading diagrams here. Happy knitting!
08.04.2019 - 09:13
|
||||||||||||||||||||||
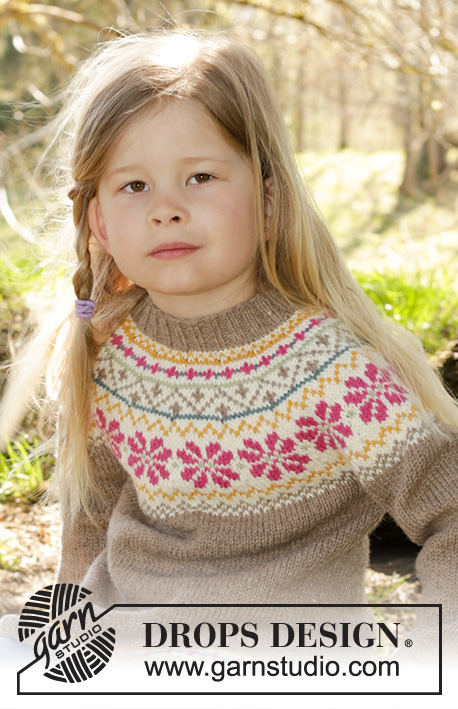
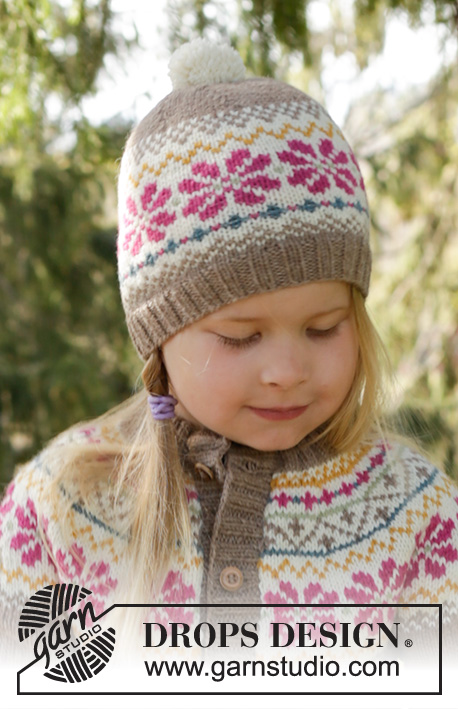
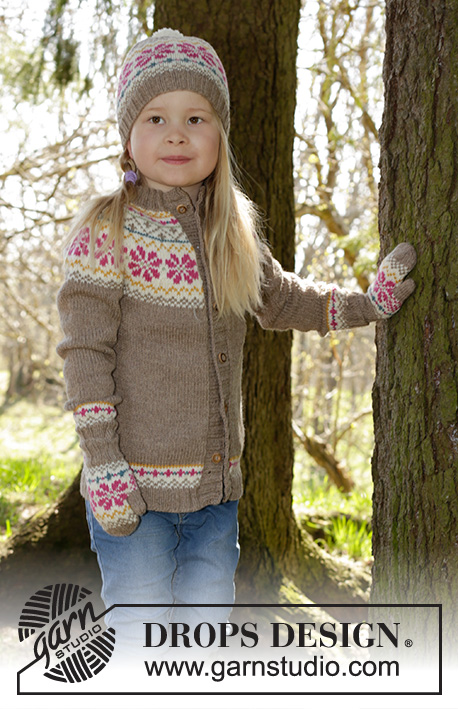
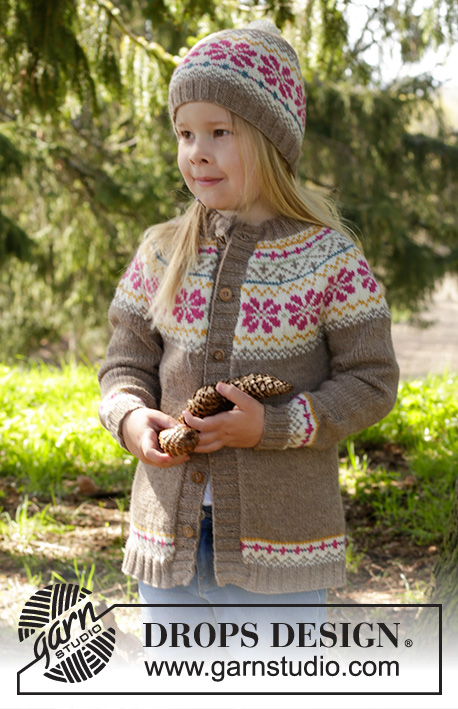
Prairie Fairy#prairiefairycardigan |
||||||||||||||||||||||
 |
 |
|||||||||||||||||||||
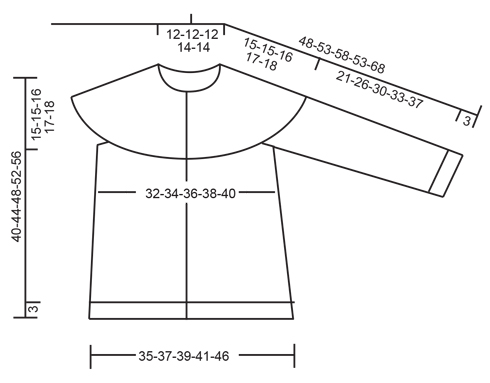
Casaco tricotado com encaixe arredondado e motivo nórdico em DROPS Lima. Tamanhos 3 - 12 anos.
DROPS Children 27-5 |
||||||||||||||||||||||
|
---------------------------------------------------------- NOTA: Existem termos diferentes de tricô e croché em português de Portugal e do Brasil. Tricô: Malha = Ponto Canelado = Barra Ponto Jarreteira = Cordões de Tricô Ponto Liga = Ponto Tricô Croché: mpa - meio ponto alto pa - ponto alto pad - ponto alto duplo pat - ponto alto triplo pb - ponto baixo pbx - ponto baixíssimo pc - ponto corrente ---------------------------------------------------------- PONTO JARRETEIRA (em idas e voltas): Tricotar todas as carreiras em meia. 1 barra jarreteira = 2 carreiras meia. JACQUARD: Ver diagramas A.1 e A.2. Os diagramas tricotam-se em ponto meia. Ver diagrama indicado para cada tamanho. DICA TRICÔ: Para evitar que a tensão seja demasiado apertado quando se tricota o jacquard, é importante não puxar demasiado os fios pelo avesso. Usar agulhas mais grossas para o jacquard se ficar algo apertado. -------------------------------------------------------- CASACO: Tricota-se de cima para baixo, em idas e voltas na agulha circular. ENCAIXE: Montar 84-88-92-96-100 ms/pts com a pequena agulha circular 3 mm em bege. Tricotar 1 m/p em PONTO JARRETEIRA - ver acima, 2 ms/pts meia, *2 ms/pts liga/tricô, 2 ms/pts meia*, repetir de * a * e terminar com 1 m/p em ponto jarreteira. Tricotar em canelado/barra desta maneira durante 3-3-4-4-5 cm (= gola). Continuar com a pequena agulha circular 4 mm e tricotar 1 carreira meia e, ao mesmo tempo, ajustar o número de ms/pts para 81-87-93-101-108. Colocar 1 marcador depois de 40-43-46-50-54 ms/pts = meio da parte de trás. Tricotar então uma elevação para o decote das costas, em ponto meia, da seguinte maneira: tricotar 8 ms/pts meia depois do marcador, virar, puxar o fio e tricotar 16 ms/pts liga/tricô na carreira de volta, virar, puxar o fio e tricotar 24 ms/pts meia, virar, continuar tricotando 8 ms/pts a mais de cada vez antes de virar até 24-24-32-32-40 ms/pts terem sido tricotadas de cada lado do marcador a meio da parte de trás, virar e tricotar as restantes ms/pts em meia. Tricotar 1 carreira liga/tricô. Tricotar então da seguinte maneira: 1 m/p ourela em ponto jarreteira, A.1 (= 13-14-15-14-15 vezes em largura) terminar com a 1.ª m/p do diagrama e 1 m/p ourela em ponto jarreteira - ver diagrama indicado para cada tamanho. VER DICA TRICÔ! NÃO ESQUECER DE MANTER A MESMA TENSÃO DA INDICADA PARA A AMOSTRA! Mudar para a agulha circular mais comprida quando achar necessário. Depois de A.1, temos 211-227-243-255-273 ms/pts. Tricotar 0-1-2-0-1 cm em bege. A peça mede cerca de 15-16-17-17-18 cm a meio da frente (medir sem o canelado/barra da gola). Continuar em ponto meia em bege. Tricotar primeiro 1 carreira e, AO MESMO TEMPO, distribuir 3-3-3-11-9 aumentos = 214-230-246-266-282 ms/pts. Tricotar a carreira seguinte da seguinte maneira: Tricotar 32-34-36-38-40 ms/pts (= frente), colocar as 44-48-52-58-62 ms/pts seguintes num alfinete de ms/pts para a manga (sem tricotá-las), montar 6 ms/pts, tricotar 62-66-70-74-78 ms/pts (= costas), colocar as 44-48-52-58-62 ms/pts seguintes num alfinete de ms/pts para a manga (sem tricotá-las), montar 6 ms/pts, tricotar 32-34-36-38-40 ms/pts (= frente). COSTAS & FRENTES: = 138-146-154-162-170 ms/pts. PASSAR A MEDIR A PARTIR DAQUI! Colocar 1 marcador de cada lado da peça, a meio das 6 novas ms/pts montadas. Continuar em ponto meia com 1 m/p ourela em ponto jarreteira de cada lado da peça. A 3 cm, aumentar 1 m/p de cada lado dos marcadores (= 4 aumentos). Aumentar 3 vezes ao todo a cada 7-9-10-12-13 cm = 150-158-166-174-182 ms/pts. Continuar até a peça medir 19-23-26-29-32 cm. Tricotar então A.2 com 1 m/p ourela de cada lado da peça. Continuar então com a agulha circular 3 mm e tricotar 1 carreira meia pelo direito e, AO MESMO TEMPO, distribuir 14 aumentos = 164-172-180-188-196 ms/pts. Tricotar então 1 carreira pelo avesso e, depois, continuar da seguinte maneira: 1 m/p ponto jarreteira, 2 ms/pts meia, *2 ms/pts liga/tricô, 2 ms/pts meia *, repetir de * a * e terminar com 1 m/p ponto jarreteira. Tricotar em canelado/barra durante 3 cm. Arrematar as ms/pts como elas se apresentam. MANGAS: Retomar as ms/pts de um dos alfinetes de ms/pts para as agulhas de pontas duplas 4 mm, e montar 6 ms/pts a meio sob a manga (colocar 1 marcador a meio destas ms/pts) = 50-54-58-64-68 ms/pts. PASSAR A MEDIR A PARTIR DAQUI! Tricotar em redondo, em ponto meia em bege. Quando a manga medir 2 cm, diminuir 1 m/p de cada lado do marcador. Repetir estas diminuições 5-7-7-10-10 vezes ao todo a cada 4½-3½-4-3-3½ cm = 40-40-44-44-48 ms/pts. Quando a manga medir 18-23-27-30-34 cm, tricotar o diagrama A.2. Continuar então com as agulhas de pontas duplas 3 mm e tricotar em canelado/barra 2 ms/pts meia/2 ms/pts liga/tricô durante 3 cm. Arrematar as ms/pts como elas se apresentam. Tricotar da mesma maneira por cima das ms/pts do outro alfinete de ms/pts. ORLA FRENTES: Com a agulha circular 3 mm em bege, levantar 84 a 118 ms/pts a 1 m/p do rebordo, ao longo do lado direito da frente direita. Tricotar 1 carreira liga/tricô pelo avesso e, AO MESMO TEMPO, distribuir aumentos para ajustar para 102-110-118-130-142 ms/pts. Tricotar a carreira seguinte da seguinte maneira pelo direito: 2 ms/pts em ponto jarreteira, *2 ms/pts meia, 2 ms/pts liga/tricô*, repetir de * a * até restarem 4 ms/pts e terminar com 2 ms/pts meia e 2 ms/pts em ponto jarreteira. Continuar em canelado/barra desta maneira. AO MESMO TEMPO, depois de 1 cm, fazer 6-6-7-7-7 casas a intervalos regulares. 1 casa = tricotar 2 ms/pts juntamente e fazer 1 laçada (arrematar 2 ms/pts liga/tricô, visto pelo direito, dará um resultado mais bonito). A casa de cima deve ficar a cerca de 1 cm do rebordo e a de baixo a cerca de 8-8-10-10-10 cm do rebordo. Quando a orla medir 3 cm, arrematar as ms/pts como elas se apresentam. Repetir ao longo da frente esquerda mas não fazer casas. MONTAGEM: Fechar a abertura sob as mangas com uma costura. Costurar os botões na orla da frente esquerda. |
||||||||||||||||||||||
Explicações do diagrama |
||||||||||||||||||||||
|
||||||||||||||||||||||
 |
||||||||||||||||||||||
 |
||||||||||||||||||||||
Terminou este projecto?Então, identifique as suas fotos com as tags #dropspattern #prairiefairycardigan ou mostre-as na galeria #dropsfan. Precisa de ajuda para este modelo?Encontrará 32 turotiais em vídeo, uma rubrica Comentários/Perguntas e muito mais ao visitar a página do modelo em www.garnstudio.com © 1982-2026 DROPS Design A/S. Todos os direitos reservados. Este documento, incluuindo as suas su-secções, tem copyrights. Saia mais o que pode fazer com os nossos modelos no fim de cada uma das páginas do nosso site. |
||||||||||||||||||||||


Com mais de 40 anos no design de modelos de tricô e de croché, a DROPS Design oferece uma das mais vastas colecções demodelos gratuitos na Internet - traduzidos em 17 línguas. Neste dia de hoje, temos 324 catálogos e 12290 modelos - dos quais 12271 estão traduzidos em português.
Trabalhamos com muito empenho para lhe proporcionar o melhor que o tricô e o croché têm para oferecer, para lhe fornecer inspiração e conselhos bem como fios da mais elevada qualidade a preços incríveis! Gostaria de usar os nossos modelos para outros fins que não uso pessoal? Pode ler o que lhe é permitido fazer no Copyright texto que se encontra na parte de baixo de todos os nossos modelos. Bom tricô! Bom croché!
Deixe um comentário acerca do modelo DROPS Children 27-5
Gostaríamos muito de saber o que tem a dizer-nos acerca deste modelo!
Se deixar uma pergunta acerca do modelo, certifique-se de que escolhe a categoria adequada no formulário abaixo para acelerar o processo relativo à resposta. Os campos obrigatórios estão assinalados com um *.