
Categorias populares
Procura um fio?


Comentários / Perguntas (58)
![]() Marit Hjelmeland escreveu:
Marit Hjelmeland escreveu:
Hei, jeg stusser over enda en ting i denne oppskriften. Ser at dere har svart at mønsteret skal strikkes frem og tilbake. Slik jeg leser oppskriften skal alle 352 m inn på rundpinne. Det passer jo med fellingsbeskrivelsen og at alt skal over på en tynnere rundpinne senere. Tar jeg feil?
23.03.2023 - 11:42DROPS Design respondeu:
Hei Marit, Ja, du strikker fram og tilbake, selv om du bruker rundpinne. Rundpinnen er brukt fordi det er for mange masker til vanlige pinner. God fornøyelse!
24.03.2023 - 06:50
![]() Marit Hjelmeland escreveu:
Marit Hjelmeland escreveu:
Hei,har. Problemer med å plukke opp masker på skrå. Hvor langt inne starter js fra toppen og hvor mange tråder hopper jeg over mellom hver maske jeg tar opp. Klarer det fint på en rett linje, men ser ikke helt løsningen når det er skrått.
22.03.2023 - 12:48DROPS Design respondeu:
Hei Marit. Ingen fasit på hva som er riktig eller galt. Det må bare plukkes opp slik at det ikke blir "hull" / minst mulig "hull", og at det blir ca likt på begge sider. mvh DROPS Design
27.03.2023 - 11:00
![]() Mette Schnitler escreveu:
Mette Schnitler escreveu:
Hei, spørsmålet gjelder bolen. 1) Nå strikkes høyre og venstre del ferdig for seg - det felles mot halsen 1 m i hver ende av hver p 3 ganger og deretter 1 p uten å felle. Betyr det å felle 1 maske på begynnelsen og slutten av hver pinne eller bare i begynnelsen av pinnen? 2) Når arbeidet måler 28 (32) cm deles det til ermhull på midten av atbeidet og hver del strikkes for seg. Hvor mange masker skal felles til ermhullet?
07.01.2023 - 11:07DROPS Design respondeu:
Hej Mette, På hver pind betyder både begyndelsen og slutten af hver pind. Du deler bare arbejdet, det skal altså ikke felles til ærmehull :)
10.01.2023 - 12:19
![]() Jacqueline escreveu:
Jacqueline escreveu:
Hola buenas tardes, saben quiero ocupar el ícono para poder cambiar el hilo para el mismo patrón pero no funciona, no hace la conversión.\\r\\nGracias un abrazo desde CHILE
23.08.2022 - 00:41
![]() Bjørg Hildre Pedersen escreveu:
Bjørg Hildre Pedersen escreveu:
Må man strikke mønster frem og tilbake? Altså 1 omg rett og 1 vrang? Synes det er vanskelig med mønster...
12.06.2022 - 15:52DROPS Design respondeu:
Hei Bjørg. På denne modellen må det strikkes slik som det står på oppskriften, altså frem og tilbake når det strikkes mønster. mvh DROPS Design
13.06.2022 - 13:08
![]() Torunn Sørvik escreveu:
Torunn Sørvik escreveu:
Finner ikke i oppskriften Drops 14-9 hvor jeg skal begynne på mønsteret . Mvh Torunn
25.04.2022 - 20:48DROPS Design respondeu:
Hej Torunn, selve mønsteret begynder nede hvor det står Montering :)
26.04.2022 - 14:55
![]() Vicki escreveu:
Vicki escreveu:
Thank you. I really appreciate your kind response. But I do not understand your answer. The height is the row count. I am talking about the width. As I decrease left and right of center I no longer have 8 stitches to complete the 8 stitch repeat on each side and it gets smaller and smaller until now I am down to 10 repeats on each side instead of 11 and so on. How should I adjust the 8 stitch repeat in the center as I decrease so that I have the pattern or a pattern?
21.03.2022 - 16:23DROPS Design respondeu:
Dear Vicki, let's say you have decreased the first stitch in the diagram, on the next row you will continue working diagram over the last 7 sts only (skip first stitch), when you have decreased the first 2 sts in the diagram, you continue working only the last 6 sts and so on, ie diagram will continue in height over less and less stitches, but it shouldn't be displaced (so that the remaining diagrams continue in height as before/in diagram).Can this helpe?
22.03.2022 - 09:39
![]() Vicki escreveu:
Vicki escreveu:
I am doing the Yoke. As I decrease midpoint front and back I also have less stitches for the 8-stitch repeats. How do you suggest changing the design? For example when there are only 6 stitches on each side do I do the first 6 stitches of the pattern on one side and again on the left (if though it will be offset) or do I improvise, and make slight adjustments so that it looks good, which is what I am doing? I've been reading and watching videos but can't find the answer.
21.03.2022 - 15:24DROPS Design respondeu:
Dear Vicki, continue working pattern in height as before, ie there will be always less stitches on each side of the decreases that are worked in the pattern since they will be "eaten" by the decreases, but the pattern should always fit in height as before. Happy knitting!
21.03.2022 - 15:37
![]() Vicki escreveu:
Vicki escreveu:
At a critical point. The English version says "Dec to shape the V-neck towards mid front and towards mid back like this: dec 1 st in each end on every row 3 times, 1 row without dec, repeat until you have dec 124 (124) sts – 62 (62) sts on each side." Should I dec one stitch at the end of row 1, 2 & 3 only or one stitch each end of 1, 2 & 3? Thanks.
06.03.2022 - 05:11DROPS Design respondeu:
Dear Vicki, you need to decrease one stitch at each end of the rows (one for each V-neck, in the front and in the back). Happy knitting!
06.03.2022 - 13:37
![]() Vicki Greene escreveu:
Vicki Greene escreveu:
I do not understand what to do when it is time to create the space for opening for the armholes. The pattern seems to have a word or two missing and I have no idea what to do at that point. Please help, I am enjoying the pattern and don't want to ruin it at that point. Thank you,
26.02.2022 - 02:46DROPS Design respondeu:
Dear Vicki, for the armhole, you divide the garment for the back and front after 18-32 cm (you don't cast off for the armhole). Happy knitting!
27.02.2022 - 17:15
|
|||||||||||||
Bluescape |
|||||||||||||
|
|
|||||||||||||
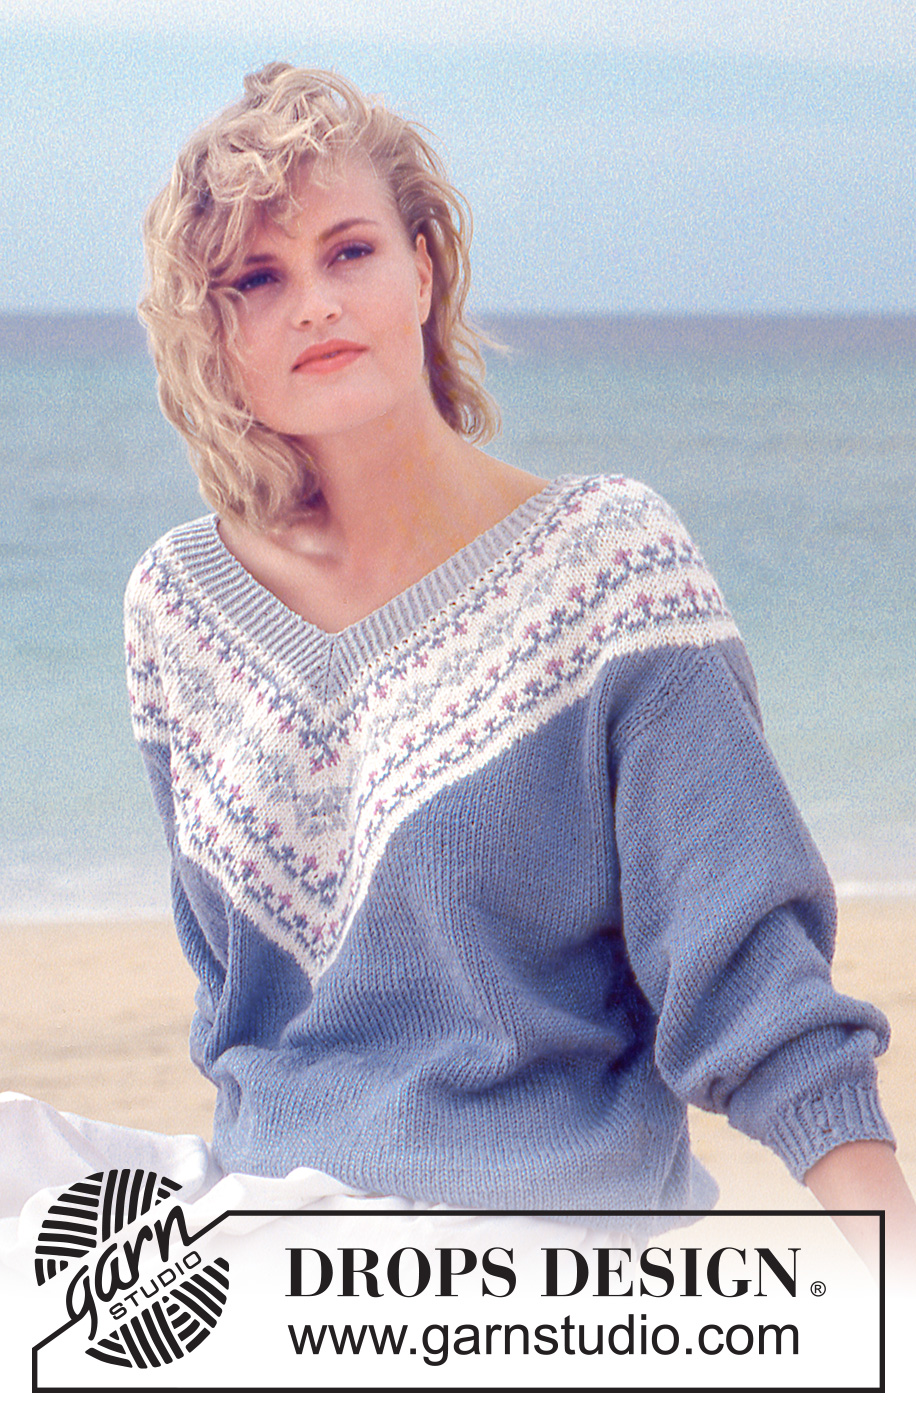
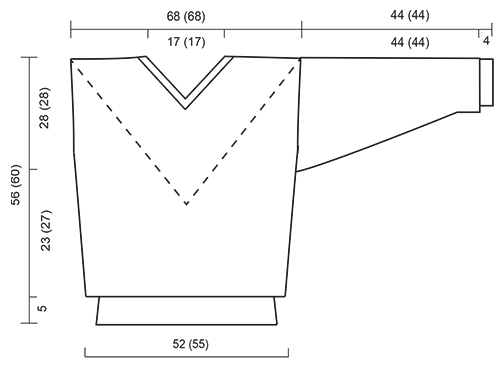
Pulôver DROPS, com jacquard às flores na orla do decote em V, em “Muskat” ou "Lima".
DROPS 14-9 |
|||||||||||||
|
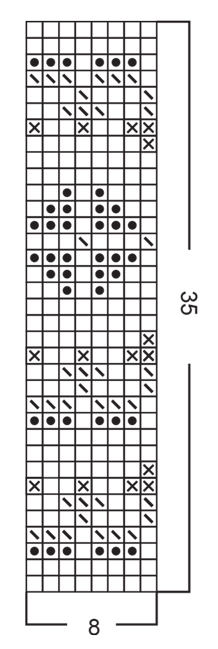
Explicações JACQUARD: Ver diagrama abaixo. O diagrama mostra o motivo pelo direito e tricota-se em ponto meia. CANELADO: *1 malha torcida em meia, 1 malha liga *, repetir de * a *. COSTAS & FRENTE: Tricotam-se em redondo na agulha circular, de cima para baixo. Montar 170-178 malhas com a agulha circular 2.5 mm em azul e tricotar 5 cm de canelado. Continuar com a agulha circular 4.5 mm em ponto meia e, ao mesmo tempo, distribuir 28-32 aumentos na 1.ª carreira = 198-210 malhas. Manter a mesma tensão da indicada para a amostra. Aumentar então 2 malhas de cada lado da peça, 15-12 vezes ao todo alternadamente a cada 3 e 4 carreiras no tamanho S/M e alternadamente a cada 5 e 6 carreiras no tamanho M/L = 258-258 malhas. A 22-26 cm de altura total, arrematar a malha central da frente e das costas e continuar o lado esquerdo e o lado direito separadamente. Diminuir para o decote em V no meio do lado da frente e a meio das costas da seguinte maneira: diminuir 3 vezes 1 malha no fim de cada carreira, tricotar 1 carreira sem diminuir, repetir até 124 malhas terem sido diminuídas – 62 malhas para cada lado. Ao mesmo tempo, a 28-32 cm de altura total, dividir a peça nas cavas de cada lado da peça e terminar a frente e as costas separadamente. Depois da última diminuição para o decote em V, restam 2 malhas na agulha. Arrematar estas 2 malhas. A peça mede cerca de 56-60 cm. MANGAS: Montar 40-42 malhas com as agulhas de pontas duplas 2,5 mm em azul e tricotar 5 cm de canelado. Continuar com as agulhas de pontas duplas 4,5 mm em ponto meia e, ao mesmo tempo, distribuir 15-13 aumentos na 1.ª carreira = 55-55 malhas. Ao mesmo tempo, depois do canelado aumentar 2 malhas sob a manga 26-26 vezes ao todo alternadamente a cada 3 e 4 carreiras = 107-107 malhas. A 41-41 cm de altura total, arrematar 10 malhas sob a manga e continuar em idas e voltas. Arrematar 10 malhas no princípio de cada carreira de cada lado da peça até a manga medir 44-44 cm e arrematar as restantes malhas. MONTAGEM: Costurar os ombros. Levantar 88 malhas ao longo de cada lado do decote em V com as agulhas 4.5 mm em branco = 352 malhas. Tricotar o jacquard (11 vezes de cada lado do decote em V) e, ao mesmo tempo, diminuir a meio da frente e a meio das costas da seguinte maneira: *tricotar juntamente torcidas em meia as 2 malhas antes da malha central e tricotar juntamente em meia as 2 malhas depois da malha central nas 3 carreiras seguintes - não diminuir na 4.ª carreira*, continuar de * a * até ao fim. Depois da última carreira do diagrama, continuar em azul claro com as agulhas 2,5 mm, tricotar 3 cm de canelado (continuar as diminuições) e arrematar. Unir as mangas. |
|||||||||||||
Explicações do diagrama |
|||||||||||||
|
|||||||||||||
 |
|||||||||||||
 |
|||||||||||||
Terminou este projecto?Então, identifique as suas fotos com as tags #dropspattern ou mostre-as na galeria #dropsfan. Precisa de ajuda para este modelo?Encontrará 26 turotiais em vídeo, uma rubrica Comentários/Perguntas e muito mais ao visitar a página do modelo em www.garnstudio.com © 1982-2026 DROPS Design A/S. Todos os direitos reservados. Este documento, incluuindo as suas su-secções, tem copyrights. Saia mais o que pode fazer com os nossos modelos no fim de cada uma das páginas do nosso site. |
|||||||||||||


Com mais de 40 anos no design de modelos de tricô e de croché, a DROPS Design oferece uma das mais vastas colecções demodelos gratuitos na Internet - traduzidos em 17 línguas. Neste dia de hoje, temos 324 catálogos e 12290 modelos - dos quais 12271 estão traduzidos em português.
Trabalhamos com muito empenho para lhe proporcionar o melhor que o tricô e o croché têm para oferecer, para lhe fornecer inspiração e conselhos bem como fios da mais elevada qualidade a preços incríveis! Gostaria de usar os nossos modelos para outros fins que não uso pessoal? Pode ler o que lhe é permitido fazer no Copyright texto que se encontra na parte de baixo de todos os nossos modelos. Bom tricô! Bom croché!
Deixe um comentário acerca do modelo DROPS 14-9
Gostaríamos muito de saber o que tem a dizer-nos acerca deste modelo!
Se deixar uma pergunta acerca do modelo, certifique-se de que escolhe a categoria adequada no formulário abaixo para acelerar o processo relativo à resposta. Os campos obrigatórios estão assinalados com um *.