
Popular categories
Looking for a yarn?


Comments / Questions (38)
![]() Marie wrote:
Marie wrote:
Sehr schöne Wolle. Stricke gerade die Decke in Herbstwald und bin ganz begeistert von den schönen Farben!
11.09.2014 - 15:07
![]() Fefa Ros wrote:
Fefa Ros wrote:
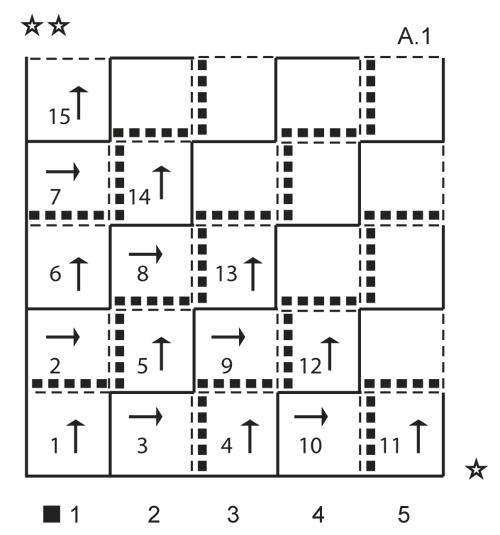
Hola! Me gustaría hacer esta manta, pero no puedo ver el diagrama A, alguien me puede ayudar?
05.08.2014 - 17:44DROPS Design answered:
Hola Fefa. Ya tienes disponible el diagrama. Ha sido un error al colgar el patrón on-line.
06.08.2014 - 23:00
![]() Anna Elise Allin-Dam wrote:
Anna Elise Allin-Dam wrote:
Hej Ang svar på mit spørgsmål med start på rude 16 så vil der komme 2 ruder lodret oven på hinanden Det ville være smart at mønsteret var gentaget 2 gange så man kunne se noget logik i mønsteret
04.08.2014 - 17:31DROPS Design answered:
Hej Anna-Elise. Det er jo fuldstaendig det samme som naar du har strikket rude 6 og gaar over til rude 7. Du gör det samme naar du har strikket rude 16 og gaar over til rude 17.
22.08.2014 - 13:10
![]() Anna Elise Allin-Dam wrote:
Anna Elise Allin-Dam wrote:
Hej Jeg er lige startet med at strikke et Domino tæppe 156-56 DE første 15 rude er ok men når jeg kommer til rude 1 (16)igen syntes jeg at det er svært af finde ud af hvor jeg skal starte igen efter diagrammet
23.07.2014 - 22:56DROPS Design answered:
Hej Anna Elise. Så starter du igen hvor du startede med rude 1 - Altså når du har afsluttet rude 15, så starter du fra den øverste kant af denne (den stiplede linie ovenpå rude 15 og med de 2 stjerner).
24.07.2014 - 15:47
![]() Steinunn Randversdóttir wrote:
Steinunn Randversdóttir wrote:
Það vantar hvernig á að byrja á ferning 1 :D
15.07.2014 - 18:36
![]() Marit Elise Gjølstad wrote:
Marit Elise Gjølstad wrote:
Nydelig
29.06.2014 - 20:38
![]() Júlía wrote:
Júlía wrote:
Hreint yndislegt teppi, er svo sannarlega til í prjóna þetta;))
27.06.2014 - 13:04
![]() Géraldine wrote:
Géraldine wrote:
Bonjour, très joli, est ce une nouvelle couleur de big delight ?
16.06.2014 - 15:13
![]() Dagmar Schwarz wrote:
Dagmar Schwarz wrote:
Wow,ein Plaid aus Flicken, aber man braucht es nicht zusammennähen!!
16.06.2014 - 12:18
![]() Eva Nodeland wrote:
Eva Nodeland wrote:
Høstkos!
10.06.2014 - 13:16
|
|||||||||||||||||||
Domino#dominoblanket |
|||||||||||||||||||
 |
 |
||||||||||||||||||
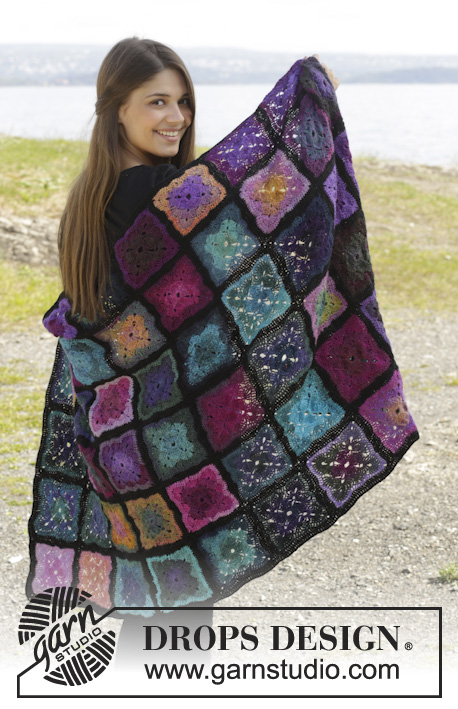
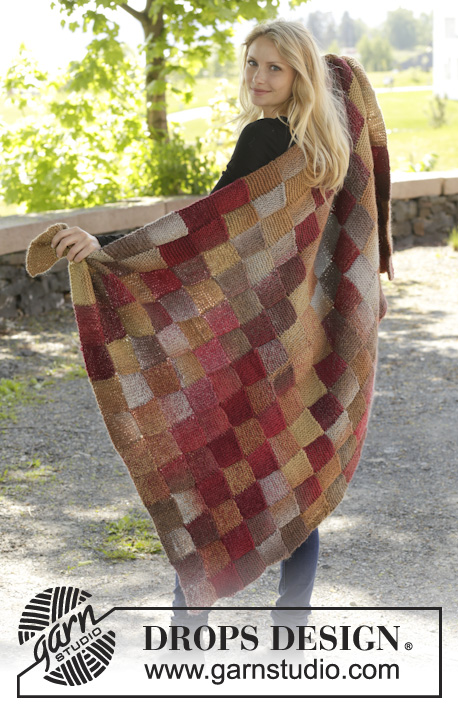
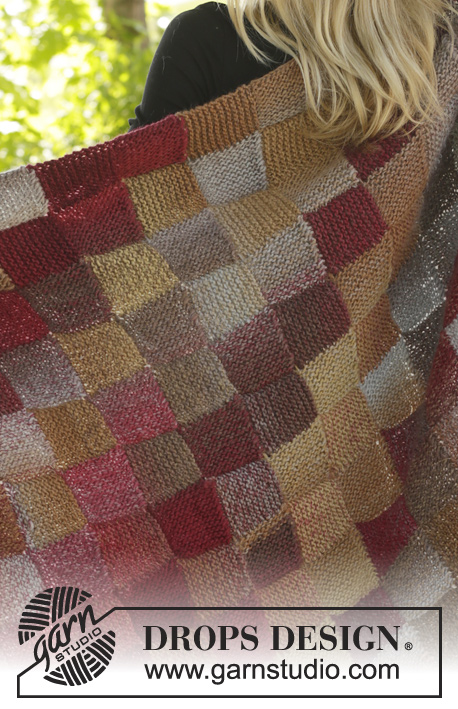
Knitted DROPS blanket with Entrelac pattern in ”Big Delight”.
DROPS 156-56 |
|||||||||||||||||||
|
GARTER ST (back and forth on needle): K all rows. 1 ridge = 2 rows K. PATTERN: See A.1 for rows, squares and knitting direction. Diagram shows 1st-5th row of squares. KNITTING TIP: Instead of slipping sts on a stitch holder, sts can be slipped on a long circular needle, or several circular needles as the blanket gets bigger. ---------------------------------------------------------- BLANKET: Worked back and forth on double pointed needles. The entire blanket is worked in GARTER ST - see explanation above. Beg at the bottom in the corner with Square 1 – see diagram A.1. SQUARE 1: Cast on 11 sts on double pointed needles size 6 mm with Big Delight. Work back and forth until piece measures approx. 7 cm (last row is worked from RS). REMEMBER THE KNITTING TENSION! Leave sts on needle. SQUARE 2: Cast on 11 new sts at the end of row from Square 1 on 1 new needle. Work back and forth over these 11 sts – AT THE SAME TIME at the end of every row from WS work 1 st from previous square back on needle, and at beg of every row from RS K tog the first 2 sts. Continue until all sts from Square 1 have been worked - NOTE: Work the last 2 sts K 2 tog = 11 sts on needle (work last row from WS). Slip sts on a stitch holder - READ KNITTING TIP above. SQUARE 3: Pick up 11 sts on 1 new needle along edge on Square 1 from RS. Work back and forth over these sts for approx. 7 cm (last row is worked from WS). Slip sts on a stitch holder. SQUARE 4: Cast on 11 new sts at the end of row from Square 3. Work back and forth over these 11 sts – AT THE SAME TIME at the end of every row from RS work 1 st from Square 3 back on needle, and at beg of every row from WS K tog the first 2 sts. Continue until all sts from Square 3 have been worked - NOTE: Work the last 2 sts from Square 3 K 2 tog = 11 sts on needle (work last row from RS). Slip sts on a stitch holder. SQUARE 5: Pick up 11 sts along edge on Square 3 from RS, work back and forth over these 11 sts – AT THE SAME TIME at the end of every row from RS work 1 st from Square 2 back on needle, and at beg of every row from WS K tog the first 2 sts. Continue until all sts from Square 2 have been worked - NOTE: Work the last 2 sts from Square 2 K 2 tog = 11 sts on needle (work last row from RS). Slip sts on a stitch holder. SQUARE 6: Pick up 11 sts along edge on Square 2 from RS. Work back and forth over these 11 sts for approx. 7 cm (last row is worked from RS). Slip the sts on 1 stitch holder. SQUARE 7: Work as Square 2 (cast on sts at the end of row from Square 6, work with 1 and 1 st from Square 6). SQUARE 8: Pick up 11 sts along edge on Square 6 from WS. Work back and forth over these 11 sts – AT THE SAME TIME at the end of every row from WS work 1 st from Square 5 back on needle, and at beg of every row from RS K tog the first 2 sts. Continue until all sts from Square 5 have been worked - NOTE: Work the last 2 sts from Square 5 K 2 tog = 11 sts on needle (work last row from WS). Slip sts on a stitch holder. SQUARE 9: Work as Square 8 (pick up sts from Square 5, work with 1 and 1 st from Square 4). SQUARE 10: Work as Square 3 (pick up sts from Square 4). SQUARE 11: Work as Square 4 (cast on sts at the end of row from Square 10, work with 1 and 1 st from Square 10). SQUARE 12: Work as Square 5 (pick up sts from Square 10, work with 1 and 1 st from Square 9). SQUARE 13: Work as Square 5 (pick up sts from Square 9, work with 1 and 1 st from Square 8). SQUARE 14: Work as Square 5 (pick up sts from Square 8, work with 1 and 1 st from Square 7). SQUARE 15: Work as Square 6 (pick up sts from Square 7). Continue this pattern until there are 13 squares in width – cast off 11 sts on last square in width instead of casting on new sts, and continue pattern as before. When 21 squares have been worked vertically, cast off the first 11 sts from WS instead of slipping sts on a stitch holder. Work until blanket has 13 x 21 squares. |
|||||||||||||||||||
Diagram explanations |
|||||||||||||||||||
|
|||||||||||||||||||
 |
|||||||||||||||||||
Have you finished this pattern?Tag your pictures with #dropspattern #dominoblanket or submit them to the #dropsfan gallery. Do you need help with this pattern?You'll find 10 tutorial videos, a Comments/Questions area and more by visiting the pattern on garnstudio.com. © 1982-2026 DROPS Design A/S. We reserve all rights. This document, including all its sub-sections, has copyrights. Read more about what you can do with our patterns at the bottom of each pattern on our site. |
|||||||||||||||||||


With over 40 years in knitting and crochet design, DROPS Design offers one of the most extensive collections of free patterns on the internet - translated to 17 languages. As of today we count 324 catalogues and 12290 patterns translated into English (UK/cm). 12290
We work hard to bring you the best knitting and crochet have to offer, inspiration and advice as well as great quality yarns at incredible prices! Would you like to use our patterns for other than personal use? You can read what you are allowed to do in the Copyright text at the bottom of all our patterns. Happy crafting!
Post a comment to pattern DROPS 156-56
We would love to hear what you have to say about this pattern!
If you want to leave a question, please make sure you select the correct category in the form below, to speed up the answering process. Required fields are marked *.