
Popular categories
Looking for a yarn?


Comments / Questions (69)
![]() Susana wrote:
Susana wrote:
Quiero hacerla en talle L pero no encuentro la explicación o patron. Me encanta.
04.07.2020 - 03:56DROPS Design answered:
Hola Susana. Todos los modelos de DROPS está preparados para varias tallas. Para la talla L tienes que comenzar con 119 puntos. Si hay varios números de puntos/veces, esto significa que para la talla S/M (en este modelo) es el primer número, para la talla L el 2º, etc. Cuando solo hay un número es igual para todas las tallas.
16.08.2020 - 16:56
![]() Andreia Aparecida De Almeida Da Cruz wrote:
Andreia Aparecida De Almeida Da Cruz wrote:
Olá sou iniciante gostaria de receber um gráfico desta peça do início ao fim. Obrigada
07.06.2020 - 21:56
![]() Andreia Aparecida De Almeida Da Cruz wrote:
Andreia Aparecida De Almeida Da Cruz wrote:
Olá sou iniciante gostaria de receber um gráfico desta peça do início ao fim. Obrigada
07.06.2020 - 21:51
![]() Adriana wrote:
Adriana wrote:
Buenos dias quisiera saber como lo hago a dos agujas ya que no manejo las circ ulares desde ya muchas gracias y me encanta esta pagina y sus patrones
02.05.2020 - 02:51DROPS Design answered:
Hola Adriana. Por su elevado número de puntos, se recomienda usar una aguja circular. Con la aguja circular, los puntos se trabajan de la misma manera que con las agujas rectas. Si no tienes posibilidad de comprar una aguja circular, puedes intentar hacer el modelo con agujas rectas (en este caso hay que dividir los puntos para los delanteros y la espalda y añadir los puntos orillo para las costuras).
16.08.2020 - 16:43Myriam wrote:
Muy lindo modelo y facil de hacer ,gracias .Saludos desde Chile.
08.03.2017 - 20:39Gilda wrote:
Me gusta mucho este modelo es precioso estoy tratando de hacer la verdad no se de cuanto punto el talla XXL se lo agradezco de Perú.
19.09.2016 - 01:15DROPS Design answered:
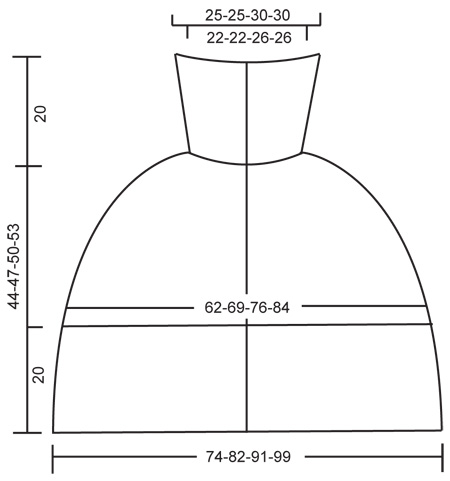
Hola Gilda. Para la talla XXL hay que montar 131 pt, si tienes la misma tensión del tejido: 7 pts x 8 filas en pt jersey = 10 x 10 cm después de trabajar la prueba con la lana y las agujas correspondientes. Para elegir bien la talla, mira las medidas del diagrama bajo el patrón. Los números son cm para las tallas S/M - L - XL/XXL - XXXL respectivamente., es decir, el primer número es para la talla S/M, el 2º para la talla L etc.)
23.09.2016 - 20:01Anabel wrote:
Otra de mis preguntas es: cuanto debe medir la capa desde la base hasta la orilla del cuello? Yo teji la talla más grande y el tamaño me quedo muy reducido como para una niña de 8 años. Gracias
13.09.2016 - 05:07DROPS Design answered:
Hola Anabel. Con la tensión del tejido (7 pts x 8 filas en pt jersey = 10 x 10 cm) y trabajando según el patrón para la talla más grande la capa debe medir 53 cm hasta el escote más 20 cm del cuello.
17.09.2016 - 19:00Anabel wrote:
Hola. Anabel de México. Ya terminé el proyecto hasta el cuello, sin embargo, tengo dudas con las medidas ya que el cuello (parte doblada) me quedo muy angosta y no se ve para nada igual que la fotografía. Mi duda es si, los aumentos después de los 12 cm se hacen sólo una vez o se hacen cada vuelta hasta los 20 cm?
13.09.2016 - 05:04DROPS Design answered:
Hola Anabel. Los aum se trabajan solo una vez, cuando has llegado a 12 cm. Y después continuas trabajando sin aum hasta que el cuello mida 20 cm
17.09.2016 - 18:49
![]() Lari wrote:
Lari wrote:
Hallo, ich stricke dieses tolle Teil gerade in Gr. L und komme nicht auf die 101 angegebenen Maschen, sondern auf 100. Kann es sein, dass das ein Rechenfehler ist oder habe ich mich vertan? Viele liebe Grüße von Lari
29.08.2016 - 22:40DROPS Design answered:
Liebe Lari, Sie haben 119 Maschen und nehmen 2 x 9 Maschen ab (also 18 M), das ergibt 101 Maschen.
31.08.2016 - 13:39Marta wrote:
Marta de chile no encontre como poner el pais
28.07.2016 - 15:14DROPS Design answered:
Hola Marta, para poner el país tienes dos opciones. La primera, en la esquina superior derecha de la pantalla hay una pestaña para cambiar el país. la segunda opción está debajo de cada patrón. Si te refieres a ponerlo para los comentario, no hay opción de poner Chile.
31.07.2016 - 15:36
|
|
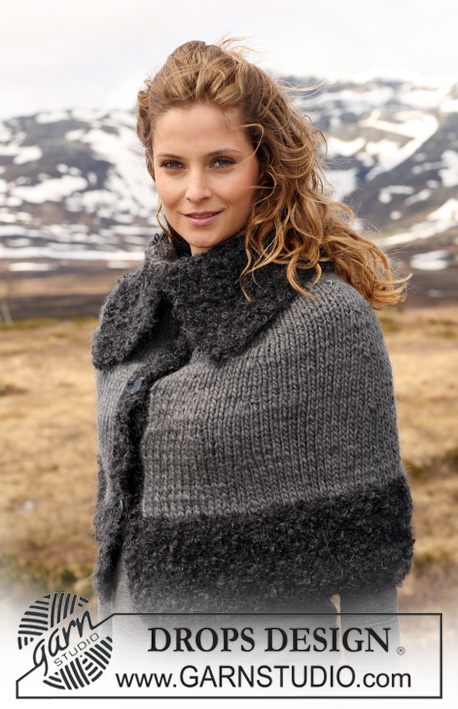
Novelette |
|
|
|
|
Short DROPS poncho in ”Polaris” with buttons at front, large collar and rib. Size S – XXXL.
DROPS 116-19 |
|
|
GARTER ST (back and forth on needle): K all rows. DECREASING TIP: Make all dec from RS. Dec as follows BEFORE marker: Slip 1 st as if to K , K1, psso. Dec as follows AFTER marker: K2 tog. -------------------------------------------------------- -------------------------------------------------------- PONCHO: Worked back and forth on circular needle from mid front. Cast on 107-119-131-143 sts (includes 4 front band sts each side towards mid front) on circular needle size 15 mm with Polaris. P 1 row from WS and continue in rib as follows: 4 front band sts in GARTER ST – see above, * K3, P3 *, repeat from *-* and finish with K3 and 4 front band sts in garter st. Continue like this until piece measures approx 20 cm. Now work next row from RS as follows: 4 front band sts in garter st, * K3 tog, 1 YO, P3 *, repeat from *-* on a total of 48-54-60-66 sts, 1 YO, K3 tog, 1 YO, * P3, 1 YO, K3 tog * repeat from *-* on a total of 48-54-60-66 sts, and finish with 4 front band sts in garter st. There are now 91-101-111-121 sts on needle. Insert 4 markers in piece as follows: MARKER-1 after 14-16-18-20 sts, MARKER-2 after a total of 34-38-42-46 sts, MARKER-3 after a total of 57-63-69-75 sts, MARKER-4 after a total of 77-85-93-101 sts, = 14-16-18-20 sts left after last marker. Continue in stocking st with front bands in garter st. REMEMBER THE KNITTING TENSION! When piece measures approx 28 cm dec 1 sts each side of all markers on next row from RS – SEE DECREASING TIP! (= 8 dec). Repeat the dec on every other row a total of 6-7-8-9 times = 43-45-47-49 sts. When piece measures approx 44-47-50-53 cm dec 4-6-1-3 sts evenly on next row from RS (do not dec on front bands) = 39-39-46-46 sts. P 1 row from WS and continue in rib as follows (as seen from RS): 4 front band sts in garter st, * P3, K4 *, repeat from *-* and finish with P3 and 4 front band sts in garter st. Continue with K over K and P over P - AT THE SAME TIME on next row from RS dec all K4 to K3 by K tog the 2 middle sts = 35-35-41-41 sts. Continue with K over K and P over P. When rib measures approx 12 cm inc all K3 to K4 (as seen from RS) by K 2 sts in the middle st = 39-39-46-46 sts. Continue until rib measures approx 20 cm and cast off loosely with K over K and P over P. ASSEMBLY: Sew buttons to left front band evenly distributed – place the top one at the start of collar and the bottom one in transition between rib and stocking st. As the sts are so large, use sts on right front band as buttonholes. |
|
 |
|
Have you finished this pattern?Tag your pictures with #dropspattern or submit them to the #dropsfan gallery. Do you need help with this pattern?You'll find 15 tutorial videos, a Comments/Questions area and more by visiting the pattern on garnstudio.com. © 1982-2026 DROPS Design A/S. We reserve all rights. This document, including all its sub-sections, has copyrights. Read more about what you can do with our patterns at the bottom of each pattern on our site. |


With over 40 years in knitting and crochet design, DROPS Design offers one of the most extensive collections of free patterns on the internet - translated to 17 languages. As of today we count 324 catalogues and 12290 patterns translated into English (UK/cm). 12290
We work hard to bring you the best knitting and crochet have to offer, inspiration and advice as well as great quality yarns at incredible prices! Would you like to use our patterns for other than personal use? You can read what you are allowed to do in the Copyright text at the bottom of all our patterns. Happy crafting!
Post a comment to pattern DROPS 116-19
We would love to hear what you have to say about this pattern!
If you want to leave a question, please make sure you select the correct category in the form below, to speed up the answering process. Required fields are marked *.