
Oblíbené kategorie
Hledáte přízi?


Komentáře / Otázky (48)
![]() María Fernanda Yáñez napsala:
María Fernanda Yáñez napsala:
Hola! Para la talla M, los 95 puntos de A2 no encajan con el sentido de los 7 puntos centrales de A3 (para que encajen tendría que tener 43 puntos a un lado y 45 en el otro). Hago el comentario para saber si es que hay un error en el patrón. Gracias por la respuesta.
15.03.2022 - 05:30
![]() Irene Simeone napsala:
Irene Simeone napsala:
Buongiorno, un'altra domanda. Quando si deve iniziare il diagramma A.3, le istruzioni dicono di iniziare dalla riga indicata dalla freccia su un ferro sul rovescio del lavoro. Questo significa che le 7 maglie centrali devono essere lavorati così: 1 dir, 5 rov, 1 dir? Grazie ancora. Irene
03.03.2022 - 15:43Odpověď DROPS Design :
Buonasera Irene, dal rovescio del lavoro deve lavorare come indicato nella legenda e cioè 1 maglia rovescio, 5 maglie diritto e 1 maglia rovescio. Buon lavoro!
05.03.2022 - 22:09
![]() Irene Simeone napsala:
Irene Simeone napsala:
Buongiorno, sto seguendo le istruzioni ma sono un po' confusa :( il davanti del lavoro è quello in cui si vedono le coste oppure quello in cui ci sono una specie di nodini? spero riusciate a capire cosa intendo. Grazie mille! Irene
03.03.2022 - 15:24Odpověď DROPS Design :
Buonasera Irene, il davanti del lavoro è quello in cui inizia a lavorare a coste sul dietro. Buon lavoro!
04.03.2022 - 17:46
![]() Stella napsala:
Stella napsala:
When it says to work 4 rows over 10 garter stitches, does is mean 4 rows with the 10 garter stitches or the 10 garter stitches with 4 rows of A2 over it?
03.01.2022 - 21:52Odpověď DROPS Design :
Dear Stella, this means you work the next 4 rows with the 10 sts in garter stitch instead of pattern and the remaining stitches as before. Happy knitting!
04.01.2022 - 07:26
![]() Angela Beaty napsala:
Angela Beaty napsala:
In the Back Piece section, work from arrow in A.3 over the middle 7 stitches on row, Is this actually in the middle of the 96 stitches? So you skip the first 4 rows and just do the arrow row? Then work A.3 over the first 48 stitches do you start from the bottom of the diagram or from the arrow?
19.08.2021 - 10:21Odpověď DROPS Design :
Dear Angela, when you work from the arrow, yes, you're working over the middle 7 stitches of the 96 stitches and you skip the first 4 rows and start from the arrow row. In the rest of the stitches, you work A.2. After finishing A.3, in the next row, there is a split for the opening. The rows under the arrow are actually from A.2 and are there just to give a context or to make it continuous visually.
30.08.2021 - 19:26
![]() Katzilicious napsala:
Katzilicious napsala:
I'm still confused, can you explain "work from arrow in A.3 over the middle 7 stitches on row - adjust so that this row marked with arrow is worked from wrong side. On first row from right side after A.3 work over the first 44-48-52-57-63-70 stitches on row and slip the remaining 44-48-52-57-63-70 stitches on 1 stitch holder"? So how do I read the chart? From the right bottom? And when i work from arrow A.3 do i start with RS or WS? Thank you
18.05.2021 - 12:06Odpověď DROPS Design :
Dear Katzilicious, you read the diagram from right to left and from bottom up, from the right side. Here you have a lesson on how to read a diagram: https://www.garnstudio.com/lesson.php?id=68&cid=19 A.3 begins from the wrong side. Work 5 rows of A.3, which is in the center of the front or the back. The next step is to separate this part into two. You work one part with the V-neck and then you work the second part from the stitch holder. Happy knitting!
07.08.2021 - 11:30
![]() Jessica napsala:
Jessica napsala:
Hi again! Thanks for the help, it clears things up, but I’m still not sure what I should be doing when I switch to the A.3 chart. It says the row marked by the arrow should be worked from the WS, but to do that, I’d have to work the row below from the RS, meaning I’d be doing a row of knitting. But the A.2 pattern states that for RS rows I should P1 K1. I’m not sure how these two charts fit together. Any help would be great.
07.05.2021 - 13:32
![]() Jessica napsala:
Jessica napsala:
Hi! I’m a little confused about what to do once I’ve done the first 8 rows in A.1. I’m finishing on the WS so starting A.2 on the RS with a P1 K1 and 3 garter stitches at each end, then on the WS purling all stitches, but from previous comments that doesn’t seem to be the correct pattern, and after I got to switching to A.3, doing the row indicated by the arrow on the WS indicates that the previous RS row should be all knitted, not P1 K1 as I have done. Any help would be appreciated.
07.05.2021 - 11:22Odpověď DROPS Design :
Dear Jessica, the garter stitches in A.2 (= P from RS, P from WS) should be worked over the P stitches in A.1, so that you will work A.2 from RS: 3 sts in garter st, K1, (P1, K1) repeat from (to) and finish with 3 sts in garter stitch and from WS: K3, P to the last 3 sts, P3. Happy knitting!
07.05.2021 - 13:00
![]() Katzilicious napsala:
Katzilicious napsala:
I'm confuse about worked A.1 until it had been vertically worked and work A.2 over A.1 can you please explain? Thank you
06.05.2021 - 07:39Odpověď DROPS Design :
Dear Katzilicious, work first the 8 rows in A.1 as explained: (from RS = 3 sts in garter stitch, knit 1, repeat A.1 (read from the right towards the left= P1, K1), 3 sts in garter st / from WS: 3 sts in garter st, A.1 (read from the left towards the right = P1, K1), P1, 3 sts in garter st). Then work: 3 sts in garter st, knit 1, repeat A.2 (= 1 st in garter st, 1 st in stocking st), and finish with 3 sts in garter st, from WS: 3 sts in garter st, repeat A.1 (=1 st in stocking st = P, 1 st in garter st = K), P1, 3 sts in garter st. Hope this help. Happy knitting!
06.05.2021 - 07:45
![]() Diana napsala:
Diana napsala:
I prefer written instructions as opposed to charts. Is there anyone who has written out the instructions? Also, there are no instructions on how many inches or rows we need to knit for each diagram. I am a long time knitter but find almost all of the patterns here quite confusing with no written instructions or actual row/inches for each size. I understand the patterns are translated from Norwegian and it is not an easy task to ensure everything is explained in detail.
29.03.2021 - 22:35Odpověď DROPS Design :
Dear Diana, we use charts insted of written out instructions not only because they are available in many languages, but also because we believe that with charts one can see not only the very next step, but one can see teh larger picture, as how stitches and rows relate to each other en large. We also have a lesson about how to read diagrams here, and one can always ask for help in the store where they bought their DROPS yarn from (over the phone or in person). We have many knitters who actually prefer diagrams to written instructions. Happy Knitting!
30.03.2021 - 11:50
|
|||||||||||||
Mazo#mazotop |
|||||||||||||
 |
 |
||||||||||||
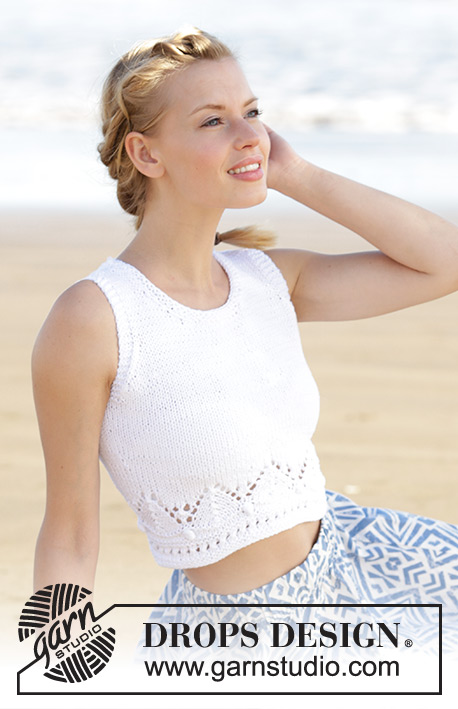
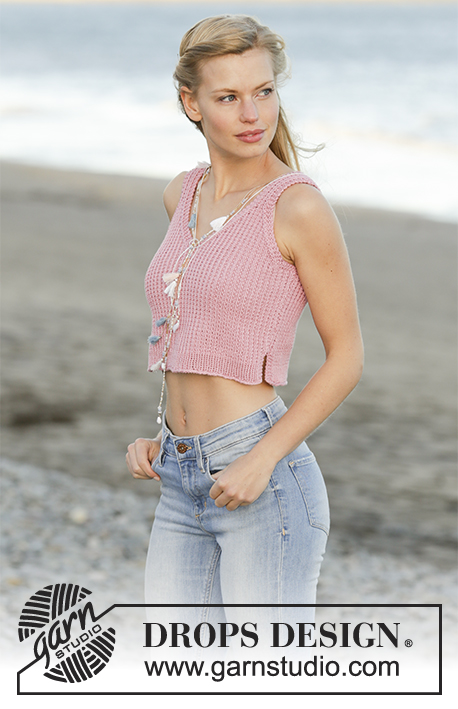
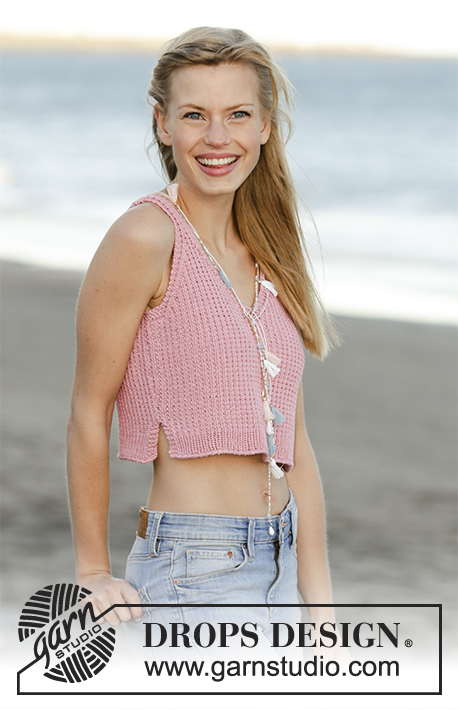
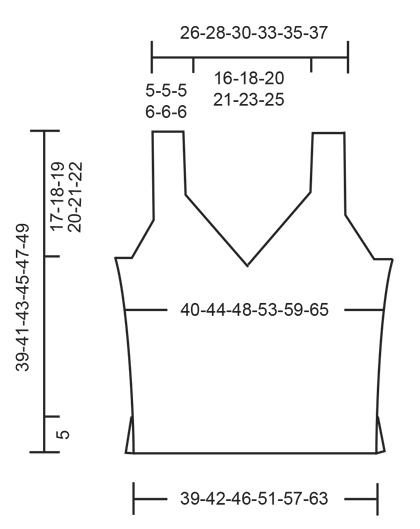
Krátké tílko - top s V-výstřihem pletené strukturovým vzorem z příze DROPS Muskat. Velikost: S - XXXL.
DROPS 178-66 |
|||||||||||||
|
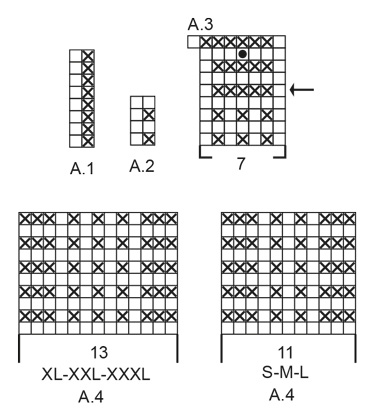
VROUBKOVÝ VZOR: Pleteme stále hladce, lícové i rubové řady. 1 vroubek = 2 řady hladce. VZOR: Viz schémata A.1 až A.4. Zobrazeny jsou všechny řady vzoru nahlížené z lícové strany. Zvolte si schéma pro požadovanou velikost. TIP - PŘIDÁVÁNÍ: Přidáváme nahozením. V následující řadě pleteme nahození za zadní nit, aby se v pletenině netvořily dírky. POZN.: nová oka postupně zapracujeme do vzoru A.2. TIP - UJÍMÁNÍ: Ujímáme 1 oko vedle 3 krajních vroubkových ok na každé straně dílu. Ujímáme vždy v lícových řadách. ZA 3 krajními oky vroubkovým vzorem ujímáme přetažením, tj. 1 oko sejmeme hladce, 1 oko upleteme hladce a sejmuté přes ně přetáhneme. PŘED 3 krajními oky vroubkovým vzorem splétáme 2 oka hladce. ---------------------------------------------------------- TOP: Upleteme v řadách 2 díly, které nakonec sešijeme. ZADNÍ DÍL: Na kruhovou jehlici č.4 nahodíme přízí Muskat 81-89-97-107-119-133 ok a upleteme 1 rubovou řadu obrace. Pokračujeme pružným vzorem, takto (1. řada = lícová): 3 oka VROUBKOVÝM VZOREM – viz výše, 1 oko hladce, vzor A.1 (= 2 oka) – sekvenci vzoru opakujeme až po poslední 3 oka, končíme 3 oky vroubkovým vzorem. Pleteme v řadách v tomto rozvržení vzorů. Po dokončení celé sekvence vzoru A.1 (na výšku) pleteme namísto něj vzor A.2 (= 2 oka). Ve výši 5 cm nahodíme na konci každé z následujících 2 řad 1 nové oko (= konec postranního rozparku) = 83-91-99-109-121-135 ok. Pokračujeme takto: 1 krajové oko vroubkovým vzorem, 1 oko hladce, vzor A.2 - sekvenci vzoru opakujeme až po poslední 1 oko, 1 krajové oko vroubkovým vzorem. Ve výši 7 cm přidáme na každé straně vedle 1 krajového oka vroubkovým vzorem 1 oko - viz TIP - PŘIDÁVÁNÍ! Toto přidávání zopakujeme ještě ve výši 10 cm = 87-95-103-113-125-139 ok. Ve výši 19-20-21-22-23-24 cm pleteme nad prostředními 7 oky vzor A.3 od místa označeného šipkou – řada označená šipkou musí být rubová. V 1. lícové řadě po dokončení vzoru A.3 upleteme prvních 44-48-52-57-63-70 ok v řadě a dalších 44-48-52-57-63-70 ok odložíme na pomocnou jehlici. PRAVÝ ZADNÍ DÍL: = 44-48-52-57-63-70 ok. NEŽ BUDETE PLÉST DÁL, PŘEČTĚTE SI POZORNĚ CELÝ NÁSLEDUJÍCÍ POPIS! Ujímáme SOUČASNĚ průkrčník i průramek, takto: Pleteme vzor A.2 jako dosud se 3 krajními oky vroubkovým vzorem po stranách průkrčníku a 1 krajovým okem vroubkovým vzorem na boku. PRŮKRČNÍK: V 1.lícové řadě začneme tvarovat průkrčník – ujmeme 1 oko vedle 3 krajních vroubkových ok - viz TIP - UJÍMÁNÍ. Takto ujímáme v každé 2. řadě (tj. v každé lícové) celkem 16-18-20-22-24-26x. PRŮRAMEK: Ve výši 21-22-23-24-25-26 cm upleteme nad krajními 10-10-12-11-11-14 oky na boku (včetně 1 krajového oka vroubkovým vzorem) 4 řady vroubkovým vzorem (= 2 vroubky). Potom uzavřeme prvních 7-7-9-8-8-11 ok v řadě (= průramek). Následující 3 oka pleteme vroubkovým vzorem (= lem průramku). Pro vytvarování průramku pak vedle těchto 3 vroubkových ok ujmeme 1 oko a takto ujímáme v každé 2. řadě (tj. v každé lícové) celkem 10-12-12-14-18-20x. Po dokončení veškerého ujímání průkrčníku i průramku zbývá v řadě 11-11-11-13-13-13 ok (= ramínko). Dál pleteme vzor jako dosud se 3 vroubkovými oky na každé straně. Ramínko je znázorněno ve schématu A.4 – zvolte si schéma pro požadovanou velikost. Ve výši 39-41-43-45-47-49 cm všechna oka uzavřeme. LEVÝ ZADNÍ DÍL: Odložených 44-48-52-57-63-70 ok druhé půlky zadního dílu vrátíme z pomocné jehlice zpět na kruhovou jehlici č.4 a pleteme stejně jako pravý zadní díl, jen zrcadlově převrácený – POZN.: při tvarování průramku uzavřeme oka na začátku rubové řady (nikoli na začátku lícové). Další ujímání průramku i průkrčníku už pleteme z lícové strany. PŘEDNÍ DÍL: Nahodíme a pleteme stejně jako zadní díl. DOKONČENÍ: Obě ramínka sešijeme – nejlépe pletacím stehem, aby byl šev co nejjemnější. Sešijeme postranní švy od průramku k okraji rozparku. |
|||||||||||||
Vysvětlivky ke schématu |
|||||||||||||
|
|||||||||||||
 |
|||||||||||||
 |
|||||||||||||
Dokončili jste tento model?Pak označte své fotky tagem #dropspattern #mazotop nebo je pošlete do galerie #dropsfan. Potřebujete s tímto návodem poradit?Otevřete-li si návod na stránce garnstudio.com, najdete tam 19 výukových video-ukázek, Komentáře/Dotazy a další užitečné informace. © 1982-2026 DROPS Design A/S. Vyhrazujeme si veškerá práva. Tento dokument, včetně všech jeho dílčích částí, podléhá autorským právům. Podrobnější komentář k možnostem užití našich návodů najdete dole pod každým návodem na našich stránkách. |
|||||||||||||


V oblasti pletené a háčkované módy působí DROPS Design více než 40 let. Díky tomu vám můžeme nabídnout jednu z nejrozsáhlejších kolekcí modelů s bezplatnými návody dostupnými na internetu - navíc v 17 jazycích. K dnešnímu dni máme na 324 katalogů a 12290 návodů celkem - z nich je už 7603 dostupných v [češtině].
Přidejte komentář k návodu DROPS 178-66
Rádi bychom věděli, co si o tomto modelu myslíte!
Pokud se chcete na něco zeptat, dbejte prosím na to, abyste ve formuláři níže vybrali správnou kategorii - díky tomu se dříve dozvíte, co potřebujete vědět. Povinná pole jsou označena *.