
Categorías populares
¿Buscas un hilo?


Comentarios / Preguntas (73)
![]() Montagne escribió:
Montagne escribió:
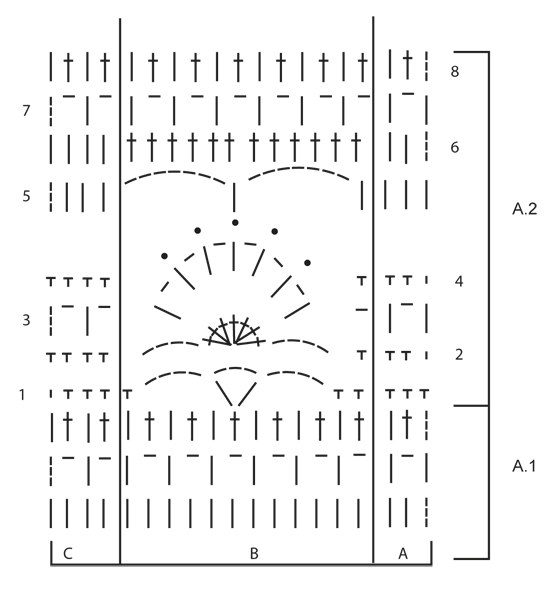
Comment comprendre:Crocheter ensuite en suivant le diagramme A.1 ainsi: A.1 A, 7-8-9 fois A.1 B au total, terminer par A.1C. ? ainsi que ainsi: A.2 A, 9-10-11 fois A.2 B au total, terminer par A.2 C. MERCI
09.05.2015 - 08:29DROPS Design respondió:
Bonjour Mme Montagne, les diagrammes se décomposent en 3 parties: A (= début de rang sur l'end, fin de rang sur l'env), B (= à répéter sur les mailles suivantes le nombre de fois requis pour chaque taille) et C (= fin de rang sur l'end, début de rang sur l'env). Crochetez ainsi: les 3 m de la partie A de A.1 ou A.2 sur les 3 m suivantes, puis répétez les 12 m de la partie B de A.1 ou A.2 et terminez par les 4 m de la partie C de A.1 ou A.2. Bon crochet!
11.05.2015 - 09:59
![]() Lydia Dam-Prins escribió:
Lydia Dam-Prins escribió:
Welke maat moet ik nemen als ik confectiemaat 46 heb.
16.04.2015 - 10:33DROPS Design respondió:
Hoi Lydia. Onderaan het patroon vind je de maattekening met alle afmetingen in cm. Vergelijk deze met je eigen afmetingen om de maat te kiezen.
16.04.2015 - 13:10
![]() Confused escribió:
Confused escribió:
Hi. I am confused on the instructions when it starts to follow the diagram. This is vague for me. I don't understand what is meant by working A1 vertically, because it is a horizontal row. Does it refer to A1 being composed of 3 rows? Why must A1 b be worked 7 8 9 times? Shouldn't it be done once horizontally? IMO this pattern is not well written
09.04.2015 - 03:15DROPS Design respondió:
Dear Confused, working A1 vertically means working the 3 rows in A.1, starting from RS with the 3 sts in A.1-A, then repeating the 12 sts in A.1-B over the next sts until 4 sts remain before the end of row and finish with the 4 sts in A.1C - from WS, work A.1-C, repeat A.1B and finish with A.1-A. Happy crocheting!
09.04.2015 - 10:08
![]() Aria escribió:
Aria escribió:
Ik wil graag van drop s bolero 162-34 maken voor mijn dochter maar de eerste toer staat onderlijk schrijven wil u voor mijn wat beter en makkelijk op schrijven het gaat om maat s twee toer ook graag als die twee toer goed dan kom ik er wel uit ik hoor graag van u
08.04.2015 - 16:17DROPS Design respondió:
Beste Aria, wij herschrijven geen patronen, maar als je het lastig vindt om haakpatronen te lezen, kunnen we je wel op weg helpen. Zo staat stk voor stokje, l voor losse en v voor vaste. De sterretjes geven het begin en einde aan van een stukje dat je steeds herhaalt en erachter staat hoe vaak je dat moet doen. Veel succes!
08.04.2015 - 17:12
![]() Deborah York escribió:
Deborah York escribió:
YOU MIGHT WANT TO LOOK AT THIS PATTERN A LITTLE CLOSER, AS THE FIRST ERROR IS THAT CH 4 DOES NOT MAKE A DOUBLE CROCHET CHAIN!!! Blue Wonder by DROPS Design Crochet DROPS shoulder piece in "Paris". Size. S-XXXL MATERIALSYARN ALTERNATIVESVIDEOS DROPS 162-34 DROPS design: Pattern no w-546 Yarn group C or A + A
22.03.2015 - 22:31DROPS Design respondió:
Dear Mrs York, the fundation chain includes the first ch3 for turning, ie you will crochet the first dc in 4th ch from hook (the first 3 ch = the last 3 ch worked on fundation row = first dc) + the dc you just worked in 4th ch from hook = 2 first dc in row. Happy crocheting!
23.03.2015 - 10:46
![]() Sandra escribió:
Sandra escribió:
Ja, bedankt , het gaat prima, wordt super!!
19.02.2015 - 21:02
![]() Sandra escribió:
Sandra escribió:
Sorry, was te snel, snap t al, 1x A, 8xB, 1xC= 103 st.
18.02.2015 - 19:40DROPS Design respondió:
Hoi Sandra. Dus je bent eruit?
19.02.2015 - 16:14
![]() Sandra escribió:
Sandra escribió:
Vraagje, ik ben bij toer 2, ga ik uit van de maat l/xl, dan moet ik 8x A.1A, A.1,B haken en dan 1x A.1,C, kom ik op een totaal van 125 st., terwijl ik van de vorige toer 103 st. over heb. Mis ik iets? Groetjes Sandra.
18.02.2015 - 19:35
![]() Pia escribió:
Pia escribió:
Super fin, Men! Jag påbörjade detta mönster (mitt första virkprojekt förövrigt) Men när jag gjort allt enl mönster och när jag kommer till att börja om med A.2 så får jag inte till mönstret. Det blir förskjutet trots att jag sett till att jag hade rätt antal stolpar. Nu har jag repat upp hela och nu lutar det åt att jag ger upp det mönstret helt. Så frågan e om det ska vara förskjutet, om jag gjort nå fel eller om det kan finnas nå fel i mönstret. :(
16.02.2015 - 16:36DROPS Design respondió:
Hej Pia, Svårt att säga var det blir fel. När du skall börja på A.2 så fråga gärna hos din lokala DROPS återförsäljare. Virka evt först bara själva diagram-rapporten så du ser hur det skall se ut. Lycka till!
18.02.2015 - 15:26
![]() Rita Boucher escribió:
Rita Boucher escribió:
J'adore ce modele mais je le trouve difficile a confectionner j'aimerais pls dexplications merci
02.02.2015 - 21:27
|
||||||||||||||||
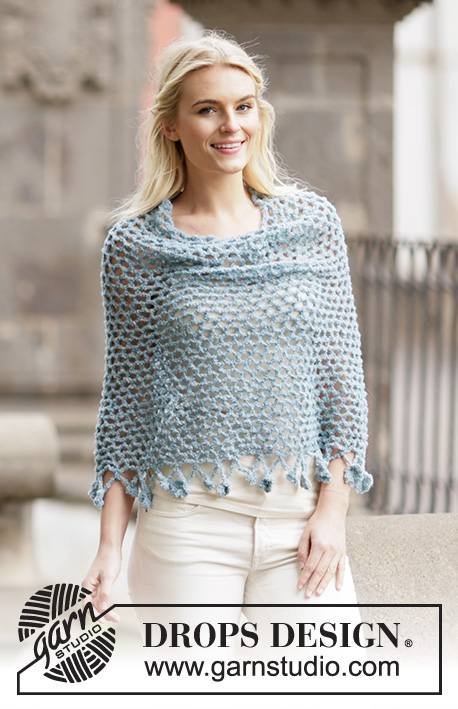
Blue Wonder#bluewondershoulderpiece |
||||||||||||||||
 |
 |
|||||||||||||||
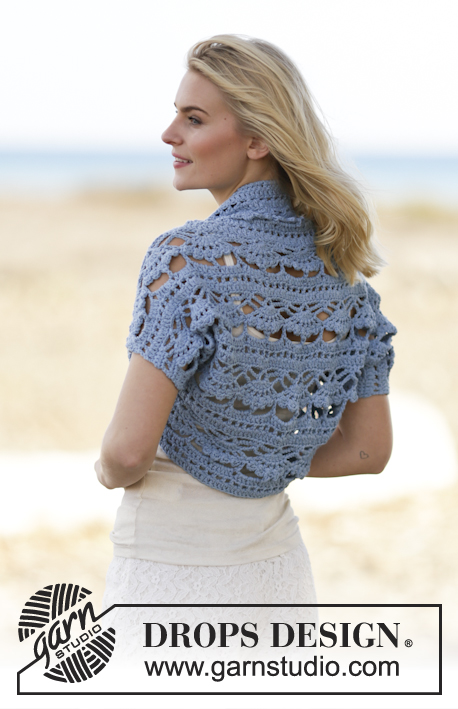
Bolero de ganchillo DROPS, en “Paris”. Talla: S - XXXL.
DROPS 162-34 |
||||||||||||||||
|
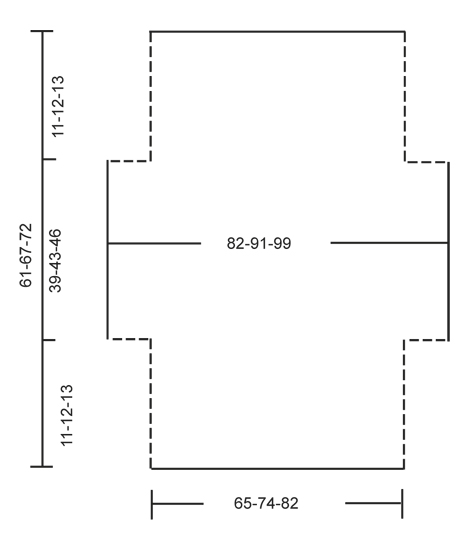
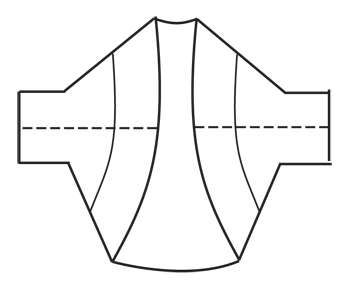
PATRÓN: Ver diagramas A.1 y A.2. ----------------------------------------------------- BOLERO: Montar 110-125-139 cad en ag de ganchillo tamaño 5 mm con Paris. HILERA 1: Virar y trabajar 1 p.a. en la 4ª cad a partir de la ag (= 2 p.a.), trabajar 1 p.a. en cada una de las 4-1-3 cad sig, * saltar 1 cad, 1 p.a. en cada una de las 5 cad sig *, repetir de *a* = 91-103-115 p.a. HILERA 2: Después trabajar de acuerdo al diagrama A.1 de la manera sig: A.1 A, A.1 B 7-8-9 veces en total, terminar con A.1 C. Cuando A.1 ha sido trabajado 1 vez verticalmente, repetir A.2 hacia arriba. AL MISMO TIEMPO, cuando la pieza mida aprox 11-12-13 cm (ajustar para que la hilera sig sea la 6ª hilera en A.2), trabajar 14 cad al final de la hilera (= hilera 5). Virar y trabajar 1 p.a. en la 4ª cad a partir de la ag, después trabajar 1 p.a. en cada una de las sig 10 nuevas cad. Continuar con la 6ª hilera en A.2, al final de la hilera trabajar 15 nuevas cad. Virar y trabajar 1 p.a. en la 6ª cad a partir de la ag, * trabajar 1 cad, saltar 1 cad, 1 p.a. en la cad sig *, repetir de *a* sobre las sig 9 nuevas cad, terminar con 1 cad. Trabajar el resto de la hilera de acuerdo a A.2. En la hilera sig, trabajar como antes hasta los nuevos pts al final de la hilera, trabajar 1 p.a. en cada arco de cad y 1 p.a. en cada p.a. Han sido aumentados 12 p.a. en cada lado = 115-127-139 p.a. Después continuar en la hilera 8 de la manera sig: A.2 A, A.2 B 9-10-11 veces en total, terminar con A.2 C. Cuando la pieza mida aprox 50-55-59 cm (ajustar para que la hilera sig sea la 7ª hilera), no trabajar sobre los 12 p.a. de cada lado = 91-103-115 p.a. Continuar trabajando de la manera sig: A.2 A, A.2 B 7-8-9 veces en total, terminar con A.2 C. Continuar hasta que la pieza mida aprox 61-67-72 cm – ajustar después de una repetición completa de A.2. Cortar y asegurar el hilo. ENSAMBLAJE: Hacer la costura de los lados y de la parte de abajo de los brazos en una, a 1 pt del pt de orillo. |
||||||||||||||||
Explicaciones del diagrama |
||||||||||||||||
|
||||||||||||||||
 |
||||||||||||||||
 |
||||||||||||||||
 |
||||||||||||||||
¿Terminaste este patrón?Entonces, etiqueta tus fotos con #dropspattern #bluewondershoulderpiece o envíalas a la galería #dropsfan. ¿Necesitas ayuda con este patrón?Encontrarás 7 videos tutoriales, un espacio para comentarios/preguntas y más visitando la página del patrón en garnstudio.com © 1982-2026 DROPS Design A/S. Todos los derechos reservados. Este documento, incluyendo todas sus sub-secciones, está protegido por los derechos de autor (copyright). Lee más acerca de lo que puedes hacer con nuestros patrones en la parte de abajo de cada patrón de nuestro sitio. |
||||||||||||||||


Con más de 40 años en el diseño de modelos de punto y de ganchillo, DROPS Design ofrece una de las más vastas colecciones de patrones gratuitos en el internet - traducidos en 17 idiomas. Al día de hoy, contamos con 324 catálogos y 12290 patrones - de los cuales 11675 están traducidos en español.
Nosotros trabajamos con mucho esmero para brindarte lo mejor que las labores de punto y ganchillo tienen para ofrecer,inspiración y consejos, así como hilos de magnífica calidad a precios increíbles! Te gustaría usar nuestros patrones para otro fin además del uso personal? Puedes leer acerca de lo que estás permitida a hacer en el texto de Copyright en la parte de abajo de todos nuestros patrones. Felices labores!
Escribe un comentario sobre DROPS 162-34
¡Nos encantaría saber qué piensas acerca de este patrón!
Si quieres escribir una pregunta referente al patrón, por favor asegúrate de elegir la categoría correcta en el formulario debajo, para acelerar el proceso de respuesta. Los campos obligatorios están marcados con un *.