
Categorías populares
¿Buscas un hilo?


Comentarios / Preguntas (73)
Jayne escribió:
Is there a video on how to fold the garment to assemble?
24.01.2016 - 06:55DROPS Design respondió:
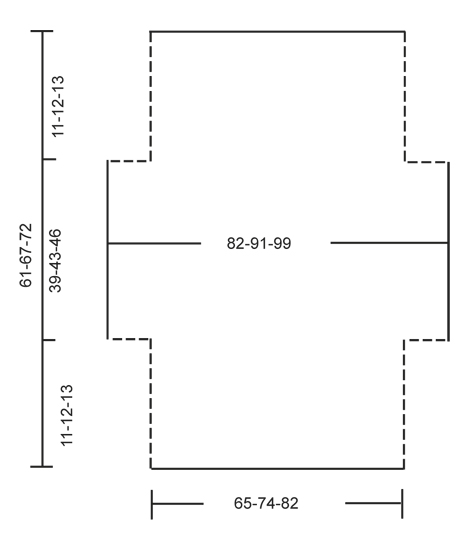
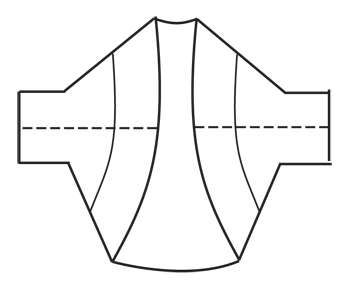
Dear Jayne, there is no video showing how to make the assembly, both charts are showing how to sew tog (fold along the measurement 82-91-99 in measurement chart) and sew tog the dotted lines from measurement chart to get the bottom chart, how to wear the piece. Happy crocheting!
25.01.2016 - 12:10
![]() Pia escribió:
Pia escribió:
Jeg har hæklet modellen, og synes den er mærkelig! Jeg trævlede Man laver ligesom både forstykke og bagstykke og så skal det hele sidde på ryggen..? det virkede ikke for mig. Jeg trævlede det ene "forstykke" op og lavede nogle Freestyle trekanter under ærmerne således at bagstykkets kant ikke bare hang og flagrede - på den måde blev den god. Men den oprindelige opskrift synes jeg ikke holder.
27.08.2015 - 13:49Nadia escribió:
Thanks for your quick answer!!! My problem is that I'm size 16 UK so what kind of crochet mm should I prefer?2mm or 5mm? I'm new in all this Thanks again
21.08.2015 - 14:03DROPS Design respondió:
Dear Nadia, compare the measurements in the chart to a similar garment you have (height, width... in cm). Shoulder piece is worked with a crochet hook size 5 mm or size to get 14 tr x 8.5 rows = 10 x 10 cm. Remember to check and keep the correct tension. Happy crocheting!
21.08.2015 - 15:10Nadia escribió:
Hi I'm new in crochet and want to ask how can we find our size for this pattern for example?? Thanks anyway....
19.08.2015 - 22:56DROPS Design respondió:
Dear Nadia, you will find at the bottom of the pattern a measurement chart with all measurements in cm taken flat from side to side (before folding it), compare theses to a similar garment you have and like the shape to find out the matching size. Happy crocheting!
20.08.2015 - 13:43
![]() Inge escribió:
Inge escribió:
Ach ja, zo logisch, het is ook alweer jaren geleden, dank!
19.08.2015 - 08:32
![]() SJH escribió:
SJH escribió:
Hej. Der hvor der skal tages ud, forstår jeg opskriften sådan at der på den ene side tages ud efter A2 række 5, mens der på den anden side tages ud efter A2 række 6. De 2 sider bliver dermed ikke ens - er det meningen?
15.08.2015 - 18:50DROPS Design respondió:
Hej, Jo det er sådan du skal tage ud, så bare fölg opskriften. God fornöjelse!
04.09.2015 - 09:25
![]() Inge escribió:
Inge escribió:
De eerste toer begint met: haak 1 stokje in elke van de volgende 4-1-3l. Dit begrijp ik niet. Betekent dit 8 stokjes achter elkaar haken?
15.08.2015 - 07:33DROPS Design respondió:
Hoi Inge. Nee, je haakt afhankelijk van welke maat je maakt: 1 stokje in elke van de volgend 4, 1 OF 3 l, dus voor de kleinste maat 1 stk in 4 l.
18.08.2015 - 17:06
![]() Genie escribió:
Genie escribió:
Hi, I'm quite new to crochet and I'm struggling to read the chart. Please could you explain what the dotted lines mean? For Example, A.1 starts with one. Also is the rest of the row trebles till the end or are there meant to be spaces between? Thanks Genie
01.08.2015 - 20:02DROPS Design respondió:
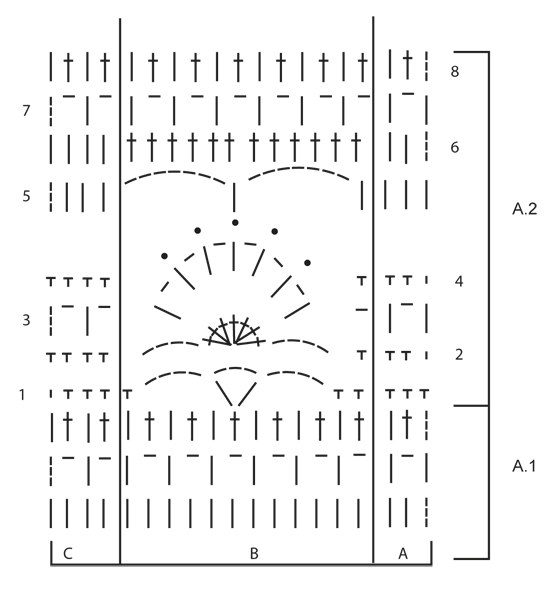
Dear Mrs Genie, the 3 dotted lines on the bottom corner on the right side of diagrams represent the first 3 ch to work to replace 1st tr. You will see all symbols and text to diagram above A.1/A.2, start to read from the bottom corner ont the right side towards th eleft from RS and from the left towards the right from WS. From RS: work 1 time A.1, repeat A.1B and finish with 1 time A.1C on the last 4 sts - from WS work 1 time A.1C, repeat A.1B and finish with A.1A on the last 3 sts. Happy crocheting!
03.08.2015 - 09:25Jacquie escribió:
The pattern states that at 11-12-13 centimetres, adjust so that you are working Row 6. At 11 centimetres I am on Row 1. As far as I can understand, it is impossible to work Row 6 into Row 1. Am I missing something? Thank you
06.06.2015 - 02:30DROPS Design respondió:
Dear Jacquie, you first work 1 row, then A.1 (= 3 rows), then A.2 to row 5 and inc at the end of row 5, work row 6 and inc at the end of row 6 (on the other side). Remember to check and keep the correct tension. Happy crocheting!
06.06.2015 - 15:20
![]() Montagne escribió:
Montagne escribió:
Merci pour les précisions....
12.05.2015 - 13:05
|
||||||||||||||||
Blue Wonder#bluewondershoulderpiece |
||||||||||||||||
 |
 |
|||||||||||||||
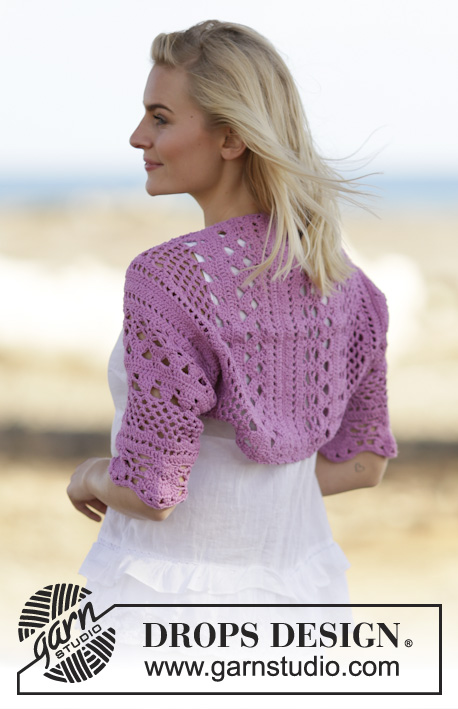
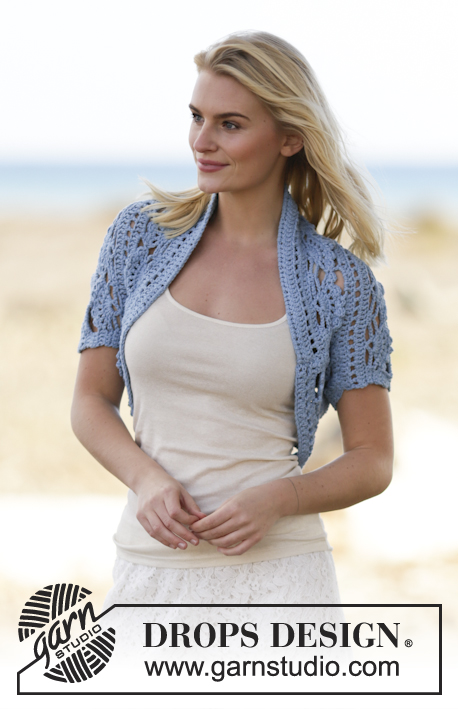
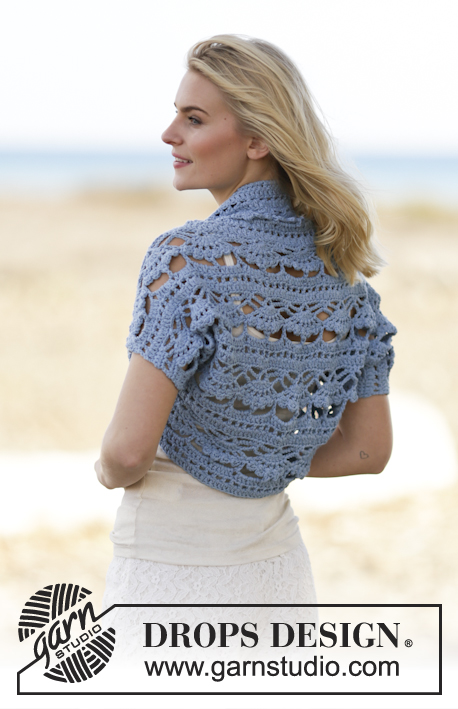
Bolero de ganchillo DROPS, en “Paris”. Talla: S - XXXL.
DROPS 162-34 |
||||||||||||||||
|
PATRÓN: Ver diagramas A.1 y A.2. ----------------------------------------------------- BOLERO: Montar 110-125-139 cad en ag de ganchillo tamaño 5 mm con Paris. HILERA 1: Virar y trabajar 1 p.a. en la 4ª cad a partir de la ag (= 2 p.a.), trabajar 1 p.a. en cada una de las 4-1-3 cad sig, * saltar 1 cad, 1 p.a. en cada una de las 5 cad sig *, repetir de *a* = 91-103-115 p.a. HILERA 2: Después trabajar de acuerdo al diagrama A.1 de la manera sig: A.1 A, A.1 B 7-8-9 veces en total, terminar con A.1 C. Cuando A.1 ha sido trabajado 1 vez verticalmente, repetir A.2 hacia arriba. AL MISMO TIEMPO, cuando la pieza mida aprox 11-12-13 cm (ajustar para que la hilera sig sea la 6ª hilera en A.2), trabajar 14 cad al final de la hilera (= hilera 5). Virar y trabajar 1 p.a. en la 4ª cad a partir de la ag, después trabajar 1 p.a. en cada una de las sig 10 nuevas cad. Continuar con la 6ª hilera en A.2, al final de la hilera trabajar 15 nuevas cad. Virar y trabajar 1 p.a. en la 6ª cad a partir de la ag, * trabajar 1 cad, saltar 1 cad, 1 p.a. en la cad sig *, repetir de *a* sobre las sig 9 nuevas cad, terminar con 1 cad. Trabajar el resto de la hilera de acuerdo a A.2. En la hilera sig, trabajar como antes hasta los nuevos pts al final de la hilera, trabajar 1 p.a. en cada arco de cad y 1 p.a. en cada p.a. Han sido aumentados 12 p.a. en cada lado = 115-127-139 p.a. Después continuar en la hilera 8 de la manera sig: A.2 A, A.2 B 9-10-11 veces en total, terminar con A.2 C. Cuando la pieza mida aprox 50-55-59 cm (ajustar para que la hilera sig sea la 7ª hilera), no trabajar sobre los 12 p.a. de cada lado = 91-103-115 p.a. Continuar trabajando de la manera sig: A.2 A, A.2 B 7-8-9 veces en total, terminar con A.2 C. Continuar hasta que la pieza mida aprox 61-67-72 cm – ajustar después de una repetición completa de A.2. Cortar y asegurar el hilo. ENSAMBLAJE: Hacer la costura de los lados y de la parte de abajo de los brazos en una, a 1 pt del pt de orillo. |
||||||||||||||||
Explicaciones del diagrama |
||||||||||||||||
|
||||||||||||||||
 |
||||||||||||||||
 |
||||||||||||||||
 |
||||||||||||||||
¿Terminaste este patrón?Entonces, etiqueta tus fotos con #dropspattern #bluewondershoulderpiece o envíalas a la galería #dropsfan. ¿Necesitas ayuda con este patrón?Encontrarás 7 videos tutoriales, un espacio para comentarios/preguntas y más visitando la página del patrón en garnstudio.com © 1982-2026 DROPS Design A/S. Todos los derechos reservados. Este documento, incluyendo todas sus sub-secciones, está protegido por los derechos de autor (copyright). Lee más acerca de lo que puedes hacer con nuestros patrones en la parte de abajo de cada patrón de nuestro sitio. |
||||||||||||||||


Con más de 40 años en el diseño de modelos de punto y de ganchillo, DROPS Design ofrece una de las más vastas colecciones de patrones gratuitos en el internet - traducidos en 17 idiomas. Al día de hoy, contamos con 324 catálogos y 12290 patrones - de los cuales 11673 están traducidos en español.
Nosotros trabajamos con mucho esmero para brindarte lo mejor que las labores de punto y ganchillo tienen para ofrecer,inspiración y consejos, así como hilos de magnífica calidad a precios increíbles! Te gustaría usar nuestros patrones para otro fin además del uso personal? Puedes leer acerca de lo que estás permitida a hacer en el texto de Copyright en la parte de abajo de todos nuestros patrones. Felices labores!
Escribe un comentario sobre DROPS 162-34
¡Nos encantaría saber qué piensas acerca de este patrón!
Si quieres escribir una pregunta referente al patrón, por favor asegúrate de elegir la categoría correcta en el formulario debajo, para acelerar el proceso de respuesta. Los campos obligatorios están marcados con un *.