
Categorías populares
¿Buscas un hilo?


Comentarios / Preguntas (73)
![]() SandraB escribió:
SandraB escribió:
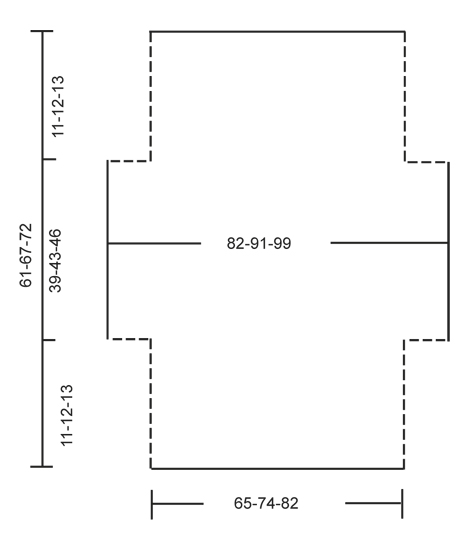
Hallo! Ik wil graag dit patroon maken. Heb nog niet zovaak kleren gehaakt. Daarom begrijp ik de tweede tekening met de maten niet zo goed. Hoe moet ik die zien?
01.07.2017 - 08:37DROPS Design respondió:
Hoi Sandra, In de tweede tekening zie je het werk wanneer je klaar bent met haken, maar nog niet in elkaar genaaid hebt. Het kledingstuk wordt op de horizontale lijn dubbel gevouwen en op op de stippellijnen aan elkaar gehaakt.
01.07.2017 - 12:01
![]() Elizabeth Baker escribió:
Elizabeth Baker escribió:
I have finished my 21 1/2 inches and pattern says to not work 12 stitches on either side how then do I start my next row
21.05.2017 - 19:07DROPS Design respondió:
Dear Mrs Baker, work next row until 12 sts remain, turn and work next row until 12 sts remain, turn and work next row. You will have now 12 sts unworked on each side. Happy crocheting!
22.05.2017 - 09:54
![]() Elizabeth Baker escribió:
Elizabeth Baker escribió:
I have finished my 21 1/2 inches and pattern says to not work 12 stitches on either side, how do I start next row?
20.05.2017 - 19:02
![]() Elizabeth Baker escribió:
Elizabeth Baker escribió:
After I have finished row 8 to continue do I start with A1 or A2 to repeat
01.05.2017 - 16:43DROPS Design respondió:
Dear Mrs Baker, after you have worked A.2 1 time in height, repeat A.2 from row 1. Happy croccheting!
02.05.2017 - 11:48
![]() Elizabeth Baker escribió:
Elizabeth Baker escribió:
After I have finished row 8 do I start with row A1 or A2
01.05.2017 - 16:20DROPS Design respondió:
Dear Elizabeth, after row 8, you should continue and repeat pattern A.2. I hope this helps. Happy crocheting!
06.05.2017 - 11:06
![]() GB escribió:
GB escribió:
Hi, in the pattern directions it says the picot has a DC in the first of the chain 3s, but the video shows a sc instead. Could you clarify please? Thanks!
15.04.2017 - 17:14DROPS Design respondió:
Dear GB, you should work 1 dc in 1st of the 3 ch as explained in the pattern and not 1 sc as worked in the video, thanks for noticing. Happy crocheting!
19.04.2017 - 15:24
![]() Mary Ancira escribió:
Mary Ancira escribió:
The letter sizes, (example- S, M, L,) are not showing what size the bust is like it normally does. Should I assume the sizes are the same on all the patterns?
03.04.2017 - 10:24DROPS Design respondió:
Dear Mrs Ancira, you will find at the bottom of the pattern a measurement chart with measurements for each size in cm, taken flat from side to side. Compare these to a similar garment you have and like the shape to find out the matching size. Read more about sizing and convert into inches here. Happy crocheting!
03.04.2017 - 11:25
![]() Stephanie escribió:
Stephanie escribió:
Bonjour je ne comprends pas l'augmentation, au rang 6 avec l'ajout de maille en l'air que l'on crochete apres avec une bride un ml une bride et ensuite crochete le reste comment ? c'est la que je saisis pas , parce que logiquement on serait sur le rang 7 mais ensuite encore au rang 7 ,pouvez vous m'expliquer merci
14.02.2017 - 00:10DROPS Design respondió:
Bonjour Stéphanie, la 1ère augmentation sur le côté se fait à la fin du rang 5 (= le rang suivant sera le rang 6), on crochète 14 ml à la fin de ce rang, on tourne, on crochète 11B, puis le rang 6 de A.2 et on crochète 15 ml à la fin du rang 6, on tourne, on crochète 1B, 1 ml sur les nouvelles ml et on continue le rang 7 comme A.2. Puis on continue A.2 sur toutes les mailles. Bon crochet!
14.02.2017 - 09:32
![]() Jasmine escribió:
Jasmine escribió:
Dear Jasmine, "on row 1 in A.1 work 1 dc in each st," So since I have 92 stitches in A.1 I need to do 92 DC stitches all the way across?
21.01.2017 - 03:45DROPS Design respondió:
Dear Jasmine, you should have 92 dc on first row, then work: A.1A (= 4 sts), repeat A.1B a total of 7 times (= 7 x 12 sts), and finish with A.1C (= 4 sts), ie: 3 + (x12=84) + 4= 91 sts. Happy crocheting!
23.01.2017 - 09:29Leonore escribió:
This pattern doesnt make any sence. Row one is clear to work. From there on i dont understand anything! Please write out the pattern. I dont work with diagrams or whatever this confusuon is called. Please help!
17.12.2016 - 18:45DROPS Design respondió:
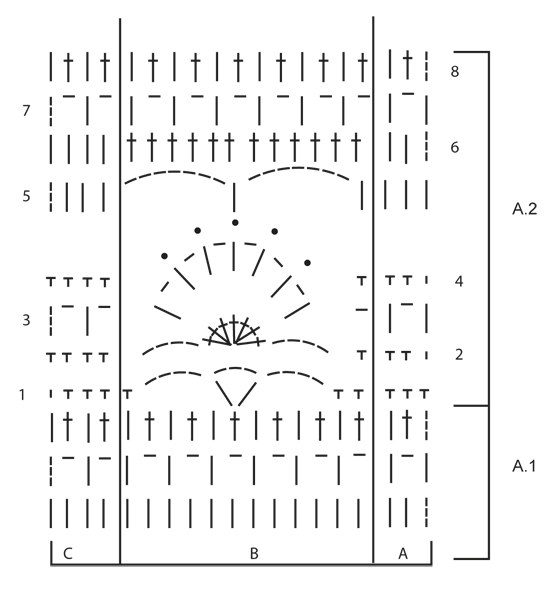
Dear Leonore, there is only diagram to this pattern, start reading diagram from the bottom corner on the right side and read towards the left from RS and from left to right from WS. Each symbol represents 1 st/group of sts. work A.1A (= 3 sts), then repeat A.1B (= 12 sts) and finish with A.1C (= 4 sts). You are welcome to contact your DROPS store for any further individual assistance. Happy crocheting!
19.12.2016 - 09:17
|
||||||||||||||||
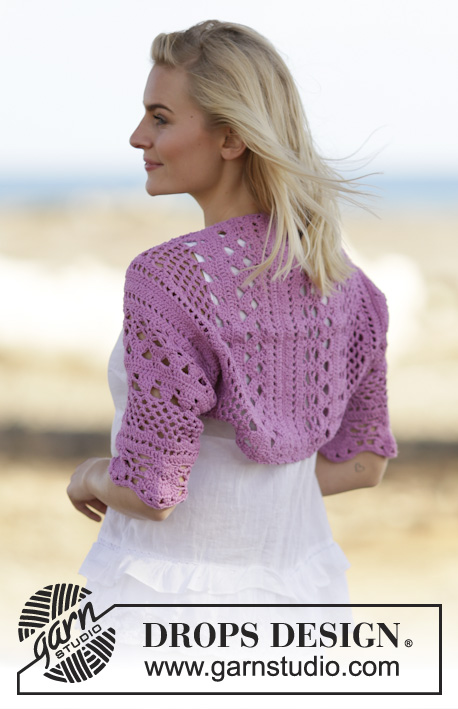
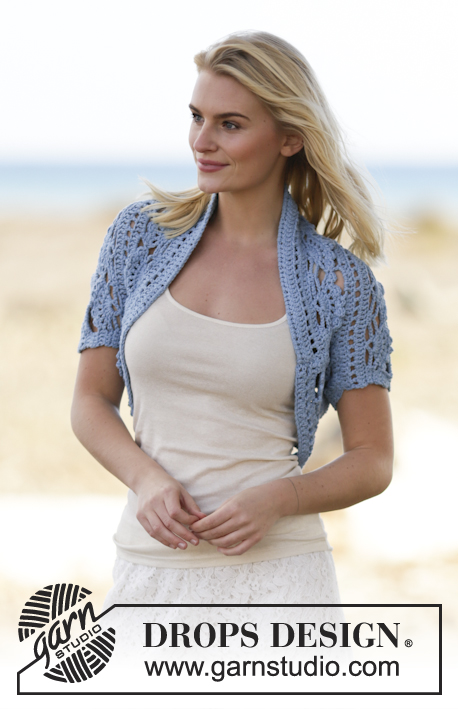
Blue Wonder#bluewondershoulderpiece |
||||||||||||||||
 |
 |
|||||||||||||||
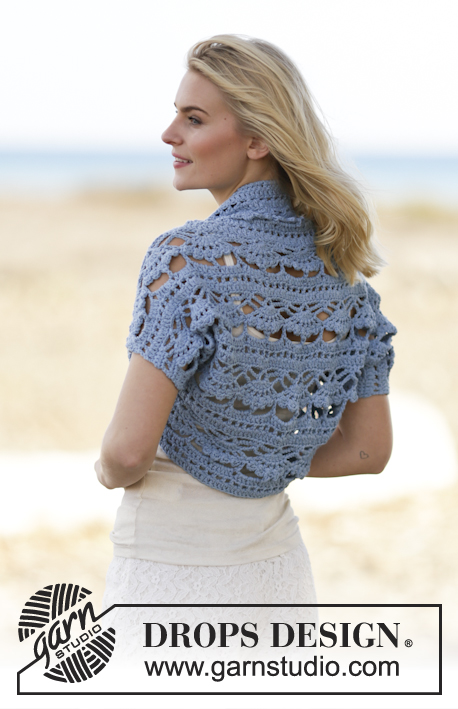
Bolero de ganchillo DROPS, en “Paris”. Talla: S - XXXL.
DROPS 162-34 |
||||||||||||||||
|
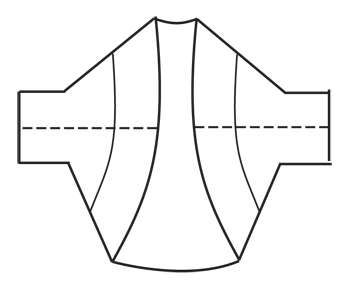
PATRÓN: Ver diagramas A.1 y A.2. ----------------------------------------------------- BOLERO: Montar 110-125-139 cad en ag de ganchillo tamaño 5 mm con Paris. HILERA 1: Virar y trabajar 1 p.a. en la 4ª cad a partir de la ag (= 2 p.a.), trabajar 1 p.a. en cada una de las 4-1-3 cad sig, * saltar 1 cad, 1 p.a. en cada una de las 5 cad sig *, repetir de *a* = 91-103-115 p.a. HILERA 2: Después trabajar de acuerdo al diagrama A.1 de la manera sig: A.1 A, A.1 B 7-8-9 veces en total, terminar con A.1 C. Cuando A.1 ha sido trabajado 1 vez verticalmente, repetir A.2 hacia arriba. AL MISMO TIEMPO, cuando la pieza mida aprox 11-12-13 cm (ajustar para que la hilera sig sea la 6ª hilera en A.2), trabajar 14 cad al final de la hilera (= hilera 5). Virar y trabajar 1 p.a. en la 4ª cad a partir de la ag, después trabajar 1 p.a. en cada una de las sig 10 nuevas cad. Continuar con la 6ª hilera en A.2, al final de la hilera trabajar 15 nuevas cad. Virar y trabajar 1 p.a. en la 6ª cad a partir de la ag, * trabajar 1 cad, saltar 1 cad, 1 p.a. en la cad sig *, repetir de *a* sobre las sig 9 nuevas cad, terminar con 1 cad. Trabajar el resto de la hilera de acuerdo a A.2. En la hilera sig, trabajar como antes hasta los nuevos pts al final de la hilera, trabajar 1 p.a. en cada arco de cad y 1 p.a. en cada p.a. Han sido aumentados 12 p.a. en cada lado = 115-127-139 p.a. Después continuar en la hilera 8 de la manera sig: A.2 A, A.2 B 9-10-11 veces en total, terminar con A.2 C. Cuando la pieza mida aprox 50-55-59 cm (ajustar para que la hilera sig sea la 7ª hilera), no trabajar sobre los 12 p.a. de cada lado = 91-103-115 p.a. Continuar trabajando de la manera sig: A.2 A, A.2 B 7-8-9 veces en total, terminar con A.2 C. Continuar hasta que la pieza mida aprox 61-67-72 cm – ajustar después de una repetición completa de A.2. Cortar y asegurar el hilo. ENSAMBLAJE: Hacer la costura de los lados y de la parte de abajo de los brazos en una, a 1 pt del pt de orillo. |
||||||||||||||||
Explicaciones del diagrama |
||||||||||||||||
|
||||||||||||||||
 |
||||||||||||||||
 |
||||||||||||||||
 |
||||||||||||||||
¿Terminaste este patrón?Entonces, etiqueta tus fotos con #dropspattern #bluewondershoulderpiece o envíalas a la galería #dropsfan. ¿Necesitas ayuda con este patrón?Encontrarás 7 videos tutoriales, un espacio para comentarios/preguntas y más visitando la página del patrón en garnstudio.com © 1982-2026 DROPS Design A/S. Todos los derechos reservados. Este documento, incluyendo todas sus sub-secciones, está protegido por los derechos de autor (copyright). Lee más acerca de lo que puedes hacer con nuestros patrones en la parte de abajo de cada patrón de nuestro sitio. |
||||||||||||||||


Con más de 40 años en el diseño de modelos de punto y de ganchillo, DROPS Design ofrece una de las más vastas colecciones de patrones gratuitos en el internet - traducidos en 17 idiomas. Al día de hoy, contamos con 324 catálogos y 12290 patrones - de los cuales 11673 están traducidos en español.
Nosotros trabajamos con mucho esmero para brindarte lo mejor que las labores de punto y ganchillo tienen para ofrecer,inspiración y consejos, así como hilos de magnífica calidad a precios increíbles! Te gustaría usar nuestros patrones para otro fin además del uso personal? Puedes leer acerca de lo que estás permitida a hacer en el texto de Copyright en la parte de abajo de todos nuestros patrones. Felices labores!
Escribe un comentario sobre DROPS 162-34
¡Nos encantaría saber qué piensas acerca de este patrón!
Si quieres escribir una pregunta referente al patrón, por favor asegúrate de elegir la categoría correcta en el formulario debajo, para acelerar el proceso de respuesta. Los campos obligatorios están marcados con un *.