
Categorías populares
¿Buscas un hilo?


Comentarios / Preguntas (67)
![]() Rosalind escribió:
Rosalind escribió:
I do not understand the following: CROCHET INFO: Replace first dc at beg of every dc row with 3 ch. CROCHET TIP: To avoid a tight edge, work 5 ch more to turn with in each side of piece. Do I ch8 at the end of every row and then turn to continue the next row? Where exactly do I put the last dc on the return row when I get to the ch8 from the previous row? I am an advanced crocheter but feel very obtuse as I find this pattern extremely confusing.
15.09.2020 - 20:47DROPS Design respondió:
Dear Rosalind, the 3 chains at the beg of the row replace the first dc - to get looser edges, you can work 5 chains instead of 3 (as in CROCHET TIP), on return row, work 1 dc in the 5th chain from the beg of row. Happy crocheting!
16.09.2020 - 08:42
![]() Kerry Field escribió:
Kerry Field escribió:
Brilliant thank you so much for your clarification 💖
26.06.2020 - 09:54
![]() Kerry Field escribió:
Kerry Field escribió:
Thank you for your prompt response to my question but if we loosely chain 6 do we then work Row 5 into the chain stitches if so there isn’t enough for the 8 trebles that should be in that section or is A1 ignored from the repetition stages? Thanks!
26.06.2020 - 07:43DROPS Design respondió:
Dear Mrs Field, at the beginning of this row crochet the 6 chains (you will crochet A.5B in these 6 chains on row 2), then crochet A.2 and repeat A.3, crochet 8 chains (= 5 chains + 3 to turn with). Turn and crochet now A.5 over the chains before A.3, repeat A.3 and work A.2 + A.5 over the 6 chains worked at the beg of row 1. (you don't crochet A.1 anymore). Hope this will help.
26.06.2020 - 08:03
![]() Kerry Field escribió:
Kerry Field escribió:
After AX and AY have been completed once and the marker has been inserted I understand the yarn is cut and then we work again from the right side. Please can you confirm the amount of trebles that should be at the start and end of Row 1 and Row 2 - is it 12 as per row 5?
25.06.2020 - 19:06DROPS Design respondió:
Dear Mrs Field, A.2 starts on row 5 with 5 trebles (= worked over a total of 18 trebles). The first 8 trebles at the arrow 5 are the 8 stitches in A.1. Happy crocheting!
26.06.2020 - 07:20
![]() LINDA escribió:
LINDA escribió:
I am having problems with the measurments. The startin chain of 81, is that going to be the back OR the sleeve opening? I might be crocheting too loose as it seems to become huge
02.05.2020 - 06:04DROPS Design respondió:
Dear Linda, each side is worked from mid back towards sleeve edge, ie the 81 chains is for mid back, on first row you should have only 68 sts - since the fundation chain is most of the time too tight, you cast on here more chains and skip chains evenly on first row to avoid tight edge - if your foundation chain is not that tight you can cast on the number of stitches required - remember to replace the first st with 3 chains; Happy crocheting!
04.05.2020 - 11:32
![]() Susanne Ortvald escribió:
Susanne Ortvald escribió:
Jeg har læst tidligere kommentaren. Men forstår det stadig ikke. Skal jeg når jeg har hæklet række 1-11 I A.X, fortsætte med at hækle række 5-11 2 gange mere, så jeg I alt har dette mønster 3 gange, før jeg fortsætter med række 12 og A.Y?
27.02.2019 - 15:45DROPS Design respondió:
Hei Susanne. Etter at du har heklet A.x 1 gang i høyden (til og med omgang 12) hekler du som vist i A.Y. Det vil si at A.2 og A.3 fortsetter som før, mens det vokser ut 1 ny rapport av mønsteret i hver side (altså A.1 og A.4). Når A.Y er heklet ferdig i høyden hekler du videre fra rad 5 i A.X, med luftmasker i hver side som forklart under 1. RAD. God fornøyelse
07.03.2019 - 15:11
![]() Lara escribió:
Lara escribió:
Ik haak de kleinste maat. Mij is alleen niet duidelijk vanaf waar ik moet gaan herhalen en hoe vaak. Dit is voor het eerst dat ik zo’ n soort project als een vestje haak, dus best ingewikkeld.. Bedankt alvast!
12.06.2018 - 14:19Oana escribió:
Hi! I crochet toys so this is a first for me. Can you please explain the 3rd row for me. It says to crochet A1,A2,A3 for 1,2,3 guessing those are the sizes, then finish with A4. I'm working a xl and apparently I don't have enough chains to repeat 3 times. So what should I repeat and what am I doing wrong? Sorry for the bad English, i'm from Romania.
07.11.2017 - 18:52DROPS Design respondió:
Dear Oana, in size XL you have 68 tr (UK-English)/dc(US-English) and work the 3rd row as follows: A.18 (= over the first 8 tr/dc), work then A.2 (= 18 tr/dc) over the next 18 sts, then repeat A.2 (=17 tr/dc) over the next 34 sts (= 2 times in width), and finish with A.4 over the last 8 sts: 8 + 18 + 34 + 8 = 68 sts. Happy crocheting!
08.11.2017 - 08:42
![]() Natasja Buijk escribió:
Natasja Buijk escribió:
Hallo , Ik wil graag de bolero maken. Alleen kom ik Uit het volgende niet uit : klopt het dat je bij de mouwen begint ? En wat word er met de volgende stukje patroon bedoeld ? ( ik snap met name het stukje van dan1-0-1 stk in elke van de volgende 1-0-5 l) Ik hoop dat ik geholpen kan worden Groetjes Natasja
02.04.2017 - 21:55DROPS Design respondió:
Hoi Natasja, Dat klopt; je haakt vanaf de mouw naar midden achter. 1-0-1 stk slaat op de verschillende maten, dus 1 stokje voor maat S/M, 0 stjokjes voor maat L/XL enzovoort. Dus als je bijv. in de maat XXXL haakt, dan haak je 1 stokje in elk van de volgende 5 lossen, dan sla je 1 losse over, dus daar haak je geen stokje in en dan haak je 1 stokje in elk van de volgende 6 lossen. Dit herhaal je nog 12 keer.
03.04.2017 - 08:36
![]() France Boisseau escribió:
France Boisseau escribió:
Bonjour, j'ai un problème avec le point de fantaisie. Lorsque vous dites "crocheter en aller-retour", est-ce que je dois crocheter par exemple A.2 tel qu'il se présente sur le diagramme ou dois-je le faire à rebours sur le rang envers? Merci.
01.09.2016 - 14:38DROPS Design respondió:
Bonjour Mme Boisseau, quand on crochète en allers et retours, on lit les diagrammes de droite à gauche sur l'endroit et de gauche à droite sur l'envers. Bon crochet!
01.09.2016 - 15:09
|
|||||||||||||||||||||||||||||||
Such A Doll#suchadollbolero |
|||||||||||||||||||||||||||||||
 |
 |
||||||||||||||||||||||||||||||
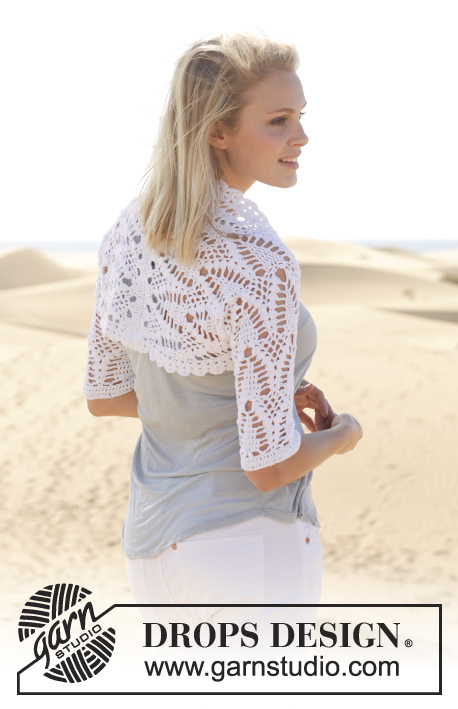
Bolero DROPS a ganchillo con patrón de calados y puntos altos, en “Safran”. Talla: S – XXXL.
DROPS 152-20 |
|||||||||||||||||||||||||||||||
|
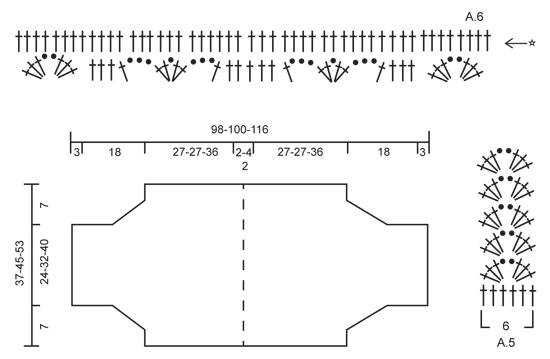
INFORMACIÓN PARA LA ELABORACIÓN DEL TRABAJO: Sustituir el primer p.a. al inicio de cada hilera de p.a. con 3 cad. TIP PARA LA ELABORACIÓN DEL TRABAJO: Para evitar una orilla apretada, hacer 5 cad más para virar en cada lado de la pieza. PATRÓN: Ver diagramas A.1-A.6. Los diagramas muestran todas las hileras en el patrón vistas por el LD. ------------------------------------------------------ BOLERO: La pieza es trabajada en dos partes y unidas con una costura al centro de la espalda. PRIMER LADO: Mon 61-81-100 cad flojas en ag de ganchillo tamaño 4 mm con Safran. Trabajar la primera hilera de la manera sig (= LD): 1 p.a. en la 4ª cad a partir de la ag (= 2 p.a.). Después 1-0-1 p.a. en cada una de las 1-0-5 cad sig, * saltar 1 cad, 1 p.a. en cada una de las 6 cad sig *, repetir de *a* 7-10-12 veces más (8-11-13 veces en total) = 51-68-85 p.a. Virar y hacer 1 hilera con 1 p.a. en cada p.a. de la hilera anterior. NOTA! Esta hilera es la segunda hilera en el diagrama A.1, A.2, A.3 y A.4. Después trabajar de la manera sig por el LD – LEER TIP PARA LA ELABORACIÓN DEL TRABAJO: HILERA 1: (= 3ª hilera en el diagrama A.1, A.2, A.3 y A.4). Trabajar el PATRÓN de acuerdo al diagrama A.1 (= 8 p.a.), después trabajar A.2 (= 18 p.a.), A.3 (= 17 p.a.) 1-2-3 veces a lo ancho, terminar con A.4 (= 8 p.a.). Continuar el patrón de acuerdo al diagrama A.1, A.2, A.3 y A.4 de ida y vuelta, de la misma manera, hasta la 11ª hilera en el patrón. En esta hilera hacer 9 p.a. triples en vez de p.a. en cada lado de la pieza (es decir, en A.1 y A.4, primer pt en A.2 y último pt en A.3). Después de haber trabajado A.X 1 vez verticalmente, continuar las 2-3-4 repeticiones centrales como antes y, AL MISMO TIEMPO, aum las repeticiones en cada lado de la pieza (es decir, A.1 y A.4) a una nueva repetición del patrón en cada lado de la manga (= A.Y). Después de haber trabajado A.Y 1 vez verticalmente, insertar un marcapuntos en esta hilera. Cortar el hilo. Después trabajar de la manera sig, por el LD: HILERA 1: 6 cad flojas. Comenzar en la 5ª hilera en A.X y trabajar de la manera sig: A.2 1 vez sobre la primera repetición en el lado derecho de la pieza (= la repetición aum de A.1), después trabajar A.3 3-4-5 veces en total. Terminar con 8 cad flojas (incl 3 cad para virar = 1 p.a.). Virar la pieza. HILERA 2: Trabajar A.5 (= 6 p.a.), comenzar en la 4ª cad a partir de la ag. NOTA! Las 3 cad para virar = primer p.a. en A.5. Continuar con A.3 3-4-5 veces en total, A.2 1 vez, y la 1ª hilera en A.5 en las 6 cad sig. Virar la pieza. HILERA 3: Hacer 5 cad para virar – leer TIP PARA LA ELABORACIÓN DEL TRABAJO. Después trabajar el patrón como antes. Continuar este patrón de ida y vuelta hasta que la pieza mida 48-48-57 cm a partir del inicio de la orilla y después de haber hecho 3-3-4 repeticiones verticalmente a partir del marcapuntos. Después hacer una orilla en p.a. de acuerdo al diagrama A.6. NOTA! Trabajar de acuerdo a la 2ª hilera en el diagrama. Cortar y asegurar el hilo. Trabajar la otra parte de la misma manera. ENSAMBLAJE: Unir las dos partes con una costura al centro de la espalda. Doblar el bolero en dos a todo lo largo, y unir con una costura a partir de la parte de abajo de cada manga y ascendiendo hasta donde el marcapuntos fue insertado en cada lado – coser orilla con orilla para evitar que se forme una costura abultada. |
|||||||||||||||||||||||||||||||
Explicaciones del diagrama |
|||||||||||||||||||||||||||||||
|
|||||||||||||||||||||||||||||||
 |
|||||||||||||||||||||||||||||||
 |
|||||||||||||||||||||||||||||||
¿Terminaste este patrón?Entonces, etiqueta tus fotos con #dropspattern #suchadollbolero o envíalas a la galería #dropsfan. ¿Necesitas ayuda con este patrón?Encontrarás 5 videos tutoriales, un espacio para comentarios/preguntas y más visitando la página del patrón en garnstudio.com © 1982-2026 DROPS Design A/S. Todos los derechos reservados. Este documento, incluyendo todas sus sub-secciones, está protegido por los derechos de autor (copyright). Lee más acerca de lo que puedes hacer con nuestros patrones en la parte de abajo de cada patrón de nuestro sitio. |
|||||||||||||||||||||||||||||||


Con más de 40 años en el diseño de modelos de punto y de ganchillo, DROPS Design ofrece una de las más vastas colecciones de patrones gratuitos en el internet - traducidos en 17 idiomas. Al día de hoy, contamos con 324 catálogos y 12290 patrones - de los cuales 11685 están traducidos en español.
Nosotros trabajamos con mucho esmero para brindarte lo mejor que las labores de punto y ganchillo tienen para ofrecer,inspiración y consejos, así como hilos de magnífica calidad a precios increíbles! Te gustaría usar nuestros patrones para otro fin además del uso personal? Puedes leer acerca de lo que estás permitida a hacer en el texto de Copyright en la parte de abajo de todos nuestros patrones. Felices labores!
Escribe un comentario sobre DROPS 152-20
¡Nos encantaría saber qué piensas acerca de este patrón!
Si quieres escribir una pregunta referente al patrón, por favor asegúrate de elegir la categoría correcta en el formulario debajo, para acelerar el proceso de respuesta. Los campos obligatorios están marcados con un *.