
Categorías populares
¿Buscas un hilo?


Comentarios / Preguntas (61)
![]() Kathleen Goulding escribió:
Kathleen Goulding escribió:
Hello. What would the best cast on edge be for this hooded aurora jacket.
12.08.2019 - 20:55DROPS Design respondió:
Dear Mrs Goulding, you can use your favorite technique to cast on, just don't forget -as always - to avoid a tighting edge. Happy knitting!
13.08.2019 - 08:12
![]() Brenda Wilkinson escribió:
Brenda Wilkinson escribió:
I am going to use And es to make Aurora. Can It be felted if I knit a size larger? Thanks.
25.04.2019 - 22:08DROPS Design respondió:
Dear Mrs Wilkinson, Andes is feltable but this pattern is not felted so that we don't have any experience of how it would work if felted and we are unfortunately not able to adapt every pattern to every single request. Read more about felting here and please contact your DROPS store for any further individual assistance. Happy knitting!
26.04.2019 - 08:52
![]() Karen escribió:
Karen escribió:
Could I do a two tie sweater with a dark curve panel on each side. Like an hour glass visual shaping? Like this )__( and the sleeve and hood and moddle of sweater a multi colored boucle?
28.02.2019 - 16:06DROPS Design respondió:
Dear Karen, you will find here all our jacket patterns with rounded front edges. Happy knitting!
01.03.2019 - 09:25
![]() Freya escribió:
Freya escribió:
Hallo, Ich habe zwei Fragen zum Vorderteil: 1. Welche Maschen werden auf den Hilfsfaden gelegt? Die zur Mitte/Knopfleiste hin gerichteten? 2. Was ist damit gemeint: "damit man den Faden nicht abschneiden muss strickt man die M. bevor man sie auf den Hilfsfaden legt"? Im Videotutorial ist der Hilfsfaden ein seperater Faden!?
19.11.2018 - 22:43DROPS Design respondió:
Liebe Freya, Sie können diese Maschen entweder auf einem Hilfsnadel/separaten Nadel/Hilfsfaden legen. Beim linken Vorderteil, stricken Sie am Anfang der Rückreihe (= vom Halsausschnitt bis Seite/Armausschnitt) die ersten 7 Maschen, dann legen Sie diese 7 M still, die Reihe bis zur Ende stricken, wenden, Hinreihe stricken, wenden, um am Anfang der nächste Rückreihe stricken Sie die ersten 3-4 M (siehe Grösse) und legen diese 3-4 M still (jetzt wurden 10-11 M stillgelegt) und die Reihe bis zur Ende stricken. Diese stillgelegten Maschen werden bei der Kaputze wieder gestrickt. Viel Spaß beim stricken!
20.11.2018 - 08:23
![]() ANNICK escribió:
ANNICK escribió:
SUR LA PHOTO LES BOUTONS SONT POSES SUR LE COTE AVANT DROIT ET DANS LES EXPLICATIONS C EST SUR CE COTE QUE L ON FAIT LES BOUTONNIÈRES .
27.09.2017 - 19:05DROPS Design respondió:
Bonjour Annick, les boutonnières sont généralement ouvertes sur la bordure devant droit pour les femmes, la photo a probablement été inversée. Bon tricot!
28.09.2017 - 10:33
![]() Nina escribió:
Nina escribió:
Ik heb een vraag over het laatste stukje van het voorpand. Ik begrijp niet wat jullie bedoelen met hulpdraad. Hoe moet ik dat doen?
27.12.2016 - 21:24
![]() Natalia Tiessen escribió:
Natalia Tiessen escribió:
Hallo alle zusammen! Hab diese tolle Jacke vor kurzem gestrickt Und bin total zufrieden!! Ich hab die Nähte nicht genäht, sondern auf rechter Seite zusammen gestrickt, Sieht ganz toll aus!
13.10.2014 - 13:32
![]() Annika escribió:
Annika escribió:
Hi, ich komme bei dem teil in dem man die Maschen auf den hilfsfaden legen soll nicht weiter :( könnten sie mir diesen teil bitte genauer erklären? Vielen Dank! Viele Grüße Annika
15.09.2014 - 20:06DROPS Design respondió:
Schauen Sie sich am besten ein Hilfsvideo an: unter Tipps & Hilfe => Strickvideos das Video "Maschen auf einen Faden stilllegen". Für das Vorderteil der Jacke müssen Sie die ersten 7 M der R stilllegen, beim nächsten Mal legen Sie 1 M zu diesen stillgelegten M dazu, das machen Sie dann noch 2x/3x, je nach Größe. Dann haben Sie insgesamt 10 bzw. 11 M auf dem Hilfsfaden. Ich hoffe, damit ist Ihre Frage beantwortet? Ansonsten fragen Sie einfach noch einmal nach. Gutes Gelingen!
16.09.2014 - 10:38Laslig escribió:
Hi, where do I find the size chart to see which size I should knit? Thanks
02.07.2014 - 15:24DROPS Design respondió:
Dear Mrs Laslig, you will find at the end of the pattern a measurement chart of the finished garment, with all measurements for each size, taken flat, from side to side (in cm). Happy knitting!
02.07.2014 - 18:42
![]() M. Wicht escribió:
M. Wicht escribió:
Hallo, die Jacke habe ich mit Eskimo gestrickt, super schön und schön warm. Ich freue mich schon auf das nächste Projekt. Lieben Gruß M. Wicht
04.05.2014 - 00:16
|
|
Aurora#aurorajacket |
|
 |
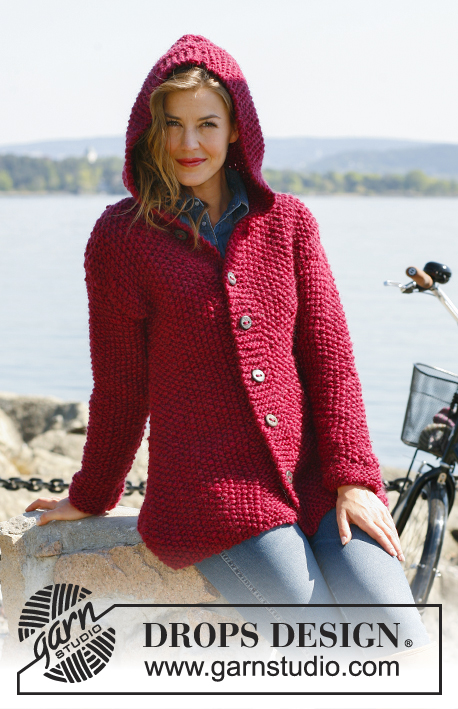 |
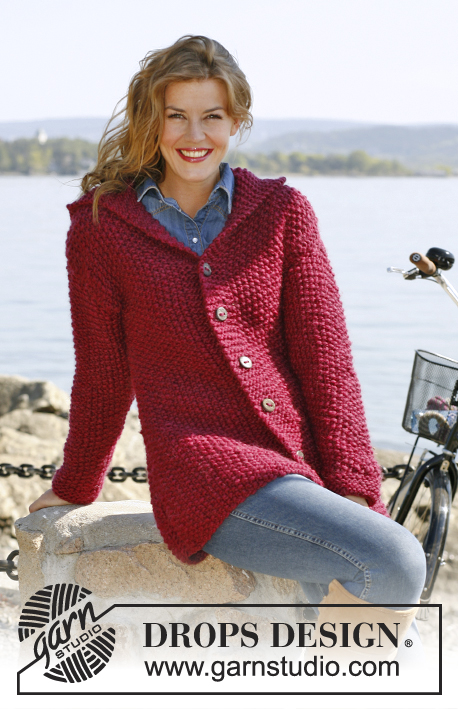
Saco DROPS, de punto, en punto arroz con capucha / gorro en “Andes” o “Snow”. Talla: S – XXXL.
DROPS 132-9 |
|
|
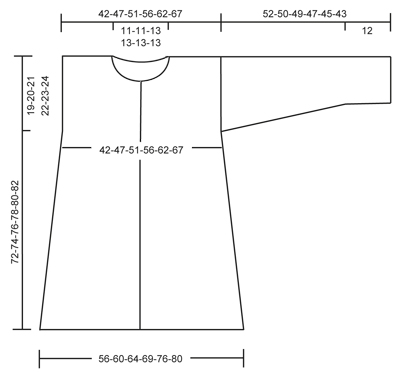
PT ARROZ: 1ª vuelta: * 1d, 1r *, repetir de *a*. 2ª vuelta: derecho sobre revés y revés sobre derecho. Repetir la 2ª vuelta. PT MUSGO (de ida y vuelta en la ag): Todas las vtas de derecho. TIP PARA TOMAR LAS MEDIDAS: Debido al peso de la prenda, suspender la pieza verticalmente para tomar las medidas, de lo contrario la prenda quedará muy larga cuando se use. OJALES: Rem para los ojales en el borde delantero derecho. 1 ojal = Tejer juntos de derecho el 3º y 4º pt a partir del centro del frente, después hacer 1 HEB (lazada). Rem para los ojales cuando la pieza mida: TALLA S: 19, 28, 37, 46, 55 y 64 cm TALLA M: 21, 30, 39, 48, 57 y 66 cm TALLA L: 23, 32, 41, 50, 59 y 68 cm TALLA XL: 20, 30, 40, 50, 60 y 70 cm TALLA XXL: 22, 32, 42, 52, 62 y 72 cm TALLA XXXL: 24, 34, 44, 54, 64 y 74 cm TIP PARA LA ELABORACIÓN DEL TEJIDO (aplica a la capucha): Para evitar que se formen agujeros en las uniones en donde los pts para el cuello fueron deslizados en un gancho o seguro aux, levantar el hilo entre 2 pts y tejer este hilo conjuntamente con el 1er pt en la vta. ------------------------------------------------------ ESPALDA: Tejer de ida y vuelta en la ag. Mon 50-54-58-62-68-72 pts en ag tamaño 10 mm con Andes. Tejer en PT ARROZ – ver explicación arriba! RECUERDE MANTENER LA MISMA TENSIÓN DE TEJIDO DE LA MUESTRA! Cuando la pieza mida 8 cm – LEER TIP PARA TOMAR LAS MEDIDAS – dism 1 pt en cada lado. Repetir la dism cada 8 cm un total de 6 veces = 38-42-46-50-56-60 pts. Cuando la pieza mida 53-54-55-56-57-58 cm, insertar 1 marcapuntos (MP) en cada lado (marca el inicio de la sisa). Cuando la pieza mida 70-72-74-76-78-80 cm, rem los 8-8-10-10-10-10 pts centrales para el cuello y terminar cada hombro por separado. Después rem 1 pt en la vta sig a partir del cuello = 14-16-17-19-22-24 pts. Rem cuando la pieza mida 72-74-76-78-80-82 cm. DELANTERO IZQUIERDO: Tejer de ida y vuelta en la ag. Mon 30-32-34-36-39-41 pts (incl 7 pts del borde en el centro del frente) en ag tamaño 10 mm con Andes. Tejer en PT MUSGO – ver explicación arriba – sobre los 7 pts del borde en el centro del frente y pt arroz sobre los pts restantes. Cuando la pieza mida 8 cm, empezar a dism en el lado como se hizo en la pieza de la espalda = 24-26-28-30-33-35 pts. Cuando la pieza mida 53-54-55-56-57-58 cm, insertar 1 MP en el lado (marca el inicio de la sisa). Continuar tejiendo hasta que la pieza mida 66-68-70-72-74-76 cm. Ahora desl pts en el inicio de cada vta a partir del cuello en 1 gancho o seguro aux (después de haber sido tejidos, para evitar cortar el hilo) de la manera sig: 7 pts 1 vez y 1 pt 3-3-4-4-4-4 veces = 14-16-17-19-22-24 pts restantes en el hombro. Rem cuando la pieza mida 72-74-76-78-80-82 cm. DELANTERO DERECHO: Mon y tejer como la pieza del delantero izquierdo, pero a la inversa. Adicionalmente rem para los OJALES en el borde – ver explicación arriba! MANGA: Tejer de ida y vuelta en la ag. Mon 24-24-26-26-28-28 pts en ag tamaño 10 mm con Andes. Tejer 8 vtas en pt musgo, continuar en pt arroz. Al mismo tiempo cuando la pieza mida 12 cm, aum 1 pt en cada lado. Repetir el aum cada 8-7-7-5-5-4 cm un total de 5-6-6-7-7-8 veces = 34-36-38-40-42-44 pts. Cuando la pieza mida 52-50-49-47-45-43 cm, rem flojamente todos los pts. NOTA: Medidas más cortas en las tallas más grandes debido a una mayor anchura de hombros. TERMINACIÓN: Hacer las costuras de los hombros. Montar las mangas – ver los marcadores en la pieza del frente y espalda para el inicio de las mangas. Hacer las costuras de mangas y laterales en una, coser orilla con orilla en la hebra delantera del pt externo para evitar que se forme una costura abultada. Coser los botones. CAPUCHA: Levantar aprox 35 a 42 pts alrededor del cuello (incl pts en los ganchos o seguros aux en el frente) en ag tamaño 10 mm con Andes. Tejer 1 vta de derecho por el LR, al mismo tiempo evitando la formación de agujeros en las transiciones en el frente del cuello – LEER TIP PARA LA ELABORACIÓN DEL TEJIDO. Después tejer 8 vtas en pt musgo. En la vta sig por el LD, distribuir aum equitativamente para ajustar a 48-50-52-54-56-58 pts. NOTA: No hacer aum sobre los 7 pts externos en cada lado (= bordes). Cont en pt musgo sobre los 7 pts externos en cada lado y pt arroz sobre los pts restantes hasta que la capucha mida 47-47-48-48-49-49 cm, rem. Doblar la capucha en dos y unirla con una costura en la parte de arriba, orilla con orilla, para evitar que se forme una costura abultada. |
|
 |
|
¿Terminaste este patrón?Entonces, etiqueta tus fotos con #dropspattern #aurorajacket o envíalas a la galería #dropsfan. ¿Necesitas ayuda con este patrón?Encontrarás 10 videos tutoriales, un espacio para comentarios/preguntas y más visitando la página del patrón en garnstudio.com © 1982-2026 DROPS Design A/S. Todos los derechos reservados. Este documento, incluyendo todas sus sub-secciones, está protegido por los derechos de autor (copyright). Lee más acerca de lo que puedes hacer con nuestros patrones en la parte de abajo de cada patrón de nuestro sitio. |
|


Con más de 40 años en el diseño de modelos de punto y de ganchillo, DROPS Design ofrece una de las más vastas colecciones de patrones gratuitos en el internet - traducidos en 17 idiomas. Al día de hoy, contamos con 324 catálogos y 12290 patrones - de los cuales 11673 están traducidos en español.
Nosotros trabajamos con mucho esmero para brindarte lo mejor que las labores de punto y ganchillo tienen para ofrecer,inspiración y consejos, así como hilos de magnífica calidad a precios increíbles! Te gustaría usar nuestros patrones para otro fin además del uso personal? Puedes leer acerca de lo que estás permitida a hacer en el texto de Copyright en la parte de abajo de todos nuestros patrones. Felices labores!
Escribe un comentario sobre DROPS 132-9
¡Nos encantaría saber qué piensas acerca de este patrón!
Si quieres escribir una pregunta referente al patrón, por favor asegúrate de elegir la categoría correcta en el formulario debajo, para acelerar el proceso de respuesta. Los campos obligatorios están marcados con un *.