
Beliebte Kategorien
Suchen Sie nach einem Garn?


Kommentare / Fragen (17)
![]() Monica Panera hat geschrieben:
Monica Panera hat geschrieben:
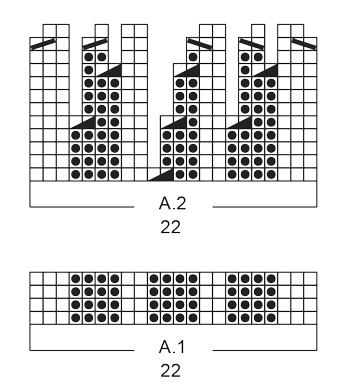
Buongiorno, ho difficoltà a capire lo schema A2 della fascia per capelli che sto facendo Warm Lavender modello:ee-536 Quando nello schema non vi sono quadratini che spiegano il punto da fare ma c'è il vuoto cosa significa? Che il punto è da passare sull'altro ferro senza lavorarlo? Aspetto una vostra gentile risposta.Grazie
12.12.2018 - 16:49DROPS Design hat geantwortet:
Buongiorno Monica. Trova un vuoto perchè al ferro precedente è stata diminuita una maglia. Quando incontra il vuoto, deve lavorare la maglia come indicato nel quadratino successivo. Quindi per es., alla riga 6 del diagramma A2 (riga lavorata sul rovescio, quindi si legge da sinistra verso destra), lavora: 3 m rovescio, 3 m diritto, 2 maglie rovescio e così via. Buon lavoro!
12.12.2018 - 17:02
![]() Alva hat geschrieben:
Alva hat geschrieben:
Hur många masker ska man lägga upp om man har 4mm stickor och garn till stickorna?
23.02.2018 - 21:35DROPS Design hat geantwortet:
Hei Alva. Oppskriften er skrevet til pinne 7 og Eskimo ... et garn som er tykkere og koster ca 15 kr for 50 gr ... kanske du skulle bytte garn - da blir den myk og fin og du kan bruke oppskriften :) Go Fornøyelse.
24.02.2018 - 09:34
![]() Sandra hat geschrieben:
Sandra hat geschrieben:
What is meant by: K YO twisted on next row & P YO twisted on next row?
25.11.2017 - 22:47DROPS Design hat geantwortet:
Hi Sandra, To avoid a hole after increasing by making a yarn over (YO) you need to work them twisted. Either this will be knitted twisted or purled twisted depending on the pattern. To work twisted you need to insert the needle in the back loop of the stitch, rather than the front. I hope this helps. Happy knitting!
26.11.2017 - 06:49
![]() Sandra hat geschrieben:
Sandra hat geschrieben:
Part 2: I am so confused! YouTube person says that when you are reading charts in the round, everything is always read from Right to Left. So what is the right way?
23.11.2017 - 01:03DROPS Design hat geantwortet:
Dear Sandra, that's right, diagrams will be read here from the right towards the left every round (= you are working here in the round, ie from RS) starting on the bottom corner on the right side. Read more here. Happy knitting!
23.11.2017 - 08:35
![]() Sandra hat geschrieben:
Sandra hat geschrieben:
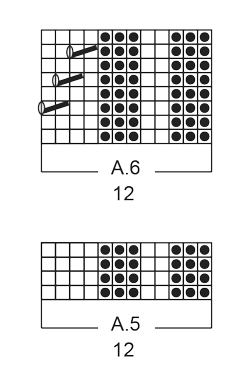
Part 1: A friend of mine read chart A.6 as this: "I'm looking at that exact pattern and this particular chart A6 is just k2tog, yo, k, k. The cable is worked in chart A3. In laments terms this would read: R1: p4, k3, p2, k3 R2: p3, k2, p3, k2tog, yo, k2 R3: p4, k3, p2, k3 R4: p3, k2, p3, k1, k2tog, yo, k1 R5: p4, k3, p2, k3 R6: p3, k2, p3, k2, k2tog, yo R7: p4, k3, p2, k3 R8: p3, k2, p3, k4" Is this correct?
23.11.2017 - 01:02DROPS Design hat geantwortet:
Dear Sandra, start reading diag. from the bottom corner on the right side towards the left on every round (from RS), so that on row 3 in A.3 work the cable (previous and next rows are K from RS) and work row 3 in A.6 as follows: P3, K2, P3, K2, K2 tog, YO. When diagrams are done in height, repeat from row 1. Happy knitting!
23.11.2017 - 08:33
![]() Sandra hat geschrieben:
Sandra hat geschrieben:
Hi again...sorry for bugging you. In chart A6 of the neck warmer pattern - 1 slant from Right to Left over 2 squares then a yarn over is a cable (right?). How does this work? Slip 2 sts onto a cable needle (to the front or back yarn over then yarn over then knit from the cable?
22.11.2017 - 01:33DROPS Design hat geantwortet:
Dear Sandra, the symbol used in A.6 with a slant line is 3rd symbol under diagram text, ie Knit 2 stitches together (and then make a YO (= 5th symbol) to compensate this dec). Happy knitting!
22.11.2017 - 09:10
![]() Sandra Delamont hat geschrieben:
Sandra Delamont hat geschrieben:
I have just finished the headband successfully after numerous attempts. I am very new to knitting and reading charts in patterns - so this is my first. When I look at the picture the neck warmer I see cable patterns. However, when I read the chart and words there is no mention of slipping stitches onto cable needles. What am I missing in the chart/directions? Can you please help me? Thanks. Sandra
11.11.2017 - 20:19DROPS Design hat geantwortet:
Hi Sandra, The diagram A6 has the cables - just 2 this time (the sloping lines over 2 squares) and A6 is worked after you have worked A5 for 4 cm. You work A6 until the neck warmer measures 20-22 cm and then A5 for another 4 cm. I hope this helps and happy knitting!
12.11.2017 - 06:33
|
|||||||||||||||||||||||||
Warm Lavender |
|||||||||||||||||||||||||
|
|
|||||||||||||||||||||||||
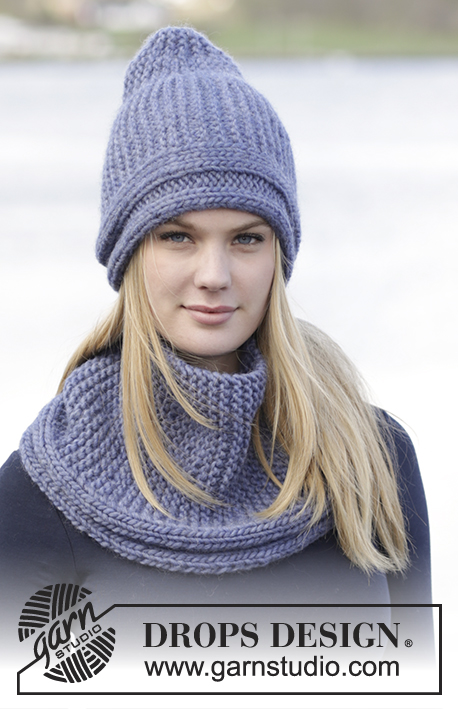
Das Set umfasst: Gestricktes DROPS Stirnband und Kragenschal in ”Snow” mit Rippenmuster.
DROPS Extra 0-1234 |
|||||||||||||||||||||||||
|
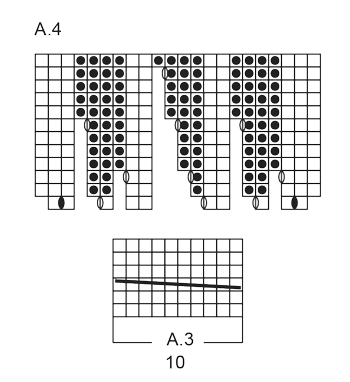
KRAUSRIPPEN (in Hin- und Rück-R): 1 Krausrippe = 2 R kraus re = 2 R re. MUSTER: Siehe Diagramme A.1-A.6. Die Diagramme zeigen alle Hin- und Rück-R, Hin-R werden von rechts nach links, Rück-R von links nach rechts gelesen. ---------------------------------------------------------- STIRNBAND: Die Arb wird in Hin- und Rück-R gestr. 22 M auf Nadel Nr. 7 mit Snow anschlagen. 1 KRAUSRIPPE (siehe oben) str. Dann im Muster A.1 str (= 22 M). MASCHENPROBE BEACHTEN! A.1 wdh, bis die Arb 14-15-16 cm misst, daran angepasst, dass die nächste R eine Hin-R ist. Dann Muster A.2 über A.1 str. Wenn A.2 1 x in der Höhe gestr wurde, sind 10 M auf der Nadel. A.3 1 x in der Höhe str. Dann A.4 über A.3 str, die Umschläge dabei verschränkt in das Muster einarb. Wenn A.4 1 x in der Höhe gestr wurde, sind 22 M auf der Nadel. A.1 str, bis die Arb eine Gesamtlänge von 48-50-52 cm hat. 1 Krausrippe (= 2 R kraus re) str. Abketten. FERTIGSTELLEN: Die Anschlag- und Abkettkante aneinander nähen. ---------------------------------------------------------- KRAGENSCHAL: Die Arb wird in Rd gestr. 72-84 M auf Rundnadel Nr. 8 mit Snow anschlagen. Muster A.5 (= 12 M) insgesamt 6-7 x in der Breite str. Bei einer Gesamtlänge von 4 cm A.6 über A.5 str. MASCHENPROBE BEACHTEN! Bei einer Gesamtlänge von 20-22 cm, daran angepasst, dass ein ganzer Rapport von A.6 gestr wurde, A.5 über A.6 str. Bei einer Gesamtlänge von 24-26 cm alle M abketten. |
|||||||||||||||||||||||||
Erklärungen zum Diagramm |
|||||||||||||||||||||||||
|
|||||||||||||||||||||||||
 |
|||||||||||||||||||||||||
 |
|||||||||||||||||||||||||
 |
|||||||||||||||||||||||||
Haben Sie diese Anleitung nachgearbeitet?Dann taggen Sie Ihre Fotos mit #dropspattern oder schicken Sie sie an die #dropsfan Galerie Brauchen Sie Hilfe bei dieser Anleitung?Sie finden 19 Videotutorials, einen Kommentar/Fragen-Bereich und vieles mehr, wenn sie die Anleitung bei garnstudio.com aufrufen. © 1982-2026 DROPS Design A/S. Wir besitzen alle Rechte. Dieses Dokument, einschließlich aller Untersektionen, hat Urheberrechte. Mehr dazu, was Sie mit unseren Anleitungen machen können, finden Sie ganz unten auf der Seite zu jeder Anleitung. |
|||||||||||||||||||||||||


Mit über 40 Jahren Tätigkeit im Entwerfen von Strick- und Häkelmustern bietet Ihnen DROPS Design eine der umfangreichsten Sammlungen von kostenlosen Anleitungen im Internet - in 17 Sprachen übersetzt. Zum jetzigen Zeitpunkt haben wir insgesamt 324 Handarbeitshefte und 12290 Anleitungen auf Deutsch. 12202
Unser Ziel ist es, Ihnen die besten Angebote zum Stricken und Häkeln, Inspirationen und Ratschläge sowie qualitativ hochstehende Garne zu unglaublichen Preisen zu bieten! Möchten Sie unsere Anleitungen nicht nur für den persönlichen Gebrauch nutzen? Unsere Copyright Bedingungen finden Sie bei allen unseren Anleitungen ganz unten auf der jeweiligen Seite. Viel Spaß beim Handarbeiten!
Kommentieren Sie die Anleitung DROPS Extra 0-1234
Wir würden gerne Ihre Meinung zu diesem Modell erfahren!
Wenn Sie eine Frage stellen möchten, prüfen Sie bitte, dass Sie die richtige Kategorie im unten stehenden Formular gewählt haben - so bekommen Sie schneller eine Antwort. Die obligatorischen Felder sind mit einem * gekennzeichnet.