Kommentare / Fragen (17)
![]() Natalia hat geschrieben:
Natalia hat geschrieben:
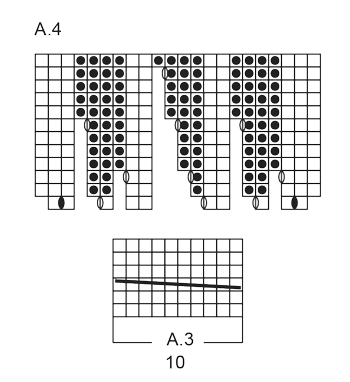
I don't understand A3 schema, and do not see any video how to do it. Tried multiple variants and still do not know how should it be done: "zdjąć 5 o. na drut pomocniczy przed robótką, 5 o.p., 5 o. z drutu pomocniczego przer. na prawo"
28.10.2025 - 16:32DROPS Design hat geantwortet:
Hi Natalia, Here is a link to a video showing you how to work cables (which is what A.3 is describing): https://www.garnstudio.com/video.php?id=19&lang=en Regards, Drops Team.
29.10.2025 - 07:04
![]() Charmain hat geschrieben:
Charmain hat geschrieben:
Can I have this pattern in downloadable form in PDF please
26.03.2021 - 16:19DROPS Design hat geantwortet:
Dear Chairman, to have the pattern as a PDF please click on the print icon, and select "print as PDF". Happy Crafting!
27.03.2021 - 02:11
![]() Helena hat geschrieben:
Helena hat geschrieben:
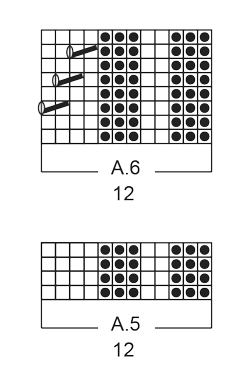
Another question - neck warmer, it says "when piece measures 20-24cm adjust after one whole repetition of A6", what is meant by 'adjust'? What adjustment is required, other than just to repeat once more A6 before finishing it with A5?
30.01.2021 - 01:37DROPS Design hat geantwortet:
Dear Helena, this means that you should emphasize pattern more than height in cm. You can stay with 19 cm or with 25 - important is knit up whole repetition of A.6. Height in cm may vary slightly depends on your personal gauge. Happy knitting!
30.01.2021 - 09:36
![]() Helena hat geschrieben:
Helena hat geschrieben:
Hi, my question refers to the neck warmer; in the photo, the neck warmer seems to have holes where the yarn overs are, but in the instructions it says to knit yo twisted to avoid holes. I get it for the headband as there should not be holes. But the neck warmer looks like it has holes left where the yo were made. Can you please clearify? Thank you
30.01.2021 - 00:37DROPS Design hat geantwortet:
Hi Helena, there is a mistahe here. I'll report it. Thank you. Happy knitting!
30.01.2021 - 19:20
![]() Simone hat geschrieben:
Simone hat geschrieben:
Hallo! Leider verstehe ich beim Stirnband nicht, wie das Muster A.3 gestrickt wird. Ich stricke zuerst eine Hinreihe rechts und eine Rückreihe links. Dann ziehe ich die Hälfte der Maschen (5 Maschen) auf eine andere Nadel. Aber wie stricke ich dann weiter? Danke im Voraus für die Antwort.
10.11.2020 - 20:55DROPS Design hat geantwortet:
Liebe Simone, ja genau die 5 ersten Maschen legen Sie vor die, dann stricken Sie die 5 letzten Maschen und stricken jetzt die 5 Maschen von der Hilfsnadel - dieses Video zeigt, wie man einen (anderen) Zopf über alle Maschen auf der Nadel strickt, es kann Ihnen sicher weiterhelfen. Viel Spaß beim stricken!
11.11.2020 - 08:41
![]() Mari Gjerdåker hat geschrieben:
Mari Gjerdåker hat geschrieben:
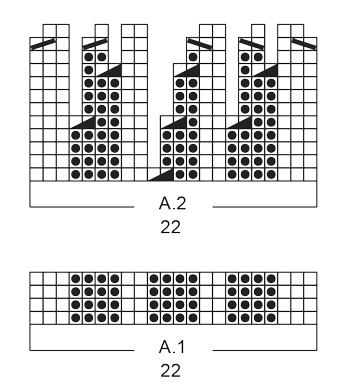
Hei! Jeg lurer på hva de diagonale stripene på nest siste pinne på A2 betyr? Regner med at de kal settes på hjelpepinne, men har det noe å si hvilken vei diagonalen er?
24.07.2020 - 20:01DROPS Design hat geantwortet:
Hej Mari, du finder symbolerne i symbolforklaringen: 2 r sammen og ta 1 m løst av p, 1 r, løft den løse m over. God fornøjelse!
03.08.2020 - 14:47
![]() Mallory hat geschrieben:
Mallory hat geschrieben:
Hi there, although this is a beautiful pattern, I feel like it was poorly written and drawn out in the diagrams. Multiple times I would look at the diagram and then my stitches. There where stitches that would disappear on the diagram (still on my needle) and then reappear on another row. As well as the twist, if you K5 from your working and K5 from the new, it will NOT come out right. Beautiful pattern, Horrible instructions.
11.01.2020 - 18:01
![]() Sondra hat geschrieben:
Sondra hat geschrieben:
Working the headband (straight needles) and confused by “missing boxes” in pattern A.2. Row 1, for example, appears to start on 2nd stitch and skip 4th and 5th, 7th (ie boxes missing). How do I interpret the empty spaces? Also not sure how to interpret heavy short diagonal line intermittent across second row. Nothing in diagram key matches exactly. Thabks
10.01.2019 - 01:23DROPS Design hat geantwortet:
Dear Sondra, start reading the diagram from the bottom corner on the right side towards the left from RS (and from the left towards the right from WS), working A.2 you will then dec 1 st (= P2 tog) in the middle of A.2, on next row the missing stitch is matching the st you decreased before. Happy knitting!
10.01.2019 - 10:03
![]() Monica Panera hat geschrieben:
Monica Panera hat geschrieben:
Buongiorno , Volevo fare un'ultima domanda. Ogni riga di uno schema è un ferro e rappresenta i punti da fare sul diritto del lavoro ,ciò significa che ogni riga è un ferro diritto è un ferro rovescio? Spero di essere stata chiara.Grazie dell'aiuto.
14.12.2018 - 07:38DROPS Design hat geantwortet:
Buongiorno Monica. Nel diagramma trova tutti i ferri da lavorare seguendo il motivo stesso. Quindi: primo ferro (dal basso) si lavora sul diritto del lavoro; secondo ferro si lavora sul rovescio del lavoro; terzo ferro sul diritto e così via. Buon lavoro!
14.12.2018 - 08:29
![]() Monica Panera hat geschrieben:
Monica Panera hat geschrieben:
Buonasera, non riesco a capire lo schema A3 della fascia per capelli modello Warm Lavender. Non capisco perché devo mettere 5 punti su un ferro ausiliario e come procedere con il lavoro. Ho un buio totale. Grazie per il vostro aiuto. Panera Monica
13.12.2018 - 19:05DROPS Design hat geantwortet:
Buonasera Monica, le 5 maglie vengono messe in sospeso per creare la treccia. Deve metterle su un ferro ausiliario sul davanti del lavoro, lavorare 5 maglie a diritto e lavorare le 5 maglie in sospeso a diritto, creando così la treccia. Buon lavoro!
13.12.2018 - 22:22
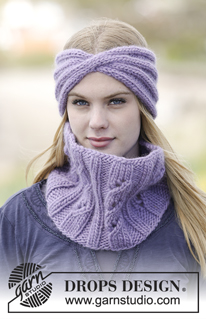
Warm Lavender |
|||||||||||||||||||||||||
|
|
|||||||||||||||||||||||||
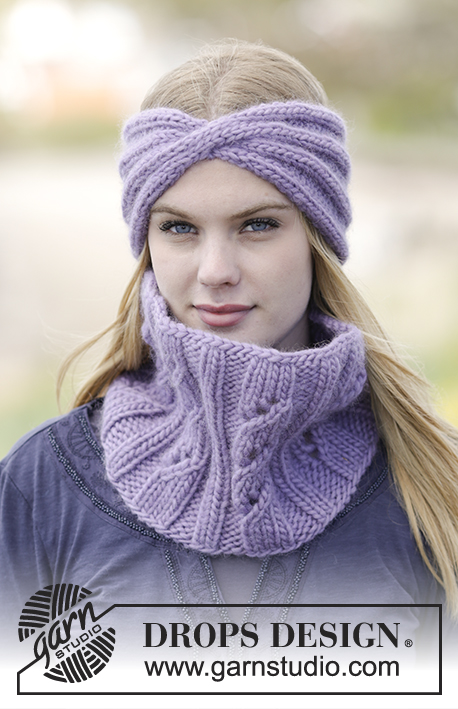
Das Set umfasst: Gestricktes DROPS Stirnband und Kragenschal in ”Snow” mit Rippenmuster.
DROPS Extra 0-1234 |
|||||||||||||||||||||||||
|
KRAUSRIPPEN (in Hin- und Rück-R): 1 Krausrippe = 2 R kraus re = 2 R re. MUSTER: Siehe Diagramme A.1-A.6. Die Diagramme zeigen alle Hin- und Rück-R, Hin-R werden von rechts nach links, Rück-R von links nach rechts gelesen. ---------------------------------------------------------- STIRNBAND: Die Arb wird in Hin- und Rück-R gestr. 22 M auf Nadel Nr. 7 mit Snow anschlagen. 1 KRAUSRIPPE (siehe oben) str. Dann im Muster A.1 str (= 22 M). MASCHENPROBE BEACHTEN! A.1 wdh, bis die Arb 14-15-16 cm misst, daran angepasst, dass die nächste R eine Hin-R ist. Dann Muster A.2 über A.1 str. Wenn A.2 1 x in der Höhe gestr wurde, sind 10 M auf der Nadel. A.3 1 x in der Höhe str. Dann A.4 über A.3 str, die Umschläge dabei verschränkt in das Muster einarb. Wenn A.4 1 x in der Höhe gestr wurde, sind 22 M auf der Nadel. A.1 str, bis die Arb eine Gesamtlänge von 48-50-52 cm hat. 1 Krausrippe (= 2 R kraus re) str. Abketten. FERTIGSTELLEN: Die Anschlag- und Abkettkante aneinander nähen. ---------------------------------------------------------- KRAGENSCHAL: Die Arb wird in Rd gestr. 72-84 M auf Rundnadel Nr. 8 mit Snow anschlagen. Muster A.5 (= 12 M) insgesamt 6-7 x in der Breite str. Bei einer Gesamtlänge von 4 cm A.6 über A.5 str. MASCHENPROBE BEACHTEN! Bei einer Gesamtlänge von 20-22 cm, daran angepasst, dass ein ganzer Rapport von A.6 gestr wurde, A.5 über A.6 str. Bei einer Gesamtlänge von 24-26 cm alle M abketten. |
|||||||||||||||||||||||||
Erklärungen zum Diagramm |
|||||||||||||||||||||||||
|
|||||||||||||||||||||||||
 |
|||||||||||||||||||||||||
 |
|||||||||||||||||||||||||
 |
|||||||||||||||||||||||||
Haben Sie diese Anleitung nachgearbeitet?Dann taggen Sie Ihre Fotos mit #dropspattern oder schicken Sie sie an die #dropsfan Galerie Brauchen Sie Hilfe bei dieser Anleitung?Sie finden 19 Videotutorials, einen Kommentar/Fragen-Bereich und vieles mehr, wenn sie die Anleitung bei garnstudio.com aufrufen. © 1982-2026 DROPS Design A/S. Wir besitzen alle Rechte. Dieses Dokument, einschließlich aller Untersektionen, hat Urheberrechte. Mehr dazu, was Sie mit unseren Anleitungen machen können, finden Sie ganz unten auf der Seite zu jeder Anleitung. |
|||||||||||||||||||||||||




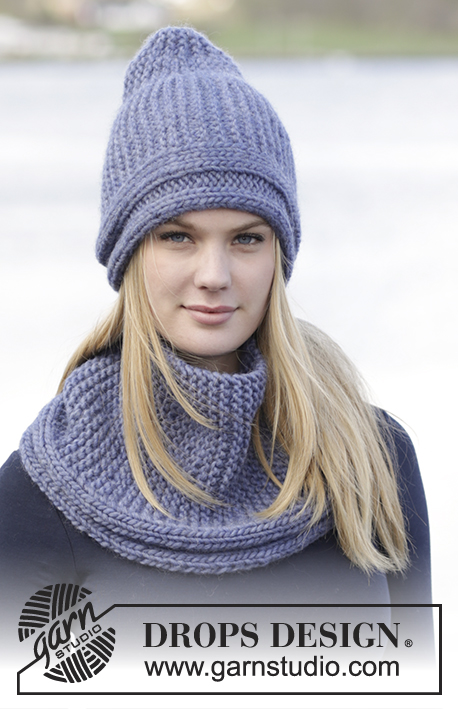


Kommentieren Sie die Anleitung DROPS Extra 0-1234
Wir würden gerne Ihre Meinung zu diesem Modell erfahren!
Wenn Sie eine Frage stellen möchten, prüfen Sie bitte, dass Sie die richtige Kategorie im unten stehenden Formular gewählt haben - so bekommen Sie schneller eine Antwort. Die obligatorischen Felder sind mit einem * gekennzeichnet.