
Beliebte Kategorien
Suchen Sie nach einem Garn?


Kommentare / Fragen (85)
![]() Marcia Gilliam hat geschrieben:
Marcia Gilliam hat geschrieben:
Is there a way to import this pattern into Knit Companion? Your web interface informs me I'm using a forbidden word and I can't post the complete question.
30.11.2018 - 17:09DROPS Design hat geantwortet:
Dear Mrs Gilliam, our pattern can only be printed or saved as a .pdf with a virtual printer, this maybe the reason why you cannot import them into Knit Companion. Happy knitting!
03.12.2018 - 10:56
![]() Linda Medvic hat geschrieben:
Linda Medvic hat geschrieben:
Wondering if there’s a printable version somewhere?
25.10.2018 - 15:28DROPS Design hat geantwortet:
Dear Mrs Medvic, you just have to click on the icon with the printer to launch printing. Happy knitting!
25.10.2018 - 15:44
![]() MEAGHAN MORIARTY hat geschrieben:
MEAGHAN MORIARTY hat geschrieben:
Thank you for the clarification! The instructions "Now work A.2, but continue with K and P as in A.1 in the orange section." confused me - I read that as knit A2 but using the A1 pattern when working in the orange.
10.10.2018 - 02:33DROPS Design hat geantwortet:
Dear Mrs Moriary, you are right, I missed that part from the pattern, work A.2 as explained previously but continue working the st in garter st from A.1 as before (alternately K and P every other round). Happy knitting!
10.10.2018 - 09:54
![]() MEAGHAN MORIARTY hat geschrieben:
MEAGHAN MORIARTY hat geschrieben:
I\'m struggling with the A2 pattern. Is the green stitch in addition to the orange or take the place of one it? In other words, in the first line, for example, does it start green K, then orange KKKPKK, OR is it green K, then orange KKPKK with the green taking the place of the first orange K? Thanks!
09.10.2018 - 02:50DROPS Design hat geantwortet:
Dear Mrs Moriarty, A.2 is a stranded chart, ie you will alternately work with orange and green, on first row for example work: (K1 with green, K8 with orange) and repeat from (to) the whole round. On round 2, work (K2 with greeen, K5 with orange, K1 with green) and repeat from (to) the whole round. Happy knitting!
09.10.2018 - 09:55
![]() Cindy hat geschrieben:
Cindy hat geschrieben:
So when starting A1 is it knitt three then purl one then knitting 5 purl one knit 5 and continue that until you finish all the way around. Then next round is straight knit all the way around?
18.09.2018 - 02:50DROPS Design hat geantwortet:
Dear Cindy, when repeating A.1 in the round you will work: (K3, P1, K2), ie it will look at: K3 at the beg of round, repeat (P1, K5) and finish with K2. On round 2, knit all sts. Happy knitting!
18.09.2018 - 09:22
![]() Lorelei Schnabler hat geschrieben:
Lorelei Schnabler hat geschrieben:
Are the instructions for both A1 and A2 per row, or are they to be repeated over and over within one row? This pattern is beautiful, but I'm unclear on this point. Thank you for your quick response.
25.08.2018 - 20:44DROPS Design hat geantwortet:
Hi Lorelei, You repeat A.1 both within the round and in height to the reqired length, then you work A.2, repeated within the round, but only once in height. Happy knitting!
26.08.2018 - 07:58
![]() Giulia hat geschrieben:
Giulia hat geschrieben:
Grazie per l’immediata risposta, sempre nel diagramma ogni riga corrisponde a 1 ferro interamente lavorato vero? Esempio per il primo ferro farò 3 dritti, 1 rovescio e 2 dritti a ripetizione per tutto il ferro mentre nel secondo ferro lavorerò tutto a diritto?
09.02.2018 - 14:43DROPS Design hat geantwortet:
Buongiorno Giulia, esattamente così, una riga un ferro/giro. I diagrammi mostrano semprd tutti i ferri/giri. Buon lavoro!
09.02.2018 - 16:11
![]() Giulia hat geschrieben:
Giulia hat geschrieben:
Buongiorno, Chiedo scusa ma sono alle prime armi e non so come si legge lo schema A1 della cuffia sweet pumpkin. So che di solito si parte dall’angolo in basso a dx e sotto vedo un 6 che non so che significa, significano ripetizioni da 6? Ogni riga va ripetuta per tutto il ferro? Chiedo consiglio su come leggerlo grazie.
08.02.2018 - 16:12DROPS Design hat geantwortet:
Buongiorno Giulia, 6 è il numero delle maglie del motivo, e il motivo va ripetuto per tutto il giro. Buon lavoro!
08.02.2018 - 16:34
![]() Giulia hat geschrieben:
Giulia hat geschrieben:
Buongiorno, Chiedo scusa ma sono alle prime armi e non so come si legge lo schema A1 della cuffia sweet pumpkin. So che di solito si parte dall’angolo in basso a dx e sotto vedo un 6 che non so che significa, significano ripetizioni da 6? Ogni riga va ripetuta per tutto il ferro? Chiedo consiglio su come leggerlo grazie.
08.02.2018 - 08:21DROPS Design hat geantwortet:
Buongiorno Giulia. I diagrammi si leggono dal basso verso l'alto e da destra verso sinistra. Il numero indicato, in questo caso 6, indica che ogni ripetizione del motivo è di 6 maglie. Ripete queste sei maglie su tutte le maglie presenti sui ferri. Ci riscriva se ancora in difficltà. Buon lavoro!
08.02.2018 - 08:48
![]() Edie McRoberts hat geschrieben:
Edie McRoberts hat geschrieben:
Dear Jeanette; I have to let you know how much I enjoyed making this delightful Pumpkin cap. We haven't had a baby in the family for quite some time, so it was a treat to be able to get back into the baby knitting. The instructions were very clear and easy to follow. I found the trick was to use the markers rather than just to try counting! Thank you so much for making this available over the internet. It is very much appreciated. Sincerely, Edie McRoberts.
07.10.2017 - 17:50
|
||||||||||
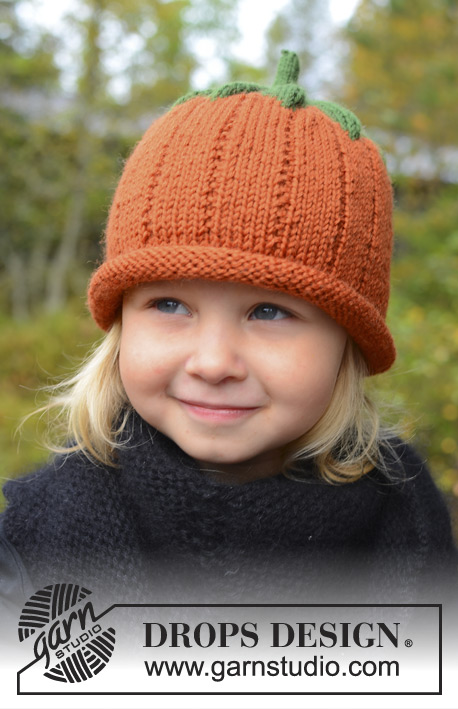
Sweet Pumpkin#sweetpumpkinhat |
||||||||||
 |
 |
|||||||||
DROPS Halloween: Gestrickte Kürbis - Mütze für Babys und Kinder in DROPS Karisma. Größe 0 - 8 Jahre.
DROPS Extra 0-966 |
||||||||||
|
Muster: Siehe Diagramm – A.1 und A.2. Das Muster im Diagramm wird von der Vorderseite darstellt. ---------------------------------------------------------- MÜTZE: 84-90-96-102-108 M mit orange mit dem Nadelspiel oder der kurzen Rundnadel Nr. 3,5 anschlagen. 1 Runde li str, dann glatt re weiterstricken. Beachten Sie die Maschenprobe! Nach 6 cm eine Markierung anbringen (= Rollrand). AB HIER WIRD DIE ARBEIT NUN GEMESSEN! Im Muster gemäß Diagramm A.1 weiterstricken. Nach 7-8-9-10-12 cm gleichmäßig verteilt 3-0-6-3-0 M abnehmen = 81-90-90-99-108 M. Nun 9-10-10-11-12 Markierungen mit je 9 M Abstand setzen. Die erste M nach der 1. Markierung ist die 1. M von A.2. Nun A.2 stricken, aber in den orangen Teilen weiterhin rechts und links stricken wie in A.1. Nach A.2 wird mit waldgrün fertig gestrickt - dabei GLEICHZEITIG in jeder 2. Rd auf der rechten Seite aller Markierungen 1 M abn bis noch 9-10-10-11-12 M übrig sind. Zu Nadelspiel Nr. 2 wechseln und für den Stiel 3 cm über diese M stricken. Den Faden durch die restlichen M ziehen und gut vernähen. |
||||||||||
Erklärungen zum Diagramm |
||||||||||
|
||||||||||
 |
||||||||||
Haben Sie diese Anleitung nachgearbeitet?Dann taggen Sie Ihre Fotos mit #dropspattern #sweetpumpkinhat oder schicken Sie sie an die #dropsfan Galerie Brauchen Sie Hilfe bei dieser Anleitung?Sie finden 11 Videotutorials, einen Kommentar/Fragen-Bereich und vieles mehr, wenn sie die Anleitung bei garnstudio.com aufrufen. © 1982-2026 DROPS Design A/S. Wir besitzen alle Rechte. Dieses Dokument, einschließlich aller Untersektionen, hat Urheberrechte. Mehr dazu, was Sie mit unseren Anleitungen machen können, finden Sie ganz unten auf der Seite zu jeder Anleitung. |
||||||||||


Mit über 40 Jahren Tätigkeit im Entwerfen von Strick- und Häkelmustern bietet Ihnen DROPS Design eine der umfangreichsten Sammlungen von kostenlosen Anleitungen im Internet - in 17 Sprachen übersetzt. Zum jetzigen Zeitpunkt haben wir insgesamt 325 Handarbeitshefte und 12291 Anleitungen auf Deutsch. 12203
Unser Ziel ist es, Ihnen die besten Angebote zum Stricken und Häkeln, Inspirationen und Ratschläge sowie qualitativ hochstehende Garne zu unglaublichen Preisen zu bieten! Möchten Sie unsere Anleitungen nicht nur für den persönlichen Gebrauch nutzen? Unsere Copyright Bedingungen finden Sie bei allen unseren Anleitungen ganz unten auf der jeweiligen Seite. Viel Spaß beim Handarbeiten!
Kommentieren Sie die Anleitung DROPS Extra 0-966
Wir würden gerne Ihre Meinung zu diesem Modell erfahren!
Wenn Sie eine Frage stellen möchten, prüfen Sie bitte, dass Sie die richtige Kategorie im unten stehenden Formular gewählt haben - so bekommen Sie schneller eine Antwort. Die obligatorischen Felder sind mit einem * gekennzeichnet.