
Beliebte Kategorien
Suchen Sie nach einem Garn?


Kommentare / Fragen (85)
![]() Margaret J Ritchey hat geschrieben:
Margaret J Ritchey hat geschrieben:
How do I make the "leaves'" / green part at the top of beanie look puffed up. Mine is flat.
16.09.2019 - 23:59DROPS Design hat geantwortet:
Dear Mrs Ritchey, it's a bit tricky to answer you here, you might have to try with larger needles. Do not hesitate to bring your work to your store (or send them a picture per mail), they would be able to help you. Happy knitting!
19.09.2019 - 10:03
![]() Gillian hat geschrieben:
Gillian hat geschrieben:
Could I knit this hat on single point needles ? Thanks
15.09.2019 - 10:11DROPS Design hat geantwortet:
Dear Gillian, you will find how to adapt a pattern into straight needles here. Happy knitting!
16.09.2019 - 11:06
![]() Cindy Rand hat geschrieben:
Cindy Rand hat geschrieben:
Can you tell me how many balls of yarn I need for each color? Orange and Forest Green. Thanks
17.08.2019 - 03:47DROPS Design hat geantwortet:
Hello Cindy. Drops Karisma comes in 50 gr balls, so you will need 1 ball of orange for sizes: 0/6 months, 1 year, 2/4 and 5/6 years; 2 balls of orange for size 7/8 years. You also need 1 ball of forest green for all sizes. Happy knitting!
17.08.2019 - 08:32
![]() Catherine hat geschrieben:
Catherine hat geschrieben:
Je t'ai regardé mais je n'ai rien trouvé, merci de me faire un dessins à savoir quand vous commencez les diminutions et si c'est avec le 1er vert et l'orange juste à droite, en les prenant ensemble. J'ai même essayé de traduire de l'allemand et de l'anglais en français, mais rien vu, ce modèle reste en suspens, dommage, il me faudrait un dessin de près pour voir où les dim. se trouvent ou schéma.
01.04.2019 - 12:37DROPS Design hat geantwortet:
Bonjour Catherine, nous n'avons pas de schéma supplémentaires disponibles pour ce modèle, pour toute assistance personnelle complémentaire, merci de bien vouloir demander au magasin où vous avez acheté votre laine, vous pouvez contacter votre magasin DROPS même par mail ou téléphone. Bon tricot!
01.04.2019 - 12:44
![]() Catherine hat geschrieben:
Catherine hat geschrieben:
Pour les marqueurs c'est ok, après dessin, car vraiment entre deux il n'y en a que 8 mailles, mais d'un marqueur à l'autre marqueur il y en a bien 9. J'ai besoin de savoir quand commence les diminutions de la feuille, après le schéma A2 ou quand on pose les marqueurs soit juste à côté de la première maille verte, au tout début. Merci
01.04.2019 - 11:33DROPS Design hat geantwortet:
Bonjour Catherine, on commence à diminuer au 1er tour après A.2. Bon tricot!
01.04.2019 - 12:42
![]() Catherine hat geschrieben:
Catherine hat geschrieben:
Vous marquez 10 marqueurs, non, pour faire 90, soit 9x9 = 81 plus 9 marqueurs = 90, à revoir car je ne peux pas continuer ce bonnet, je l'ai tricoté jusqu'à 5 h du mat. Merci pour vos réponses. Dommage que je ne puisse pas vous avoir au tél.
01.04.2019 - 10:53DROPS Design hat geantwortet:
Bonjour Catherine, vous avez 81 m dans la 1ère taille, vous placez vos marqueurs ainsi: *comptez 9 m, placez 1 marqueur* répétez de *à* tout le tour = vous avez bien 9 marqueur espacés de 9 mailles chacun.
01.04.2019 - 12:40
![]() Catherine hat geschrieben:
Catherine hat geschrieben:
Bonjour, Pourquoi avec votre fil marqueur vous prenez la maille avant et après d'une autre manière, le tricot ne sera plus la même chose ? en passant le fil dessus et ensuite par l'arrière à l'avant, ça va aussi, non ? il gênera plus, mais tant pis
01.04.2019 - 10:36DROPS Design hat geantwortet:
Bonjour Catherine, dans cette vidéo on augmente 1 maille avant et 1 maille après le fil marqueur - dans ce bonnet, on va diminuer 1 maille avant le marqueur. Passez simplement le fil marqueur devant et derrière l'ouvrage comme on le montre dans la vidéo.
01.04.2019 - 12:38
![]() Catherine hat geschrieben:
Catherine hat geschrieben:
Bonjour, Vous marquez A2 terminer - en même temps diminuer tous les 2 tours, si je regarde votre photo du bonnet, il me semble que je vois toutes la grille A2 faite sans diminution, à partir de quel tous de A2 commencez- vous à diminuer ???? car le 1er et le second à l'air sans diminution, l'explication n'est pas clair, il faut faire le dessin différent et noter dessus avec une flèche où diminuer. Merci.
01.04.2019 - 04:07DROPS Design hat geantwortet:
Bonjour Catherine, vous placez un marqueur toutes les 9 mailles et tricotez A.2, et après A.2, vous diminuez 1 m à droite de chaque marqueur (= avant chaque marqueur), dès le 1er tour après A.2 puis tous les 2 tours.
01.04.2019 - 12:36
![]() Catherine hat geschrieben:
Catherine hat geschrieben:
Je tricote ce bonnet avec du n° 5, que dois-je prendre pour la tige comme n° d'aiguille ? Ce modèle n'a pas l'air facile de son explication, dommage car ça décourage, merci de faire quelque chose plus facile à comprendre. I’m knitting this hat with number 5, what should I take for the shank as a needle? This model doesn’t seem easy to explain, too bad because it discourages, thanks for doing something easier to understand.
30.03.2019 - 19:27DROPS Design hat geantwortet:
Bonjour Catherine, ce modèle se tricote sur la base de 22 m x 30 rangs avec des aiguilles 3,5 (ou celles qui vous permettront d'avoir le bon échantillon) - nous ne sommes pas en mesure de pouvoir adapter chacun de nos modèles à chaque demande, n'hésitez pas à contacter - même par mail ou téléphone - le magasin où vous avez acheté votre laine si nécessaire.
01.04.2019 - 12:34
![]() Catherine hat geschrieben:
Catherine hat geschrieben:
Madame, Apparamment ce modèle est compliqué est contient plusieurs erreurs, pourriez-vous le remettre en ordre pour pouvoir le faire juste. Merci Ma'am, Apparently this template is complicated and contains several errors, could you put it back in order to be able to do it right. Thank you
30.03.2019 - 19:15DROPS Design hat geantwortet:
Bonjour Catherine, ce modèle est l'un des plus populaires et aucune erreur - sauf les corrections déjà faites - n'ont été rapportées. Voir ci-dessus les réponses à vos autres questions. Bon tricot!
01.04.2019 - 12:33
|
||||||||||
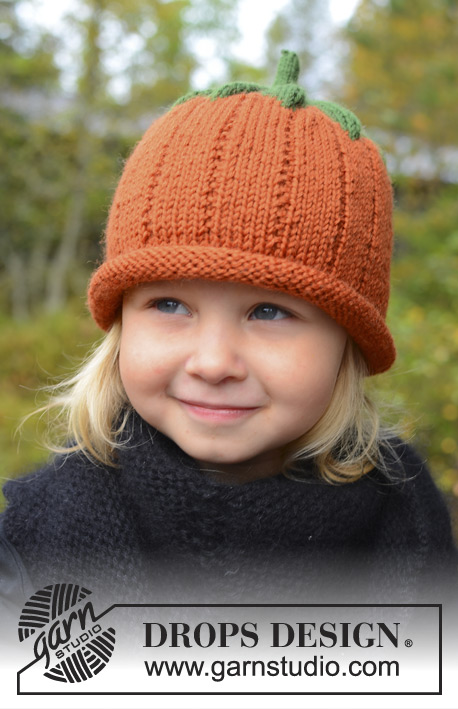
Sweet Pumpkin#sweetpumpkinhat |
||||||||||
 |
 |
|||||||||
DROPS Halloween: Gestrickte Kürbis - Mütze für Babys und Kinder in DROPS Karisma. Größe 0 - 8 Jahre.
DROPS Extra 0-966 |
||||||||||
|
Muster: Siehe Diagramm – A.1 und A.2. Das Muster im Diagramm wird von der Vorderseite darstellt. ---------------------------------------------------------- MÜTZE: 84-90-96-102-108 M mit orange mit dem Nadelspiel oder der kurzen Rundnadel Nr. 3,5 anschlagen. 1 Runde li str, dann glatt re weiterstricken. Beachten Sie die Maschenprobe! Nach 6 cm eine Markierung anbringen (= Rollrand). AB HIER WIRD DIE ARBEIT NUN GEMESSEN! Im Muster gemäß Diagramm A.1 weiterstricken. Nach 7-8-9-10-12 cm gleichmäßig verteilt 3-0-6-3-0 M abnehmen = 81-90-90-99-108 M. Nun 9-10-10-11-12 Markierungen mit je 9 M Abstand setzen. Die erste M nach der 1. Markierung ist die 1. M von A.2. Nun A.2 stricken, aber in den orangen Teilen weiterhin rechts und links stricken wie in A.1. Nach A.2 wird mit waldgrün fertig gestrickt - dabei GLEICHZEITIG in jeder 2. Rd auf der rechten Seite aller Markierungen 1 M abn bis noch 9-10-10-11-12 M übrig sind. Zu Nadelspiel Nr. 2 wechseln und für den Stiel 3 cm über diese M stricken. Den Faden durch die restlichen M ziehen und gut vernähen. |
||||||||||
Erklärungen zum Diagramm |
||||||||||
|
||||||||||
 |
||||||||||
Haben Sie diese Anleitung nachgearbeitet?Dann taggen Sie Ihre Fotos mit #dropspattern #sweetpumpkinhat oder schicken Sie sie an die #dropsfan Galerie Brauchen Sie Hilfe bei dieser Anleitung?Sie finden 11 Videotutorials, einen Kommentar/Fragen-Bereich und vieles mehr, wenn sie die Anleitung bei garnstudio.com aufrufen. © 1982-2026 DROPS Design A/S. Wir besitzen alle Rechte. Dieses Dokument, einschließlich aller Untersektionen, hat Urheberrechte. Mehr dazu, was Sie mit unseren Anleitungen machen können, finden Sie ganz unten auf der Seite zu jeder Anleitung. |
||||||||||


Mit über 40 Jahren Tätigkeit im Entwerfen von Strick- und Häkelmustern bietet Ihnen DROPS Design eine der umfangreichsten Sammlungen von kostenlosen Anleitungen im Internet - in 17 Sprachen übersetzt. Zum jetzigen Zeitpunkt haben wir insgesamt 325 Handarbeitshefte und 12291 Anleitungen auf Deutsch. 12203
Unser Ziel ist es, Ihnen die besten Angebote zum Stricken und Häkeln, Inspirationen und Ratschläge sowie qualitativ hochstehende Garne zu unglaublichen Preisen zu bieten! Möchten Sie unsere Anleitungen nicht nur für den persönlichen Gebrauch nutzen? Unsere Copyright Bedingungen finden Sie bei allen unseren Anleitungen ganz unten auf der jeweiligen Seite. Viel Spaß beim Handarbeiten!
Kommentieren Sie die Anleitung DROPS Extra 0-966
Wir würden gerne Ihre Meinung zu diesem Modell erfahren!
Wenn Sie eine Frage stellen möchten, prüfen Sie bitte, dass Sie die richtige Kategorie im unten stehenden Formular gewählt haben - so bekommen Sie schneller eine Antwort. Die obligatorischen Felder sind mit einem * gekennzeichnet.