
Beliebte Kategorien
Suchen Sie nach einem Garn?


Kommentare / Fragen (132)
![]() Stefania hat geschrieben:
Stefania hat geschrieben:
Buongiorno Ho terminato la maglia e mi piacerebbe inviarvi la foto Dove posso spedirla dopo averla fotografata? Grazie
19.04.2026 - 12:04DROPS Design hat geantwortet:
Buongiorno Stefania, può compilare il modulo che trova al : seguente link, Buon lavoro!
19.04.2026 - 13:35
![]() Stefania hat geschrieben:
Stefania hat geschrieben:
Quindi, se ho capito bene per la taglia S il diagramma M3 è composto di 20 maglie invece che 18 ? Grazie ancora e buona giornata
24.03.2026 - 08:18DROPS Design hat geantwortet:
Buonasera Stefania, è solo per l'inizio che si parte dalla taglia, poi si lavora il diagramma intero. Buon lavoro!
28.03.2026 - 20:45
![]() Stefania hat geschrieben:
Stefania hat geschrieben:
Scusate, sto facendo la parte alta del davanti dove si parla del diagramma M3. Sto eseguendo la taglia S. Voi dite di iniziare dove c’è la lettera S ma il diagramma poi lo termino dove c’è la lettera S o a fine diagramma.? Grazie
23.03.2026 - 20:08DROPS Design hat geantwortet:
Buonasera Stefania, poi deve lavorare il diagramma intero. Buon lavoro!
23.03.2026 - 22:11
![]() Stefania hat geschrieben:
Stefania hat geschrieben:
Ho eseguito diversi vostri maglioni . Ora però Non riesco a capire gli aumenti delle maniche. Cosa si intende quando dite di fare ogni 9/8/6/ecc ferri per 12 ecc volte? E i numero delle maglie 86/90/94 ecc sono maglie totali o quelle di aumento ? Grazie
04.03.2026 - 18:30DROPS Design hat geantwortet:
Buonasera Stefania, i diversi numeri sono le taglie del modello: deve fare riferimento al numero riportato per la taglia che sta lavorando. Buon lavoro!
04.03.2026 - 22:50
![]() Mariángeles hat geschrieben:
Mariángeles hat geschrieben:
Buenos días, muchas gracias por el patrón, me parece muy bonito. Me extraña mucho que después del elástico o resorte haya que disminuir puntos, ¿no será más bien aumentarlos? Muchas gracias por la aclaración.
03.02.2026 - 14:23DROPS Design hat geantwortet:
Hola Mariángeles, normalmente tenemos más puntos en el elástico para que el elástico no quede tenso. Como se trabaja de abajo arriba, el borde elástico inferior en elástico no tiene que quedar prieto y la disminución de puntos después nos asegura que la sección en elástico y el comienzo del jersey tenga una anchura similar, a pesar de la diferencia en la textura de los puntos.
23.02.2026 - 00:36
![]() Donna hat geschrieben:
Donna hat geschrieben:
Knitting an XXL I'm confused about where to start each row in M.3, and after repeating the design 7 times, where to start the finish of each row. On the RS, start at the arrow and reading from R to L, do 5 stitches; then , after 7 repeats, at the end of the row, do 6 stitches, reading from far R to L? Do I start every row on RS at the arrow? But not on WS? On WS, do I start 6 stitches in from the far right side of the diagram, and then finish the final 5 starting on the far left?
20.01.2026 - 02:04DROPS Design hat geantwortet:
Hi Donna, It is just starting the diagram which involves the arrow, you then work to the end of the round, repeating the full width of the diagram each side until you work the edge stitch at the end of the row (this will not be the end of a repeat as both sides are symmetrical). When you work back from the right side, you begin the diagram where you finished on the previous row, repeat full widths until you reach where you started on the diagram, then work 1 edge stitch. Hope this helps. Regards, Drops Team.
20.01.2026 - 08:00
![]() Arlene hat geschrieben:
Arlene hat geschrieben:
What does “adjust after one half repetition or one whole repetition of diagram m1 and m2 vertically” mean? Also when I start on size medium in m3 do I keep going back to where I started or the beginning of the row?
30.12.2025 - 17:46DROPS Design hat geantwortet:
Dear Arlene, it means that we don't need to exactly stop working charts M1 and M2 when piece measures 58-60-62-64-66-68 cm but rather we need to ensure that, around that measurement, we stop at a row that is the last row of the chart or the row in the middle of the chart, to avoid interrupting the stitch-pattern too much. The arrow show which stitch of the chart will be the first stitch of the row; afterwards you need to work the stitch in the same position in the next row, so you should consider the arrow the beginning/end of the chart (for the first/last repeat of the row). Happy knitting!
12.01.2026 - 00:16
![]() Francine Pelletier hat geschrieben:
Francine Pelletier hat geschrieben:
Merci , Mon problème est M3. je débute rg end avec 1 m. lis puis à partir de la flèche pour L, je tricote de dr. vers la gche les 13 m et les 5 m avant la flèche. J’ai fait 6x le diag de 18 m et il me reste 9 m ( 8 et 1 lis) avant la fin du rv end. Je fais quoi avec ces m? J’espère que je suis claire avec mes explications Merci de m’éclairer
12.12.2025 - 18:12DROPS Design hat geantwortet:
Bonjour Mme Pelletier, après avoir répété le diagramme en entier, reprenez le diagramme au début pour terminer le rang avec les 8 premières mailles du diagramme. Notez bien quelle est la dernière maille tricotée sur l'endroit, ce sera la 1ère m à tricoter sur l'envers, et pensez à lire le diagramme de gauche à droite sur l'envers. Bon tricot!
15.12.2025 - 10:15
![]() Francine Pelletier hat geschrieben:
Francine Pelletier hat geschrieben:
Pouvez-vous m’éclairer svp À la grandeur L , au dos, lorsque je suis rendue à tricoter le M3 j’ai 118 m. et le diagramme a 18 m. . Il reste 10 m à la fin du rang dont 2 pour les m. lisières. Je débute bien le diagramme comme indiqué. Est-ce moi qui fait erreur ? Merci de m’éclairer J’aime votre modèle
12.12.2025 - 16:13DROPS Design hat geantwortet:
Bonjour Mme Pelletier, continuez vos diagrammes comme avant, comme vous avez rabattu la 1ère maille et la dernière de M.1 au début et à la fin du rang, vous allez commencer (sur l'endroit) M.1 par la 2ème maille (= 1 m jersey) et vous terminez le dernier M.1 du rang par l'avant-dernière maille (1 m jersey). Bon tricot!
12.12.2025 - 16:49
![]() Corrie hat geschrieben:
Corrie hat geschrieben:
Bij m3 beging je dan bij de pijl? En dan het hele patroon
17.09.2025 - 17:46
|
||||||||||
Sir Lancelot#sirlancelotsweater |
||||||||||
|
|
||||||||||
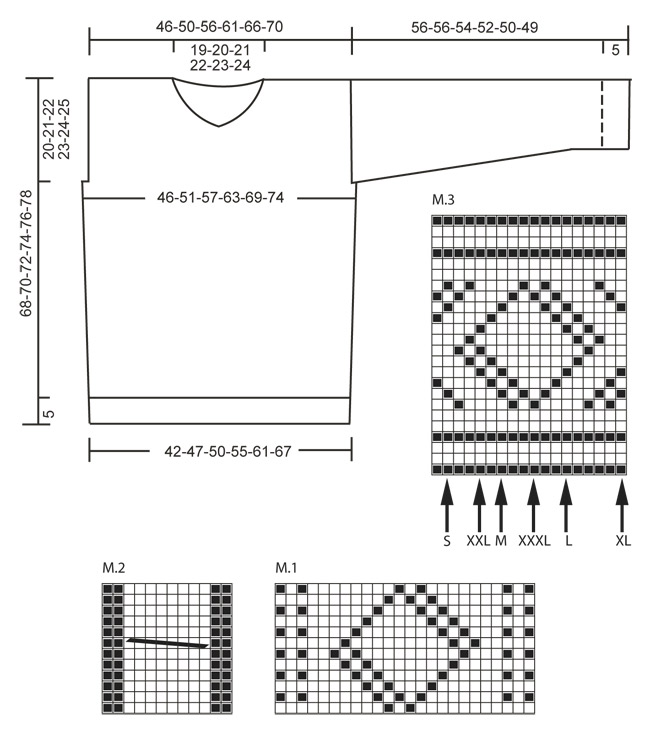
Gestrickter Pullover mit Strukturmuster und V-Muster für Herren in DROPS Karisma. Größe S bis XXXL
DROPS 135-36 |
||||||||||
|
KRAUSRIPPE (hin und zurück): 1 Krausrippe = 2 R. re. MUSTER: Siehe M1 bis M3 – das Diagramm zeigt das Muster von der Vorderseite. M1 = 24 M. breit M2 = 12 M. breit M3 = 18 M. breit. -------------------------------------------------------- RÜCKENTEIL: Die Arbeit wird hin und zurück gestrickt. Mit Karisma auf Nadel Nr. 3, 110-122-134-146-158-170 M. anschlagen (inkl. 1 Randm auf beiden Seiten). Das Bündchen wie folgt stricken (von der Vorderseite gesehen): 1 Randm in KRAUSRIPPE - siehe oben, *1 re., 3 li.*, von *-* wiederholen und mit 1 Randm in Krausrippe abschliessen. Nach ca. 5 cm (die nächste R. wird von der Rückseite gestrickt) zu Nadel Nr. 4 wechseln und 1 R. li von der Rückseite stricken. Gleichzeitig gleichmässig verteilt 12 M. abn. = 98-110-122-134-146-158 M. Die nächste R. von der Vorderseite wie folgt: Grösse S: 1 Randm in Krausrippe, M1, M2, M1, M2, M1 und 1 Randm in Krausrippe. Grösse M: 1 Randm in Krausrippe, 6 M. glatt, M1, M2, M1, M2, M1, 6 M. glatt und 1 Randm in Krausrippe. Grösse L: 1 Randm in Krausrippe, M2, M1, M2, M1, M2, M1, M2 und 1 Randm in Krausrippe. Grösse XL: 1 Randm in Krausrippe, 6 M. glatt, M2, M1, M2, M1, M2, M1, M2, 6 M. glatt und 1 Randm in Krausrippe. Grösse XXL: 1 Randm in Krausrippe, 12 M. von M1 – mit der 13. M. von der rechten Seite anfangen, M2, M1, M2, M1, M2, M1, M2 und 12 M. von M1 – mit der ersten M. anfangen - und 1 Randm in Krausrippe. Grösse XXXL 1 Randm in Krausrippe, 18 M. von M1 – mit der 7. M. von der rechten Seite anfangen, M2, M1, M2, M1, M2, M1, M2 und 18 M. von M1 – mit der ersten M. anfangen - und 1 Randm in Krausrippe. ALLE Grössen: Weiterstricken bis die Arbeit 48-49-50-51-52-53 cm misst. Stimmt die Maschenprobe? Weiter auf beiden Seite am Anfang der nächsten 2 Runden je 1-2-2-3-4-5 M. für das Armloch abk. = 96-106-118-128-138-148 M. Mit dem Muster und je 1 Randm in Krausrippe auf beiden Seiten weiterstricken. Nach ca. 58-60-62-64-66-68 cm (nach einem ganzen oder einem halben Rapport M1 /M2), 2 R. glatt stricken und danach M3 über alle M. stricken (mit Ausnahme der Randm) – im Diagramm finden Sie Pfeile welche die Grössen markieren. GLEICHZEITIG nachdem noch 4 Runden in M3 zu stricken sind die mittleren 36-38-40-42-44-46 M. für den Halsausschnitt abk. Weiter bei der nächsten R. 2 M. gegen den Halsausschnitt abk. = 28-32-37-41-45-49 M. Nach M3 ca. 1 cm glatt stricken und danach abk. Die Arbeit misst ca. 68-70-72-74-76-78 cm. VORDERTEIL: Wie das Rückenteil anschlagen und stricken und weiter wie am Rückenteil für das Armloch abk. Weiter nach ca. 58-60-62-64-66-68 cm 2 R. glatt stricken und gleichzeitig bei der 1. R. die mittleren 4 M. für den Halsausschnitt abk. Die Teile werden separat fertig gestrickt. Das Muster wie am Rückenteil weiterstricken (achten Sie darauf, dass M3 auf beiden Seiten gleich wird). GLEICHZEITIG bei jeder R. gegen den Halsausschnitt wie folgt abk.: 5-6-7-8-9-10 Mal 2 M. und danach 8-7-6-5-4-3 Mal 1 M. = 28-32-37-41-45-49 M. Das Vorderteil gleich lang stricken wie das Rückenteil und danach abk. ÄRMEL: Die Arbeit wird hin und zurück gestrickt. Mit Karisma auf Nadel Nr. 3 für alle Grössen 62 M. anschlagen und das Bündchen von der Vorderseite gesehen wie folgt stricken: 1 Randm in Krausrippe, * 1 re., 3 li.*, von *-* wiederholen und mit 1 Randm in Krausrippe abschliessen. Nach ca. 5 cm (die nächste R. wird von der Rückseite gestrickt) zu Nadel Nr. 4 wechseln und 1 R. li. von der Rückseite stricken. Die nächste R. wie folgt: 1 Randm in Krausrippe, M1, M2, M1 und 1 Randm in Krausrippe. So weiterstricken bis die Arbeit 9 cm misst. Jetzt auf beiden Seiten je 1 M. aufnehmen. Total 12-14-16-18-20-21 Mal bei jeder 9.-8.-6.-5.-4.-4. R. – die neuen M. werden glatt gestrickt = 86-90-94-98-102-104 M. Nach ca. 46-46-44-42-40-39 cm (nach einem ganzen oder einem halben Rapport M1 /M2), 2 R. glatt stricken und danach M3 stricken (mit der ersten M. im Diagramm anfangen, das Muster wird nicht aufgehen). Nach M3 wenn nötig glatt weiterstricken bis die Arbeit 56-56-54-52-50-49 cm misst (Auf Grund der breiteren Schultern sind die Ärmel bei den grossen Grössen kürzer). Danach abk. ZUSAMMENNÄHEN: Die Schulternaht zusammennähen. KRAGEN: Rund um den Halsausschnitt mit Karisma auf Nadel Nr. 3, ca. 119 bis 139 M. aufnehmen (muss durch 4 + 3 teilbar sein). Weiter von der vorderen Mitte her wie folgt hin und zurück stricken (Rückseite): 1 Randm in Krausrippe, * 1 li., 3 re. *, von *-* wiederholen und mit 1 li. und 1 Randm in Krausrippe abschliessen. Re. über re. und li. über li. weiterstricken bis der Kragen ca. 6 cm misst. Danach re. über re. und li. über li. abk. Danach den Kragen vorne übereinander legen und annähen. Die Ärmel zusammennähen und die Ärmel- und Seitennaht zusammennähen. |
||||||||||
Erklärungen zum Diagramm |
||||||||||
|
||||||||||
 |
||||||||||
Haben Sie diese Anleitung nachgearbeitet?Dann taggen Sie Ihre Fotos mit #dropspattern #sirlancelotsweater oder schicken Sie sie an die #dropsfan Galerie Brauchen Sie Hilfe bei dieser Anleitung?Sie finden 19 Videotutorials, einen Kommentar/Fragen-Bereich und vieles mehr, wenn sie die Anleitung bei garnstudio.com aufrufen. © 1982-2026 DROPS Design A/S. Wir besitzen alle Rechte. Dieses Dokument, einschließlich aller Untersektionen, hat Urheberrechte. Mehr dazu, was Sie mit unseren Anleitungen machen können, finden Sie ganz unten auf der Seite zu jeder Anleitung. |
||||||||||


Mit über 40 Jahren Tätigkeit im Entwerfen von Strick- und Häkelmustern bietet Ihnen DROPS Design eine der umfangreichsten Sammlungen von kostenlosen Anleitungen im Internet - in 17 Sprachen übersetzt. Zum jetzigen Zeitpunkt haben wir insgesamt 324 Handarbeitshefte und 12290 Anleitungen auf Deutsch. 12202
Unser Ziel ist es, Ihnen die besten Angebote zum Stricken und Häkeln, Inspirationen und Ratschläge sowie qualitativ hochstehende Garne zu unglaublichen Preisen zu bieten! Möchten Sie unsere Anleitungen nicht nur für den persönlichen Gebrauch nutzen? Unsere Copyright Bedingungen finden Sie bei allen unseren Anleitungen ganz unten auf der jeweiligen Seite. Viel Spaß beim Handarbeiten!
Kommentieren Sie die Anleitung DROPS 135-36
Wir würden gerne Ihre Meinung zu diesem Modell erfahren!
Wenn Sie eine Frage stellen möchten, prüfen Sie bitte, dass Sie die richtige Kategorie im unten stehenden Formular gewählt haben - so bekommen Sie schneller eine Antwort. Die obligatorischen Felder sind mit einem * gekennzeichnet.