
Beliebte Kategorien
Suchen Sie nach einem Garn?


Kommentare / Fragen (34)
![]() Joana Dinis hat geschrieben:
Joana Dinis hat geschrieben:
In which part of the row I do a inc?
22.06.2019 - 18:01DROPS Design hat geantwortet:
Dear Joana, if you want to make this knitted flat on straight needles (instead of knitting the sleeves on the round on DPN's), you shoul increase one stitch at the beginning of the row (in the 2nd stitch) and at the end of the row (in the stitch before the last stitch). Happy Knitting!
23.06.2019 - 09:06
![]() Joana Dinis hat geschrieben:
Joana Dinis hat geschrieben:
So i will cast on 52 sts for the sleeves?
14.06.2019 - 14:33DROPS Design hat geantwortet:
Dear Mrs Dinis, right, you will cast on 50 sts + 2 edge sts = 52 sts. Happy knitting!
17.06.2019 - 06:46
![]() Joana Dinis hat geschrieben:
Joana Dinis hat geschrieben:
What is the difference to Cast on 50 (50-50) sts on double pointed needles or cast on in normal needles?
14.06.2019 - 14:21DROPS Design hat geantwortet:
Dear Mrs Dinis, when you work in the round there is no seam, when you work back and forth you will have to make a seam, so that you should add 2 sts to the number of sts to cast on (= 1 edge st on each side) for the seam allowance. Read more details here. Happy knitting!
14.06.2019 - 14:24
![]() Joana Dinis hat geschrieben:
Joana Dinis hat geschrieben:
Its possible to do the sleeves with a normal needle?
14.06.2019 - 14:09DROPS Design hat geantwortet:
Dear Mrs Dinis, to adjust sleeves onto straight needles, please read here how to do. Happy knitting!
14.06.2019 - 14:15
![]() Joana Dinis hat geschrieben:
Joana Dinis hat geschrieben:
Ok i did it. now i have two parts on the needles. but this : Then cast off 2 sts on each side on next row to shape neckline. thank you so much for your patience.
11.06.2019 - 13:51DROPS Design hat geantwortet:
Dear Mrs Dinis, now continue working the shoulder on one side (where the yarn ball is), ie turn and work next row (from armhole towards neck), turn and at the beginning of the row from neck, cast off the first 2 stitches. Continue now working to the finished length, cast off and cut the yarn. Join now the yarn to the other shoulder and work the same way, ie casting off the 2 sts at the beg of a row from neck towards armhole. Happy knitting!
11.06.2019 - 14:53
![]() Joana Dinis hat geschrieben:
Joana Dinis hat geschrieben:
Thank you but i know how to blind off. i dont know where i bind off. when you said bind off in the middle...this i dont understand.
09.06.2019 - 10:35DROPS Design hat geantwortet:
Dear Mrs Dinis, you can first mark the middle 30-32 sts (see size) with a marker on either side of these stitches, then work to the first marker, bind off the next 30-32 sts (= to the 2nd marker) and work the remaining stitches on needle = you have now bound off for neck and the stitches on each side are for shoulders, turn and work now first shoulder as explained to the end, cut the yarn and join to finish the 2nd shoulder. Happy knitting!
11.06.2019 - 11:02
![]() Joana hat geschrieben:
Joana hat geschrieben:
Hello again. Can you explain this part for me please? When piece measures 44 (44-46) cm bind off middle 30 (32-32) sts to shape neckline. Then bind off 2 sts on each side on next row to shape neckline. Bind off when piece measures 46 (46-48) cm Thank you
02.06.2019 - 10:45DROPS Design hat geantwortet:
Hi Joanna, The middle stitches are the lowest part of the neckline at the back. Once they are bound off, each shoulder is continued separately. On the next row bind off 2 more stitches at the neck end of the row. Then continue working until the length measures 46 (46-48) cm, then bind off the remaining stitches for the shoulder. Do the same on the other side/shoulder. I hope this helps and happy knitting!
03.06.2019 - 08:44
![]() Joana Dinis hat geschrieben:
Joana Dinis hat geschrieben:
Thanks you!! when you said: continuing bind off for armhole like front piece = 110 (116-116) sts; it's this process: 3 sts 1 (1-2) times, 2 sts 2 (2-2) times, 1 st 1 (2-3) times = 56 (59-59) sts. ??? i need to repeat 2 times for the 2 parts right??? thank u
08.05.2019 - 10:23DROPS Design hat geantwortet:
Dear Mrs Dinis, you cast off for the armhole on each front piece (= at the beg of WS row on right front piece / at the beg of RS row on left front piece): 3 sts 1 (1-2) times, 2 sts 2 (2-2) times, 1 st 1 (2-3) times = 56 (59-59) sts - For back piece, you will cast off the same way, but at the beg of every row = both from RS and from WS so that the armholes are shaped as on each front piece. Happy knitting!
08.05.2019 - 12:00
![]() Joana Dinis hat geschrieben:
Joana Dinis hat geschrieben:
Thank you. i understood. but my neck is not regular like on the pict. how do you do the blind off?
25.04.2019 - 12:50DROPS Design hat geantwortet:
Dear Mrs Dinis, after you have finished pieces and seams, you will first pick up stitches for the front bands, then pick up 110-120 sts around the neckline and knit 2 rows for the neck edge = the neck will then sew much regular, ie as on the picture. Happy knitting!
25.04.2019 - 13:39
|
|
Sandy Beach |
|
 |
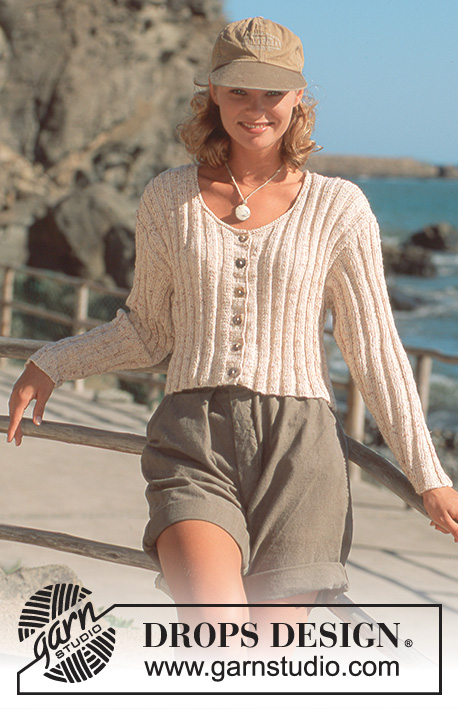 |
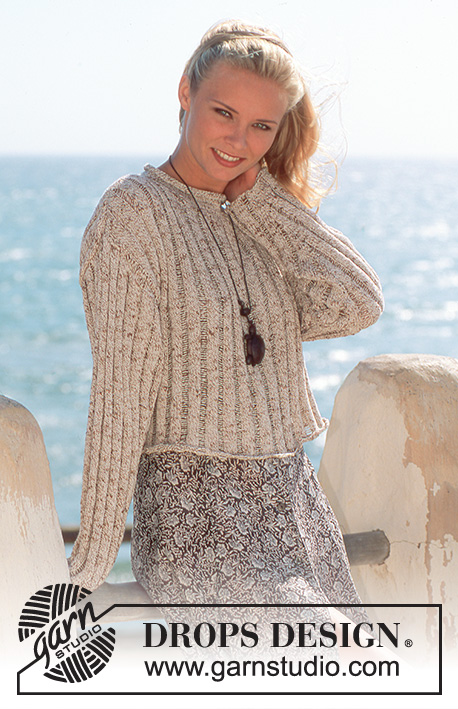
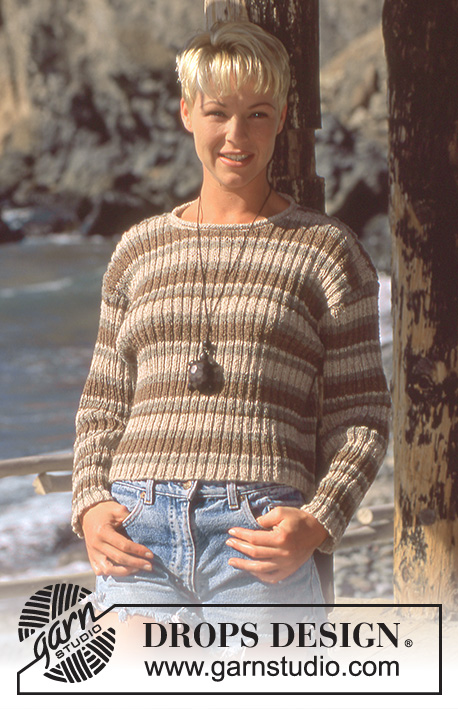
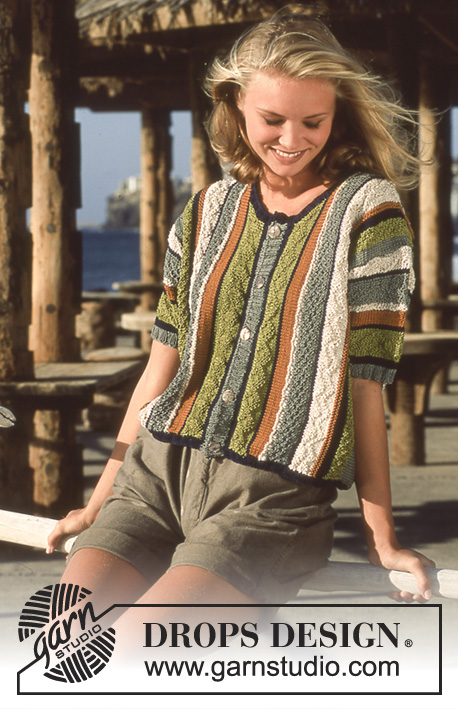
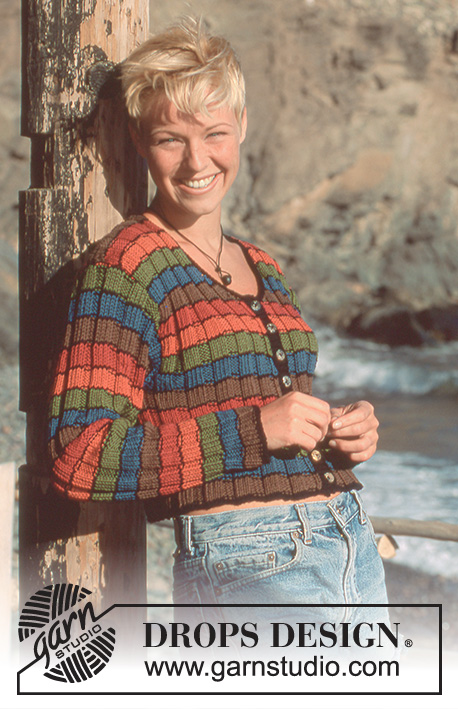
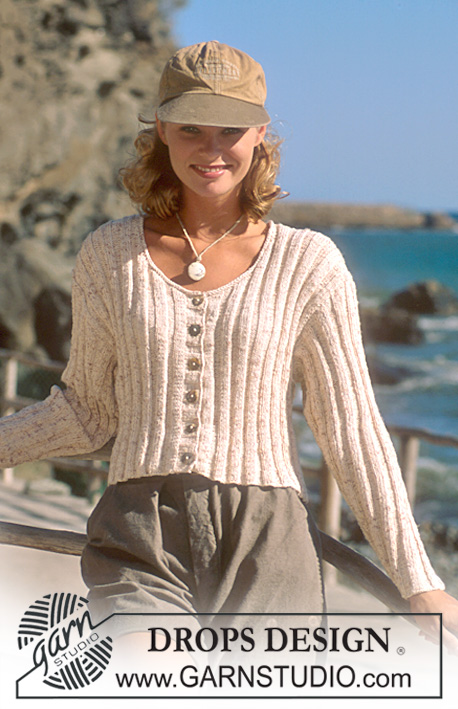
Gestrickte Jacke mit Rippenmuster in DROPS Safran. Größe S-L.
DROPS 41-23 |
|
|
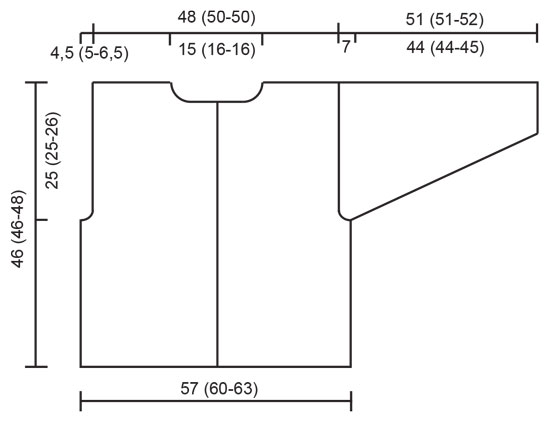
--------------------------- HINWEISE ZUR ANLEITUNG --------------------------- Rippenmuster: * 4 re., 4 li. *, von *-* wiederholen. ------------------------------- DIE ARBEIT BEGINNT HIER ------------------------------- Jacke - Kurzbeschreibung der Arbeit Das Rumpfteil wird auf einer Rundstr. Ndl. hin und zurück gestrickt. Ab den Armausschnitten werden die Vorderteile und das Rückenteil einzeln weitergestrickt. Die Ärmel werden in Runden gestrickt. Die vorderen Blenden und die Halsblende werden zuletzt angestrickt. Rumpfteil: Mit natur meliert auf Rundstr. Nr. 3,5 262 (278-294) M. anschlagen und im Rippenmuster (siehe oben) stricken, mit je 1 Rand-M beidseitig. Nach 21 (21-22) cm die nächste R. wie folgt stricken: 64 (68-72) M. im Muster wie zuvor für das Vorderteil stricken, 4 M. für den Armausschnitt abketten, 126 (134-142) M. für das Rückenteil wie zuvor stricken, 4 M. für den Armausschnitt abketten, 64 (68-72) M. für das Vorderteil stricken. Jeder Teil wird jetzt für sich fertig gestrickt. Vorderteil: = 64 (68-72) M. An Anfang jeder R, die am Armausschnitt beginnt, wie folgt abketten: 3 M. 1 (1-2) x, dann 2 M. 2 (2-2) x, dann 1 M. 1 (2-3) x = 56 (59-59) M. Nach 29 (29-31) cm am Anfang jeder R, die am Halsrand beginnt, wie folgt für den Halsausschnitt abketten: 2 M. 7 x, und danach am Anfang jeder 2. R, die am Halsrand beginnt: 1 M. 4 (5-5) x. Die Arbeit nach 46 (46-48) cm abk. Das andere Vorderteil gegengleich stricken. Rückenteil: = 126 (134-142) M. Wie beim Vorderteil für die Armausschnitte abk. = 110 (116-116) M. Nach 44 (44-46) cm die mittleren 30 (32-32) M. für den Halsausschnitt abketten und jede Seite einzeln weiterstricken, dabei am Anfang der nächsten R, die am Halsrand beginnt, 2 M abketten. Die Arbeit nach 46 (46-48) cm abk. Ärmel: Die Ärmel werden in Runden gestrickt. Mit natur meliert auf Nadelspiel Nr. 3,5 (50-50) M. anschlagen und in Runden im Rippenmuster stricken (es sind 4 M. re. in der Mitte des Ärmels). Gleichzeitig an der unteren Ärmelmitte wie folgt zunehmen: 2 M. 33 (33-35) x abwechselnd in jeder 3. und 4. Rd. = 116 (116-120) M. Nach 44 (44-45) cm die mittleren 6 M. unter dem Ärmel abk. und hin und zurück fertig stricken, dabei am Anfang jeder R, d.h. beidseitig, wie folgt für die Armkugel abketten: 4 M. je 9 x beidseitig, danach abketten. Die Arbeit misst jetzt ca. 51 (51-52) cm. Zusammennähen: Die Schulternähte zusammennähen. Für die vordere Blende am linken Vorderteil mit natur meliert auf einer Rundstr. Nr. 3 ca. 84 M. auffassen (teilbar durch 8 + 4) und 3 cm im Rippenmuster stricken. Am rechten Vorderteil wiederholen, jedoch nach 1 cm gleichmäßig verteilt 6 Knopflöcher einstricken - 1 Knopfloch = 3 M. abk. und bei der nächsten R. über den angeketteten M. 3 neue M. anschlagen. Für die Halsblende aus dem ganzen Halsausschnitt mit natur auf Rundstr. Nr. 3 ca. 110-120 M. auffassen und 1 Krausrippe (= 2 R kraus re) stricken, danach abk. Die Ärmel einnähen und die Knöpfe annähen. |
|
 |
|
Haben Sie diese Anleitung nachgearbeitet?Dann taggen Sie Ihre Fotos mit #dropspattern oder schicken Sie sie an die #dropsfan Galerie Brauchen Sie Hilfe bei dieser Anleitung?Sie finden 17 Videotutorials, einen Kommentar/Fragen-Bereich und vieles mehr, wenn sie die Anleitung bei garnstudio.com aufrufen. © 1982-2026 DROPS Design A/S. Wir besitzen alle Rechte. Dieses Dokument, einschließlich aller Untersektionen, hat Urheberrechte. Mehr dazu, was Sie mit unseren Anleitungen machen können, finden Sie ganz unten auf der Seite zu jeder Anleitung. |
|


Mit über 40 Jahren Tätigkeit im Entwerfen von Strick- und Häkelmustern bietet Ihnen DROPS Design eine der umfangreichsten Sammlungen von kostenlosen Anleitungen im Internet - in 17 Sprachen übersetzt. Zum jetzigen Zeitpunkt haben wir insgesamt 324 Handarbeitshefte und 12290 Anleitungen auf Deutsch. 12202
Unser Ziel ist es, Ihnen die besten Angebote zum Stricken und Häkeln, Inspirationen und Ratschläge sowie qualitativ hochstehende Garne zu unglaublichen Preisen zu bieten! Möchten Sie unsere Anleitungen nicht nur für den persönlichen Gebrauch nutzen? Unsere Copyright Bedingungen finden Sie bei allen unseren Anleitungen ganz unten auf der jeweiligen Seite. Viel Spaß beim Handarbeiten!
Kommentieren Sie die Anleitung DROPS 41-23
Wir würden gerne Ihre Meinung zu diesem Modell erfahren!
Wenn Sie eine Frage stellen möchten, prüfen Sie bitte, dass Sie die richtige Kategorie im unten stehenden Formular gewählt haben - so bekommen Sie schneller eine Antwort. Die obligatorischen Felder sind mit einem * gekennzeichnet.