
Popular categories
Looking for a yarn?


Comments / Questions (168)
![]() Birgit Hainzlmayr wrote:
Birgit Hainzlmayr wrote:
Ich verstehe nicht, wie ich, wenn ich das Muster A3 stricke, gleichzeitig Zunahmen wie bei A1 und A2 machen soll. Entweder stricke ich doch A1/A2 oder A3? Wo werden die Zunahmen gestrickt? Wie kann ich plötzlich bei A3B einen Rapport mehr in der Breite stricken?
19.12.2022 - 18:54DROPS Design answered:
Liebe Frau Hainzlmayr, nehmen Sie zuerst wie im A.1/A.2 zu dann stricken Sie A.3 A, B und C und nach A.3C nehmen Sie wie am Ende A.1/A.2 zu, die neuen Maschen stricken Sie wie am Anfang und am Ende A.1/A.2 so haben Sie jeweils ein neues Muster in der Breite. Viel Spaß beim stricken !
20.12.2022 - 08:11
![]() Britt wrote:
Britt wrote:
Jeg syntes det er en super fin model, men opskriften er for utydelig, hvilket man også kan se på alle de spørgsmål der er stillet om det samme problem i skiftet mellem A1/A2 til A3. Det burde skæres mere ud i pap, for at forstå
12.11.2022 - 12:14
![]() Britt wrote:
Britt wrote:
Når man er færdig med A1 engang i højden i str. XL og skal strikke A3, skal udtagningerne der er noteret i A1 så ikke laves? Og det samme når A2 er strikket en gang som tegningen. Hvad skal maskeantal være når A2 er stikket en gang i højden? Hvis udtagningerne skal laves, er mønster og udtagninger jo det samme hele vejen???
12.11.2022 - 12:11DROPS Design answered:
Hej Britt, Når A.1 og A.2 er strikket 1 gang i høyden, strikkes det videre med A.3. Du starter omgangen med A.3a (over 5 masker), så strikker du A.3b til det gjenstår 6 masker på omgangen, strikk A.3c. Du fortsetter også med økningene som før (som vist i A.1 og A.2). mvh DROPS Design
16.11.2022 - 12:21
![]() Lucia wrote:
Lucia wrote:
Buonasera vorrei fare questa maglia ma il collo dietro rialzato con i ferri accorciati, come posso fare con il disegno dei rombi? Grazie
04.11.2022 - 21:33DROPS Design answered:
Buonasera Lucia, per un aiuto così personalizzato può rivolgersi al suo rivenditore DROPS di fiducia. Buon lavoro!
05.11.2022 - 10:19
![]() Gasparetto wrote:
Gasparetto wrote:
Bonjour J’ai fini le pull. Mais il s’avère qu’à l’essayage pour la personne à qui il était destinée le col est trop serré pour passer la tête. Le reste du pull irait bien . Est ce qu’il y a moyen de défaire uniquement le col et de rajouter des mailles pour le refaire plus large dans la mesure où le pull a été tricoté de haut en bas. Il y aurait juste les cotes à refaire? Merci pour votre retour.
29.09.2022 - 09:18DROPS Design answered:
Bonjour, c'est possible meme si votre ouvrage est tricote de haut en bas. Regardez la video ICI. Bon tricot!
29.09.2022 - 11:50
![]() Nicole wrote:
Nicole wrote:
Bonjour, Dans la section : dos & devant ,que veut dire : « en commençant 3 mailles avant les 7 nouvelles mailles montées sur le côté, tricoter A4 sur toutes les mailles… À quel endroit du graphique de A4 doit-on reprendre notre rang après les 7 mailles montées? Merci
27.09.2022 - 17:34DROPS Design answered:
Bonjour Nicole, vous devez commencer le tour quand il reste 3 mailles avant la fin du dos (3 mailles avant les 7 mailles montées sous la manche), puis tricoter A.4 (= 10 m) à partir de la 1ère maille en veillant bien en même temps à aligner A.4 au-dessus des A.3 précédents; autrement dit, le surjet double du 7ème rang de A.3 doit être la 7ème maille de A.4. Bon tricot!
28.09.2022 - 08:39
![]() Waltraut Jebara wrote:
Waltraut Jebara wrote:
Wenn man RVO genau nach den Anleitungen strickt, ist nicht berücksichtigt, dass der Halsausschnitt vorne tiefer sein muss als hinten. Ich habe bereits einen Pullover so gestrickt und musste später den Rand vorne am Hals einschlagen und fest nähen, damit es bequemer ist. Haben Sie eine Raglan-von-oben-Anleitung für einen üblichen Halsausschnitt, d.h. vorne tiefer als hinten?
17.07.2022 - 18:51DROPS Design answered:
Liebe Frau Jebara, hier finden Sie gestrickte Pullover, die von oben nach unten gestrickt werden. Darin können Sie dann Modelle finden, die eine Erhöhung für den Hals haben. Viel Spaß beim stricken!
01.08.2022 - 10:36
![]() Cornelia wrote:
Cornelia wrote:
Ich habe eine Frage zur Passe. Ich stricke Größe L. .A1 ist nach 20 R. beendet, A2 aber erst nach 30 R. Wie führe ich A1 weiter, mit A3? Dann wird aber in der 21. Reihe am Anfang nur 1 Umschlag (1. u. 11. R. zu Beginn. und am Ende 2 Umschläge) gearbeitet. Ist das so richtig?
06.03.2022 - 22:20DROPS Design answered:
Liebe Cornelia, über A.1 stricken Sie: die Zunahme wie in A.1, dann stricken Sie: A.3A, A.3B bis 6 M übrig sind, dann stricken Sie A.3C und nehmen wie in A.1 zu. Viel Spaß beim stricken!
07.03.2022 - 09:38
![]() Rikke wrote:
Rikke wrote:
Forstår ikke helt dette med A3. Har skjønt at jeg skal beholde grattstrikk og raglanøkningene (?), men skal A3a-c strikkes mellom hver raglanøkning? Altså mellom hver økning strikkes a-c strikkes = x4 på en omg? Eller skal man begynne med a og strikke b over hele, helt til man avslutter selve omgangen med c?
24.02.2022 - 08:20DROPS Design answered:
Hei Rikke. Når A.1 og A.2 er strikket 1 gang i høyden, strikkes det videre med A.3. Du starter omgangen med A.3a (over 5 masker), så strikker du A.3b til det gjenstår 6 masker på omgangen, strikk A.3c. Du fortsetter også med økningene som før (som vist i A.1 og A.2). mvh DROPS Design
28.02.2022 - 12:59
![]() Unni Solli wrote:
Unni Solli wrote:
Jeg strikker Frosted Leaves Drops 216-3, og synes oppskriften er veldig vanskelig å skjønne. I andre avsnitt på s 3 står det at A1 og A2 skal strikkes 1 gang i høyden. Hva betyr det? Er det hele diagrammet på 30 omg? Det står også at det skal økes p hver 2. omg totalt 25 ganger (strikker S). Er det da 25 ganger fra jeg starter med A1 og A2??
10.02.2022 - 17:27DROPS Design answered:
Hei Unni. Ja, du strikker diagram A.1 og A.2 1 gang i høyden (= 30 omganger/15 omganger der du har økt). Deretter strikker du videre med A.3, men du fortsetter å øke som vist i A.1/A.2 på hver 2. omgang 10 ganger til, totalt 25 ganger. I str. S vil du da ha 272 masker og arbeidet måler ca 23-cm fra merketråden. mvh DROPS Design
14.02.2022 - 10:01
|
||||||||||||||||
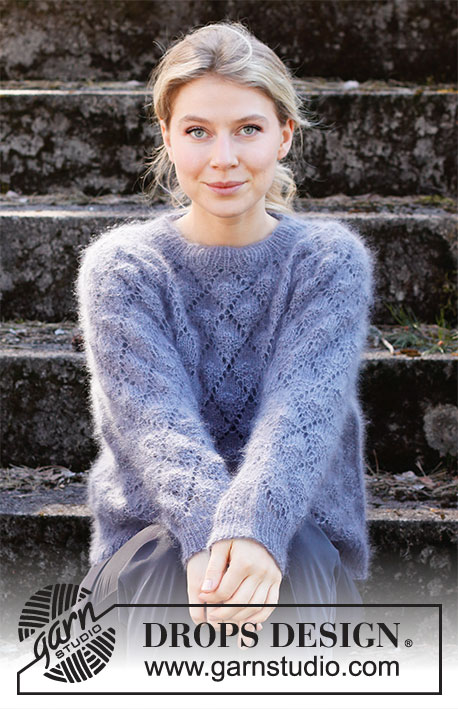
Frosted Leaves#frostedleavessweater |
||||||||||||||||
 |
 |
|||||||||||||||
Knitted jumper in 1 strand DROPS Brushed Alpaca Silk or 2 strands DROPS Kid-Silk. The piece is worked top down with raglan and lace pattern. Sizes S - XXXL.
DROPS 216-3 |
||||||||||||||||
|
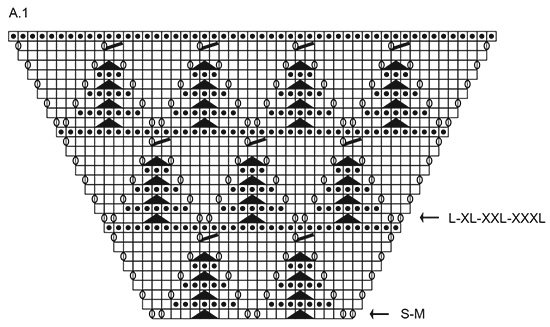
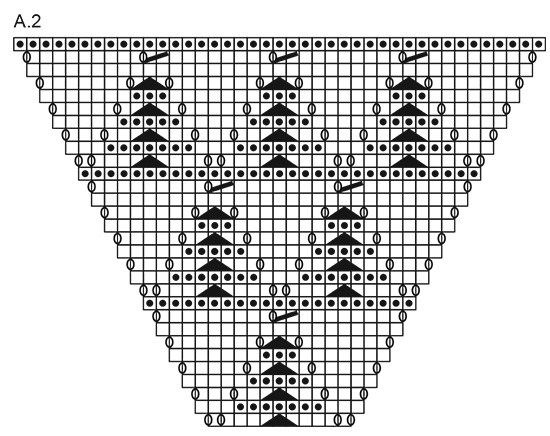
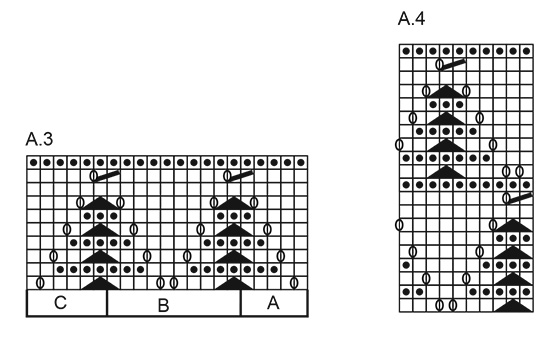
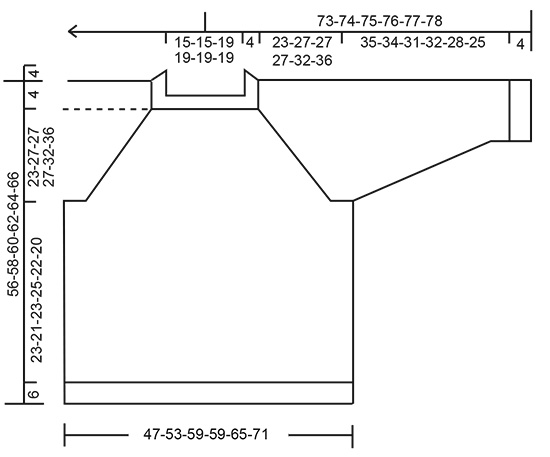
------------------------------------------------------- EXPLANATIONS FOR THE PATTERN: ------------------------------------------------------- PATTERN: See diagrams A.1 to A.4 DECREASE TIP-1 (evenly spaced): To work out how to decrease evenly, count the total number of stitches on needle (e.g. 48 stitches) and divide by number of decreases to be made (e.g. 8) = 6. In this example decrease by knitting each 5th and 6th stitch together. DECREASE TIP-2 (for sleeves): Decrease 1 stitch on either side of the marker thread as follows: Work until there are 3 stitches left before the marker thread, knit 2 together, knit 2 (marker thread sits between these 2 stitches), slip 1 stitch as if to knit, knit 1 and pass the slipped stitch over the knitted stitch (= 2 stitches decreased). CASTING-OFF TIP: To avoid the cast-off edge being tight you can cast off with a larger size needle. If the edge is still tight, make 1 yarn over after approx. each 4th stitch at the same time as casting off; the yarn overs are cast off as normal stitches. ------------------------------------------------------- START THE PIECE HERE: ------------------------------------------------------- JUMPER – SHORT OVERVIEW OF THE PIECE: The neck and yoke are worked in the round with circular needle, top down. The yoke is divided for body and sleeves and the body continued in the round with circular needle. The rounds start at the transition between sleeve and back piece. The sleeves are worked in the round with short circular needle/double pointed needles, top down. The piece is worked with 1 strand Brushed Alpaca Silk or 2 strands Kid-Silk. NECK: Cast on 72-72-92-92-92-92 stitches with circular needle size 4 mm and 1 strand Bruched Alpaca Silk or 2 strands Kid-Silk. Knit 1 round. Then work rib (knit 1, purl 1) for 4 cm. Insert 1 marker at the beginning of the round. The yoke will be measured from this marker. Change to circular needle size 5 mm and work the yoke as described below. REMEMBER THE KNITTING TENSION! YOKE: On the next round work pattern as follows: Work 1 stitch in stocking stitch, A.1 (= 21-21-31-31-31-31 stitches, see start-arrow for your size), 2 stitches in stocking stitch, A.2 (= 11 stitches), 2 stitches in stocking stitch, A.1 (= 21-21-31-31-31-31 stitches, see start-arrow for your size), 2 stitches in stocking stitch, A.2 (= 11 stitches) and 1 stitch in stocking stitch. Continue this pattern; all increases are drawn into the diagrams. 8 stitches are increased every 2nd round. When A.1 and A.2 have been worked 1 time in height, continue with A.3. Work A.3 A over the first 5 stitches, repeat A.3 B until there are 6 stitches left on the row and work A.3 C over the last 6 stitches. Each time A.3 has been worked 1 time in height there is room for 1 more repeat of A.3 B in width. Continue the increases as shown in A.1 and A.2. Increase every 2nd round a total of 25-30-30-30-35-40 times = 272-312-332-332-372-412 stitches. The piece measures approx. 23-27-27-27-32-36 cm from the marker thread. Now divide the yoke for body and sleeves as follows (continue the pattern as before; you should be on the last round in a repeat of A.3, where all stitches are purled): Work 73-83-93-93-103-113 stitches (= back piece), place the next 63-73-73-73-83-93 stitches on 1 thread for the sleeve, cast on 7 new stitches on the needle (= in side under sleeve), work 73-83-93-93-103-113 stitches as before (= front piece), place the next 63-73-73-73-83-93 stitches on 1 thread for the sleeve and cast on 7 new stitches on the needle (= in side under sleeve). Body and sleeves are finished separately. Cut the strand. BODY: = 160-180-200-200-220-240 stitches. Start 3 stitches before the 7 new stitches cast on in the side and work A.4 over all stitches; make sure the pattern matches the pattern on the yoke. Continue working until the piece measures 23-21-23-25-22-20 cm from the division (there is approx. 6 cm left to finished length; you can try the jumper on and work to desired length). Change to circular needle size 4 mm and work rib (knit 1, purl 1) for 6 cm. Cast off with knit over knit and purl over purl – read CASTING-OFF TIP! The jumper measures approx. 56-58-60-62-64-66 cm from the shoulder down. SLEEVES: Place the 63-73-73-73-83-93 stitches from the thread on the one side of the piece on short circular needle/double pointed needles size 5 mm and knit up 1 stitch in each of the 7 stitches cast on under the sleeve = 70-80-80-80-90-100 stitches. Insert a marker thread in the middle of the 7 stitches under the sleeve. Allow the thread to follow your work onwards; it will be used when decreasing under the sleeve. Cut the strand and start working 3 stitches before the new stitches under the sleeve and continue the pattern in the round according to A.4; make sure the pattern matches the pattern on the yoke. When the sleeve measures 3 cm from the division in all sizes, decrease 2 stitches mid under the sleeve – read DECREASE TIP-2. Decrease like this every 3-2-1½-2-1-1 cm a total of 11-15-15-13-17-21 times = 48-50-50-54-56-58 stitches. The stitches which do not fit into the pattern when decreasing are worked in stocking stitch. Continue working until the sleeve measures 35-34-31-32-28-25 cm from the division (there is approx. 4 cm left to finished length; you can try the jumper on and work to desired length). NOTE: Shorter measurements in larger sizes due to wider neck and longer yoke. Knit 1 round where you decrease 8 stitches evenly spaced – read DECREASE TIP-1 = 40-42-42-46-48-50 stitches. Change to double pointed needles size 4 mm and work rib (knit 1, purl 1) for 4 cm. Cast off with knit over knit and purl over purl – remember CASTING-OFF TIP! The sleeve measures approx. 39-38-35-36-32-29 cm from the division. Work the other sleeve in the same way. |
||||||||||||||||
Diagram explanations |
||||||||||||||||
|
||||||||||||||||
 |
||||||||||||||||
 |
||||||||||||||||
 |
||||||||||||||||
 |
||||||||||||||||
Have you finished this pattern?Tag your pictures with #dropspattern #frostedleavessweater or submit them to the #dropsfan gallery. Do you need help with this pattern?You'll find 26 tutorial videos, a Comments/Questions area and more by visiting the pattern on garnstudio.com. © 1982-2026 DROPS Design A/S. We reserve all rights. This document, including all its sub-sections, has copyrights. Read more about what you can do with our patterns at the bottom of each pattern on our site. |
||||||||||||||||


With over 40 years in knitting and crochet design, DROPS Design offers one of the most extensive collections of free patterns on the internet - translated to 17 languages. As of today we count 325 catalogues and 12298 patterns translated into English (UK/cm).
We work hard to bring you the best knitting and crochet have to offer, inspiration and advice as well as great quality yarns at incredible prices! Would you like to use our patterns for other than personal use? You can read what you are allowed to do in the Copyright text at the bottom of all our patterns. Happy crafting!
Post a comment to pattern DROPS 216-3
We would love to hear what you have to say about this pattern!
If you want to leave a question, please make sure you select the correct category in the form below, to speed up the answering process. Required fields are marked *.