
Popular categories
Looking for a yarn?


Comments / Questions (25)
![]() Dea wrote:
Dea wrote:
Avrei bisogno un chiarimento. Perchè dice "Passare al colore verde/grigio chiaro e lavorare a coste (= 2 maglie diritto / 2 maglie rovescio) per circa 2½-3 cm. " senza specificare a che taglie corrisponde la differenza di centimetri? Visto che faccio la M cosa devo prendere in esame? Grazie.
11.10.2019 - 20:16DROPS Design answered:
Buongiorno Dea. È un suggerimento sull’altezza del bordo a coste intorno allo scollo, altezza che non è vincolante, ma che può essere regolata in base al suo gusto personale. A seconda se preferisce un bordo leggermente più alto o meno. Può lavorare fino a 2,5 cm e se le sembra un bordo troppo basso può aggiungere uno o più giri a coste. Buon lavoro!
12.10.2019 - 09:42
![]() Peggie wrote:
Peggie wrote:
Waar in het patroon ga je de 80 cm nr 4 gebruiken. Dat kan ik nergens vinden.
13.09.2019 - 23:29DROPS Design answered:
Dag Peggie,
Deze gebruik je op het lijf en de pas om in de rondte te breien. Als de steken niet meer op de korte naald passen, neem je de lange naald.
17.09.2019 - 08:25
![]() Karin wrote:
Karin wrote:
Is dit patroon ook verkrijgbaar in maat 128/134
06.09.2019 - 19:28DROPS Design answered:
Dag Karin,
Nee, helaas is hier alleen een patroon voor volwassenen voor.
08.09.2019 - 13:17
![]() Angela wrote:
Angela wrote:
I’m working the M size, struggling with the sleeve shaping, the pattern sates a total of 80 stitches are picked up, then that the first decrease will have been done when the lace pattern starts, but there are still 80 stitches on the needle at that point. I tried doing the deacrease first, but the lace pattern doesn’t work out over 78 stitches. Is this an error? Thank you
27.06.2019 - 13:59DROPS Design answered:
Dear Angela, size M should have 64 sts from sleeve + 8 sts picked up = 72 sts (80 sts in size L where you pick up 70 sts + 10 sts). Start mid under arm and work the first round in pattern as explained in size M = 70 sts remain (first decrease has been worked): 4 sts in stocking st, A.2 over 60 sts (= 6 repeats in width), A.2B (= 2 sts), 4 sts in stocking st. Happy knitting!
27.06.2019 - 14:37
![]() Kathrin Reichardt wrote:
Kathrin Reichardt wrote:
In der Erhöhung vor der Passe hat sich ein Fehler eingeschlichen, es fehlt die letzte Rückreise (Größe L müsste man 96 M li str. und dann 48 M re bis zum Seitenanfang), damit auf beiden Seiten die Erhöhung gleich hoch ist.
07.06.2019 - 20:26
![]() Janet Kabel wrote:
Janet Kabel wrote:
Making xxxl large size. It states cast on 128 stitches. Then knit 2 purl 2 ribbing, I start with knit 2 but stitches 127, 128 come out knitted so I have four knitted stitches where the join is. I have counted and recounted, what am I doing wrong?
01.06.2019 - 18:57DROPS Design answered:
Hi Janet, 128 stitches divides evenly by 4 (32 times) so you should end up with purl 2. Happy knitting!
03.06.2019 - 08:46
![]() Liisa Lappalainen wrote:
Liisa Lappalainen wrote:
Kiitos kivasta puseronmallista. Olisi kiva saada flamingopuseron ja villatakin neulemalli myös lasten koissa.
20.05.2019 - 16:39
![]() Christina Petersen wrote:
Christina Petersen wrote:
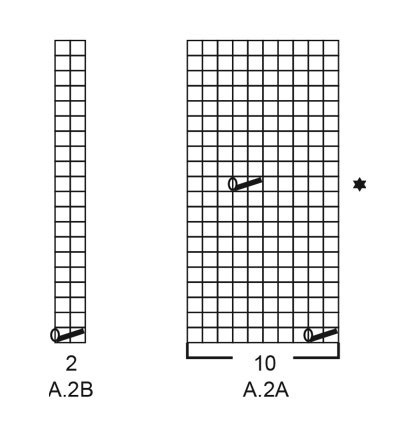
Der er fejl i symbolforklaringen til diagram A2A. Det angives at begge symboler (skrå streg samt cirkel) betyder det samme. Den skrå streg over to masker skal betyde to ret sammen. Dette er korrekt beskrevet i cardigan modellen.
12.03.2019 - 20:57
![]() Annette Müller wrote:
Annette Müller wrote:
Meine Norwegerpullis habe ich bisher immer von unten nach oben gestrickt. Ist das auch bei diesem Modell möglich ?
23.02.2019 - 13:59DROPS Design answered:
Liebe Frau Müller, wenn Sie dieses Modell von unten nach oben stricken, sollen Sie die ganze Anleitung umändern/anpassen, die Flamingo würden auch anders aussehen, am besten stricken Sie wie in der Anleitung erklärt, dh von oben nach unten. Viel Spaß beim stricken!
25.02.2019 - 08:31
![]() Anni wrote:
Anni wrote:
Trying to make an L sweater but having problems with tension. Keep getting 18st in 10cm instead of 21. Changed the needle to 4mm (instead of 3) still no result. Neck measures at this point 20cm instead of 23. Should I follow the XL pattern and maybe I'll get the correct measurements for an L? I knit pretty loosely but afraid it will turn out 2 size smaller if I continue.Thank you.
14.02.2019 - 18:28DROPS Design answered:
Dear Ami, needle size is just a suggestion, we all knit different way, sometimes somewhat loose or somewhat tight , you should try again to check your gauge with smaller needles until you get the correct tension. Merino Extra Fine should rather be worked too tight than too loose, you can also first wash your swatch and check again tension. Your store will have some more tips for you, do not hesitate to contact them. Happy knitting!
15.02.2019 - 08:41
|
||||||||||||||||||||||||||||||||||
Flamingo Parade#flamingoparadesweater |
||||||||||||||||||||||||||||||||||
 |
 |
|||||||||||||||||||||||||||||||||
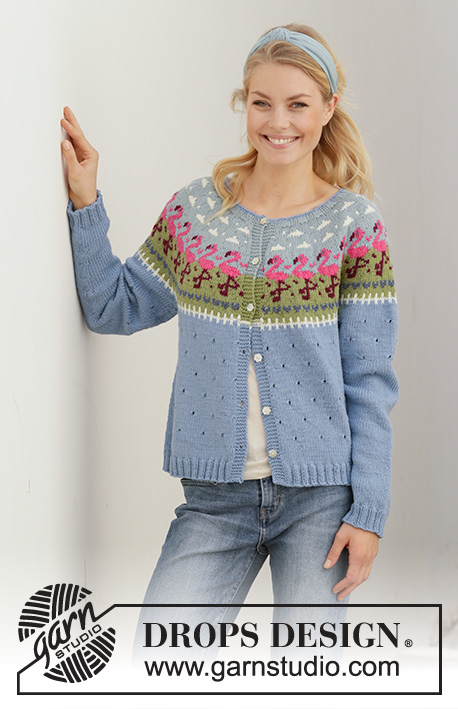
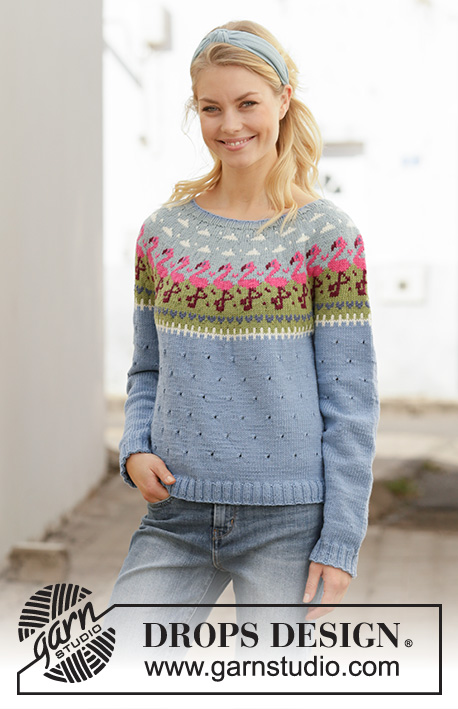
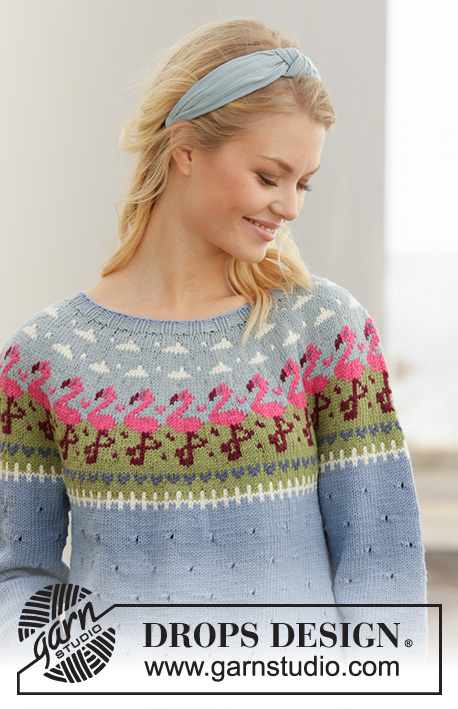
Knitted jumper with flamingos in DROPS Merino Extra Fine. The piece is worked top down with round yoke and Nordic pattern. Sizes S - XXXL.
DROPS 201-11 |
||||||||||||||||||||||||||||||||||
|
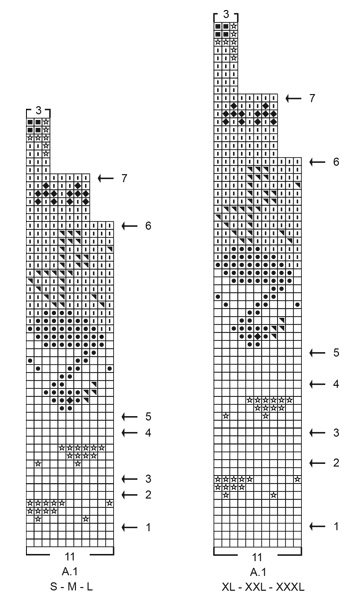
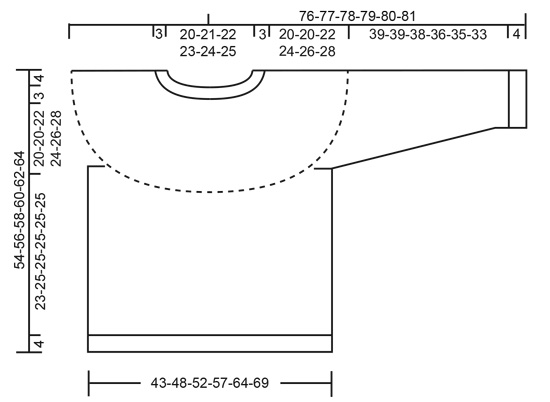
------------------------------------------------------- EXPLANATIONS FOR THE PATTERN: ------------------------------------------------------- ELEVATION (back of neck): To make the jumper slightly higher at the back of the neck when working the yoke, work an elevation as described below. Skip this section if you do not want an elevation. Insert 1 marker at the beginning of the round (= mid back). Start from the right side with light greyish green and knit 15-15-16-16-18-18 stitches, turn, tighten strand and purl 30-30-32-32-36-36 stitches. Turn, tighten strand and knit 45-45-48-48-54-54 stitches, turn, tighten strand and purl 60-60-64-64-72-72 stitches. Turn, tighten strand and knit 75-75-80-80-90-90 stitches, turn, tighten strand and purl to mid back. Then work YOKE as described in text. INCREASE TIP (evenly spaced): To work out how to increase evenly, count the total number of stitches on the needle (e.g. 108 stitches) and divide by the number of increases to be made (e.g. 24) = 4.5. In this example, increase by making 1 yarn over after alternately each 4th and 5th stitch. On the next round knit the yarn overs twisted to avoid holes. PATTERN: See diagrams A.1 and A.2. Choose diagram for your size (applies to A.1). A.1 is worked in stocking stitch. As there are long gaps between colour changes, twist the strands together after approx. each 7th stitch to avoid loose strands at the back. KNITTING TIP: To avoid the knitting tension becoming tighter when working pattern, it is important not to have tight strands at the back. You can increase the needle size when working pattern if this is a problem. DECREASE TIP (for mid under sleeves): Start 3 stitches before the marker thread, knit 2 together, knit 2 (marker thread sits between these 2 stitches), slip 1 stitch as if to knit, knit 1 and pass the slipped stitch over the knitted stitch (= 2 stitches decreased). CASTING-OFF TIP: To avoid the cast-off edge being tight, you can cast off with a larger needle size. Or make 1 yarn over after approx. each 8th stitch at the same time as you cast off (yarn overs cast off as normal stitches). ------------------------------------------------------- START THE PIECE HERE: ------------------------------------------------------- JUMPER - SHORT OVERVIEW OF THE PIECE: Neck and yoke are worked in the round with circular needle, top down. The yoke is divided for body and sleeves. The body is continued in the round with circular needle, top down. The sleeves are worked in the round with short circular needle/double pointed needles, top down. NECK: Cast on 108-112-116-120-124-128 stitches with short circular needle size 3 mm and light grey blue. Start of round = mid back. Knit 1 round. Change to light greyish green and work rib in the round (= knit 2 / purl 2) for approx. 2½-3 cm. Change to short circular needle size 4 mm. Knit 1 round where you increase 24-20-27-23-30-26 stitches evenly spaced – read INCREASE TIP = 132-132-143-143-154-154 stitches. Knit 1 round (yarn overs knitted twisted). Then you can work an ELEVATION in back of neck – read description above. If you do not want an elevation, go straight to YOKE. YOKE: Read KNITTING TIP and work A.1 in the round (= 12-12-13-13-14-14 repeats of 11 stitches). REMEMBER THE KNITTING TENSION! AT THE SAME TIME on each round marked with an arrow in A.1 increase as follows – read INCREASE TIP: Arrow-1: Increase 33-44-44-44-44-44 stitches evenly spaced = 165-176-187-187-198-198 stitches (there is now room for 15-16-17-17-18-18 repeats of 11 stitches). Arrow-2: Increase 33-33-44-44-44-44 stitches evenly spaced = 198-209-231-231-242-242 stitches (there is now room for 18-19-21-21-22-22 repeats of 11 stitches). Arrow-3: Increase 22-22-22-33-44-44 stitches evenly spaced = 220-231-253-264-286-286 stitches (there is now room for 20-21-23-24-26-26 repeats of 11 stitches). Arrow-4: Increase 22-33-33-33-33-44 stitches evenly spaced = 242-264-286-297-319-330 stitches (there is now room for 22-24-26-27-29-30 repeats of 11 stitches). Arrow-5: Increase 11-11-11-22-33-33 stitches evenly spaced = 253-275-297-319-352-363 stitches (there is now room for 23-25-27-29-32-33 repeats of 11 stitches). Arrow-6: Increase 11-21-23-25-24-29 stitches evenly spaced = 264-296-320-344-376-392 stitches (there is now room for 33-37-40-43-47-49 repeats of 8 stitches). Arrow-7: Increase 12-16-19-22-20-25 stitches evenly spaced = 276-312-339-366-396-417 stitches (there is now room for 92-104-113-122-132-139 repeats of 3 stitches). On the last round in A.1, increase 0-0-1-2-2-1 stitches evenly spaced (increase in background colour) = 276-312-340-368-398-418 stitches. When A.1 has been completed the piece measures approx. 23-23-23-27-27-27 cm from the cast-on edge mid front. The rest of the garment is worked in light grey blue. Work stocking stitch onwards until the piece measures 23-23-25-27-29-31 cm from the cast-on edge mid front (i.e. approx. 0-0-2-0-2-4 cm after A.1). The next round is worked as follows: Work 41-46-50-55-61-65 stitches in stocking stitch (= ½ back piece), place the next 56-64-70-74-76-78 stitches on 1 thread for sleeve, cast on 8-8-10-10-12-14 new stitches on needle (= in side under sleeve), work 82-92-100-110-123-131 stitches in stocking stitch (= front piece), place the next 56-64-70-74-76-78 stitches on 1 thread for sleeve, cast on 8-8-10-10-12-14 new stitches on needle (= in side under sleeve) and work the remaining 41-46-50-55-62-66 stitches in stocking stitch (= ½ back piece). Cut the strand. Then continue body and sleeves separately. THE PIECE IS NOW MEASURED FROM HERE! BODY: = 180-200-220-240-270-290 stitches. Insert 1 marker thread in the middle of the 8-8-10-10-12-14 stitches under the sleeve on one side of the piece. Start the round by the marker thread and work stocking stitch in the round. When you have worked a total of 3-3-3-4-4-5 cm with light grey blue after A.1 on the yoke (i.e. after fence), start the lace pattern on the body. Work A.2A in the round (= 18-20-22-24-27-29 repeats of 10 stitches). A.2A is worked a total of 3 times in height in all sizes, but the last repeat finishes after the round marked with a star in A.2A. Then work stocking stitch in the round until the piece measures 23-25-25-25-25-25 cm from the division (or to desired length; there is 4cm left to finished length). On the next round increase 36-40-44-48-54-58 stitches evenly spaced = 216-240-264-288-324-348 stitches. This is done to avoid the rib being tight. Change to circular needle size 3 mm and work rib in the round (= knit 2 / purl 2) for 4 cm. Cast off with knit over knit and purl over purl – read CASTING-OFF TIP! The jumper measures approx. 54-56-58-60-62-64 cm from the shoulder down. SLEEVE: Place the 56-64-70-74-76-78 stitches from the thread on the one side of the piece on circular needle/double pointed needles size 4 mm and knit up 1 stitch in each of the 8-8-10-10-12-14 stitches cast on under the sleeve = 64-72-80-84-88-92 stitches. Insert 1 marker thread in the middle of the 8-8-10-10-12-14 stitches under the sleeve. Allow the marker thread to follow your work onwards; it will be used when decreasing mid under sleeve. Read the rest of the sleeve section before continuing! Start the round by the marker thread and work stocking stitch in the round (with light grey blue). When the piece measures 2-2-3-3-3-3 cm from the division, decrease 2 stitches mid under sleeve – read DECREASE TIP! Decrease like this every 4-3-2-2-1½-1½ cm a total of 10-13-16-17-18-19 times = 44-46-48-50-52-54 stitches. AT THE SAME TIME when you have worked a total of 3-3-3-4-4-5 cm with light grey blue after A.1 on the yoke (i.e. after fence), start the lace pattern on the sleeve. The first round is worked as follows (the first decrease under the sleeve has been done in sizes S, M and XL and there are 62-70-80-82-88-92 stitches on the needle when the lace pattern starts): Work 0-4-4-0-3-0 stitches in stocking stitch, A.2A over the next 60-60-70-80-80-90 stitches (= 6-6-7-8-8-9 repeats of 10 stitches), work A.2B (= 2 stitches) and finish with 0-4-4-0-3-0 stitches in stocking stitch. Continue this pattern, but make sure that the holes in A.2 are positioned over each other when decreasing under sleeve. A.2 is worked a total of 2 times in height in all sizes, but the last repeat finishes after the round marked with a star in A.2A. Then work stocking stitch in the round over all stitches until the piece measures approx. 39-39-38-36-35-33 cm from the division (or to desired length; there is 4cm left to finished length – NOTE: Shorter measurements in larger sizes due to wider neck and longer yoke). Knit 1 round where you increase 4-2-0-2-0-2 stitches evenly spaced = 48-48-48-52-52-56 stitches. Change to double pointed needles size 3 mm. Work rib in the round (= knit 2 / purl 2) for 4 cm. Cast off with knit over knit and purl over purl – read CASTING-OFF TIP! The sleeve measures approx. 43-43-42-40-39-37 cm from the division. Work the other sleeve in the same way. |
||||||||||||||||||||||||||||||||||
Diagram explanations |
||||||||||||||||||||||||||||||||||
|
||||||||||||||||||||||||||||||||||
 |
||||||||||||||||||||||||||||||||||
 |
||||||||||||||||||||||||||||||||||
 |
||||||||||||||||||||||||||||||||||
Have you finished this pattern?Tag your pictures with #dropspattern #flamingoparadesweater or submit them to the #dropsfan gallery. Do you need help with this pattern?You'll find 28 tutorial videos, a Comments/Questions area and more by visiting the pattern on garnstudio.com. © 1982-2026 DROPS Design A/S. We reserve all rights. This document, including all its sub-sections, has copyrights. Read more about what you can do with our patterns at the bottom of each pattern on our site. |
||||||||||||||||||||||||||||||||||


With over 40 years in knitting and crochet design, DROPS Design offers one of the most extensive collections of free patterns on the internet - translated to 17 languages. As of today we count 325 catalogues and 12298 patterns translated into English (UK/cm).
We work hard to bring you the best knitting and crochet have to offer, inspiration and advice as well as great quality yarns at incredible prices! Would you like to use our patterns for other than personal use? You can read what you are allowed to do in the Copyright text at the bottom of all our patterns. Happy crafting!
Post a comment to pattern DROPS 201-11
We would love to hear what you have to say about this pattern!
If you want to leave a question, please make sure you select the correct category in the form below, to speed up the answering process. Required fields are marked *.