
Popular categories
Looking for a yarn?


Comments / Questions (47)
Anna wrote:
Muss man das DREIMAL schreiben?
28.10.2013 - 18:59
![]() Schumacher wrote:
Schumacher wrote:
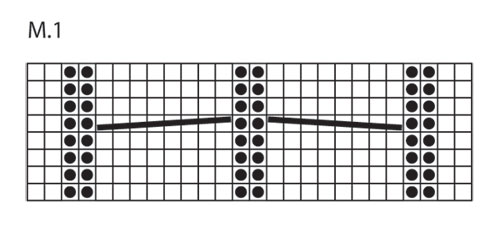
Hallo, ich finde diese Schal super schön. aber wenn ich mich an die Anleitung von M1 Diagarmm halten, entsteht ein ganz anderer Zopf!! Habe ich hier etwas übersehen? Meine Meinung nach passt das Diagramm nicht zur Abbildung. Es werden da ja wohl Hin- und Rückreihen angegeben. Wer kann mir hier helfen?
27.10.2013 - 09:11DROPS Design answered:
Hallo Frau Schumacher, wir haben das Diagramm überprüft und es stimmt. Inwiefern wird Ihr Zopf anders?
28.10.2013 - 08:07
![]() Nina wrote:
Nina wrote:
500g= 10 bollen
24.09.2013 - 18:44
![]() GRETA VAN CUTSEM wrote:
GRETA VAN CUTSEM wrote:
Hoeveel bollen heb ik nodig voor deze sjaal te breien a u b ? hartelijkdank
24.09.2013 - 14:49
![]() Cathis wrote:
Cathis wrote:
Dum fråga - ska man sticka alla tre "samtidigt" på en gång eller ska jag först börja med M1 och öka tills jag har 53 maskor. Sen börja med forkortade varv - eller ska jag sticka förkortade varv redan från början?
14.02.2013 - 11:57DROPS Design answered:
SAMTIDIGT från början av M.1 stickas det också förkortade v över de rätst m i sidorna. Sticka fram och tillbaka 1 gång endast över rätst-m i början av v varje v från rätsidan!
12.03.2013 - 11:03
![]() Sjanie Ermstrang wrote:
Sjanie Ermstrang wrote:
Het kwartje is gevallen, hartelijk dank voor de uitleg. ps. de kerstkalender is fantastisch !!!!!
05.12.2012 - 21:56
![]() Sjanie Ermstrang wrote:
Sjanie Ermstrang wrote:
Dus als ik het goed begrijp...de 1e kabel beginnen in nld 5 en de 2e kabel beginnen in nld 15 ?
05.12.2012 - 17:01DROPS Design answered:
Nee. Kijk op de teltekening. Lees van beneden naar boven. Eerste kabel komt in nld 5. Daarna nog 3 nld en dan begin je weer beneden en breit naar boven. Dus eerste kabel in nld 5, dan 7 nld breien, kabel, 7 nld en zo voort
05.12.2012 - 17:14
![]() Sjanie Ermstrang wrote:
Sjanie Ermstrang wrote:
Elke 5e nld beginnen met kabel breien( aan goede kant) echter bij nld 10 (2e kabel) is dit volgens patroon de verkeerde kant. Klopt dit wel ? je moet toch weer aan de goede kant beginnen?
04.12.2012 - 12:10DROPS Design answered:
Nee, de eerste keer brei je de kabel in de 5 nld, daarna brei je 7 nld (3 boven de kabel, en begin dan opnieuw met de teltekening). Dan komt de kabel elke keer op de goede kant.
05.12.2012 - 12:50Cheryl wrote:
Hi Work row until 3 sts remain on needle do i cosf off these 3st
07.05.2012 - 14:21DROPS Design answered:
No you do not cast off these sts.
07.05.2012 - 21:48Cheryl wrote:
Hi i do not understand this paragrath can you help Work garter st on the remaining sts with shortened rows as follows (row 1 = from WS): Work row until 3 sts remain on needle, turn piece, tighten thread and work return row. Work row until 6 sts remain on needle, turn piece, tighten thread and work return row. Continue like this with 3 sts more before each turn until you have worked back and forth on 2 sts only. Now work back and forth on all sts and cast off.
03.05.2012 - 07:07DROPS Design answered:
Cheryl, we do not know an easier way to explain this. Try to do exactly what is says, step by step. Or try get help at the yarn store where you got the yarn.
04.05.2012 - 00:43
|
|||||||||||||
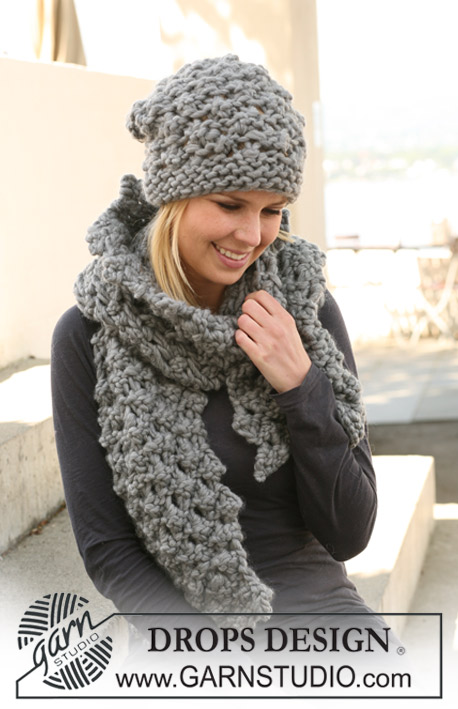
DROPS 125-19 |
|||||||||||||
|
|
|||||||||||||
DROPS scarf with cables in ”Snow”.
DROPS 125-19 |
|||||||||||||
|
PATTERN: See diagram M.1. Diagram shows the pattern from RS. GARTER ST (back and forth on needle): K all rows. -------------------------------------------------------- SCARF: Cast on 26 sts on needle size 8 mm with Snow. Work GARTER ST - see above - back and forth on needle for approx 12 cm. Change to needle size 7 mm. Continue in rib as follows (from RS): 2 garter sts, * K2, P2 *, repeat from *-* and finish with K2 and 2 garter sts until rib measures approx 15 cm. Change back to needle size 8 mm and work next row from RS as follows: 1 Garter st, 1 YO, 1 Garter st, 1 YO, K2, P2, K2, 1 YO, K2, 1 YO, K2, P2, K2, 1 YO, K2, 1 YO, K2, P2, K2, 1 YO, 1 Garter st, 1 YO and 1 Garter st = 34 sts. Work next row from WS as follows: 4 Garter sts, P2, K2, P8, K2, P8, K2, P2, 4 Garter sts. NOTE! Work YO into back of loop on return row. READ ALL OF THE FOLLOWING SECTION BEFORE CONTINUING! Insert a marker 4 sts in from each side and continue in M.1 between markers with garter st each side. AT THE SAME TIME inc the garter sts each side as follows (from RS): inc 1 st before the first marker on every 4th row and 1 st after the second marker on every 8th row. Continue like this until there are 17 sts before the first marker and 10 sts after the second marker (= a total of 53 sts). AT THE SAME TIME as beg M.1 also work shortened rows on the garter sts each side. Work back and forth 1 time on the garter sts at beg of every row from RS. And work back and forth 1 time on the garter sts at beg of every other row from WS (these rows each side are additional and not included with respect to the inc). When all inc are complete work 1 row from WS with K over K and P over P. Then K 1 row from RS on all sts, AT THE SAME TIME dec 2 sts on each cable (= 4 dec sts) = 49 sts. K 1 row from WS on all sts. Cast off 17 garter sts (= collar) at beg of row, work remaining sts on rows = 32 sts. Work garter st on the remaining sts with shortened rows as follows (row 1 = from WS): Work row until 3 sts remain on needle, turn piece, tighten thread and work return row. Work row until 6 sts remain on needle, turn piece, tighten thread and work return row. Continue like this with 3 sts more before each turn until you have worked back and forth on 2 sts only. Now work back and forth on all sts and cast off. Knit 1 more piece in the same way, but mirrored. ASSEMBLY: Sew the 2 pieces tog mid back, sew edge to edge in outer loops of sts to avoid a chunky seam. Pick up 26 sts on needle size 7 mm with Snow behind the rib on the right side. Continue as follows: 2 garter sts, * K2, P2 *, repeat from *-* and finish with K2 and 2 garter sts until rib measures approx 15 cm (adjust to the rib in front). Cast off with K over K and P over P. Sew the rib to the back of scarf. |
|||||||||||||
Diagram explanations |
|||||||||||||
|
|||||||||||||
 |
|||||||||||||
Have you finished this pattern?Tag your pictures with #dropspattern or submit them to the #dropsfan gallery. Do you need help with this pattern?You'll find 14 tutorial videos, a Comments/Questions area and more by visiting the pattern on garnstudio.com. © 1982-2026 DROPS Design A/S. We reserve all rights. This document, including all its sub-sections, has copyrights. Read more about what you can do with our patterns at the bottom of each pattern on our site. |
|||||||||||||


With over 40 years in knitting and crochet design, DROPS Design offers one of the most extensive collections of free patterns on the internet - translated to 17 languages. As of today we count 324 catalogues and 12291 patterns translated into English (UK/cm).
We work hard to bring you the best knitting and crochet have to offer, inspiration and advice as well as great quality yarns at incredible prices! Would you like to use our patterns for other than personal use? You can read what you are allowed to do in the Copyright text at the bottom of all our patterns. Happy crafting!
Post a comment to pattern DROPS 125-19
We would love to hear what you have to say about this pattern!
If you want to leave a question, please make sure you select the correct category in the form below, to speed up the answering process. Required fields are marked *.