
Popular categories
Looking for a yarn?


Comments / Questions (28)
![]() Eliza wrote:
Eliza wrote:
For the 1-3 months size, if I increase on every 5 rows, surely that means the increases will be on opposite ends each time I increase? Is that correct? Thank you
13.04.2026 - 12:27DROPS Design answered:
Dear Elize, correct, increases should be worked only on one side, this means either from RS or from WS. Happy knitting!
13.04.2026 - 15:59
![]() Myrth wrote:
Myrth wrote:
Hva er vidden på ermene?
10.03.2026 - 17:41
![]() Hanneli wrote:
Hanneli wrote:
Hei, blir ikke denne voldsomt stor?
11.08.2025 - 16:00DROPS Design answered:
Hei Hanneli, Oppskriften er for en løstsittende dress. Vil du har den tettere kan du gå ned en størrelse. Med vennlig hilsen, Drops Team.
12.08.2025 - 06:47
![]() Dorthe Rasmussen wrote:
Dorthe Rasmussen wrote:
Jeg prøver at strikke den i et stykke, så der ikke bliver sammensyning i siden
21.08.2024 - 19:04
![]() Julia wrote:
Julia wrote:
Ich bin fast bei den 46 cm vom Rückenteil angekommen und nun über den weiteren Verlauf, die Maschenzunahme für die Ärmel, verwirrt. "Nach 46-54-61 (71-79) cm, bei jeder 2. R. (am Schluss jeder R.) neue M. für die Ärmel anschlagen: 2 M. 1-1-3 (1-1) Mal, 3 M. 2-2-2 (1-1) Mal, 4 M. 3-3-3 (6-7) Mal und danach 16-17-17 (20-22) M. 1 Mal = 116-122-136 (156-174) M. Können Sie mir das in anderen Worten erklären? Wann, wo ,wie viele Zunahmen setze ich in einer Reihe? Dankeschön!
30.07.2024 - 18:55DROPS Design answered:
Liebe Julia, für die Ärmel wird man am Ende jeder Reihe (Hin- sowie Rückreihe) neue Maschen anschlagen und zwar zuerst 2 Maschen am Ende von der nächsten 2 Reihen (1. Grösse), dann 3 Maschen am Ende der nächsten 4 Reihen (2 Mal beidseitig), 4 Maschen am Ende der nächsten 6 Reihen (3 Mal beidseitig) und 16 Maschen am Ende der nächsten 2 Reihen (1 Mal beidseitig), so haben Sie insgesamt: 2+3x2+4x3+16 = 36 Maschen für jede Ärmel angeschlagen: insgesamt 36+44+36=116 Maschen sind es insgesamt auf der Nadel wenn alle Zunahmen fertig sind. Viel Spaß beim Stricken!
31.07.2024 - 07:31
![]() Annelies Steidle wrote:
Annelies Steidle wrote:
Ich habe noch ein Problem: was mache ich mit dem Loch über den abgeketteten Maschen? Die Alpaca-Wolle ist super! Gruss
14.03.2024 - 20:40DROPS Design answered:
Liebe Frau Steidle, welches Loch meinen Sie? Beim Schritt sind es 8 Maschen (je 4 M pro Bein) hinten und vorne, diese Maschen werden zusammengenäht; die 3 neuen Maschen für die Blenden nähen Sie zusammen (sie sollen sich überlappen). Viel Spaß beim Fertigstellen!
15.03.2024 - 08:34
![]() Annelies Steidle wrote:
Annelies Steidle wrote:
Herzlichen Dank! Gruss Annelies.
14.03.2024 - 15:58
![]() Annelies Steidle wrote:
Annelies Steidle wrote:
Hallo, bei Anleitung 14- 26 ist mir das Zusammennähen im Schritt nicht klar, gibt es dazu eine Skizze? Vielen Danke! Gruss Annelies Steidle
14.03.2024 - 11:43DROPS Design answered:
Liebe Frau Steidle, die abgekettenen Maschen bei den Beinden, am Rückenteil werden an den abgekettenen Maschen bei den Beinen vom jeden Vorderteil angenäht; so gibt es 8Maschen für den Schritt (4+4 von beiden Beinen, Rückenteil an den 4+4 von beiden Beinden, Vorderteile). Viel Spaß beim Fertigstellen!
14.03.2024 - 14:01
![]() Rachael wrote:
Rachael wrote:
I’m newer to knitting so I may just be miss-reading the instructions. I am currently on the left leg, back piece and you list 1 inc every 5 rows a total of 9 times. I keep getting stuck at 7 inc (24 stitches) at the 22 cm length to bind off the 4. Do you have any suggestions to fix my complication or would it be fine continuing without the 26 stitches before the 4 cast off?
13.03.2024 - 17:24DROPS Design answered:
Dear Rachael, what about your tension in height? Do you have 34 rows garer stitch = 10 cm? when all increases are done leg should measure 20 cm approx. If your tension is off, adjust the intervals between increases to your own tension but remember that you might also require more yarns; Happy knitting!
14.03.2024 - 08:01
![]() Ester Øeby wrote:
Ester Øeby wrote:
Jeg har lavet en strikkeprøve, som giver den den skal. På trods af det bliver benlængden dobbelt så lang, som den skal. Er der en fejl i opskriften? Jeg strikker til 2 år
18.11.2023 - 14:51DROPS Design answered:
Hei Ester. Skal ikke være noe feil på denne oppskriften. Får du den oppgitte strikkefastheten, skal målene du ser på målskissen stemme. Husk det er beregnet ca 4 cm til oppbrett nederst på beina (og ermene). mvh DROPS Design
20.11.2023 - 10:03
|
|
Green Giggles#greengigglesoverall |
|
|
|
|
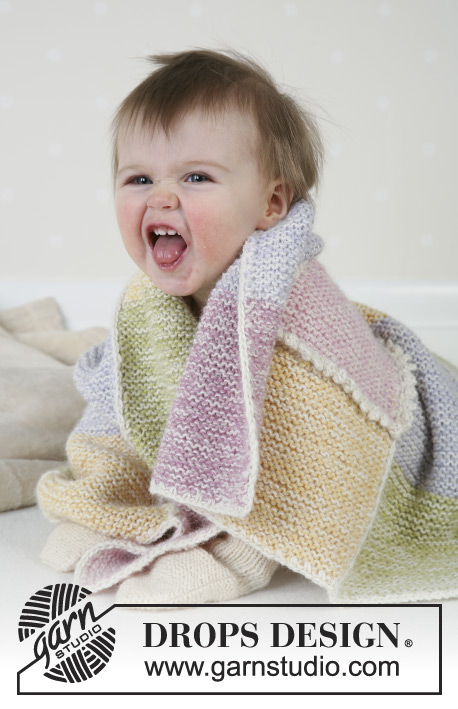
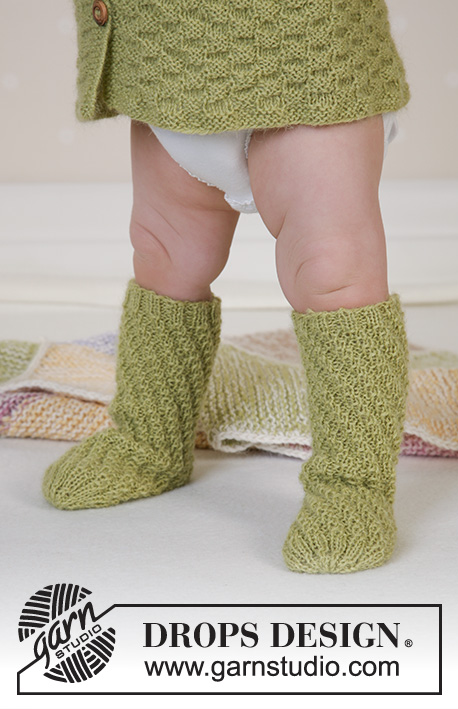
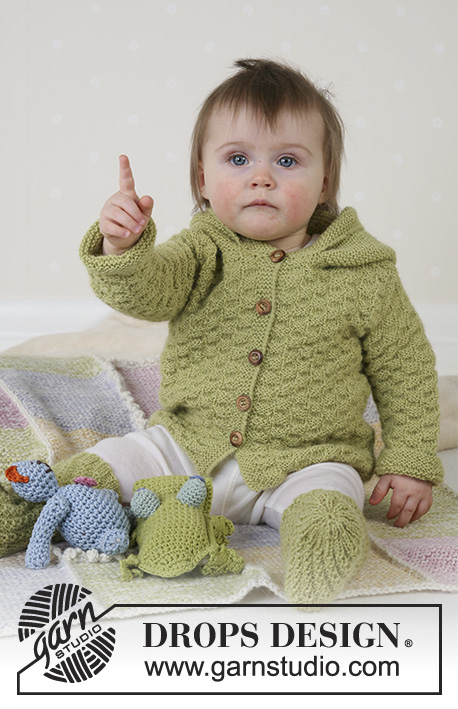
Knitted overall with seamless sleeves. Sizes baby and children from 1 month to 4 years.
DROPS Baby 14-26 |
|
|
Knitting tension: 17 sts x 34 rows with 2 strands of Alpaca on needle size 5mm in garter sts = 10 x 10 cm. Garter sts: Knit all rows Buttonhole: Make buttonholes on right front edge from the right side as follows: cast off 3rd and 4th st from the edge, on next row cast on 2 new sts over the cast off sts. Make buttonholes as follows: Size 1/3 months: 25, 31, 38, 44 and 50 cm Size 6/9 months: 29, 37, 44, 52 and 59 cm Size 12/18 months: 32, 41, 49, 58 and 66 cm Size 2 years: 37, 45, 53, 61, 69 and 77 cm Size 3/4 years: 42, 51, 60, 68, 77 and 85 cm JUMPSUIT: Left leg, back: Cast on 17-19-20 (22-24) sts with 1 thread of each Alpaca colour (= double thread) on needle size 5mm. Knit garter sts. When piece measures 8 cm inc 1 st at right side of piece (= inner side of leg) on every 5-6-6 (8-8) row a total of 9-9-11 (12-12) times = 26-28-31 (33-36) sts. When piece measures 22-25-28 (33-38) cm cast off 4 sts on inner side of leg, i.e. at the same side where sts were increased earlier = 22-24-27 (29-32) sts. Knit 6 rows garter sts and put sts on a thread. Right leg, back: Knit as left leg but with inc and dec the opposite side. Keep sts on needle. Back piece: Put legs in on the same needle with decreases towards each other = 44-48-54 (58-64) sts. Continue in garter sts over all sts. When piece measures 46-54-61 (71-79) cm cast on new sts for sleeves each side on every other row (i.e. at the end of each row) as follows: 2 sts 1-1-3 (1-1) times, 3 sts 2-2-2 (1-1) times, 4 sts 3-3-3 (6-7) times and then 16-17-17 (20-22) sts 1 time = 116-122-136 (156-174) sts on row. When piece measures 55-64-72 (83-92) cm cast off the middle 14-16-16 (18-18) sts for neck. Dec 1 st on neckline on next row = 50-52-59 (68-77) sts left on shoulder/sleeve. Cast off loosely when piece measures 57-66-74 (85-94) cm. Left front piece: Cast on and knit as described for left leg back, but instead of putting sts on thread cast on 3 new sts towards mid front for front edge (i.e. at the same side where dec/inc were made earlier) = 25-27-30 (32-35) sts. Knit garter sts but purl the 5 outermost sts towards mid front until finished measurements (= front edge). This way the front edge will be accentuated. When piece measures 46-54-61 (71-79) cm cast on new sts at side for sleeve as described for back piece = 61-64-71 (81-90) sts. When piece measures 53-62-69 (80-88) cm cast off the outermost 5-6-6 (7-7) sts for neck. Dec to shape the neckline on every other row: 2 sts 2 times and 1 st 2 times = 50-52-59 (68-77) sts left on shoulder/sleeve. When piece measures 57-66-74 (85-94) cm cast off loosely. Right front piece : Cast on and knit as left front piece, but mirrored. Remember to make buttonholes, see explanation above. Assembly: Pick up approx 40 to 55 sts round the neck with 1 strand of each colour. Knit 4 rows garter sts, at the same time after 1st row make buttonhole over the others on front edge. Cast off from the wrong side. Sew shoulder + upper sleeve seams in outermost loop of sts to create a neat seam. Sew under-sleeve and side seams the same way. Sew inner leg seams. Sew the opening between the legs. Sew on buttons. Fold approx 4 cm on each sleeve and each leg. SOFT TOYS: see pattern 13-25, 13-29 and 13-30 BLANKET: see pattern 14-19 |
|
 |
|
Have you finished this pattern?Tag your pictures with #dropspattern #greengigglesoverall or submit them to the #dropsfan gallery. Do you need help with this pattern?You'll find 14 tutorial videos, a Comments/Questions area and more by visiting the pattern on garnstudio.com. © 1982-2026 DROPS Design A/S. We reserve all rights. This document, including all its sub-sections, has copyrights. Read more about what you can do with our patterns at the bottom of each pattern on our site. |


With over 40 years in knitting and crochet design, DROPS Design offers one of the most extensive collections of free patterns on the internet - translated to 17 languages. As of today we count 324 catalogues and 12290 patterns translated into English (UK/cm).
We work hard to bring you the best knitting and crochet have to offer, inspiration and advice as well as great quality yarns at incredible prices! Would you like to use our patterns for other than personal use? You can read what you are allowed to do in the Copyright text at the bottom of all our patterns. Happy crafting!
Post a comment to pattern DROPS Baby 14-26
We would love to hear what you have to say about this pattern!
If you want to leave a question, please make sure you select the correct category in the form below, to speed up the answering process. Required fields are marked *.