
Popular categories
Looking for a yarn?


Comments / Questions (63)
TAL wrote:
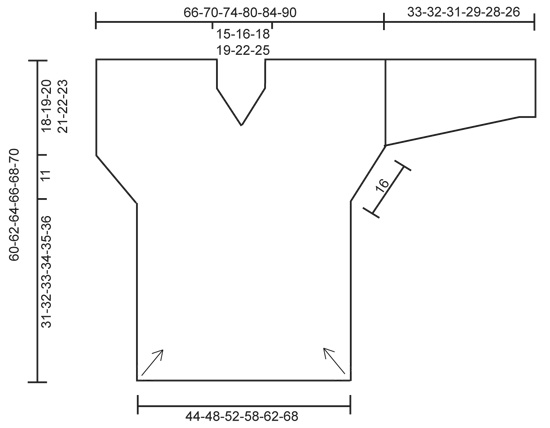
Hello again, i think i am doing something wrong )-: becoues the shape does not looks as of the model.if i make the small- 31 cm should it be also in the middle of the garment (where is the decreasing is done)? thanks
29.01.2014 - 20:01DROPS Design answered:
Dear Tal, measure the 31 cm straight up along the sides of piece (see measurement chart). Happy knitting!
30.01.2014 - 10:12TAL wrote:
Hello, could you please explane when it is written to inc in the beg of every row does it means in the beg of the rs row or also in the beg of wr row?
24.01.2014 - 07:56DROPS Design answered:
Dear Tal, you are correct when you inc at the beg of every row, you will inc at the beg of row from RS and from WS. Happy knitting!
24.01.2014 - 09:20
![]() Chrislibrarian wrote:
Chrislibrarian wrote:
Eureka! I just had a lightbulb moment and finally understood what you meant by "flat" and it's fine :) can't believe I missed that! Thanks for your patience :D Merry Christmas!
19.12.2013 - 11:45DROPS Design answered:
No worries, glad to read everything is now fine. Thank you ! Happy knitting !
19.12.2013 - 13:54
![]() Chrislibrarian wrote:
Chrislibrarian wrote:
Sorry to post twice, I forgot to change the country :( Thanks for getting back to me. I've done this 3 times now and laid it flat to measure, but the increase in length over 8 rows isn't 11cms. My tension is fine though. I would need to increase only 3sts over 16 rows to get anywhere near 11cms in length from the first increase. So I'm still confused. If I start knitting "straight" (on the diagonal) after the last increase marker, the jumper will be 7cms shorter than it should be.
19.12.2013 - 11:34DROPS Design answered:
See below - while casting on sts each side, do not forget to dec in the middle as before to keep V shape. Happy knitting!
19.12.2013 - 13:53
![]() Chrislibrarian wrote:
Chrislibrarian wrote:
Thanks for getting back to me. I've done this 3 times now and laid it flat to measure, but the increase in length over 8 rows isn't 11cms. My tension is fine though. I would need to increase only 3sts over 16 rows to get anywhere near 11cms in length from the first increase. So I'm still confused. If I start knitting "straight" (on the diagonal) after the last increase marker, the jumper will be 7cms shorter than it should be.
19.12.2013 - 11:29DROPS Design answered:
Dear Mrs Chrislibrarian, if your tension is correct, you should have this 11 cm, the 24 sts inc each side (less the dec in the middle of piece) should give you approx. 16 cm measured along edges. Let's take size S: you start inc when piece measures 31 cm, after these inc you should have a total of 42 cm -measured straight along the side of piece (not in knitting direction). Happy knitting!
19.12.2013 - 13:52
![]() Chrislibrarian wrote:
Chrislibrarian wrote:
All ok up to the increase for the shoulders. I'm confused by the instructions. I have tried to incr 6 sts each end over 8 rows (so 24 sts more each side) but that doesn't measure 11cms in length as the image suggests. 11cms would be a totally different increase/cast-on. Or am I missing something?
18.12.2013 - 01:09DROPS Design answered:
Dear Chrislibrarian, since you are working diagonnally, your get 24 extra sts each side. Lay your work flat to check measurements and you should then have 11 cm. Happy knitting!
18.12.2013 - 14:03
![]() Signe wrote:
Signe wrote:
Har i et ca mål for hvor langt blusen strækker sig når man har den på og hvilken str. Har modellen på? Mvh signe skov
12.11.2013 - 17:15
![]() Lone wrote:
Lone wrote:
Jeg har et akut problem ved afslutningen på ryggen. Der står , at man skal strikke de 2 første og de 2 sidste masker sammen på hver retpind. I en parentes står der så, at man derved tager ind både mod halssiden og skulderen. Det kan jeg ikke forstå. Håber der er en, der har tid til at svare mig. På forhånd tak. Mvh Lone Haslund
05.11.2013 - 22:56DROPS Design answered:
Jo men indtagningerne midt på fortsætter til færdig mål, så ud over disse indtagninger lukker du også af til skulder i hver side ved at strikke de 2 yderste m sammen på hver retpind ifølge opskriften.
06.11.2013 - 08:57
![]() Lone wrote:
Lone wrote:
Jeg har et akut problem. Er kommet til indtagning ved skulder. Først står der, at man skal strikke de 2 første og de 2 sidste masker sammen på hver retpind. I en parentes står så, at man lukker af både mod halssiden og skulderen. Det forstår jeg bare ikke. Håber I hurtigt kan hjælpe. Mvh Lone Haslund
05.11.2013 - 22:53DROPS Design answered:
Hej Lone. I og med du strikker de 2 förste og de 2 sidste masker sammen paa hver retpind lukker du af i begge sider af arbejdet.
06.11.2013 - 10:40
![]() Andrea Lange wrote:
Andrea Lange wrote:
Ja das ist richtig, man sieht die cm Angabe links von der Massskizze.Aber um richtig messen zu können muss man die Rundstricknadel aus den Maschen ziehen und erst dann kann man das hochgezogene "V" sehen und richtig messen.Also gut, dann werde ich bis auf 20 Reihen alles auftrennen und dann sieht es mit dem Wollverbrauch auch viel besser aus. Danke
27.09.2013 - 14:03
|
||||
Haze Tunica#hazetunica |
||||
|
|
||||
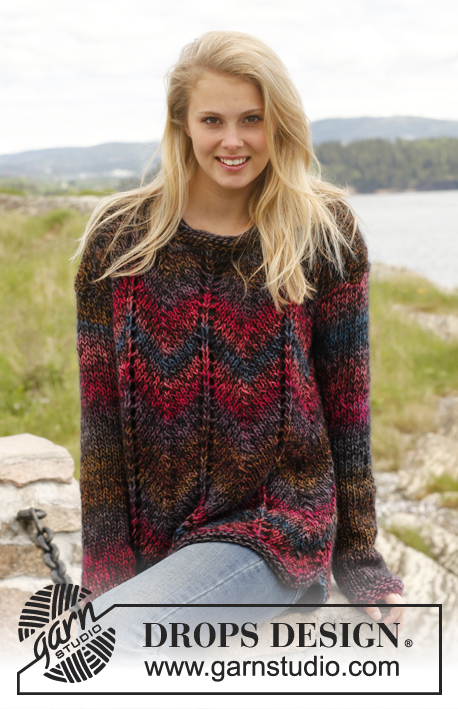
Knitted DROPS jumper in garter st in ”Big Delight”. Worked diagonally. Size: S - XXXL.
DROPS 150-23 |
||||
|
GARTER ST (back and forth on needle): K all rows. 1 ridge = 2 rows K. ---------------------------------------------------------- JUMPER: Arrows on chart show the knitting direction. The entire jumper is worked in GARTER ST - see explanation above. REMEMBER THE KNITTING TENSION - Incorrect knitting tension will affect the shape of the garment! BACK PIECE: Worked back and forth on circular needle to make room for all the sts. Cast on 3-3-4-4-4-4 sts on circular needle size 7 mm with Big Delight. Work in GARTER ST - see explanation above (1st row = RS). AT THE SAME TIME inc 1 st at beg of every row by working 2 sts in first st on all rows until there are 47-51-56-62-66-72 sts on needle. Put piece aside and knit another part the same way. Place the two parts tog on same circular needle size 7 mm = 94-102-112-124-132-144 sts. Insert a marker between the two parts. Then work as follows from RS: Work 2 sts in first st, work until 2 sts remain before marker, K 2 tog, marker, slip 1 st as if to K, K 1, psso, work until 1 st remains, work 2 sts in last st. Continue like this with inc and dec on every row from RS (no of sts will thus not vary) until piece measures 31-32-33-34-35-36 cm - measured straight up along the side of piece (not in knitting direction) - see chart. Insert 1 marker in the side. Now cast on new sts at the end of every row (i.e. towards the sides) for shoulder as follows: Cast on 6 new sts towards the side 4 times in total (= 24 sts inc in each side). Insert another marker in the side. NOTE: Remember to continue dec mid back as before the entire way until finished measurements = 134-142-152-164-172-184 sts on needle. After last inc for shoulder, continue inc towards the sides as before (i.e. work 2 sts in first and last st on every row from RS). When piece measures 18-19-20-21-22-23 cm from the last marker (measured straight up along the side), dec for shoulder as follows: Work the first 2 sts on row tog and the last 2 sts on row tog on all rows from RS until 38-42-44-48-52-56 sts remain on needle (i.e. dec both in the middle and in each side). Slip the first 13 sts on a stitch holder (work them first), cast off the next 12-16-18-22-26-30 sts = 13 sts remain on row. Continue in garter st over these sts, AT THE SAME TIME dec 1 st at beg of every row. Continue until 1 st remains, cut the yarn and pull it through the last st. Slip sts on stitch holder back on needle, work the same way over these 13 sts. FRONT PIECE: Cast on and work as back piece. SLEEVE: Worked back and forth on needle. Cast on 36-38-40-42-44-46 sts on circular needle size 7 mm with Big Delight. Work in garter st. When piece measures 6 cm, inc 1 st in each side, repeat inc every 6-4½-4-4-3-3 cm 4-5-5-5-6-6 more times (= 5-6-6-6-7-7 inc in total) = 46-50-52-54-58-60 sts. Cast off all sts when piece measures 33-32-31-29-28-26 cm (shorter measurements in the larger sizes because of wider shoulders). ASSEMBLY: Sew the shoulder seams. Sew in sleeves. Sew underarm seam and side seam in front loop of outermost st to avoid a chunky seam. |
||||
Diagram explanations |
||||
|
||||
 |
||||
Have you finished this pattern?Tag your pictures with #dropspattern #hazetunica or submit them to the #dropsfan gallery. Do you need help with this pattern?You'll find 13 tutorial videos, a Comments/Questions area and more by visiting the pattern on garnstudio.com. © 1982-2026 DROPS Design A/S. We reserve all rights. This document, including all its sub-sections, has copyrights. Read more about what you can do with our patterns at the bottom of each pattern on our site. |
||||


With over 40 years in knitting and crochet design, DROPS Design offers one of the most extensive collections of free patterns on the internet - translated to 17 languages. As of today we count 324 catalogues and 12290 patterns translated into English (UK/cm). 12290
We work hard to bring you the best knitting and crochet have to offer, inspiration and advice as well as great quality yarns at incredible prices! Would you like to use our patterns for other than personal use? You can read what you are allowed to do in the Copyright text at the bottom of all our patterns. Happy crafting!
Post a comment to pattern DROPS 150-23
We would love to hear what you have to say about this pattern!
If you want to leave a question, please make sure you select the correct category in the form below, to speed up the answering process. Required fields are marked *.