
Populære kategorier
Leder du efter et garn?


Kommentarer / Spørgsmål (182)
![]() Sharon Hunt- Edwards skrev:
Sharon Hunt- Edwards skrev:
Yes thr last to explantion helps. You guys are the best. Am so happy now. Thank you.
11.03.2024 - 17:19
![]() Sharon Hunt-Edwards skrev:
Sharon Hunt-Edwards skrev:
Thanks for asking. Am asking about the dividing row the right and left front is going to overlapp. Seems so from a earlier response that i never saw before I posted my last question. Please confirm any way
11.03.2024 - 15:08DROPS Design svarede:
Dear Mrs Hunt-Edwards, when working the dividing row you first work the 1st row of the right edge over the 7 stitches to start the right edge/right front piece (when garment is worn), ie K3, double YO, P1, K3, then work the whole round ending with casting on 4 new stitches, turn, work the row 1 on left edge (= K3, double YO, K4), work in stocking stitch until the sts on right front piece remain and work row 2 on right edge (= K5, K 1 twisted, K3). Can this help?
11.03.2024 - 16:03
![]() Sharon Hunt- Edwards skrev:
Sharon Hunt- Edwards skrev:
Hello, i just counted from start on my project. When I count i ended up yo the right of the row 1 of the lace pattern. Is this correct. Am sure it is but I wanted to make sure before I proceed. Thank you.
11.03.2024 - 06:53DROPS Design svarede:
Dear Mrs Hunt-Edwards, not sure to understand properly what you mean here sorry, can you tell us more? Which row do you have an issue with?Thanks for your comprehension!
11.03.2024 - 14:25
![]() Sharon Hunt skrev:
Sharon Hunt skrev:
Am so sorry 😢 but this isn’t working out for me. I have a marker at the start of the round and 1 at 110 sts. I did the lace pattern on the first 7 and last 7 sts but the stitch count for me is incorrect. St. Count is 218 and am suppose to have 224 but the is on 218. I ripped back counted all the sts on the needle on have a stitch count of 220 as stated before lace pattern. Am working on the back and largest size.
09.03.2024 - 12:06DROPS Design svarede:
Dear Sharon, when you inserted the markers you should have 220 stitches. Now you displace the beginning of the round from the mid under the sleeve to the center of the neck by working 53 stitches in stocking stitch. Work the right neckline stitches, then work 213 stitches in stocking stitch, which should get you back to the right neckline stitches and pick up 4 stitches over the right neckline stitches (= 224 stitches). Now you will turn and start working the lace edge over the 2 necklines (so you work 7 lace edge stitches + 210 stocking stitch + 7 lace edge stitches.). There may be a slight misalignment because of starting the lace edge in the right neckline earlier. Happy knitting!
10.03.2024 - 23:50
![]() Sharon Hunt skrev:
Sharon Hunt skrev:
Dear Drops am not understanding the instructions for the lace pattern. Am I supposed to repeat row 1 of the lace pattern between the markers 1st marker at begynning of round and 2. marker at 110. This will then be 214 when completed?
08.03.2024 - 23:21DROPS Design svarede:
Dear Sharon, only work lace over the first and last 7 stitches on row. Work only one side (half) of the lace pattern on 1st round to create a border on the right side of the neckline. At the end of this 1st round, cast on 4 new stitches after the lace edge to create the overlap (point) of the neckline in the middle of the front piece. Then work back and forth and the lace pattern will be the first and last 7 stitches on the row. Just note that the pattern order is different at the beginning and end of the row! (The pattern is offset because it was started 1 row earlier on the right side. ) Happy knitting!
09.03.2024 - 10:50
![]() Sharon Hunt-Edwards skrev:
Sharon Hunt-Edwards skrev:
Hello, thanks for the respond so far. I have 260 sts as stated in the pattern , but 4 sts left after all markers er placed. Is this correct?
04.03.2024 - 08:00DROPS Design svarede:
Dear Mrs Hunt-Edwards, you should have approx. 32 sts between each marker, but as 260 is not divisible by 32 you will have sometimes 33 sts instead between each markers, ie 32-33-32-33-32-33-32-33 = 260 sts/8 markers. Happy knitting!
04.03.2024 - 10:06
![]() Sharon Hunt-Edwards skrev:
Sharon Hunt-Edwards skrev:
What does it mean to knit alternately as instructed below. When piece measures 5 cm dec 1 st to the right and to the left alternately of all markers After setting up 7 markers 32 sts apart I have 5 sts left. Am I doing something wrong? I have 260 sts as stated in the pattern. Thanks for your response to my previous question. Sharon
03.03.2024 - 20:20DROPS Design svarede:
Dear Sharon, alternately means that you will decrease at the right or left of each marker, not always on the same side. The first time you decrease you decrease at the right side of all markers. Then, 8cm later, decrease at the left side of all markers. 8cm later, decrease at the right side again. Continue in the same way. This will help correctly shape the garment. Happy knitting!
03.03.2024 - 23:41
![]() Sharon HuntEdwards skrev:
Sharon HuntEdwards skrev:
Hello Drops! I have awuestion about the instruction in the pattern below: When piece measures 5 cm / 2’’ dec 1 st to the right and to the left alternately of all markers on …. Do I decrease on when piece measured 5 cm and there after 8 cm per rest of instruction. Thanks for responding.
02.03.2024 - 16:44DROPS Design svarede:
Dear Sharon, you increase at the 5cm mark and, counting from here, every 8cm. So it would be 8cm from the 5cm mark or 13cm from the very beginning. Happy knitting!
03.03.2024 - 20:07
![]() Sharon Hunt skrev:
Sharon Hunt skrev:
Hei!! I usually make a size 52 sweater. I know the largest size in the pattern is 51. When I calculate my size it seems like I would have less stitches cast on for my size than calls for in the pattern here. So am wondering if the sweater is made with positive ease and would fit me anyway.
17.09.2023 - 10:25DROPS Design svarede:
Dear Sharon, you can find the measurements of the garment in cm in the measurements schematic after the pattern instructions. For the largest size, the bust would be 130cm (65x2). This is the bust of the garment and, as you can see in the photo, it should have little positive ease. You can compare this to your measurements to see if the largest size would fit you in this case. Happy knitting!
17.09.2023 - 21:28
![]() Dan skrev:
Dan skrev:
Thanks for fast response. Saves me chasing my tail over this. Now attempting to chart the thing in Excel. Lots of fun :)
27.04.2022 - 18:54
|
|
Morning Light#morninglighttunic |
|
|
|
|
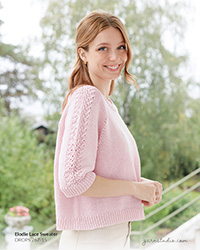
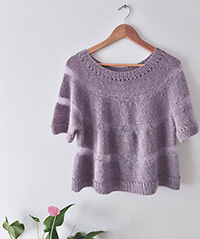
DROPS Tunika med blondekant i ”Bomull-Lin”. Str S - XXXL.
DROPS 112-1 |
|
|
RETSTRIK (rundt på rundp således): 1.omg ret og 2.omg vrang. RETSTRIK (frem og tilbage på p således): Strik ret på hver p. BLONDEMØNSTER: Højre forkant: 1.p (fra retsiden): 3 r, 1 dbl-oms, 1 vr, 3 r. 2.p (fra vrangen): 5 r, 1 dr r (dvs strik i bagerste del af m i stedet for i forreste), 3 r. 3.p: Luk 2 m af (= 1 m tilbage på højre p), 2 r, 1 vr, 1 dbl-oms, 2 m dr r sm, 1 m dr r. 4.p: 2 m r, 1 r i dbl-oms, det andet oms slippes ned, 4 r. Venstre forkant: 1.p (fra vrangen) = 3 r, 1 dbl-oms, 4 r 2.p (fra retsiden): 3 r, 1 vr, 1 r, 1 dr r, 3 r 3.p: Luk 2 m af (= 1 m tilbage på p), 3 r, 1 dbl-oms, 2 m dr r sm, 1 m dr r. 4.p: 3r (det andet oms slippes ned), 1 vr, 3 r. INDTAGNINGSTIPS (gælder halsen): Alle indtagninger gøres fra retsiden. Tag ind således efter forkanten: Tag 1 m løs af p som om den skulle strikkes r, 1 r, løft den løse m over. Tag ind således før forkanten: 2 r sm. -------------------------------------------------------- RYG- OG FORSTYKKE: Arb strikkes rundt på p. Slå 176-188-204-220-244-260 m op på rundp 5 med Bomull-Lin. Strik 4 omg retstrik - se forkl over! Derefter strikkes der glatstrik. Sæt 8 mærketråde i arb med ca 22-23-25-27-30-32 m imellem. HUSK PÅ STRIKKEFASTHEDEN! Når arb måler 5 cm tages der 1 m ind på skiftevis højre og venstre side af mærketrådene på hver 8.cm totalt 5 gange (= 8 indtagninger pr omg) = 136-148-164-180-204-220 m. Når arb måler 38 cm strikkes der videre i retstrik. Sæt 2 mærketråde i arb, 1 i beg af omg og 1 efter 68-74-82-90-102-110 m. Når arb måler 44 cm fortsættes der således, begynd efter den første mærketråd: Strik 32-35-39-43-49-53 m ret, Blondemønster (1.p - højre forkant) over de næste 7 m, 129-141-157-173-197-213 m ret, slå 4 nye m op bag højre forkant = 140-152-168-184-208-224 m. BLONDEMØNSTER – se forkl over! Vend, videre strikkes arb frem og tilbage. Næste p strikkes således fra vrangen: Blondemønster (1.p - venstre forkant) over de første 7 m, glatstrik over de næste 126-138-154-170-194-210 m, blondemønster (2.p – højre forkant) over de sidste 7 m (= højre forkant) OBS! M-ant vil variere pga blondekanten, tæl kun m efter 4.p. Når arb måler 51-52-53-54-55-56 cm lukkes der 3 m af på hver side af hver mærketråd og hver del strikkes færdig for sig. RYGSTK: = 62-68-76-84-96-104 m. Fortsæt i glatstrik, SAMTIDIG lukkes der af til ærmegab i hver side i beg af hver p således: 2 m 0-1-2-3-5-6 gange og 1 m 0-0-1-2-3-4 gange = 62-64-66-68-70-72 m. Når arb måler 66-68-70-72-74-76 cm strikkes der retstrik over de midterste 30-30-32-34-34-36 m, de resterende m fortsættes i glatstrik. Når arb måler 68-70-72-74-76-78 cm lukkes de midterste 14-14-16-18-18-20 m af til hals, på næste p lukkes der 1 m af mod halsen = 23-24-24-24-25-25 m tilbage på hver skulder. Fortsæt med 7 m retstrik mod halsen. Luk af når arb måler 70-72-74-76-78-80 cm. HØJRE FORSTK: = 33-36-40-44-50-54 m. Luk af til ærmegab i siden som på rygstk = 33-34-35-36-37-38 m. Strik glatstrik med Blondemønster over forkanten, SAMTIDIG tages der ind til hals indenfor forkanten på hver 1½.cm totalt 10-10-11-12-12-13 gange – læs INDTAGNINGSTIPS = 23-24-24-24-25-25 m tilbage på skulderen. Luk af når arb måler 70-72-74-76-78-80 cm. VENSTRE FORSTK: Strik som højre men modsat. ÆRME: Arb strikkes frem og tilbage på p. Slå 50-52-54-54-56-58 m op (inkl 1 kantm i hver side) på p 5 med Bomull-Lin. Strik 10 p retstrik, derefter strikkes der glatstrik. Når arb måler 5 cm tages der 1 m ud i hver side på hver 9.-6½.-4½.-3½.-2½.-2.cm totalt 4-5-6-8-10-11 gange = 58-62-66-70-76-80 m. Når arb måler 34-33-33-33-31-30 cm - OBS! kortere mål i de større str pga længere ærmekuppel og bredere skuldervidde - lukkes der af til ærmekuppel i beg af hver p således: 3 m 1 gang, 2 m 3-3-3-3-4-4 gange, 1 m 0-1-2-3-3-5 gange, videre lukkes der 2 m af i hver side til arb måler 40-40-41-42-42-43 cm, luk 3 m af 1 gang i hver side, derefter lukkes de resterende m af. Arb måler ca 41-41-42-43-43-44 cm. MONTERING: Sy skuldersømmene yderst i kanten. Sy ærmerne i. Sy ærmesømmene. |
|
 |
|
Har du lavet denne opskrift?Så tagger du dine billeder med #dropspattern #morninglighttunic eller send dem til #dropsfan galleriet. Behøver du hjælp med opskriften?Du finder 27 instruktionsvideoer, kommentarer/spørgsmål og mere i opskriften på www.garnstudio.com © 1982-2026 DROPS Design A/S. Alle rettigheder er reserveret. Dette dokument med tilhørende underdokumenter har copyright. Læs mere om hvad du kan gøre med vore opskrifter, nedert i alle vore opskrifter på hjemmesiden. |

Med over 40 år i strikke- og hæklebranchen tilbyder DROPS Design en af de mest omfattende kollektioner med gratis opskrifter på internettet - oversat til 17 sprog. Dags dato har vi 324 kataloger og 12220 opskrifter på Dansk.
Vi arbejder hårdt for at kunne tilbyde Dig det bedste man kan få af strik og hækling, inspiration og gode råd men også kvalitetsgarn til fantastiske priser! Vil du bruge vore opskrifter til andet end for privat brug? Du kan læse om hvilke regler som gælder under teksten Copyright nederst på siden i alle vore opskrifter. God fornøjelse!
Kommentere opskrift DROPS 112-1
Vi vil gerne høre din mening om denne model!
Hvis du ønsker at stille et spørgsmål, så husk at vælge rigtig kategori i menuen under - det vil give dig hurtigere svar. Obligatoriske felter er markeret med *.