
Popular categories
Looking for a yarn?


Comments / Questions (10)
![]() Renate Bjørndal wrote:
Renate Bjørndal wrote:
Ang felling på benet.. når det er en rett og en vrang på hver side av merket skal man felle av rett eller vrang da?
28.04.2025 - 12:33DROPS Design answered:
Hei Renate. Ville ha felt av slik at det blir penest (hva du syns blir penest). mvh DROPS Design
05.05.2025 - 12:00
![]() Renate Bjørndal wrote:
Renate Bjørndal wrote:
Hvordan strikker man et kast vridd vrang?
27.04.2025 - 16:39DROPS Design answered:
Hei Renate, Du strikker en vrang masker men gjennom den bakerste løkke på kasten. Hilsen Drops Team.
28.04.2025 - 07:36
![]() Maja wrote:
Maja wrote:
Når jeg skal felle av 6 masker på hver side av merkene til bein, hvordan bør jeg felle?
07.10.2023 - 14:25DROPS Design answered:
Hei Maja. Fell av som vanlig, se evnt videoen: Hvordan felle av fra rettsiden eller Hvordan felle av i vrangbord. Når du har 6 masker igjen av omgangen før arbeidet måler 22-23-24-25-26-27 cm fra oppleggskanten midt foran, kan du felle av de første 12 maskene, strikk deretter x-antall masker til 6 masker før neste merke, fell deretter av de neste 12 masken og så strikk til der du felte av første gang Nå strikkes hvert ben ferdig for seg selv. mvh DROPS Design
16.10.2023 - 13:36
![]() Elena Mina wrote:
Elena Mina wrote:
Buongiorno, vorrei capire come aumentare le maglie ai lati delle 2 maglie centrali mantenendo le coste (2/2) corrette. A me si sfalsano, non mantengono 2 diritti e 2 rovesci corretti. Grazie
18.07.2022 - 14:20DROPS Design answered:
Buonasera Elena, deve incorporare le maglie nella lavorazione delle coste: all'inizio avrà una maglia sola per lato, al secondo aumento ne avrà 2, e così via. Buon lavoro!
10.08.2022 - 22:45
![]() Elvira wrote:
Elvira wrote:
I do not completely understand the increasing I think. Because is says you increase on each side of 2 knitted stitches and than work them in to rib, but at first you only have one stitch extra so how do you continue them in your rib? Does that question make sense? I’m not sure how else to put it, :). Am I doing it correct by first increase by yo then knit 2 stitches and make a yo again? Thanks for your help!
24.11.2021 - 09:59DROPS Design answered:
Dear Elvira, yes correct, you should inc with yarn over/K2/yarn over; and then you should incorporate them into the rib as you work them, ie first 2 increases will be knitted, next 2 will be purled= after 1st inc: rib K2,P2, K1 (inc), K2 (middle sts), K1 (inc), P2, K2; after 2nd inc: rib K2, P2, K2 (inc), K2 (middle sts), K2 (inc), P2, K2; after 3rd inc: K2,P2,K2,P1(inc), K2 (mid sts), P1 (inc), K2, P2, K2; after 4th inc: K2,P2,K2, P2 (inc), K2 (mid sts), P2 (inc), K2,P2,K2 and so on. Happy knitting!
24.11.2021 - 15:41
![]() Hannah wrote:
Hannah wrote:
Hallo! Sollte die Maschenprobe in Reihen oder in Ruden oder in beidem gestrickt werden? Danke vorab! Hannah
06.02.2021 - 03:18DROPS Design answered:
Liebe Hannah, die Hose wird ganz in Runden gestrickt, am besten stricken Sie Ihre Maschenprobe auch in Runden (manchmal strickt man unterschiedlich in Runden / in Reihen). Viel Spaß beim stricken!
08.02.2021 - 08:02
![]() Elisabeth wrote:
Elisabeth wrote:
På øketips står det: De økte maskene strikkes fortløpende inn i vrangborden, dvs at de 2 første maskene som økes strikkes rett, de 2 neste strikkes vrang osv... Er det da de 2 første økte maskene på omgangen, eller de 2 første omgangene som er økt?
02.07.2020 - 23:54DROPS Design answered:
Hei Elisabeth. Det er de 2 første (økte) maskene på omgangen som strikkes rett, neste gang det økes, strikkes de økte maskene vrang osv. God Fornøyelse!
06.07.2020 - 11:38
![]() Milada Kacapor wrote:
Milada Kacapor wrote:
Hei! Når jeg legger opp 104 masker og senere øker med 2 masker (8 ganger) får jeg 120 m totalt. I oppskriften står det 136 m. Kan dere hjelpe meg til å se hvor jeg feiler? På forhånd takk.
10.11.2019 - 23:44DROPS Design answered:
Hei Milada. Du øker med 1 maske på hver side av de 2 midterst maskene bak og 1 maske på hver side av de midterste maskene foran (= 4 økte masker pr omgang). Det skal økes 8 ganger, 4 x 8 = 32 økte masker + 104 masker = 136 masker. God Fornøyelse!
11.11.2019 - 12:44
![]() Evelina Gustafsson wrote:
Evelina Gustafsson wrote:
Hej! I monteringen står inget om att sy ner en kant över resåren som dras genom hållbarhet. Ska den vara synlig? Med vänliga hälsningar Evelina
15.09.2019 - 20:12DROPS Design answered:
Hei Evelina. Ja, på denne modellen blir strikken synlig. Strikken trekkes gjennom hullraden som ble strikket øverst vrangborden. God Fornøyelse!
16.09.2019 - 09:58
![]() Evelina Gustafsson wrote:
Evelina Gustafsson wrote:
Hej! I monteringen står inget om att sy ner en kant över resåren som dras genom hållbarhet. Ska den vara synlig? Med vänliga hälsningar Evelina
15.09.2019 - 20:10
|
|
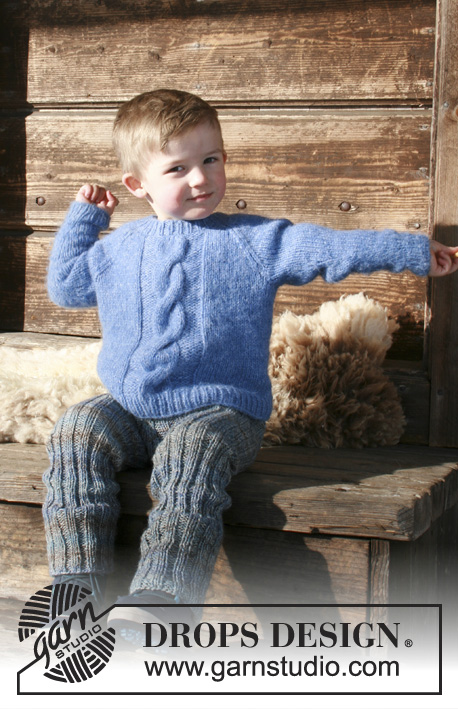
Winter Wolf#winterwolftrousers |
|
|
|
|
Children’s knitted trousers with rib. Sizes 2 - 12 years. The piece is worked in 2 strands DROPS Fabel.
DROPS Children 30-22 |
|
|
INFORMATION FOR THE PATTERN: INCREASE TIP: Increase on each side of 2 knitted stitches by making 1 yarn over. On the next round work the yarn overs twisted to prevent holes. The increased stitches are worked into the rib as you go, i.e. the first 2 stitches which are increased are knitted, the next 2 are purled, etc. DECREASE TIP: Decrease like this before marker: Knit 2 stitches twisted together/ Purl 2 stitches twisted together. Decrease like this after marker: Knit 2 stitches together/ Purl 2 stitches together. KNITTING TIP: Leg length can be adjusted to desired length. By working the legs longer, they can be turned up and the trousers can grow with the child. ---------------------------------------------------------- TROUSERS: The piece is worked in the round, top down. The round starts mid back. Cast on 104-112-120-120-128-136 stitches with circular needle size 4.5 mm and 2 strands Fabel. Insert 1 marker at the beginning of the round (= mid back) and 1 marker after 52-56-60-60-64-68 stitches (= mid front). Work rib as follows from mid back: * Purl 3, knit 1 *, repeat from *-* to end of round. When the piece measures 2 cm work a row of holes as follows: * Purl 1, purl 2 together, 1 yarn over, knit 1 *, work from *-* to end of round = 26-28-30-30-32-34 holes on the round. After the row of holes continue with rib as before with purl 3/ knit 1 for 2 more rounds. The next round is worked as follows: Knit 1, * purl 2, knit 2 *, work from *-* until there are 3 stitches left on the round, finish with purl 2 and knit 1. Continue with rib in this way. When the piece measures 5 cm work an elevation at the back of the trousers as follows: Work 7 stitches rib, turn, tighten the strand and work 14 stitches rib back. Turn, tighten the strand and work 24 stitches rib. Turn, tighten the strand and work 34 stitches rib back. Continue back and forth in this way by working 10 more stitches each time you turn until you have worked over a total of 74-74-94-94-114-114 stitches, turn the piece. Continue by working rib in the round over all stitches again with knit 2/ purl 2 until the piece measures 15-16-17-18-19-20 cm from the cast-on edge mid front. On the next round, increase 1 stitch on each side of the middle 2 stitches in front and back - read INCREASE TIP! Increase in this way every 2nd round a total of 8 times = 136-144-152-152-160-168 stitches. When the piece measures 22-23-24-25-26-27 cm from the cast-on edge mid front, cast off 12 stitches mid front and mid back (i.e. cast off 6 stitches on each side of both markers). Each leg is finished separately. Place the stitches around one leg on 1 thread. LEG: = 56-60-64-64-68-72 stitches. Divide the stitches onto double pointed needles size 4.5 mm. Insert 1 marker on the inside of the leg – the round starts here. Continue rib with knit over knit and purl over purl. When the leg measures 2 cm from the marker, decrease 1 stitch on each side of the marker – read DECREASE TIP (= 2 stitches decreased). Decrease in this way every 2-2-2-2-3-3 cm a total of 6 times = 44-48-52-52-56-60 stitches. When the leg measures approx. 31-38-44-50-58-66 cm – read KNITTING TIP, loosely cast off with knit over knit and purl over purl. Place the stitches from the other leg on double pointed needles and work in the same way as the first leg. ASSEMBLY: Sew the 12 stitches cast off between the legs together. Thread the elastic through the row of holes. |
|

|
|
Have you finished this pattern?Tag your pictures with #dropspattern #winterwolftrousers or submit them to the #dropsfan gallery. Do you need help with this pattern?You'll find 22 tutorial videos, a Comments/Questions area and more by visiting the pattern on garnstudio.com. © 1982-2025 DROPS Design A/S. We reserve all rights. This document, including all its sub-sections, has copyrights. Read more about what you can do with our patterns at the bottom of each pattern on our site. |


With over 40 years in knitting and crochet design, DROPS Design offers one of the most extensive collections of free patterns on the internet - translated to 17 languages. As of today we count 314 catalogues and 11821 patterns translated into English (UK/cm). 11821
We work hard to bring you the best knitting and crochet have to offer, inspiration and advice as well as great quality yarns at incredible prices! Would you like to use our patterns for other than personal use? You can read what you are allowed to do in the Copyright text at the bottom of all our patterns. Happy crafting!
Post a comment to pattern DROPS Children 30-22
We would love to hear what you have to say about this pattern!
If you want to leave a question, please make sure you select the correct category in the form below, to speed up the answering process. Required fields are marked *.