
Popular categories
Looking for a yarn?


Comments / Questions (25)
![]() Gio wrote:
Gio wrote:
Buonasera, non capisco come lavorare il collo a V: nelle spiegazioni si dice di intrecciare le 3 maglie centrali e lavorare ogni parte separatamente ( cioè rimarrebbero i due bordi con 3 maglie legaccio ciascuno visto che le coste a legaccio centrali sono di nove maglie in totale). Ma nel video non si intrecciano maglie centrali e i bordi a legaccio paiono di 4 maglie ( quindi le coste centrali a legaccio dopo A2 sarebbero di 8 maglie?). Grazie infinite
04.03.2017 - 02:57DROPS Design answered:
Buongiorno Gio. È corretto come trova scritto nel testo: quindi 3 maglie di bordo a legaccio. Il video è valido come esempio generale e serve per mostrare come lavorare la tecnica. Buon lavoro!
04.03.2017 - 13:46
![]() Mireille wrote:
Mireille wrote:
Bonjour, Je suis bloquée après avoir tricoté le motif A1 en entier. J'ai donc 4 motifs alignés. Est ce que dois TriCoter à partir du rang suivant un cinquième motif où est ce que commence les demi motifs A 1A et A1B ? Merci pour votre réponse Mireille
23.09.2016 - 07:58DROPS Design answered:
Bonjour Mireille, Continuez en suivant A1, c'est-à-dire qu'au prochain motif ajouré, vous aurez 5 coeurs maintenant, et ainsi de suite. En fonction de la taille tricotée, si vous n'avez pas assez de mailles pour tricoter 1 motif entier en début et fin de rang, tricotez alors A.1A et A.1B. Bon tricot!
23.09.2016 - 09:00
![]() Hanne wrote:
Hanne wrote:
Fin opskrift, er meget glad for min nye bluse. Men jeres nye søgesystem til opskrifter er helt håbløst, jeg kan ikke finde det jeg leder efter.
07.09.2016 - 10:22
![]() Benedetta wrote:
Benedetta wrote:
Grazie! Buona giornata!
11.07.2016 - 13:55
![]() Benedetta wrote:
Benedetta wrote:
Buongiorno, vorrei chiedervi spiegazioni in merito alla nota del davanti lavorare il 1 f dal centro davanti,riprendere 1 m dall'altro lato ecc ecc".Grazie mille
11.07.2016 - 11:57DROPS Design answered:
Buongiorno Benedetta. Nel video che le alleghiamo trova spiegato come procedere correttamente per lo scollo. Il punto che le interessa è al minuto 1:26. Buon lavoro!
11.07.2016 - 12:14
![]() Benedetta wrote:
Benedetta wrote:
Grazie!Gentilissimo, come sempre!
06.07.2016 - 15:20
![]() Benedetta wrote:
Benedetta wrote:
Buongiorno, non ho capito questo passaggio:"quando il lavoro misura cm 42 (sto facendo la Tg M),lavorare 2 coste sulle 8 m piu esterne.Le 2 m a legaccio sono comprese nelle 8 m ?
06.07.2016 - 15:01DROPS Design answered:
Buongiorno Benedetta. Sì, nelle 8 m sono comprese le m vivagno. Buon lavoro!
06.07.2016 - 15:07Vana wrote:
Thank you for your answer. That means if I have to do it for 3 times the sts that will be binded off wil be 6 or 12? Thank you
07.06.2016 - 20:07DROPS Design answered:
Dear Vana, you will cast off 2 sts at the beg of each row a total of 3 times = you will have cast off 6 sts on each side = a total of 12 sts are cast off. Happy knitting!
08.06.2016 - 08:39Vana Giannitsopoulou wrote:
Hello, at the sleeve section where you say cast off at beg of every row in each side follows: Cast off 2 sts 2-2-3-3-3 times, you mean I must cast off 2 sts in the beg and 2sts at the end of the row or just 2sts only in the beg of every row? Thank you
07.06.2016 - 15:42DROPS Design answered:
Dear Mrs Giannitsopoulou, you have to bind off 2 sts at the beg of every row both from RS and from WS a total of 2 or 3 times (see size). Happy knitting!
07.06.2016 - 17:02
![]() Biret wrote:
Biret wrote:
J'attends les explications avec impatience
07.02.2016 - 21:05
|
||||||||||||||||
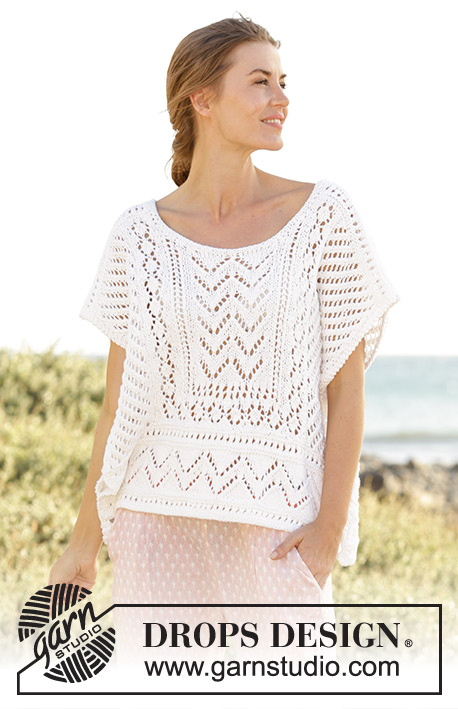
Sunny Day#sunnydaysweater |
||||||||||||||||
 |
 |
|||||||||||||||
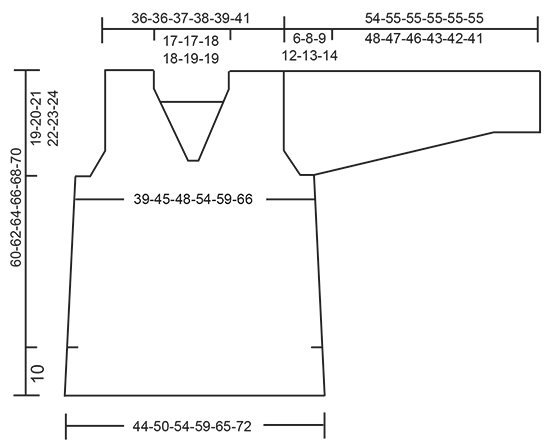
Knitted DROPS jumper with V-neck, lace pattern and vents in the sides in ”Paris”. Size: S - XXXL.
DROPS 170-8 |
||||||||||||||||
|
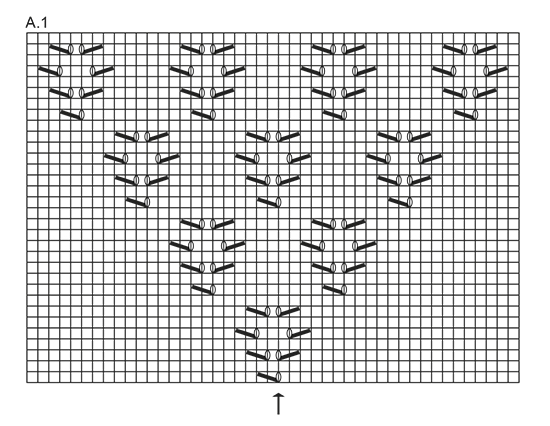
GARTER ST (back and forth): K all rows. 1 ridge = 2 rows K. GARTER ST (worked in the round): * K 1 round and P 1 round *, repeat from *-*. 1 ridge = 2 rounds. PATTERN: See diagrams A.1 and A.2. The diagrams show all rows in pattern seen from RS. DECREASE TIP (applies to sides on body, at armholes and neck): Dec inside 2 edge sts in garter st on front and back piece and inside 3 edge sts in garter st along armholes and neck. All dec are done from RS! Dec as follows after 2 or 3 edge sts: Slip 1 st as if to K, K 1, psso. Dec as follows before 2 or 3 edge sts: Beg 2 sts before edge sts and K 2 tog. INCREASE TIP (applies to mid under sleeve): Beg 1 st before marker, make 1 YO, K 2 (marker is between these 2 sts) and make 1 YO. On next round K YOs twisted to avoid holes. ---------------------------------------------------------- JUMPER: Body is worked bottom up in two parts. Sleeves are worked in the round. BACK PIECE: Cast on 75-85-91-101-111-123 sts on needle size 4 mm with Paris. Work 2 ridges in GARTER ST - see explanation above. Insert 1 marker after the first 37-42-45-50-55-61 sts on needle (seen from RS) = 38-43-46-51-56-62 sts on needle after marker, move the marker upwards when working. Switch to needle size 5 mm and work in stocking st with 2 edge sts in garter st in each side. REMEMBER THE KNITTING TENSION When piece measures 12 cm, dec 1 st in each side - READ DECREASE TIP! Repeat dec every 8-8-7-7-7-7 cm a total of 4-4-5-5-5-5 times in each side = 67-77-81-91-101-113 sts. AT THE SAME TIME when piece measures 15-16-17-14-15-16 cm, work pattern according to diagram A.1 over the middle sts – pattern beg from RS after marker in the middle of piece (see arrow in diagram) – work the other sts as before. When A.1 has been worked 1 time in height continue the pattern towards the edge st in each side as before - adjust to a whole or half heart - see A.1A and A.1B, (work A.1A in the right side of work and work A.1B in the left side of work), inside edge st in each side. Work the sts that do not fit a whole or half heart out towards the sides in stocking st. When piece measures 40-41-42-43-44-45 cm, work 2 ridges over the outermost 5-7-8-9-10-11 sts in each side (work the other sts as before). Then cast off the first 2-4-5-6-7-8 sts at beg of the next 2 rows for armholes. Continue pattern with 3 edge sts in garter st in each side (where there is not enough room for a whole or half heart out towards armholes work these sts in stocking st). AT THE SAME TIME dec for armholes inside edge st on every other row (i.e. every row from RS) as follows: Dec 1 st 1-4-4-7-10-14 times in total – READ DECREASE TIP = 61-61-63-65-67-69 sts remain on needle. Continue pattern with 3 edge sts in garter st in each side (where there is not enough room for a whole or half heart out towards armhole work these sts in stocking st). When piece measures 52-54-56-58-60-62 cm, work 2 ridges over the middle 29-29-31-31-33-33 sts on needle (work the other sts as before). On next row from RS, cast off the middle 23-23-25-25-27-27 sts for neck and finish each shoulder separately. Continue as before with 3 edge sts in garter st in each side. AT THE SAME TIME dec for neck on every other row as follows: Dec 1 st 3 times in total – READ DECREASE TIP = 16-16-16-17-17-18 sts remain on shoulder. Continue until piece measures 60-62-64-66-68-70 cm and cast off. Repeat on the other shoulder. FRONT PIECE: READ ALL OF THE FOLLOWING SECTION BEFORE CONTINUING! Cast on and work as on back piece until piece measures 35-37-38-39-40-42 cm - NOTE: Do not work A.1 on front piece. Now work pattern according to diagram A.2 over the middle sts – pattern beg from RS after marker in the middle of piece (see arrow in diagram) – work the other sts as before. ARMHOLE: AT THE SAME TIME when piece measures 40-41-42-43-44-45 cm, work 2 ridges over the outermost 5-7-8-9-10-11 sts in each side as on back piece (work the other sts as before). Then dec for armhole in the side as on back piece. V-NECK: AT THE SAME TIME when A.2 has been worked 1 time vertically work 2 ridges over the middle 9 sts mid front (work the other sts as before). On next row from RS after ridges, cast off the middle 3 sts for neck and finish each part separately. Continue in stocking st with dec for armhole as before and dec AT THE SAME TIME for V-neck on every other row (i.e. on every row from RS) as follows: Dec 1 st 13-13-14-14-15-15 times in total - READ DECREASE TIP. After all dec for armholes and V-neck, 16-16-16-17-17-18 sts remain on shoulder. Continue until piece measures 60-62-64-66-68-70 cm and cast off. Repeat on the other shoulder - NOTE: Work first row from mid front (= WS). Beg by picking up 1 st in first st from the other side and work this tog with first st on needle. This is done to avoid a nick at the bottom of vent. SLEEVE: Worked in the round on double pointed needles. Cast on 32-34-36-38-40-40 sts on double pointed needles size 4 mm with Paris. Work 2 ridges in GARTER ST in the round - see explanation above. Switch to double pointed needles size 5 mm and work in stocking st, insert 1 marker at beg of round (= mid under sleeve). When piece measures 7-6-10-6-6-12 cm, inc 2 sts mid under sleeve - READ INCREASE TIP. Repeat inc every 3½-3-2½-2½-2-1½ cm 12-14-14-15-17-19 times in total = 56-62-64-68-74-78 sts. When sleeve measures 48-47-46-43-42-41 cm (NOTE: Shorter measurements in the larger sizes because of longer sleeve cap and wider shoulders) cast off the middle 4-8-10-12-14-16 sts mid under sleeve. Finish sleeve cap back and forth on circular needle in stocking st AT THE SAME TIME cast off at beg of every row in each side follows: Cast off 2 sts 2-2-3-3-3-3 times and 1 st 1-1-2-4-7-8 times, then cast off 2 sts in each side until piece measures 53-54-54-54-54-54 cm, cast off 3 sts at beg of the next 2 rows and the cast off the remaining sts, piece measures approx. 54-55-55-55-55-55 cm. Knit another sleeve. ASSEMBLY: Sew shoulder seams inside cast-off edge. Sew side seams – sew edge to edge in outer loops of edge sts - beg at the top by armhole and sew until approx. 10 cm remain in each side (= vent). Sew in sleeves – place sleeve 1 st in under edge in garter st along armhole and fasten neatly so that edge in garter st shows. |
||||||||||||||||
Diagram explanations |
||||||||||||||||
|
||||||||||||||||
|
||||||||||||||||

|
||||||||||||||||
|
||||||||||||||||
Have you finished this pattern?Tag your pictures with #dropspattern #sunnydaysweater or submit them to the #dropsfan gallery. Do you need help with this pattern?You'll find 22 tutorial videos, a Comments/Questions area and more by visiting the pattern on garnstudio.com. © 1982-2025 DROPS Design A/S. We reserve all rights. This document, including all its sub-sections, has copyrights. Read more about what you can do with our patterns at the bottom of each pattern on our site. |
||||||||||||||||


With over 40 years in knitting and crochet design, DROPS Design offers one of the most extensive collections of free patterns on the internet - translated to 17 languages. As of today we count 314 catalogues and 11820 patterns translated into English (UK/cm). 11820
We work hard to bring you the best knitting and crochet have to offer, inspiration and advice as well as great quality yarns at incredible prices! Would you like to use our patterns for other than personal use? You can read what you are allowed to do in the Copyright text at the bottom of all our patterns. Happy crafting!
Post a comment to pattern DROPS 170-8
We would love to hear what you have to say about this pattern!
If you want to leave a question, please make sure you select the correct category in the form below, to speed up the answering process. Required fields are marked *.