
Popular categories
Looking for a yarn?


Comments / Questions (59)
![]() Jenny wrote:
Jenny wrote:
I am ready to finish the back but can't understand a detail. On neckline, how i knit the chart on sts after the edges? I knit the half sts of a row on diagram then 32 garter sts in the middle and the other half sts of the row after?
30.04.2020 - 19:24DROPS Design answered:
Dear Jenny, for the next 4 rows you will work the stitches on each side of the 32 middle stitches as before and work the middle 32 stitches in garter stitch. After these 4 rows have been worked, you will cast off the middle 26 sts for neck and continue each shoulder separately with 3 sts in garter stitch towards neck. Happy knitting!
04.05.2020 - 09:45
![]() Jenny wrote:
Jenny wrote:
Is it possible to explain step by step the decreases on right front piece? What do i do exactly after the 3 outermost sts bind off? Thank you very much.
22.04.2020 - 12:33DROPS Design answered:
Dear Jenny, on right front piece you cast off the 3 outermost stitches = the first 3 stitches at the beg of row from the wrong side. Then decrease for armhole as explained under knitting tips (for armhole). Happy knitting!
22.04.2020 - 13:18
![]() Dimi wrote:
Dimi wrote:
Hello, i cant understand how to do the buttonholes. Can you please explain? Thank you.
20.04.2020 - 11:38DROPS Design answered:
Dear Dimi, cast off the middle front stitch (= there are 3 sts for front band, you will cast off the 2nd stitch), work row to the end turn and work next row from WS, casting one one stitch over the cast off stitch, then finish with the last stitch - This video shows how to make such a buttonhole casting off/casting on 2 sts you will have here to cast off/cast on only 1 stitch. Happy knitting!
20.04.2020 - 11:56
![]() Dorina wrote:
Dorina wrote:
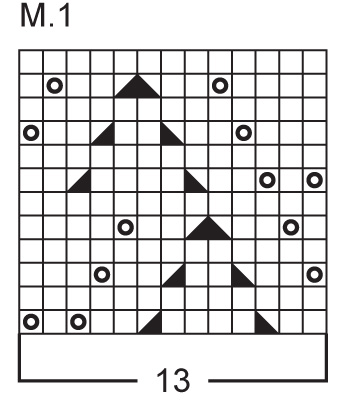
Sara\' possibile avere le istruzioni scritte del Punto traforato? Iniziando il dietro e seguendo lo schema sui 52 punti al terzo ferro mi ritrovo con due punti in più, non capisco dove mi sbaglio ! Grazie
30.04.2019 - 22:28DROPS Design answered:
Buongiorno Dorina. Provi a controllare che in ogni ripetizione del diagramma M1 ci siano 2 aumenti (le 2 m gettate) e 2 diminuzioni. Buon lavoro!
30.04.2019 - 23:10
![]() Chari wrote:
Chari wrote:
El patrón está mal, lo he comprobado y hay que cambiar lo puntos.
13.08.2018 - 12:19DROPS Design answered:
Hola Chari. En primer lugar, cuando tengas una pregunta tienes seleccionar "questions", en caso contrario no nos aparece como pregunta sobre patrón. ¿Puedes especificar qué parte del patrón tiene errores?
14.08.2018 - 20:37
![]() Montserrat wrote:
Montserrat wrote:
Hola,el patron1 tiene 26 pts pero el patron 5A tiene 27 pts. Tengo que coger 1 pt del pt jersey? Gracias
09.08.2018 - 00:05DROPS Design answered:
Hola Montserrat, si te fijas bien, al inicio del diagrama 5A hay 26 puntos, no 27. En el diagrama se muestran 26 cuadrados.
14.08.2018 - 19:40
![]() Chari wrote:
Chari wrote:
El patrón 1 estás bien? \r\nMe podéis decir si ha tenido alguna modificación?\r\nEstoy haciéndolo tal como viene el esquema y no me coinciden los puntos
11.07.2018 - 21:14Mona wrote:
In the pattern 4A do I start after the 3 stitches of the button band or do I do the decrese with the last stitch of the button band? Thank you
09.06.2017 - 17:45DROPS Design answered:
Dear Mona, you start after the 3 stitches. The decrease is after the third one.
11.06.2017 - 16:15Marla wrote:
The online pattern also shows a cardigan, this basic design but with sleeves and a different rib/waistband. There are no directions for these differences :( Are they available? Thanks, I love your website! Marla
10.06.2015 - 18:42DROPS Design answered:
Dear Marla, please click here for the pattern to the cardigan - happy knitting!
11.06.2015 - 09:31
|
|||||||||||||
DROPS 73-6 |
|||||||||||||
|
|
|||||||||||||
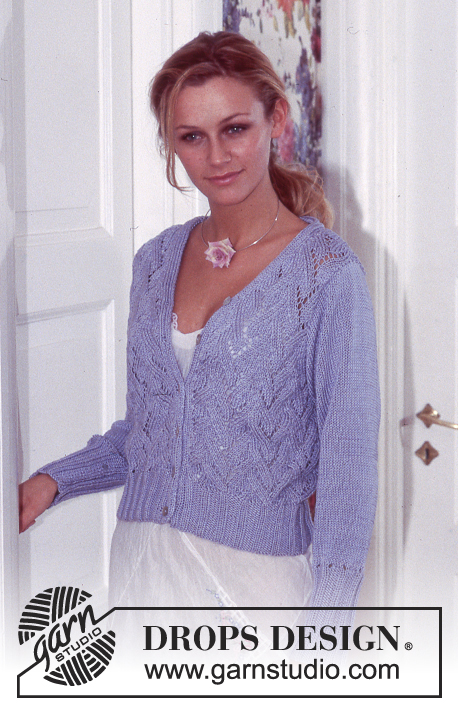
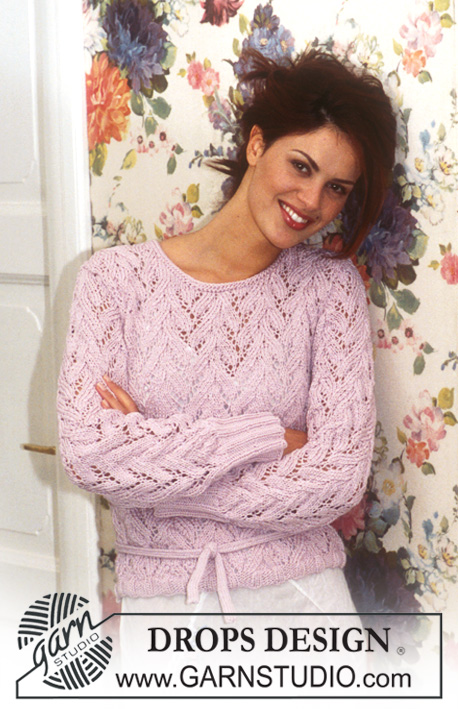
DROPS Top in Muskat
DROPS 73-6 |
|||||||||||||
|
Gauge: 20 sts x 26 rows = 10 x 10 cm on larger needles in pattern. 1 repeat of Pattern 1 = 7 cm wide. Garter st, when knitting flat: Knit all sts, all rows. Pattern: See diagrams M.1, M.4 and M.5. The pattern is seen from the right side. NB: On the garment, the lace pattern (by mistake) is shown with a couple of holes too small, but follow the diagram and possibly see DROPS Design Model no. 73-5 to see how the pattern will look when the diagram is worked. Knitting tips (for armhole): All decs are made on right side rows. Dec 1 st inside 3 edge sts knit in garter st as follows: After 3 sts: Slip 1 as if to knit, K 1, psso. Before 3 sts: K 2 tog. Buttonhole: Make buttonholes along right button band. 1 buttonhole = bind off the center st of buttonband and yo over the bound off st on the next row. Make buttonhole when the piece measures (for all sizes): 2 cm, 6.5 cm, 11 cm, 15.5 cm and 20 cm. ---------------------------------------------------------------------- Back: Cast on 72-80-88-96 sts on smaller needles. Knit 6 rows garter st. Change to larger needles and continue as follows: K 1 (edge st), 9-13-17-21 sts stockinette st, Pattern 1 over 52 sts (4 repeats), 9-13-17-21 sts stockinette st, K 1 (edge st). When the piece measures 5 cm inc 1 st at each side every 2 cm a total of 5 times = 82-90-98-106 sts - knit the increased sts in stockinette st. When the piece measures 17 cm knit 4 rows garter st over 6-6-7-8 sts at each side (knit the remaining sts as before). On the next row bind off the outermost 3-3-4-5 sts at each side for armhole. Then dec 1 st at armholes inside 3 garter st edge sts every other row 2-5-7-9 times - see knitting tips = 72-74-76-78 sts remain. Continue with 3 sts garter st and 7-8-9-10 sts stockinette st at each side of Pattern 1. When the piece measures 35-36-37-38 cm knit 4 rows garter st over the center 32 sts - knit the remaining sts as before. Then bind off the center 26 sts for the neck = 23-24-25-26 sts remain on each shoulder. Knit pattern as before with 3 sts in garter st at each neck edge. Bind off when the piece measures approx. 37-38-39-40 cm. Right front: Cast on 39-43-47-51 sts on smaller needles. Knit 6 rows garter st, change to larger needles and knit the next row as follows from center front edge: K 3 (buttonband sts knit in garter st throughout), Pattern 1 over 26 sts (2 repeats), 9-13-17-21 sts stockinette st and K 1 (edge st). Make buttonholes along buttonband - see instructions above. When the piece measures 5 cm inc at the side as on back = 44-48-52-56 sts (knit the increased sts in stockinette st). When the piece measures 17 cm knit 4 rows garter st over 6-6-7-8 sts at the side (knit the remaining sts as before). On the next row bind off the outermost 3-3-4-5 sts at the side for armhole. Then shape armhole as on back. At the same time when the piece measures approx. 20 cm - adjust to end after a complete repeat of Pattern 1 - knit and bind off for the neck following Pattern 4A - dec for neck inside 3 button band sts knit in garter st. Knit the remaining sts in each row as before. After all armhole and neck shaping is complete 23-24-25-26 sts remain on shoulder. Continue with Pattern 4B and remaining sts in stockinette st and garter st until piece measures approx. 37-38-39-40 (match back). Bind off. Left front: Cast on as right front and knit 6 rows garter st, change to larger needles. Knit the next row as follows from side: K 1 (edge st), 9-13-17-21 sts stockinette st, Pattern 1 over 26 sts (2 repeats) and 3 sts in garter st (buttonband). Inc at the side and shape armhole as on right front. For neck shaping follow Pattern 5A, then continue with Pattern 5B. Bind off when piece matches right front. Assembly: Sew shoulder- and side seams using edge sts as seam allowance. Sew on buttons. |
|||||||||||||
Diagram explanations |
|||||||||||||
|
|||||||||||||
|
|||||||||||||

|
|||||||||||||

|
|||||||||||||
Have you finished this pattern?Tag your pictures with #dropspattern or submit them to the #dropsfan gallery. Do you need help with this pattern?You'll find 14 tutorial videos, a Comments/Questions area and more by visiting the pattern on garnstudio.com. © 1982-2025 DROPS Design A/S. We reserve all rights. This document, including all its sub-sections, has copyrights. Read more about what you can do with our patterns at the bottom of each pattern on our site. |
|||||||||||||


With over 40 years in knitting and crochet design, DROPS Design offers one of the most extensive collections of free patterns on the internet - translated to 17 languages. As of today we count 314 catalogues and 11821 patterns translated into English (UK/cm). 11821
We work hard to bring you the best knitting and crochet have to offer, inspiration and advice as well as great quality yarns at incredible prices! Would you like to use our patterns for other than personal use? You can read what you are allowed to do in the Copyright text at the bottom of all our patterns. Happy crafting!
Post a comment to pattern DROPS 73-6
We would love to hear what you have to say about this pattern!
If you want to leave a question, please make sure you select the correct category in the form below, to speed up the answering process. Required fields are marked *.