
Popular categories
Looking for a yarn?


Comments / Questions (96)
![]() Caroline wrote:
Caroline wrote:
Bonjour j’ai fini A1 mais je ne comprends pas les tour 4 et 5. Pourriez vous m’expliquer s’il vous plaît
12.10.2018 - 20:41DROPS Design answered:
Bonjour Caroline, aux tours 4 et 5 après A.1 on va diminuer ainsi: Tour 4: *1 bride dans chacune des 11 brides suivantes, écoulez les 2 brides suivantes ensemble*, répétez de *-* tout le tour. Tour 5: *1 bride dans chacune des 10 brides suivantes, écoulez les 2 brides suivantes ensemble*, répétez de *-* tout le tour. Bon crochet!
15.10.2018 - 08:07
![]() Zila Doucette wrote:
Zila Doucette wrote:
Hi - I am relatively new at crochet and I absolutely LOVE this set and want to make a couple. Do you consider it to be easy enough for a beginner? Also, is the size of the yarn 100g the weight? Thanks, Zila
11.10.2018 - 17:33DROPS Design answered:
Dear Zila, you'll find some videos explaining the different techniques used in that pattern, follow diagram as explained in the written pattern starting from the bottom corner on the right side towards the left on every round. You'll find here all informations about the yarn, feel free to contact your DROPS store - even per mail or telephone - for any individual assistance. Happy crocheting!
12.10.2018 - 07:33Cloudy wrote:
Yaaay I finished the beret and it's perfect. For those who found it was too big i had the same problem so I continued decreasing in the final rounds after knitting tog 11th and 12th stitches I decreased 10th and 11th, 9th and 10th until I got the desired fit and then did the last row which was the REVERSE CROCHET .....perfect!!
03.08.2018 - 09:16Cloudy wrote:
Thank you so much for answering my questions I will persevere 🤗🤗
02.08.2018 - 16:43Cloudy wrote:
So does the 3 chain that you do at the beginning of each row count as a stitch? Would that be 3 chain then the dc in the chain space?
02.08.2018 - 13:28DROPS Design answered:
Dear Cloudy, at the beg of row 3 (and then 6, and 9) you can sl st until 1st ch-space and then replace the 1st dc with 3 chains. Happy crocheting!
02.08.2018 - 14:25Cloudy wrote:
Thank you for info re: R2 In R3 is it 9 dc in the ch3 space from R2? I wish there was an easier way of reading these graphs. They can be so confusing!
02.08.2018 - 09:51DROPS Design answered:
Dear Cloudy, correct, you work 9 dc (US-English) in the 3-ch-spaces from round 2. Happy crocheting!
02.08.2018 - 14:12Cloudy wrote:
Hi there, can you please explain rows 2 and 3 in the A.1 graph for the beret. I don't understand what the 3 little dots are in R.2. As I understand the dots are meant to be slip stitches but that just doesn't make any sense. Thank you
01.08.2018 - 12:43DROPS Design answered:
Dear Cloudy, each little line in row 2 in A.1 is for 1 chain, ie on row 2 you will work: *1 tr (UK-English)/dc(US-English), 3 ch, 1 tr/dc in same ch-space, 1 ch, skip next ch-space, 1 tr/dc, 3 ch, 1 tr/dc in same ch-space, 1 ch*, repeeat from *-* around. Happy crocheting!
01.08.2018 - 14:01
![]() Elidia wrote:
Elidia wrote:
Lo que no acabo de entender es lo que tengo que hacer después de los 18cm cuando termino el cuello. Me imagino que debo empezar a hacer los arcos, los cuales recibiran, en la próxima vuelta, los abanicos de finalización... Es eso? Es que muchas veces se quiere explicar tanto en una receta que acabamos por no entender lo más sencillo :)
12.06.2018 - 20:36DROPS Design answered:
Hola Elidia. Después de los 18 cm trabajar una terminación para el cuello, que consiste en 2 vueltas, explicadas en el patrón. Una vez trabajadas, el cuello está listo.
23.06.2018 - 21:02
![]() Rebecca wrote:
Rebecca wrote:
I need HELP. I REALLY want to make this amazing hat but I can not read the chart. I do know my stitches, but having trouble translating to a written pattern. Is there a Written pattern somewhere or would anyone be interested in translating this chart to a written pattern?? I am sure that I am not the only person in this position. I plan to make about 8-9 of the sets, as Christmas gifts, but I REALLY need the written pattern. Please help all you can. Thanks so very much...
13.05.2018 - 02:19DROPS Design answered:
Dear Rebecca, start reading diagram at the bottom corner on the right side ('see Row 1) and read towards the left on every round. Repeat diagram a total of 4 times in width (insert marker if you need too), ie at the end of 1st round you will have (1 dc, 2 ch) x4 a total of 4 times = 16 dc with 2 ch between each dc. Happy crocheting!
14.05.2018 - 10:25
![]() Stima wrote:
Stima wrote:
Jag har nog löst problemet på min förra fråga men det var klurigt!
18.03.2018 - 09:48DROPS Design answered:
Hej Stina, Härligt att du har löst det, lycka till :)
20.03.2018 - 09:46
|
|||||||||||||
Victoriana#victorianaset |
|||||||||||||
 |
 |
||||||||||||
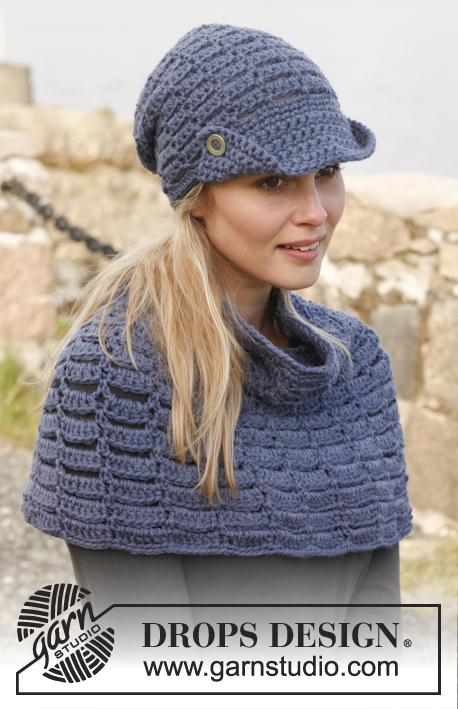
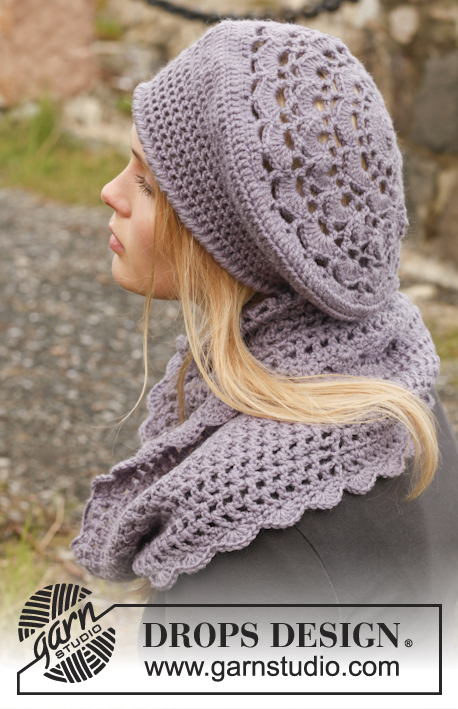
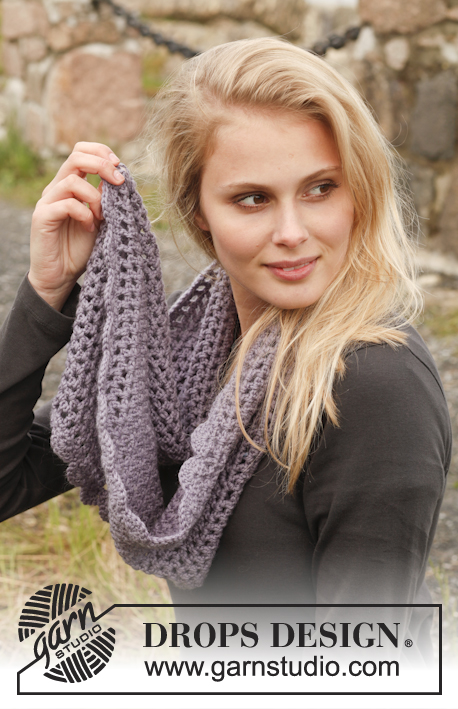
Set consists of: Crochet DROPS beret and neck warmer in ”Karisma”.
DROPS 149-8 |
|||||||||||||
|
CROCHET INFO: Replace first dc on round with 1 ch. Finish with 1 sl st in ch from beg of round. Replace first tr on a tr round with 3 ch. Finish with 1 sl st in 3rd ch. PATTERN: See diagram A.1. REVERS CROCHET: Work as dc but backwards. I.e. crochet around from left to right ROUNDS WITH TR AND CH: Work every round with tr and ch as follows: Turn piece so that WS is towards you, work 4 ch (= 1st tr + 1st ch), skip 1st ch-space (= last ch from previous round), * 1 tr in next ch-space, 1 ch *. Repeat from *-*, finish round with 1 tr in last ch-space (= ch-space with 4 ch from previous round), 1 sl st in ch-space with 4 ch from beg of round - i.e. work alternately from RS and WS to get a nice finish/beg on round. ---------------------------------------------------------- BERET: The piece is worked top down. ROUND 1: Work 4 ch on hook size 4 mm with Karisma and form a ring with 1 sl st in first ch, work 8 dc in ch-ring - READ CROCHET INFO. ROUND 2: Work 2 dc in every dc the entire round = 16 dc. REMEMBER THE CROCHET TENSION! ROUND 3: * 1 dc in first dc, 2 dc in next dc *, repeat from *-* = 24 dc. ROUND 4: * 1 dc in each of the next 2 dc, 2 dc in next dc *, repeat from *-* = 32 dc. Then work according to A.1 (= 4 repetitions on round). When A.1 has been worked 1 time vertically, there are 32 ch-spaces on round. Continue to work as follows: ROUND 1: Work 4 tr in every ch-space = 128 tr. ROUND 2: Work 1 tr in every tr AT THE SAME TIME dec 2 tr evenly = 126 tr. ROUND 3: Work 1 tr in every tr but work every 13th and 14th tr tog = 117 tr. ROUND 4: Work 1 tr in every tr but work every 12th and 13th tr tog = 108 tr. ROUND 5: Work 1 tr in every tr but work every 11th and 12th tr tog = 99 tr. ROUND 6: Work 1 tr in every tr AT THE SAME TIME dec 11 tr evenly = 88 tr. ROUND 7-10: Work 1 tr in every tr the entire round. ROUND 11: Work with a double thread. Work a round with REVERSE CROCHET - see explanation above. --------------------------------------------------------- NECK WARMER: Work in the round with Karisma on hook size 4 mm, work 1 loose ch-row with 228 ch, finish with 1 sl st in 1st ch. Work 4 ch (= 1st tr + 1st ch), * skip 1 ch, 1 tr in next ch, 1 ch *, repeat from *-* the entire round and finish with 1 sl st in ch-space with 4 ch from beg of round = 114 tr + ch. Then work ROUNDS WITH TR AND CH – see explanation above. Continue like this until piece measures 18 cm vertically. Then work a fan edge as follows: ROUND 1: Work 1 ch in 1st dc, 1 dc in every tr and 1 dc in every ch the entire round and finish with 1 sl st in first ch = 228 dc. ROUND 2: Work 1 ch in 1st dc, * skip 2 dc, 6 tr in next dc, skip 2 dc, 1 dc in next dc *, repeat from *-* the entire round and finish with 1 sl st in first ch = 38 fans. Work the same way in the other side. Fasten off. |
|||||||||||||
Diagram explanations |
|||||||||||||
|
|||||||||||||

|
|||||||||||||
Have you finished this pattern?Tag your pictures with #dropspattern #victorianaset or submit them to the #dropsfan gallery. Do you need help with this pattern?You'll find 6 tutorial videos, a Comments/Questions area and more by visiting the pattern on garnstudio.com. © 1982-2025 DROPS Design A/S. We reserve all rights. This document, including all its sub-sections, has copyrights. Read more about what you can do with our patterns at the bottom of each pattern on our site. |
|||||||||||||


With over 40 years in knitting and crochet design, DROPS Design offers one of the most extensive collections of free patterns on the internet - translated to 17 languages. As of today we count 314 catalogues and 11821 patterns translated into English (UK/cm). 11821
We work hard to bring you the best knitting and crochet have to offer, inspiration and advice as well as great quality yarns at incredible prices! Would you like to use our patterns for other than personal use? You can read what you are allowed to do in the Copyright text at the bottom of all our patterns. Happy crafting!
Post a comment to pattern DROPS 149-8
We would love to hear what you have to say about this pattern!
If you want to leave a question, please make sure you select the correct category in the form below, to speed up the answering process. Required fields are marked *.