
Popular categories
Looking for a yarn?


Comments / Questions (67)
![]() Gerda Van Den Hof wrote:
Gerda Van Den Hof wrote:
Ik heb hem gebreid en hij is super geworden. Het was mijn eerste echte kledingstuk. Ik heb al veel complimenten gehad!
11.01.2014 - 18:58
![]() Beatrice wrote:
Beatrice wrote:
Bonjour, pour toutes celles qui ont des difficultés comme moi avec les aiguilles circulaires sachez qu'il exciste des aiguilles droites de 60 cm de long. C'est bien et pratique je m'en sert régulièrement pour tous les gilets tricoter d'une pièce.
21.10.2013 - 11:07
![]() Francis wrote:
Francis wrote:
In de eerste rij van het patroon: 1 omsl, 1st recht, 1 omsl. In de tweede rij van het patroon: Av aan de verkeerde kant over alle nieuwe steken. Ik heb het idee dat dit laatste geldt voor zowel de omslagen als de rechte steek in het midden. Is dit correct?
26.01.2013 - 10:14DROPS Design answered:
Ja, dat klopt. Je moet av breien over alle nieuwe st op de verkeerde kant.
06.02.2013 - 18:39
![]() Ina wrote:
Ina wrote:
In the making right now! Looks good so far, but the pattern is badly written. Tip: Read the whole pattern like 10 times, to make sure you get it right.
23.08.2012 - 11:12
![]() Katrine wrote:
Katrine wrote:
Rigtig fin vest, er i gang med at strikke den nu, men hvad skal man vaske den på når den er færdig?
10.05.2012 - 18:23DROPS Design answered:
Hvis du bruker Karisma så er den superwash og kan vaskes i maskin. Du har vaskeanvisning på banderollen på garnet.
10.05.2012 - 23:00DROPS Design wrote:
Caroline, 1st row in chart is RS. Note! all empty boxes are P on RS, and K on WS. If you start M.2 as this too from RS, you should be correct. Remember to start chart in bottom right corner. Leaves should be K and sts each side P seen from RS.
10.02.2012 - 20:36
![]() Caroline wrote:
Caroline wrote:
I'm not sure that I'm getting the correct stiches for WS and RS, I've knitted up to the first repeat of M.1 (over M.2A and M.2B. My leaf pattern is odd it is manly in P with K either side of the pattern, your picture seems to have the reverse of this i.e that the leaf pattern is in K and the four stitches either side are P? I've started it 3 times and it turns out the same each time.
10.02.2012 - 13:41
![]() Mumlan wrote:
Mumlan wrote:
Hej! Uppdelningen gäller hela västen (framst.+bakstycke+framstycke)
05.12.2011 - 10:50
![]() Kirsten Norlen wrote:
Kirsten Norlen wrote:
Hej vid uppdelningen av maskar på bakstykket står det 89m 19m 89n det blir fel det blir 49m 19m 49m på strl xl kirsten.
05.12.2011 - 09:50
![]() DROPS Design NL wrote:
DROPS Design NL wrote:
Hoi Karien. U moet afkanten middenvoor voor de hals bij een hoogte van 45 cm en voor de armsgaten bij een hoogte van 48 cm.
14.11.2011 - 12:04
|
|||||||||||||||||||||||||||||||
Misty vines |
|||||||||||||||||||||||||||||||
 |
 |
||||||||||||||||||||||||||||||
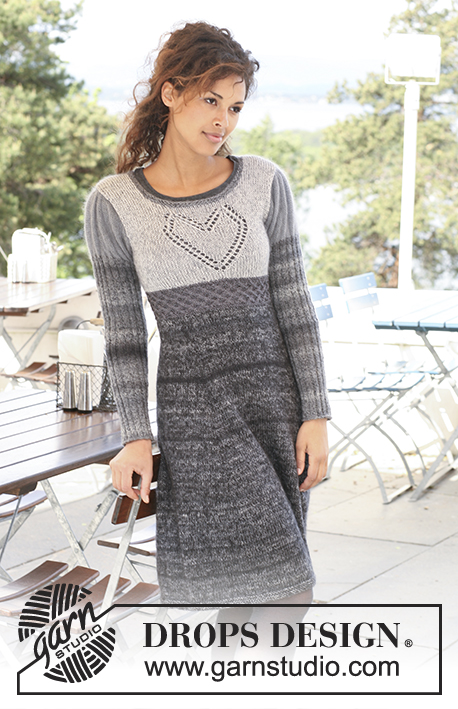
Knitted DROPS sleeveless top with leaf pattern in ”Karisma”. Size S - XXXL.
DROPS 125-2 |
|||||||||||||||||||||||||||||||
|
GARTER ST (back and forth on needle): K all rows. GARTER ST (in the round): K 1 round, P 1 round. DECREASING TIP (applies to the side on body piece): Make all dec from RS. Beg 2 sts before marker: K2 tog, slip 1 st as if to K, K1, psso. INCREASING TIP (applies to the side on body piece): Make all inc from RS. Inc 1 st by picking up st from previous row and K this. PATTERN: See diagram M.1 and M.2. Diagram shows the pattern from RS and row 1 in diagram = RS. -------------------------------------------------------- SLEEVELESS TOP: Worked back and forth on circular needle from mid front. BODY PIECE: Cast on 173-193-209-231-255-277 sts on circular needle size 3.5 mm with Karisma. Work GARTER ST back and forth on needle – see above. When piece measures 4 cm change to circular needle size 4 mm. Now insert 2 markers 42-47-51-57-63-68 sts in from each side = 89-99-107-117-129-141 sts between markers on back piece. Work next row as follows from RS: 1 edge st in garter st, 5-5-6-7-8-8 stocking sts, M.1 (= 9 sts), 62-72-79-89-100-111 stocking sts, M.2A (= 19 sts), 62-72-79-89-100-111 stocking sts, M.1 (= 9 sts), 5-5-6-7-8-8 stocking sts and 1 edge st in garter st. Continue pattern like this – NOTE: After 1 vertical repeat of M.2A, continue in M.2B, work 8-8-8-8-9-9 vertical repeats of M.2B, then work 1 repeat of M.2C and then continue in reverse stocking st on the 19 sts in M.2 up to neckline dec. Work 7 vertical repeats of M.1 for all sizes, then continue in reverse stocking st on the 9 sts in M.1 up to neckline dec. REMEMBER THE KNITTING TENSION! AT THE SAME TIME When piece measures 5 cm dec 1 st each side of both markers (= 4 dec sts) – See DECREASING TIP! Repeat the dec on every 3-3-3.5-3.5-3.5-4. cm a total of 8-8-7-7-7-6 times = 141-161-181-203-227-253 sts. When piece measures 31-32-31-31-32-31 cm inc 1 st each side of both markers (= 4 inc sts) – See INCREASING TIP! Repeat the inc on every 2-2-3-3-4-4.5 cm a total of 6-6-5-5-4-4 times = 165-185-201-223-243-269 sts. Note! When piece measures 45 cm dec for the neck is starting on all sizes. See explanation under right front piece. When piece measures 44-45-46-47-48-49 cm work next row as follows: work 36-41-44-50-54-60 sts as before (= front piece), cast off 8-8-10-10-12-12 sts for armhole (i.e. 4-4-5-5-6-6 sts each side of marker), work 77-87-93-103-111-125 sts (= back piece), cast off 8-8-10-10-12-12 sts for armhole and work the remaining 36-41-44-50-54-60 sts as before (= front piece). Complete each piece separately. BACK PIECE: = 77-87-93-103-111-125 sts. Continue as before in stocking st and M.2 on the middle 19 sts AT THE SAME TIME cast off for armhole at the beg of every row each side as follows: 3 sts 0-0-0-1-1-2 times, 2 sts 3-5-6-7-8-10 times and 1 st 5-5-5-4-5-4 times = 55-57-59-61-63-65 sts (includes 1 edge st each side). Continue pattern as before. When piece measures 61-63-64-66-68-69 cm cast off the middle 31-33-27-29-29-31 sts for neck and complete each shoulder separately. Cast off for neckline at the beg of every row from neck: 2 sts 1-1-2-2-2-2 times and 1 st 2-2-3-3-3-3 times = 8-8-9-9-10-10 sts left on shoulder. Cast off when piece measures 64-66-68-70-72-74 cm. RIGHT FRONT PIECE: = 36-41-44-50-54-60 sts. Continue as before in stocking st and M.1, AT THE SAME TIME cast off for armhole at the beg of every row from the side (i.e. on every row from WS) as described for back piece. AT THE SAME TIME when piece measures 45 cm for all sizes cast off 6-6-7-8-9-9 sts towards mid front, i.e. from RS for neck. Cast off to shape the neckline at the beg of every row from mid front as follows: 2 sts 3 times and 1 st 3 times, then cast off at the beg of every other row from mid front: 1 st 2-3-2-3-2-2 times. After all dec for armhole and neckline are complete there 8-8-9-9-10-10 sts left on needle. Cast off as described for back piece. LEFT FRONT PIECE: Like right front piece, but mirrored, i.e. cast off for armhole on every row from RS and cast off for neck from WS. ASSEMBLY: Sew shoulder seams. SLEEVE EDGE: Pick up from RS approx 84-106 sts round armhole inside 1 edge st on circular needle size 3.5 mm. Work GARTER ST in the round – see above. When edge measures approx 2 cm cast off. Repeat round the other armhole. RIGHT FRONT BAND: Pick up from RS approx 86-102 sts along right front piece inside 1 edge st on circular needle size 3.5 mm with Karisma. Work garter st back and forth on needle. After 2.5 cm make 6 buttonholes evenly distributed – place the top buttonhole approx 1 cm from neckline and the bottom one 2-3 cm from bottom edge. 1 BUTTONHOLE = cast off 1 st and cast on 1 new st on next row. Cast off when front band measures 4 cm. LEFT FRONT BAND: Like right front band but without buttonholes. Sew buttons on left front band. NECKLINE: Pick up from RS approx 140 –170 sts round neck (also pick up on front bands) on circular needle size 3.5 mm. Work garter st back and forth on needle until neckline measures approx 2 cm and cast off. |
|||||||||||||||||||||||||||||||
Diagram explanations |
|||||||||||||||||||||||||||||||
|
|||||||||||||||||||||||||||||||

|
|||||||||||||||||||||||||||||||

|
|||||||||||||||||||||||||||||||
Have you finished this pattern?Tag your pictures with #dropspattern or submit them to the #dropsfan gallery. Do you need help with this pattern?You'll find 20 tutorial videos, a Comments/Questions area and more by visiting the pattern on garnstudio.com. © 1982-2025 DROPS Design A/S. We reserve all rights. This document, including all its sub-sections, has copyrights. Read more about what you can do with our patterns at the bottom of each pattern on our site. |
|||||||||||||||||||||||||||||||


With over 40 years in knitting and crochet design, DROPS Design offers one of the most extensive collections of free patterns on the internet - translated to 17 languages. As of today we count 314 catalogues and 11820 patterns translated into English (UK/cm). 11820
We work hard to bring you the best knitting and crochet have to offer, inspiration and advice as well as great quality yarns at incredible prices! Would you like to use our patterns for other than personal use? You can read what you are allowed to do in the Copyright text at the bottom of all our patterns. Happy crafting!
Post a comment to pattern DROPS 125-2
We would love to hear what you have to say about this pattern!
If you want to leave a question, please make sure you select the correct category in the form below, to speed up the answering process. Required fields are marked *.