
Popular categories
Looking for a yarn?


Comments / Questions (561)
![]() Judi wrote:
Judi wrote:
Can you please give some detailed guidance on assembly? Do you have any videos/tutorials?
20.03.2022 - 12:55DROPS Design answered:
Dear Judi, all of the videos that may help make the pattern can be found under the pattern. You can see the assembly specified in Fig. 1. Happy knitting!
20.03.2022 - 19:02
![]() Judi Paris wrote:
Judi Paris wrote:
Hi. When decreasing the 24 stiches on the LEFT sleave and decreasing on the wrong side, do you keep in pattern and pearl 2 together for the decreases rather knit 2 together?
18.03.2022 - 01:23DROPS Design answered:
Hi Judi, Yes, on the wrong side you purl 2 together for a decrease and otherwise continue the pattern. Happy crafting!
18.03.2022 - 07:01
![]() Myriam wrote:
Myriam wrote:
Bonjour, Je tricote ce pull magnifique, mais après avoir fini le corps du pull, j'ai un doute sur les 4 premiers rangs au point mousse, qui donnent un air "gondolé" au démarrage du pull. Avez-vous une suggestion pour améliorer ce détail qui diminue l'esthétique du pull? Merci infiniment.
14.03.2022 - 08:44DROPS Design answered:
Bonjour Myriam, à priori, une fois porté, ces rangs ne devraient plus gondoler, c'est sans doute parce que les côtes tricotées ensuite resserrent un peu. En cas de doute, n'hésitez pas à montrer votre ouvrage à votre magasin (même en photo par mail), on pourra fort probablement vous aider. Bon tricot!
14.03.2022 - 13:57
![]() Yeni Gar wrote:
Yeni Gar wrote:
Hola buenos días si Sra ya le entendí lo de los diagramas\r\n\r\nPero mi pregunta era que cuando si vuelvo desde el comienzo es cuando terminó la secuencia arriba osea cada 8 vueltas
13.03.2022 - 17:34DROPS Design answered:
Hola Yeni, sí, después de la 8ª vuelta trabajas la primera vuelta de nuevo.
13.03.2022 - 22:00
![]() Yeni Gar wrote:
Yeni Gar wrote:
Buenas noches Cuando dicen ejemplo Cuando mida 5 o 50 cm siempre se mide desde la orilla donde empezó el tejido
10.03.2022 - 05:04DROPS Design answered:
Hola Yeni Gar, si, a menos que se indique lo contrario en la fórmula (por ejemplo medir desde el marcapunto). Saludos!
10.03.2022 - 09:13
![]() Yeni Gar wrote:
Yeni Gar wrote:
Buenos días me puede ayudar en la lectura de los diagramas por ejemplo m1 en las primeras dos filas es punto derecho luego en la tercera va la puntada Y en la figura m5 va todas las vueltas en derecho solo se repite la secuencia cada 7 hileras
09.03.2022 - 07:16DROPS Design answered:
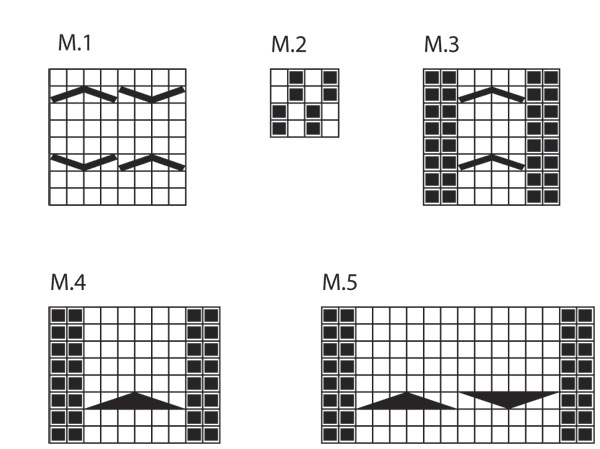
Hola Yeni, cuando M1 se trabaja en redondo, las filas 1 y 2 son todos los puntos de derecho, en la fila 3 se trabaja primero la trenza 2/2 por delante (como se explica en los símbolos) y seguido se trabaja la trenza 2/2 por detrás. Después se trabajan 3 filas de derecho y después de nuevo las trenzas, pero esta vez primero por delante y después por detrás. En M.5, cuando se trabaja en redondo, los cuadrados negros son reveses y los cuadrados blancos son derechos. Puedes consultar la siguiente lección para ayudarte a trabajar los diagramas: https://www.garnstudio.com/lesson.php?id=68&cid=23
11.03.2022 - 18:11
![]() Yeni Gar wrote:
Yeni Gar wrote:
Buenos días Muchas gracias por sus respuestas y muy rápidas Me ha quedado claro esas preguntas Cuando llegue al lado de las mangas y si tengo alguna duda les preguntaré Gracias nuevamente Que Dios los bendiga
09.03.2022 - 07:09
![]() Yeni Gar wrote:
Yeni Gar wrote:
Hola buenos dias. La parte del cuerpo en la espalda todo va en punto musgo? Gracias 🙏\r\nYa que si sumo los puntos no me da el total del contorno
08.03.2022 - 14:56DROPS Design answered:
Hola Yeni, no, la parte de la espalda se trabaja igual que el delantero, es decir, con el dibujo de las trenzas.
08.03.2022 - 21:57
![]() Yeni Gar wrote:
Yeni Gar wrote:
Buenas noches No tengo aguja doble punta puedo tejer las mangas con aguja circular? Que diferencia hay entre la aguja doble punta y la aguja circular? Gracias 🙏
08.03.2022 - 06:18DROPS Design answered:
Hola, no hay difercencia. Con aguja circular 80-120 cm de largo, tienes que usar la técnica del MAGIC LOOP. Mira el video sobre esta tecnica AQUI. Saludos!
08.03.2022 - 09:26
![]() Yeni Gar wrote:
Yeni Gar wrote:
Hola buenas noches. La parte del cuerpo en la espalda todo va en punto musgo? Gracias 🙏
08.03.2022 - 04:37DROPS Design answered:
Hola Yeni, puedes ver la respuesta arriba.
08.03.2022 - 21:57
|
|||||||||||||||||||
Dreams of Aran#dreamsofaransweater |
|||||||||||||||||||
 |
 |
||||||||||||||||||
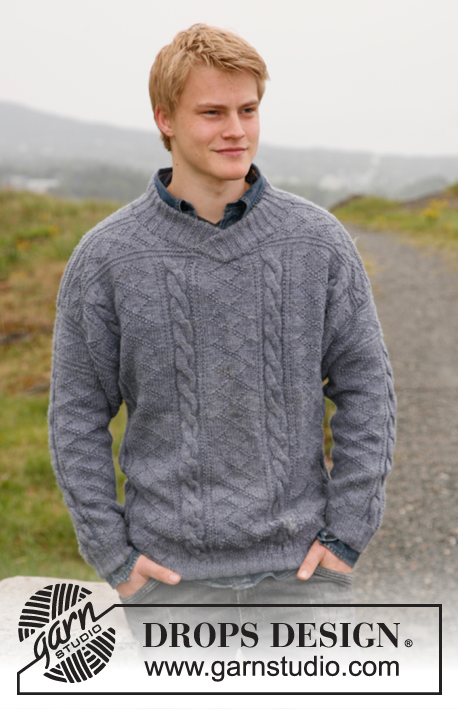
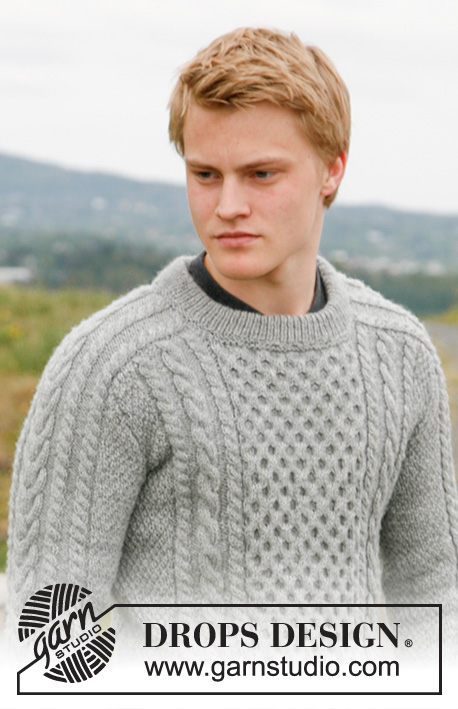
Men's knitted jumper with cables in DROPS Karisma, DROPS Puna or DROPS Merino Extra Fine. Size 13/14 years - XXXL.
DROPS 135-3 |
|||||||||||||||||||
|
GARTER ST (in the round): K 1 round, P 1 round. PATTERN: See diagram M.1 – M.5. Diagrams show the pattern from RS. DECREASING TIP: Work 1 st as in diagram, work 2 sts tog, pass over the first st on needle = 2 dec sts. Dec as follows in the different diagrams M.1 (= 44-44-52-52-52-52-52 sts): 10-10-12-12-12-12-12 sts. M.3 (= 8 sts): 2 sts. M.4 (= 10 sts): 3 sts. M.5 (= 16 sts): 6 sts. -------------------------------------------------------- JUMPER – SHORT OVERVIEW OF THE PIECE: The sleeve is worked upwards, continued onto the shoulder and along the neck, top back. The neck-stitches at the top of the sleeve are decreased towards the front piece and a small section of the sleeve is continued along the top of the back piece and later sewn together mid-back, so the neck is higher at the back than at the front – see Fig.1. -------------------------------------------------------- BODY PIECE: Worked in the round. Cast on 208-230-250-270-290-310-330 sts on circular needle size 3.5 mm with Karisma, Puna or Merino Extra Fine. Work 4 rounds GARTER ST – see above – and continue in rib K1/P1. When piece measures 5 cm work 2 rounds garter st, AT THE SAME TIME inc 20-10-6-6-22-18-18 sts evenly on last round = 228-240-256-276-312-328-348 sts. Insert 2 markers in piece, 1 at beg of round and 1 after 114-120-128-138-156-164-174 sts (= each side). Change to circular needle size 4 mm and work PATTERN as follows – see above: Size 13/14 – L: M.2 on the first 9-12-12-17 sts, M.3, M.4, M.3, M.1 on the next 44-44-52-52 sts, M.3, M.4, M.3, M.2 on the next 18-24-24-34 sts, M.3, M.4, M.3, M.1 on the next 44-44-52-52 sts, M.3, M.4, M.3, M.2 on the last 9-12-12-17 sts. Size XL-XXXL: M.2 on the first 8-12-17 sts, M.3, M.4, M.3, M.4, M.3, M.1 on the next 52-52-52 sts, M.3, M.4, M.3, M.4, M.3, M.2 on the next 16-24-34 sts, M.3, M.4, M.3, M.4, M.3, M.1 on the next 52-52-52 sts, M.3, M.4, M.3, M.4, M.3, M.2 on the last 8-12-17 sts. REMEMBER THE KNITTING TENSION! Continue in pattern like this. AT THE SAME TIME when piece measures 9 cm inc 1 st each side of both markers (work inc sts into M.2 as you go along). Repeat the inc on every 6-8-8-9-9-9-10 cm a total of 5 times = 248-260-276-296-332-348-368 sts. When piece measures 38-47-48-49-50-51-52 cm cast off 6 sts for armhole each side (= 3 sts each side of marker) and complete each piece separately (make sure cable rows are from RS after dividing piece). BACK PIECE: = 118-124-132-142-160-168-178 sts. Continue back and forth on circular needle. Cast off to shape the armhole each side at beg of every row: 2 sts 2-2-2-2-2-3-4 times and 1 st 1-1-2-3-4-4-5 times = 108-114-120-128-144-148-152 sts. Continue in pattern. When piece measures 49-59-61-63-65-67-69 cm (adjust so that next row is row 7 in diagram M.1, M.3 and M.4) cast off, AT THE SAME TIME dec 24-24-26-26-36-36-36 sts in diagram on casting off row – see DECREASING TIP! FRONT PIECE: = 118-124-132-142-160-168-178 sts. Cast off for armhole as described for back piece. When piece measures 46-56-58-60-62-64-66 cm (adjust so that next row is first or 5th row in M.1) cast off the middle 40-40-48-48-48-48-48 sts for neck, AT THE SAME TIME dec 10-10-12-12-12-12-12 sts evenly on the 40-40-48-48-48-48-48 sts on cast off row. Now complete each shoulder separately. Cast off 2 sts on neckline on next row. When piece measures 49-59-61-63-65-67-69 cm (adjust to back piece) cast off, AT THE SAME TIME dec 7-7-7-7-12-12-12 sts in diagram on cast off row. RIGHT SLEEVE: Worked in the round. Cast on 56-58-60-62-64-66-68 sts on double pointed needles size 3.5 mm with Karisma. Work 4 rounds garter st and continue in rib K1/P1 until piece measures 10 cm. Work 2 rounds garter st, AT THE SAME TIME inc 2 sts evenly on last round = 58-60-62-64-66-68-70 sts. Insert a marker at beg of round. Change to double pointed needles size 4 mm and continue in pattern on next round as follows: M.2 on the first 5-6-7-8-9-10-11 sts, M.3 2 times, M.5, M.3 2 times, M.2 on the last 5-6-7-8-9-10-11 sts. Continue in pattern like this. AT THE SAME TIME when piece measures 13-12-13-12-12-14-13 cm inc 1 st each side of marker. Work inc sts into M.2 as you go along. Repeat the inc on every 2-2.5-2-2-2-1.5-1.5 cm a total of 14-15-16-17-18-19-20 times = 86-90-94-98-102-106-110 sts. When piece measures 45-50-50-49-49-48-48 cm cast off 6 sts mid under sleeve (= 3 sts each side of marker) and complete piece back and forth on needle (make sure to have cable row from RS after dividing piece). Cast off for sleeve cap each side at the beg of every row: 2 sts 2-4-6-7-9-10-12 times and 1 st 12-10-8-8-6-6-4 times = 48 sts left on needle for all sizes. Piece measures 55-60-60-60-60-60-60 cm. Now measure piece from here! Continue in pattern on remaining sts until piece measures 12-14-13-15-17-18-19 cm. Now cast off on right side of piece, at the beg of every row from RS as follows: 24 sts 1 time (AT THE SAME TIME as 14 of these 24 sts K2 tog before they are cast off), 3 sts 2 times. Work 3 rows without dec. Cast off 1 st on next row = 17 sts left for all sizes. Continue until piece measures 19-21-22-24-26-27-28 cm. Cast off, AT THE SAME TIME dec 4 sts evenly in diagram on cast off row. The whole sleeve now measures approx 74-81-82-84-86-87-88 cm. LEFT SLEEVE: Like right sleeve, but cast off at the top at the opposite side, i.e. at the beg of every row from WS. ASSEMBLY: Set in sleeves. Sew shoulder sts from body piece to M.3 each side of sleeve (in outer loops of sts). Sew the top of sleeves tog mid back and sew to back piece. NECKLINE: Pick up 94-94-108-108-108-108-108 sts round neckline on small circular needle size 3.5 mm with Karisma, Puna or Merino Extra Fine. Work 4 rounds garter st, AT THE SAME TIME on last row inc 22-22-26-26-26-26-26 sts evenly = 116-116-134-134-134-134-134 sts. Continue in rib K1/P1. When rib measures 8 cm work 2 rounds garter st and cast off. Fold neck double towards WS and fasten, garter st to garter st. |
|||||||||||||||||||
Diagram explanations |
|||||||||||||||||||
|
|||||||||||||||||||

|
|||||||||||||||||||
|
|||||||||||||||||||
Have you finished this pattern?Tag your pictures with #dropspattern #dreamsofaransweater or submit them to the #dropsfan gallery. Do you need help with this pattern?You'll find 18 tutorial videos, a Comments/Questions area and more by visiting the pattern on garnstudio.com. © 1982-2025 DROPS Design A/S. We reserve all rights. This document, including all its sub-sections, has copyrights. Read more about what you can do with our patterns at the bottom of each pattern on our site. |
|||||||||||||||||||


With over 40 years in knitting and crochet design, DROPS Design offers one of the most extensive collections of free patterns on the internet - translated to 17 languages. As of today we count 314 catalogues and 11820 patterns translated into English (UK/cm). 11820
We work hard to bring you the best knitting and crochet have to offer, inspiration and advice as well as great quality yarns at incredible prices! Would you like to use our patterns for other than personal use? You can read what you are allowed to do in the Copyright text at the bottom of all our patterns. Happy crafting!
Post a comment to pattern DROPS 135-3
We would love to hear what you have to say about this pattern!
If you want to leave a question, please make sure you select the correct category in the form below, to speed up the answering process. Required fields are marked *.