
Popular categories
Looking for a yarn?


Comments / Questions (57)
![]() Gaelle wrote:
Gaelle wrote:
Bonjour, je suis arrivée a 17 cm de hauteur du marqueur des manches, je dois mettre en attente 6x5 mailles côté encolure, pourriez vous me dire si c'est le côté dos ou devant ? Merci, cordialement Gaëlle
13.11.2017 - 12:55DROPS Design answered:
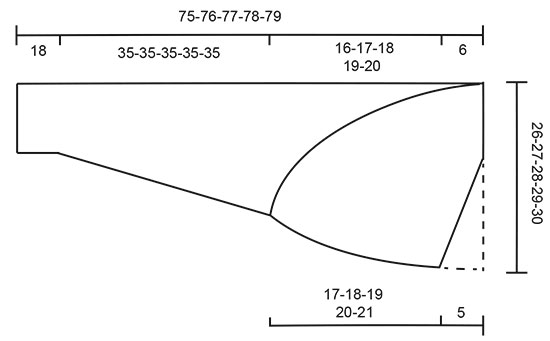
Bonjour Gaelle, ces mailles sont mises en attente côté encolure, donc côté devant, on continue à tricoter côté dos (l'ouvrage sera un peu plus long en bas du dos une fois porté), les rangs raccourcis correspondent à la partie en pointillé sur le schéma. Bon tricot!
13.11.2017 - 13:32
![]() Xaja Mykil wrote:
Xaja Mykil wrote:
What measurements (in inches) do the sizes mean?
23.07.2017 - 15:24DROPS Design answered:
Dear Xaja, the exact sizing always depend on the style of each piece, therefore please refer the shcematics for the actual measurements of any given pattern. I hope this helps. Happy Knitting!
23.07.2017 - 16:40
![]() Elisabeth S wrote:
Elisabeth S wrote:
Hei igjen, Hvis det er som du sier at "Som jeg laeser det saa bliver underkanten breddere (nederst ryggen) og nakken smallere." Hva betyr det da når oppskriften sier "(dvs det måles ikke nederst i ryggen ettersom plagget er smalere nederst) "
13.10.2016 - 22:08DROPS Design answered:
Hei Elisabeth. Ja, jeg har misforstaaet dit förste spörgsmaal. Jeg kiggede paa udtagningerne/indtagningerne. Ja, der saettes m paa en pind nedefra ryggen og op - saa kanten överst vil blive 5 cm breddere ca - som ogsaa er at se paa tegningen. Den stiplede linie er mellemrummet mellem underkant og overkant - ikke plaget. Haaber det er tydeligt nu :)
14.10.2016 - 18:03
![]() Elisabeth S wrote:
Elisabeth S wrote:
Hei, Jeg lurer på den delen av oppskriften som beskriver "kilen" som strikkes inn midt i ryggen bak. På figuren kan det se ut som man skal strikke den bredes nederst (altså sette maskene på tråden fra nakken og ned mot ryggen), men i oppskriften leser jeg det som om maskene skal settes på tråden fra ryggen opp mot nakken (altså slik at kilen blir bredest øverst). Hva er rett? Er det ekstra bredde i nakken eller nederst i ryggen man forsøker å lage?
13.10.2016 - 07:52DROPS Design answered:
Hei Elisabeth. Som jeg laeser det saa bliver underkanten breddere (nederst ryggen) og nakken smallere.
13.10.2016 - 15:25
![]() Maxine wrote:
Maxine wrote:
Hi and thanks-- but I should have been clearer. This is the section I meant. I can't envision, and the diagram doesn't help: Now bind off at the front of piece and cast on new sts at the back of piece. [BIND OFF ALL, CAST ON AND THEN BIND OFF IN THE FOLLOWING WAY?] The next few lines beginning with "At front: Bind off..." are to long to post, but confusing as well. Thanks!
20.07.2016 - 17:26DROPS Design answered:
Dear Maxine, if you have dec/bind off for front piece at beg of row from RS on 1st part, you will now inc new sts for front piece at beg of row from RS = cast on new sts for front piece at end of row from WS. If you inc/cast on new sts on 1st half piece at end of row from RS, you will now dec at end of row from RS and cast off the sts at beg of row from WS. YOu will now work reversed all inc/dec done. Happy knitting!
21.07.2016 - 08:54
![]() Maxine wrote:
Maxine wrote:
Hi there, I just complete the first 53 cm of this piece, and after reading the directions that follow three time, I am completely flummoxed! I have no idea how to proceed, and I'm afraid the pattern drawing is of no help either. Can you please provide me with more detail...I don't want to abandon this project. It looks like a beautiful design. Thanks!
16.07.2016 - 17:57DROPS Design answered:
Dear Maxine, after you have worked the first half of the bolero contiue as explained: work 1 row and now work 5 more sts from the st holder every other row a total of 6 times (all sts are now back on needle). Then inc towards neck (where you bound off in the first side) and dec at back (where you inc before), ie you will work the 2nd half reversed. Happy knitting!
18.07.2016 - 09:04Dawn wrote:
In the pattern , it says to knit 53cm and them do quite a bit of complicated decreasing and increasing which I have worked out. The pattern then says that there should be 39-40-42-43-45 st. The next instruction is "when the piece measures 17- 18...." etc cm. My question is, where do I measure these cm from. How do you define "the piece"?
13.06.2016 - 08:51DROPS Design answered:
Dear Dawn, when piece measured 53 cm you had to insert a marker, next measurements are done from this marker, ie when piece measures 17-18... cm you have to measure from this marker. Happy knitting!
13.06.2016 - 09:47
![]() Henrietta wrote:
Henrietta wrote:
Haben Sie den Link/die Moeglichkeit "Meine Favoriten" entfernt? Ich wollte zwei Strickanleitungen fuer spaeteres Aufrufen speichern, aber keinen Link gefunden. Ausser Email habe ich KEIN Facebook-, kein Twitter-, kein WasAuchImmer-Konto und nicht die Absicht, meine Absicht mit anderen zu teilen. Danke fuer Ihre Anwort
14.12.2015 - 09:05DROPS Design answered:
Liebe Henrietta, diese Funktion gibt es immer noch, Sie müssen einfach auf das Herz oben am Foto klicken.
02.03.2016 - 10:03
![]() Piwowarczyk wrote:
Piwowarczyk wrote:
Bonjour, auriez-vous une photo du dos de ce modèle, ça m'aiderait à mieux comprendre les explications. Merci d'avance. Ariane P.
15.11.2015 - 11:09DROPS Design answered:
Bonjour Mme Piwowarczyk, nous n'avons pas de photos du dos, toutefois, ce modèle se tricote en commençant par la 1ère manche, puis on augmente pour le dos/on diminue pour le devant pour créer la forme (voir schéma), on tricote des rangs raccourcis (partie en pointillé du schéma) et on tricote ensuite la 2ème moitié du boléro en sens inverse de la 1ère partie (diminutions pour le dos et augmentations pour le devant) pour terminer par la 2ème manche. On termine ensuite par la bordure en côtes tricotée tout autour de l'ouverture du boléro. Bon tricot!
16.11.2015 - 09:41
![]() Daniela wrote:
Daniela wrote:
Hallo liebes Drops- Team, ich habe ein Problem mit dem Mittelteil. Ich hab verstanden, das man verkürzte Reihen stricken soll, allerdings verstehe ich den Satz nicht ganz: "vom Rückenteil unten gegen den Nacken Maschen auf einen Hilfsfaden glegt, 5M 6Mal". Was ist damit genau gemeint und vorallem an welcher Seite soll ich die verkürzten Reihen stricken und wohin mit den Maschen? Liebe Grüße Daniela
26.09.2015 - 21:53DROPS Design answered:
Sie beginnen mit dem Stilllegen der M am unteren Rand der Jacke und legen die M nach oben, also in Richtung Nacken, still. 5 M 6 Mal soll bedeutet, dass Sie in der 1. R die ersten 5 M unten am Rückenteil stillegen. Dann stricken Sie die Rück-R. In der nächsten R legen Sie die nächsten 5 M still, also die nächsten 5 M neben den bereits stillgelegten. Das machen Sie insgesamt 6 x, haben also dannn insgesamt 30 M stillgelegt.
13.10.2015 - 12:32
|
|
Night at the Opera |
|
|
|
|
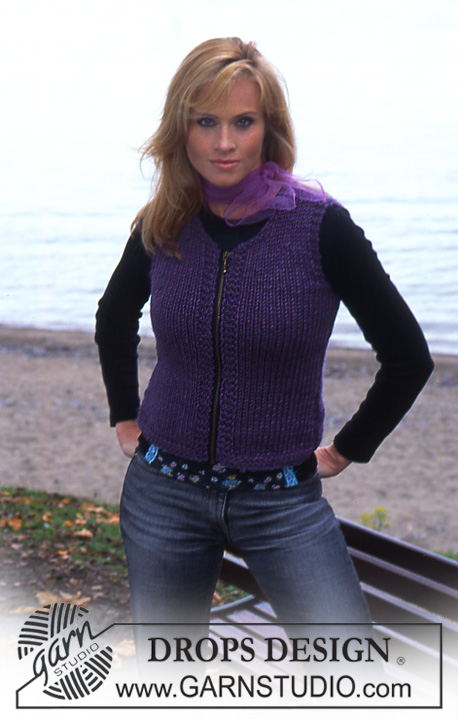
Shrug in Symphony
DROPS 86-31 |
|
|
Gauge: 15 sts x 20 rows in stockinette st = 10 x 10 cm. Rib: *K 3, P 2*, repeat *-*. Right side: The shrug is knitted in one piece. The piece starts at right wrist and ends at left wrist. Loosely cast on 46-48-50-50-52 sts on straight needles and knit 4 rows garter st. Change to stockinette st, decreasing 8 sts evenly distributed on the first row = 38-40-42-42-44 sts. When the piece measures 18 cm inc 1 st at each side every 3-3-3-2.5-2.5 cm a total of 11-11-12-13-14 times = 60-62-66-68-72 sts. When the piece measures 53 cm put a marker at each side – measure the piece from here – and read the entire section before knitting: Seen from RS the right side of piece is towards front and left side is toward back. Now bind off at the front of piece and cast on new sts at the back of piece. At front: bind off 2-2-3-3-3 sts, and then bind off every other row: 1 st 9-10-11-12-12 times, 2 sts 3-3-3-3-4 times, 3 sts 3 times and 4 sts 1 time. At back: inc every other row: 3 sts 1 time and 1 st 2 times, then every 4th row: 1 st 4 times. After all shaping is complete = 39-40-42-43-45 sts. When the piece measures 17-18-19-20-21 cm put 5 sts on a st holder from lower edge of back toward neck edge of back on every other row 6 times = 9-10-12-13-15 sts remain on needles. The shrug is now at center back. Place a new marker at center back in neck edge (right side of work seen frm RS). Now knit the other half, reversing shaping: knit 1 row stockinette st, and then put 5 sts from st holder back on needle on every other row 6 times = 39-40-42-43-45 sts. When sts are put back on needles pick up 1 st between the last st on needle and the first st on st holder, K this picked up st tog with 1st st on st holder. This will prevent a hole. When the piece measures 6 cm from the marker at back of the neck inc at front (= the side where you bound off before) every other row: 4 sts 1 time, 3 sts 3 times, 2 sts 3-3-3-3-4 times and 1 st 9-10-11-12-12 times and 2-2-3-3-3 sts 1 time. When the piece measures 12-13-14-15-16 cm from the marker at back neck, dec at back (= the side where you increased before) every 4th row: 1 st 4 times, then every other row: 1 st 2 times and then bind off 3 sts 1 time. After all incs and decs are complete 60-62-66-68-72 sts remain. Put a marker at each side – measure the work from here. When the piece measures 5-5-2-5-2.5 cm dec 1 st at each side every 3-3-3-2.5-2.5 cm a total of 11-11-12-13-14 times = 38-40-42-42-44 sts. When the piece measures 51 cm inc 8 sts evenly distributed = 46-48-50-50-52 sts. Knit 4 rows garter st and then bind off. Assembly: Sew sleeve seams up to markers, using edge sts as seam allowance. Pick up sts around edge of the garment – along right front, back of the neck, down left front and around back = approx. 175-230 sts (divisible by 5) on circular needles. Join and knit in the round as follows (seen from the right side): P 1 row and K 1 row, then knit rib - see instructions above. When the edge measures 6 cm inc all P 2 to P 3 = approx. 210-276 sts. When the edge measures 12 cm inc all K 3 to K 4 = approx. 245-322 sts. When the edge measures 16-17-18-19-20 cm inc all P 3 to P 4, on the next row bind off all sts in rib. |
|
|
|
Have you finished this pattern?Tag your pictures with #dropspattern or submit them to the #dropsfan gallery. Do you need help with this pattern?You'll find 25 tutorial videos, a Comments/Questions area and more by visiting the pattern on garnstudio.com. © 1982-2025 DROPS Design A/S. We reserve all rights. This document, including all its sub-sections, has copyrights. Read more about what you can do with our patterns at the bottom of each pattern on our site. |


With over 40 years in knitting and crochet design, DROPS Design offers one of the most extensive collections of free patterns on the internet - translated to 17 languages. As of today we count 314 catalogues and 11820 patterns translated into English (UK/cm). 11820
We work hard to bring you the best knitting and crochet have to offer, inspiration and advice as well as great quality yarns at incredible prices! Would you like to use our patterns for other than personal use? You can read what you are allowed to do in the Copyright text at the bottom of all our patterns. Happy crafting!
Post a comment to pattern DROPS 86-31
We would love to hear what you have to say about this pattern!
If you want to leave a question, please make sure you select the correct category in the form below, to speed up the answering process. Required fields are marked *.