
Popular categories
Looking for a yarn?


|
|||||||||||||||||||||||||
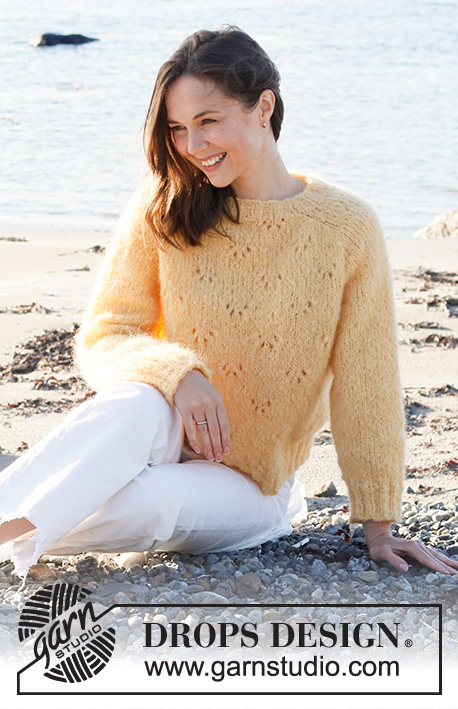
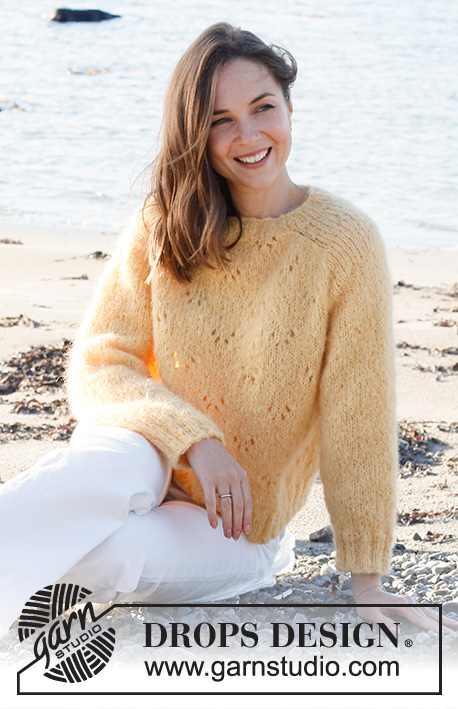
Sunshine Impressions Sweater |
|||||||||||||||||||||||||
 |
 |
||||||||||||||||||||||||
Knitted jumper in DROPS Melody. Piece is knitted top down with saddle shoulders and lace pattern. Size: S - XXXL
DROPS 221-32 |
|||||||||||||||||||||||||
|
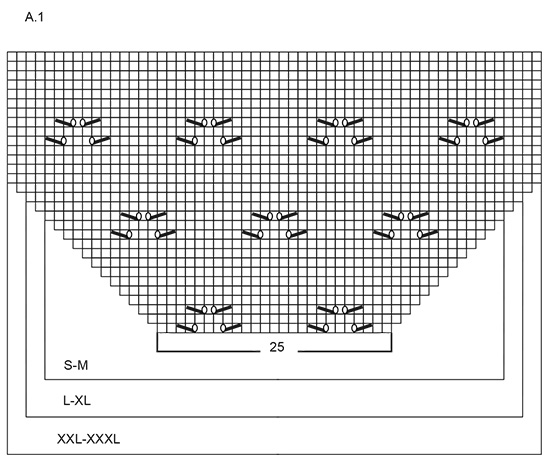
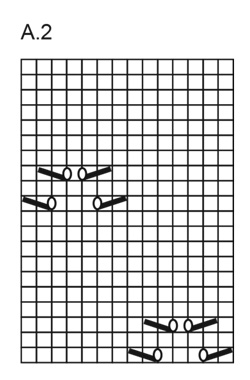
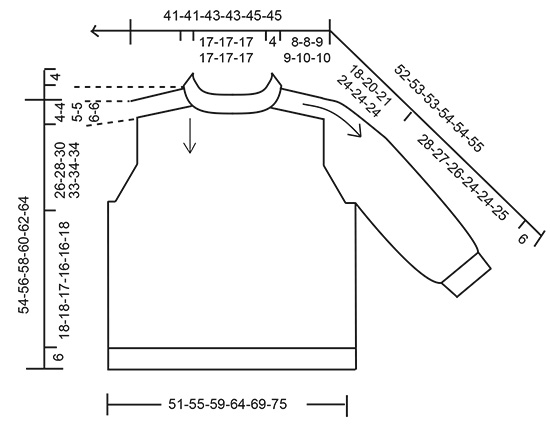
------------------------------------------------------- EXPLANATION FOR THE PATTERN: ------------------------------------------------------- INCREASE TIP-1 (evenly): To calculate how to increase evenly, use the total number of stitches on row (e.g. 68 stitches) and divide stitches by number of increases to be done (e.g. 6) = 11.3. In this example increase by making 1 yarn over after approx. every 11th stitch. On next round work yarn overs twisted to avoid holes. PATTERN: See diagrams A.1 and A.2. INCREASE TIP-2: BEFORE MARKER: The stitch is twisted towards the right. Use left needle to pick up thread between 2 stitches from round below, pick up thread from behind and knit stitch in front loop. AFTER MARKER: The stitch is twisted towards the left. Use left needle to pick up thread between 2 stitches from round below, pick up thread from front and knit stitch in back loop. DECREASE TIP (applies to mid under sleeves): Decrease 1 stitch on each side of marker thread as follows: Work until 3 stitches remain before marker thread, knit 2 together, knit 2 (marker thread is in the middle of these stitches), knit 2 twisted together (= 2 stitches decreased). CAST-OFF TIP: To avoid a tight cast-off edge you may use a larger needle size. If this also is too tight make 1 yarn over after approx. every 4th stitch while casting off (cast off yarn overs as regular stitches). ------------------------------------------------------- START THE PIECE HERE: ------------------------------------------------------- JUMPER - SHORT OVERVIEW OF THE PIECE: Worked in the round, top down. On yoke increase stitches out for shoulder, then increase stitches out for sleeve and finally increase stitches for yoke. Now divide yoke for body and sleeves. Continue body in the round, top down Work sleeves in the round on double pointed needles/a short circular needle, top down. NECK EDGE: Cast on 68-68-72-72-76-76 stitches on circular needle size 5 mm with Melody. Knit 1 round. Then work rib = knit 2/purl 2. Continue rib in the round for 4 cm, on last row increase 6 stitches evenly - read INCREASE TIP-1 = 74-74-78-78-82-82 stitches. Switch to circular needle size 6 mm. YOKE: Insert 1 marker after the first 24-24-26-26-28-28 stitches on round (= approx. mid front) – measure yoke from this marker! In addition insert 4 new markers in piece as explained below - this is done without working the stitches, and insert each of these 4 markers between 2 stitches. Use markers when increasing for saddle shoulder, and markers should have another colour than marker at the neck to separate them. 1st marker: Insert 1st marker at the beginning of round (= right shoulder at the back when garment is worn). 2nd marker: Count 12-12-14-14-16-16 stitches from 1st marker (= shoulder stitches), insert 2nd marker before next stitch. 3rd marker: Count 25-25-25-25-25-25 stitches from 2nd marker (= front piece), insert 3rd marker before next stitch. 4th marker: Count 12-12-14-14-16-16 stitches from 3rd marker (= shoulder stitches), insert 4th marker before next stitch. 25-25-25-25-25-25 stitches remain on round after 4th marker (= back piece). Move these 4 markers upwards when working; increase at each of these markers. SADDLE SHOULDER INCREASE: Read all of the following section before working! Then work piece with A.1 over stitches on front and back piece (see diagram for your size), and stocking stitch over stitches on saddle shoulder/sleeve. AT THE SAME TIME on first round increase 4 stitches for saddle shoulder as follows: Increase BEFORE 1st and 3rd marker and increase AFTER 2nd and 4th marker – read INCREASE TIP-2. Increase only on front pieces and back piece, and number of shoulder stitches remains the same. Continue pattern like this, and increase the same way on every round 12-12-14-14-16-16 times in total = 122-122-134-134-146-146 stitches (work the increased stitches in A.1). REMEMBER THE KNITTING TENSION! After last increase piece measures approx. 8-8-9-9-10-10 cm from marker by the neck. Then increase for sleeves as explained below. SLEEVE INCREASE: NOTE! Do not increase in size XXXL, move on to yoke increase in this size. SIZE S-M-L-XL-XXL: Work in stocking stitch over stitches on sleeves, and continue pattern the same way as before on body. When A.1 has been worked vertically, continue pattern the same way upwards (A.2 shows 1 repetition of pattern), make sure that A.2 fits over stitches from A.1. AT THE SAME TIME on next round increase 4 stitches for sleeves as follows: Increase AFTER 1st and 3rd marker and increase BEFORE 2nd and 4th marker – remember INCREASE TIP -2. Now increase only on sleeve, and number of stitches on front pieces and back piece stays the same. Work the increased stitches in stocking stitch. Increase like this every other round 5-4-5-4-3 times in total = 142-138-154-150-158 stitches. Piece measures approx. 14-12-15-13-13 cm from marker at the neck. Then increase for yoke as explained below. ALL SIZES: YOKE INCREASE: Move the 4 marker from sleeve increase so that each of the 4 markers is in the outermost stitch in each side on each sleeve. There are 22-20-24-22-22-16 stitches between stitches with markers on each sleeve. On next round increase 8 stitches for yoke by increasing both before and after each of the 4 stitches with markers - remember INCREASE TIP. Increase stitches on front piece, back piece and on both sleeves, and work the increased stitches in A.2 on body and stocking stitch on sleeves. Increase like this every other round 9-12-12-15-16-19 times in total = 214-234-250-270-286-298 stitches. When all increases are done, the piece measures approx. 26-28-30-33-34-34 cm from marker at the neck. If the piece is shorter than this, work as before without increases until correct measurements. Now divide piece for body and sleeves as follows: Slip the first 40-44-48-52-54-54 stitches on 1 stitch holder for sleeve, cast on 4-4-6-6-8-10 new stitches on needle (= in the side under sleeve), work as before over the next 67-73-77-83-89-95 stitches (= front piece), slip the next 40-44-48-52-54-54 stitches on a stitch holder for sleeve, cast on 4-4-6-6-8-10 new stitches on needle (= in the side under sleeve), and work as before over the next 67-73-77-83-89-95 stitches (= back piece). Cut the yarn. Finish body and sleeves separately. NOW MEASURE PIECE FROM HERE BODY: = 142-154-166-178-194-210 stitches. Continue with A.2 as before, work the stitches that do not fit the pattern in each side in stocking stitch. Continue until piece measures 18-18-17-16-16-18 cm from division. Switch to circular needle size 5 mm and knit 1 round while increasing 2 stitches evenly = 144-156-168-180-196-212 stitches. Work rib (= knit 2/purl 2) over all stitches. Continue rib like this for 6 cm. Loosely cast off with knit over knit and purl over purl, read CAST-OFF TIP. Jumper measures approx. 54-56-58-60-62-64 cm from shoulder. SLEEVES: Slip the 40-44-48-52-54-54 stitches from stitch holder in one side on a short circular needle/double pointed needles size 6 mm. Pick in addition up 1 stitch in each of the 4-4-6-6-8-10 new stitches under sleeve = 44-48-54-58-62-64 stitches. Insert 1 marker in the middle of the new stitches under the sleeve. Decrease on each side of this marker later. Work in stocking stitch in the round. When piece measures 3 cm from division, decrease 1 stitch on each side of marker - read DECREASE TIP. Repeat the decrease every 5-4-2½-2-2-2 cm 5-6-9-10-11-11 times in total = 34-36-36-38-40-42 stitches. Continue in stocking stitch until piece measures 28-27-26-24-24-25 cm from division. Knit 1 round while increasing 10-8-12-10-12-10 stitches evenly = 44-44-48-48-52-52 stitches. Switch to double pointed needles size 5 mm. Work rib (knit 2/purl 2) in the round for 6 cm. Cast off with knit over knit and purl over purl - remember CAST-OFF TIP. Work the other sleeve the same way. |
|||||||||||||||||||||||||
Diagram explanations |
|||||||||||||||||||||||||
|
|||||||||||||||||||||||||
|
|||||||||||||||||||||||||
|
|||||||||||||||||||||||||
|
|||||||||||||||||||||||||

|
|||||||||||||||||||||||||
|
Have you made this or any other of our designs? Tag your pictures in social media with #dropsdesign so we can see them! Do you need help with this pattern?You'll find tutorial videos, a Comments/Questions area and more by visiting the pattern on garnstudio.com. © 1982-2024 DROPS Design A/S. We reserve all rights. This document, including all its sub-sections, has copyrights. Read more about what you can do with our patterns at the bottom of each pattern on our site. |
|||||||||||||||||||||||||


With over 40 years in knitting and crochet design, DROPS Design offers one of the most extensive collections of free patterns on the internet - translated to 17 languages. As of today we count 304 catalogues and 11428 patterns - 11428 of which are translated into English (UK/cm).
We work hard to bring you the best knitting and crochet have to offer, inspiration and advice as well as great quality yarns at incredible prices! Would you like to use our patterns for other than personal use? You can read what you are allowed to do in the Copyright text at the bottom of all our patterns. Happy crafting!
Comments / Questions (17)
Så er der fejl i opskriften!"Nu tages der ud på forstykket, bagstykket og på begge ærmer, de nye masker strikkes løbende ind i A.2 på ryg- og forstykke og glatstrik på ærmerne.Tag ud på hver 2.omgang totalt 9-12-12-15-16-19 gange = 214-234-250-270-286-298 masker. Strl S har 142 m inden udtagn. til bærestyk., der tages 8 ud i bærestyk = 150 m. 214-150 = 64 masker, der tages ud på 9 pinde, d.v.s. 8 m pr omgang. Ergo SKAL man iflg opskrift tage ud BÅDE på ærmer og bærestykke!!
30.11.2021 - 13:22Efter bærestykke fortsættes udtgn. på både for- og bagstykke og ærmer. Det giver da en skrå ærmesøm på kroppen? Hvis man kun tager ud i ærmerne, bliver ærmesøm lige og kun ærmerne får forøget maskeantal. Præcis modsat. som når man strikker nedefra og op, hvor ærmesømme er lige og der kun tages ind på ærmerne? Jeg har strikket efter denne opskrift og får en 'bule' på kroppen ved ærmesømmen. SURT, når man først opdager det efter at ha' strikket kroppen + 1. ærme
29.11.2021 - 15:20DROPS Design answered:
Hej Anna, første udtagning efter bærestykket er til sadelskulderen og det sker kun på ryg og forstykket (ikke på ærmerne). Efter det tager du ud ifølge ærmeudtagning og det er kun på ærmerne. Først nu tager du ud på bærestykket og der er på hver side af de 4 mærketråde, det vil sige både på ryg & forstykke og på begge ærmer. God fornøjelse!
29.11.2021 - 15:33Buongiorno, desidero una vostra precisazione per un passaggio del pattern che mi lascia perplessa. L'inserimento del 3° segnalibri nello sprone definisce l'inizio del davanti della maglia, non del dietro come indicato. Oppure sono io che non ho capito qualcosa? Grazie per l'attenzione
06.10.2021 - 07:10DROPS Design answered:
Buonasera Anna, grazie per la segnalazione: abbiamo corretto il testo. Buon lavoro!
07.10.2021 - 00:23Hallo. Ich möchte gerne wissen, wo genau ich den ersten Markierer setzen soll. Dies hab ich nicht verstanden. Vielen Dank im Voraus für die Hilfe. Liebe Grüße
15.09.2021 - 15:30DROPS Design answered:
Liebe Anne, die Markierungen bei der Passe werden zwischen Maschen (nicht in einer Masche) eingesetzt, dh: 1. Markierung am Anfang der Runde, 2. Markierung nach 12-12-14-14-16-16 Maschen ab 1. Mark gezählt; 3. Markierung nach 25 Maschen ab 2. Mark gezählt.; 4. Markierung nach 12-12-14-14-16-16 ab 3. Mark gezählt. Es sind nur noch 25 Maschen übrig zwischen 4. und 1. Markierung. Viel Spaß beim stricken!
15.09.2021 - 15:56Buongiorno, ho iniziato a lavorare il modello ma non mi trovo con il numero di maglie per iniziare lo schema A1 taglia L. Ho il numero corretto di maglie al termine del collo (78) ed anche la divisione delle parti (maniche, davanti e dietro) è corretta, ma quando inizio a lavorare A1 non mi trovo con il giusto numero di ripetizioni/numero di maglie.
29.03.2021 - 15:27DROPS Design answered:
Buonasera Marighela, ci può spiegare esattamente in che senso non si ritrova con il numero di maglie? lavora correttamente i gettati e le diminuzioni? Buon lavoro!
30.03.2021 - 00:11Namnförslag: Linnéa
09.01.2021 - 14:18Twinkle afternoon
07.01.2021 - 23:29