
Popular categories
Looking for a yarn?


|
|||||||||||||||||||||||||
Sunshine Impressions Sweater |
|||||||||||||||||||||||||
 |
 |
||||||||||||||||||||||||
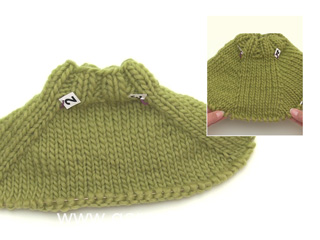
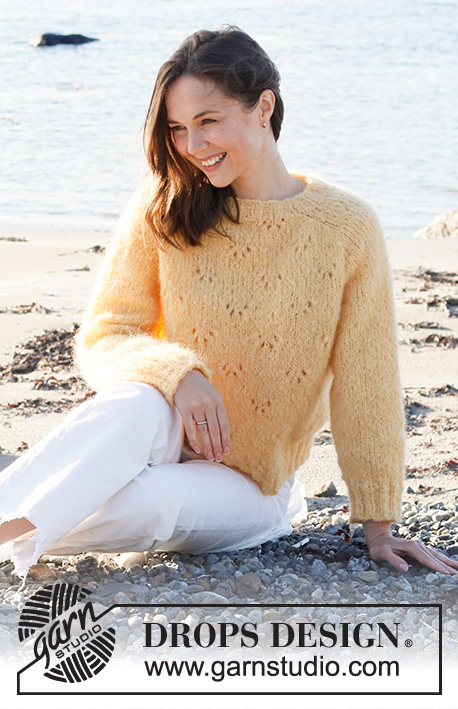
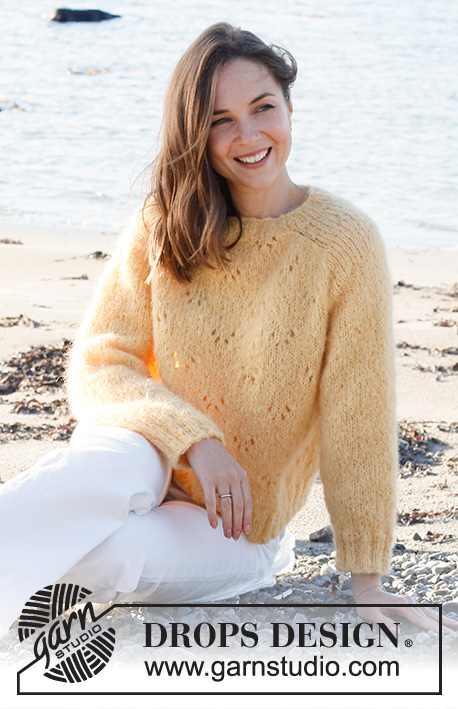
Knitted jumper in DROPS Melody. Piece is knitted top down with saddle shoulders and lace pattern. Size: S - XXXL
DROPS 221-32 |
|||||||||||||||||||||||||
|
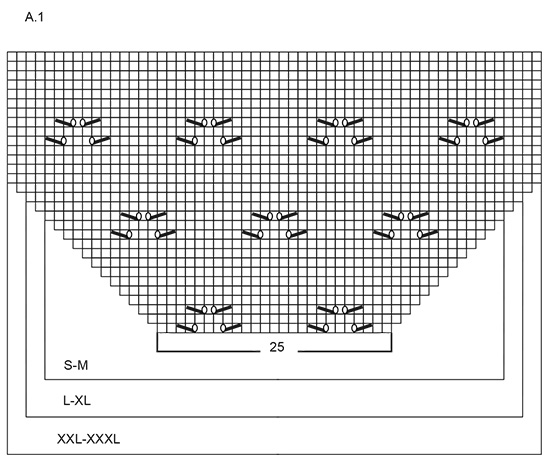
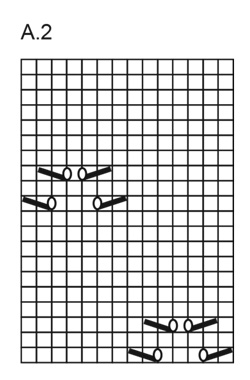
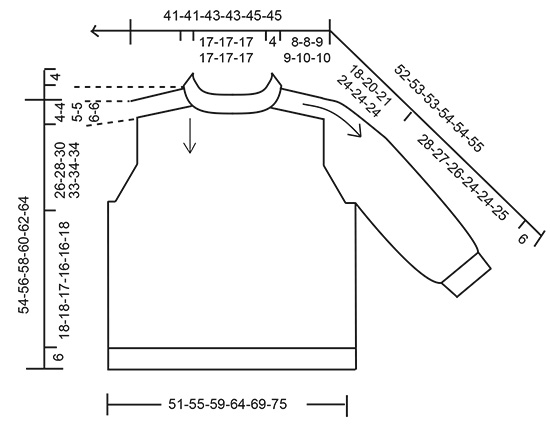
------------------------------------------------------- EXPLANATION FOR THE PATTERN: ------------------------------------------------------- INCREASE TIP-1 (evenly): To calculate how to increase evenly, use the total number of stitches on row (e.g. 68 stitches) and divide stitches by number of increases to be done (e.g. 6) = 11.3. In this example increase by making 1 yarn over after approx. every 11th stitch. On next round work yarn overs twisted to avoid holes. PATTERN: See diagrams A.1 and A.2. INCREASE TIP-2: BEFORE MARKER: The stitch is twisted towards the right. Use left needle to pick up thread between 2 stitches from round below, pick up thread from behind and knit stitch in front loop. AFTER MARKER: The stitch is twisted towards the left. Use left needle to pick up thread between 2 stitches from round below, pick up thread from front and knit stitch in back loop. DECREASE TIP (applies to mid under sleeves): Decrease 1 stitch on each side of marker thread as follows: Work until 3 stitches remain before marker thread, knit 2 together, knit 2 (marker thread is in the middle of these stitches), knit 2 twisted together (= 2 stitches decreased). CAST-OFF TIP: To avoid a tight cast-off edge you may use a larger needle size. If this also is too tight make 1 yarn over after approx. every 4th stitch while casting off (cast off yarn overs as regular stitches). ------------------------------------------------------- START THE PIECE HERE: ------------------------------------------------------- JUMPER - SHORT OVERVIEW OF THE PIECE: Worked in the round, top down. On yoke increase stitches out for shoulder, then increase stitches out for sleeve and finally increase stitches for yoke. Now divide yoke for body and sleeves. Continue body in the round, top down Work sleeves in the round on double pointed needles/a short circular needle, top down. NECK EDGE: Cast on 68-68-72-72-76-76 stitches on circular needle size 5 mm with Melody. Knit 1 round. Then work rib = knit 2/purl 2. Continue rib in the round for 4 cm, on last row increase 6 stitches evenly - read INCREASE TIP-1 = 74-74-78-78-82-82 stitches. Switch to circular needle size 6 mm. YOKE: Insert 1 marker after the first 24-24-26-26-28-28 stitches on round (= approx. mid front) – measure yoke from this marker! In addition insert 4 new markers in piece as explained below - this is done without working the stitches, and insert each of these 4 markers between 2 stitches. Use markers when increasing for saddle shoulder, and markers should have another colour than marker at the neck to separate them. 1st marker: Insert 1st marker at the beginning of round (= right shoulder at the back when garment is worn). 2nd marker: Count 12-12-14-14-16-16 stitches from 1st marker (= shoulder stitches), insert 2nd marker before next stitch. 3rd marker: Count 25-25-25-25-25-25 stitches from 2nd marker (= front piece), insert 3rd marker before next stitch. 4th marker: Count 12-12-14-14-16-16 stitches from 3rd marker (= shoulder stitches), insert 4th marker before next stitch. 25-25-25-25-25-25 stitches remain on round after 4th marker (= back piece). Move these 4 markers upwards when working; increase at each of these markers. SADDLE SHOULDER INCREASE: Read all of the following section before working! Then work piece with A.1 over stitches on front and back piece (see diagram for your size), and stocking stitch over stitches on saddle shoulder/sleeve. AT THE SAME TIME on first round increase 4 stitches for saddle shoulder as follows: Increase BEFORE 1st and 3rd marker and increase AFTER 2nd and 4th marker – read INCREASE TIP-2. Increase only on front pieces and back piece, and number of shoulder stitches remains the same. Continue pattern like this, and increase the same way on every round 12-12-14-14-16-16 times in total = 122-122-134-134-146-146 stitches (work the increased stitches in A.1). REMEMBER THE KNITTING TENSION! After last increase piece measures approx. 8-8-9-9-10-10 cm from marker by the neck. Then increase for sleeves as explained below. SLEEVE INCREASE: NOTE! Do not increase in size XXXL, move on to yoke increase in this size. SIZE S-M-L-XL-XXL: Work in stocking stitch over stitches on sleeves, and continue pattern the same way as before on body. When A.1 has been worked vertically, continue pattern the same way upwards (A.2 shows 1 repetition of pattern), make sure that A.2 fits over stitches from A.1. AT THE SAME TIME on next round increase 4 stitches for sleeves as follows: Increase AFTER 1st and 3rd marker and increase BEFORE 2nd and 4th marker – remember INCREASE TIP -2. Now increase only on sleeve, and number of stitches on front pieces and back piece stays the same. Work the increased stitches in stocking stitch. Increase like this every other round 5-4-5-4-3 times in total = 142-138-154-150-158 stitches. Piece measures approx. 14-12-15-13-13 cm from marker at the neck. Then increase for yoke as explained below. ALL SIZES: YOKE INCREASE: Move the 4 marker from sleeve increase so that each of the 4 markers is in the outermost stitch in each side on each sleeve. There are 22-20-24-22-22-16 stitches between stitches with markers on each sleeve. On next round increase 8 stitches for yoke by increasing both before and after each of the 4 stitches with markers - remember INCREASE TIP. Increase stitches on front piece, back piece and on both sleeves, and work the increased stitches in A.2 on body and stocking stitch on sleeves. Increase like this every other round 9-12-12-15-16-19 times in total = 214-234-250-270-286-298 stitches. When all increases are done, the piece measures approx. 26-28-30-33-34-34 cm from marker at the neck. If the piece is shorter than this, work as before without increases until correct measurements. Now divide piece for body and sleeves as follows: Slip the first 40-44-48-52-54-54 stitches on 1 stitch holder for sleeve, cast on 4-4-6-6-8-10 new stitches on needle (= in the side under sleeve), work as before over the next 67-73-77-83-89-95 stitches (= front piece), slip the next 40-44-48-52-54-54 stitches on a stitch holder for sleeve, cast on 4-4-6-6-8-10 new stitches on needle (= in the side under sleeve), and work as before over the next 67-73-77-83-89-95 stitches (= back piece). Cut the yarn. Finish body and sleeves separately. NOW MEASURE PIECE FROM HERE BODY: = 142-154-166-178-194-210 stitches. Continue with A.2 as before, work the stitches that do not fit the pattern in each side in stocking stitch. Continue until piece measures 18-18-17-16-16-18 cm from division. Switch to circular needle size 5 mm and knit 1 round while increasing 2 stitches evenly = 144-156-168-180-196-212 stitches. Work rib (= knit 2/purl 2) over all stitches. Continue rib like this for 6 cm. Loosely cast off with knit over knit and purl over purl, read CAST-OFF TIP. Jumper measures approx. 54-56-58-60-62-64 cm from shoulder. SLEEVES: Slip the 40-44-48-52-54-54 stitches from stitch holder in one side on a short circular needle/double pointed needles size 6 mm. Pick in addition up 1 stitch in each of the 4-4-6-6-8-10 new stitches under sleeve = 44-48-54-58-62-64 stitches. Insert 1 marker in the middle of the new stitches under the sleeve. Decrease on each side of this marker later. Work in stocking stitch in the round. When piece measures 3 cm from division, decrease 1 stitch on each side of marker - read DECREASE TIP. Repeat the decrease every 5-4-2½-2-2-2 cm 5-6-9-10-11-11 times in total = 34-36-36-38-40-42 stitches. Continue in stocking stitch until piece measures 28-27-26-24-24-25 cm from division. Knit 1 round while increasing 10-8-12-10-12-10 stitches evenly = 44-44-48-48-52-52 stitches. Switch to double pointed needles size 5 mm. Work rib (knit 2/purl 2) in the round for 6 cm. Cast off with knit over knit and purl over purl - remember CAST-OFF TIP. Work the other sleeve the same way. |
|||||||||||||||||||||||||
Diagram explanations |
|||||||||||||||||||||||||
|
|||||||||||||||||||||||||
|
|||||||||||||||||||||||||
|
|||||||||||||||||||||||||
|
|||||||||||||||||||||||||

|
|||||||||||||||||||||||||
|
Have you made this or any other of our designs? Tag your pictures in social media with #dropsdesign so we can see them! Do you need help with this pattern?You'll find tutorial videos, a Comments/Questions area and more by visiting the pattern on garnstudio.com. © 1982-2024 DROPS Design A/S. We reserve all rights. This document, including all its sub-sections, has copyrights. Read more about what you can do with our patterns at the bottom of each pattern on our site. |
|||||||||||||||||||||||||


With over 40 years in knitting and crochet design, DROPS Design offers one of the most extensive collections of free patterns on the internet - translated to 17 languages. As of today we count 304 catalogues and 11422 patterns - 11422 of which are translated into English (UK/cm).
We work hard to bring you the best knitting and crochet have to offer, inspiration and advice as well as great quality yarns at incredible prices! Would you like to use our patterns for other than personal use? You can read what you are allowed to do in the Copyright text at the bottom of all our patterns. Happy crafting!
Comments / Questions (17)
J’ai terminé les 12 augmentations à tous les tours ( small) et l’épaule ne mesure pas les 8 cm mais seulement 6. Donc je continue sans augmenter pour 2 cm avant de faire les augmentations des manches?
21.02.2024 - 23:28DROPS Design answered:
Bonjour Mme Bérard, votre tension doit être un peu juste en hauteur (vous devriez avoir 16 rangs = 10 cm), tricotez jusqu'à la hauteur indiquée - sans augmenter ou bien ajoutez des tours sans augmenter entre les tours d'augmentations pour les espacer à intervalles plus réguliers et éviter 2 cm sans augmenter. Bon tricot!
22.02.2024 - 09:14Hello I am the size medium. I have 46 stitches on hold for my sleeve. I now want to knit my sleeve. I picked up 8 stitches under the arm of my sweater because the space was very large. - now I have 54 stitches. how many rows do I knit with 54 stitches? - when and how do I reduce? Thanks very much
04.04.2022 - 05:49DROPS Design answered:
Hi France, The correct number of stitches for the sleeve is 44 + 4 = 48. You need to decrease 6 stitches (if you don't want an extra wide sleeve). It is probably best to decrease a couple of stitches over the next 6 rounds, so you don't get a marked decrease line (every 2nd round). Happy knitting!
04.04.2022 - 06:55I just finished my 12 rounds of increase (done at 2 rounds). For a total of 234 stitches. Medium size I knit it says: the piece measures approx. 28 cm from the collar marker. My question is,: The 28 cm is measured after making the collar in rib for a length of 4 cm? thank you so much PS. I don't see in the pattern where he talks about this marker
27.03.2022 - 07:40DROPS Design answered:
Dear France, the 28 cm are measured from the marker after the neck edge (the first 4 cm are not counted with the 28 cm). Happy knitting!
27.03.2022 - 23:28Ok for increase 4 stitches each 2 row for the sleeves Total 138 stitches After do I still have to increase on each side of the marker total 8 stitches on 1 row? After I have to increase : 12 times each 2 row for a total of 234 stitches. Please confirm if it exactly please. Thanks
21.03.2022 - 15:46DROPS Design answered:
Dear Mrs Poulin, after you have incrase for sleeve, there are 138 sts on the needle, now increase for yoke: 8 sts a total of 12 times = 8*12= 96 sts. So that y ou have: 138+96=234 sts. Happy knitting!
21.03.2022 - 16:07I forgot pattern said Increase 4-(5)-5-4-3 in total each second row total will be 142-(138)-154-150-158 Me I'm medium my information it's on the ( ) -Please can you send me the right number of row I need to increase ? - How many stitches on each row I need to increase - And the total of stitches after theses increase . Thanks
21.03.2022 - 14:55DROPS Design answered:
See correction - (or click F5 to refresh the page) - in M you will increase for sleeve a total of 4 times on every other round, there will be 138 stitches when all increases are done. Happy knitting!
21.03.2022 - 15:36Hello is it here the mistake? I do the Medium The pattern said increase 5 times total will be 142
21.03.2022 - 14:51DROPS Design answered:
Dear Mrs Poulin, there was a mistake and it has been edited, you are suppose to increaes on every 2nd round a total of 5 times in size S and 4 times in size M. = 142 sts in S and 138 sts in M. Happy knitting!
21.03.2022 - 15:35I did the medium size I will resume my calcul Start with 68 stitches Increase neck now. 74s Inc front + back. 122s now Inc sleeve 20. 142 now Last increase sleeve8. 150 now Next increase total need to be 234-150now 84 to increase ( 12 x 8 stitches =96stitches. Where is my incomprension? Thanks
21.03.2022 - 05:29DROPS Design answered:
Dear Mrs Poulin, there was a mistake under the number of increases for sleeve, you are supposed to increase 4 times only, ie you will have 122 sts + 4 sts x 4 = 138 sts. Correction has been done, thanks for noticing. Happy knitting!
21.03.2022 - 09:24When you start the grafique the first 12 row arrive on the row between the second design. On the grafique you still have to increase for 4 more rows. But the increase shoulder it's on 10 rows. How can I match the pattern ? The grafique increase for 16 rows Thanks
21.03.2022 - 01:32DROPS Design answered:
Dear Mrs Poulin, work A.1 as shown in diagram for your size, ie if you have to increase 12 times for saddle-shoulders (size S and M), work only the first 12 increases; but A.1 shows how to repeat diagram A.2 in width and height. Happy knitting!
21.03.2022 - 09:07When it will be time to separate the sleeves from the front and back?
20.03.2022 - 19:23DROPS Design answered:
Dear France, at the end of the chapter "ALL SIZES /YOKE INCREASES, starting with "Now divide piece for body and sleeves as follows: " tells you when and how to separate body and sleeves (just before the chapter "BODY". Happy knitting!
21.03.2022 - 00:26Hello on page 6 graph A1 at the top of the graph it has 57 stitches and at the bottom of the graph 25 stitches I do not understand? At the top of the sweater after the ribs there must be 25 stitches in front and 25 stitches in the back of the sweater. Could there be an error in the graph? Thanks very much
20.03.2022 - 07:14DROPS Design answered:
Dear France, the graph is read from the bottom up. You start with 25 stitches and end up with 57 or whichever stitches, depending on the sizes. Happy knitting!
20.03.2022 - 19:16