
Populära kategorier
Letar du efter ett garn?


Kommentarer / Frågor (75)
![]() Ana skrev:
Ana skrev:
I've just finished knitting the 10cm on the mid back, but I fear I may have done it wrong, as now there's a 10 cm height difference between one side of the work and the other, which doesn't make sense as we're not casting off just yet. Should I have been knitting all the stitches and not just the 28+62?
22.10.2022 - 15:28DROPS Design svarede:
Boa tarde, Now divide the piece mid back to work back and forth from mid back (this is done so that the seam is mid back). Work in garter stitch back and forth until piece measures 10 cm from the 28 stitches cast on mid front. Deve dividir as 152 malhas em 2 partes que tricota separadamente. até ter 10 cm medidos a partir da carreira em que montou a28 malhas, Bons tricôs!
23.10.2022 - 17:21
![]() Ana skrev:
Ana skrev:
I've just finished knitting the first 24cm and I'm already confused, what do you mean "cast on 1 stitch 2 times and 2 stitches 5 times"? I need a better explanation, please!
09.10.2022 - 16:36DROPS Design svarede:
Dear Ana, cast on 1 stitch at the end of each row from each side. Cast on 1 stitch at the end of the first row from the RS and WS. Repeat this once more on the next row from the RS and WS. Then, cast on 2 stitches at the end of each row from each side, but repeat this 5 times (so you increase 2 stitches at the end of the next 5 rows from the RS and 5 rows from the WS). Happy knitting!
09.10.2022 - 19:48
![]() Anna skrev:
Anna skrev:
Dzień dobry, czy jest dostępny szkic/schemat do tego projektu?
09.10.2022 - 11:54DROPS Design svarede:
Witaj Aniu, niestety nie. Napisz jeśli masz jakiś problem. Pozdrawiamy!
10.10.2022 - 10:09
![]() Jutta skrev:
Jutta skrev:
Hallo, wir haben mit der Anleitung angefangen, befinden uns aber grade in einer Sackgasse und kommen auch mit vereinten Denkkräften nicht weiter...Nach dem einseitige Anschlagen der 28 Maschen und dem Teilen an der hinteren Mitte können wir uns so langsam nicht mehr vorstellen wie es weiter geht und wie daraus die Kapuze entstehen soll. Hat jemand vielleicht eine Zeichnung? Was genau ist die hintere / vordere Mitte? Wie wird alles zusammengenäht? Ich hoffe jemand kann helfen
06.08.2022 - 15:54DROPS Design svarede:
Liebe Jutta, die Arbeit wird zuerst in Reihen von der vorderen Mitte gestrickt, dann wenn die neuen Maschen für die Öffnung für Gesicht angeschlagen wurden, soll die Arbeit von der hinteren Mitte gestrickt werden (so gibt es keine Naht an der vorderen Mitte). Am Ende nähen Sie die Kapuze oben zusammen und die unteren Reihen in der hinteren Mitte (ab den neuen Maschen bis zur Abketterand). Viel Spaß beim stricken!
08.08.2022 - 08:07
![]() Tiko skrev:
Tiko skrev:
First time I got confused with your pattern 😊1. the whole piece is in gaeter stitch except for the 158 stitches around face? 2. Is the piece worked inthe round at any stage? 3. Is it possible to send or add to the pattern a drawing fo what the finished piece looks like prior to been assambled? Thanks for the answerrs 💚
13.03.2022 - 19:12DROPS Design svarede:
Dear Tiko, 1. correct, only the ribbing edge around face is worked in rib, the whole work is then worked in garter stitch. 2. Piece is only worked in rows, but first from mid front (until opening for face is done), then from mid back (after you have increased/cast on the stitches for under face). 3. we have no chart for this sorry. Happy knitting!
14.03.2022 - 12:06
![]() Ana skrev:
Ana skrev:
Could I do the whole pattern in rib instead of garter stitch? How could I adapt from one to the other? Thank you so much!
24.02.2022 - 19:10DROPS Design svarede:
Dear Ana, your tension would be then different and your would have to re-calculate the whole pattern. You might find another pattern among these ones. Happy knitting!
25.02.2022 - 08:59
![]() Ayra skrev:
Ayra skrev:
Plz explain when you pick up 158 stitches around face opening do you have to pick up all of the stitches or you have to pick up 3 and skip one. Thanks
13.02.2022 - 20:44DROPS Design svarede:
Hi Ayra, you have to distribute new stitches evenly to have 158 stitches around face opening in total. Happy knitting!
14.02.2022 - 08:18
![]() Ayra skrev:
Ayra skrev:
Plz explain for mid back seam after working on 28 new cast on stitches and 62 stitches when you turn your work do you have to do the purl stitch from that side and also you have to work on 28 stitches.again so the mid back seam is done. Now you have to do garter stitch for all of the stitches. Thanks
04.02.2022 - 01:51DROPS Design svarede:
Dear Ayra, when you cut the yarn after the hood part, you start again piece from mid back (= approx. middle of previous rows), and will then cast on new stitches for face opening, ending rows on mid back. The seam on mid back will start here and will be sewn to the bottom edge; the 28 sts are cast on on mid front, there won't be any seam here. Hope it will help. Happy knitting!
04.02.2022 - 09:16
![]() Ayra skrev:
Ayra skrev:
Plz explain how you sew the hood in the end? Thanks
03.02.2022 - 02:10DROPS Design svarede:
Dear Ayra, fold the cast on edge double and sew cast on sts together; and then sew on mid back from the beginning of row worked from mid back (after face opening) towards the cast off edge. Happy knitting!
03.02.2022 - 08:47
![]() Marta skrev:
Marta skrev:
One follow up if I may. If there is a seam mid-back, where is the face opening. I'm really confused as you can tell.
02.02.2022 - 14:18DROPS Design svarede:
Dear Marta, you first work the hood, back and forth from mid front, then cut the yarn and start on mid back to work now from the mid back, increasing stitches on mid front and working the 2nd half of sts to mid back. The seam will be on mid back from this part. Hope it will help. Happy knitting!
02.02.2022 - 14:29
|
|
Lawless#lawlesshood |
|
 |
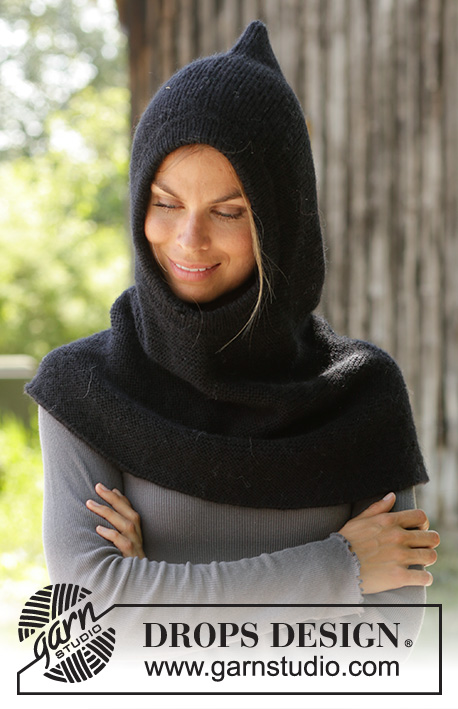 |
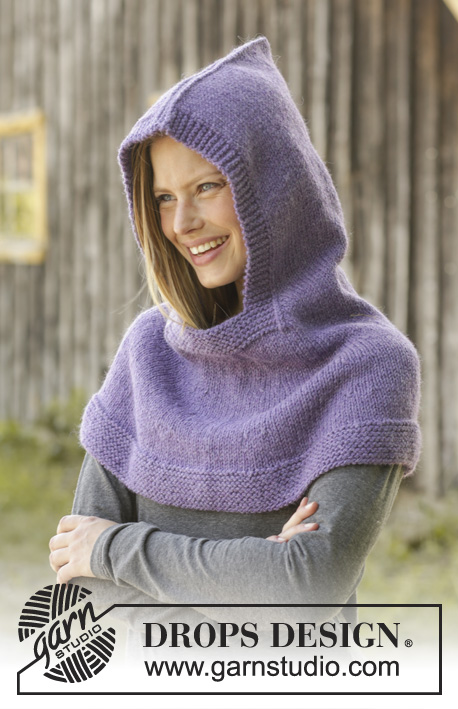
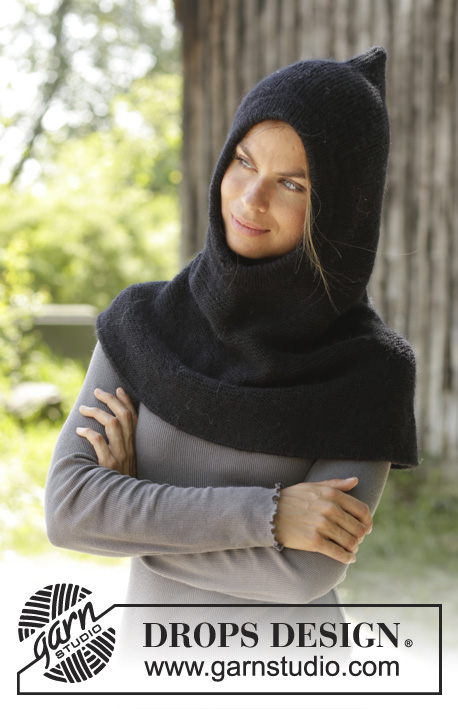
Stickad huvmössa/ balaclava med halsvärmare i DROPS Merino Extra Fine eller DROPS Karisma. Arbetet är stickat uppifrån och ner med rätstickning. Storlek S - XXXL.
DROPS 192-2 |
|
|
------------------------------------------------------- FÖRKLARING TILL BESKRIVNINGEN: ------------------------------------------------------- RÄTSTICKNING (stickas fram och tillbaka): Maskorna stickas räta på alla varv. ÖKNINGSTIPS: Sticka tills det återstår 1 maska före markören, 1 omslag, sticka 2 rätmaskor (markören sitter mitt emellan dessa maskorna), 1 omslag. På nästa varv stickas omslagen vridna så att det inte blir hål. ------------------------------------------------------- BÖRJA ARBETET HÄR: ------------------------------------------------------- HUVMÖSSA MED HALSVÄRMARE - KORT ÖVERSIKT ÖVER ARBETET: Arbetet stickas fram och tillbaka på rundsticka uppifrån och ner. Till sist sys arbetet ihop mitt bak och på toppen av huvan. HUVMÖSSA MED HALSVÄRMARE: Lägg upp 100 maskor på rundsticka 3 med Merino Extra Fine eller Karisma. Sticka RÄTSTICKNING - läs förklaring ovan, fram och tillbaka. KONTROLLERA STICKFASTHETEN! När arbetet mäter 24 cm läggs det upp maskor i slutet på varje varv i varje sida (mot mitt fram - mot ansiktet) så här: Lägg upp 1 maska 2 ggr och 2 maskor 5 ggr (= 12 maskor ökade i varje sida) = 124 maskor. I slutet på nästa varv läggs det upp 28 maskor i slutet på varvet (mot mitt fram - undersidan av öppning till ansiktet) = 152 maskor. Sticka rätmaskor till mitt bak på huvan genom att sticka 62 rätmaskor från efter där de 28 maskorna lades upp mitt fram. Nu delas arbetet och det stickas fram och tillbaka härifrån - mitt bak (detta görs så att sömmen kommer mitt bak). Sticka rätstickning fram och tillbaka till arbetet mäter 10 cm från de 28 maskorna som lades upp mitt fram. Nu sätts det 8 markörer i arbetet så här: Börja mitt bak och sätt första markören efter 10 maskor, sedan sätts de nästa 7 markörerna efter 19 maskor, det är nu 9 maskor kvar på stickan efter sista markören. Fortsätt sedan med rätstickning. På nästa varv från rätsidan ökas det 1 maska på varje sida av varje markör - läs ÖKNINGSTIPS. Öka så med ca 3 cm mellanrum totalt 6-7-8 ggr = 248-264-280 maskor. Fortsätt vidare till arbetet mäter totalt 58-60-62 cm. Maska av med 2 trådar. MONTERING: Sy ihop huvmössan i de yttersta maskbågarna mitt bak och längst uppläggningskanten på toppen av huvan. KANT RUNT ANSIKTET: Plocka upp från rätsidan 158 maskor runt ansiktsöppningen på kort rundsticka 2,5. Sticka 1 varv avigt, 1 varv rätt, 1 varv avigt, 1 varv rätt. Sedan stickas det resår (1 rätmaska, 1 avigmaska) i 6 cm. Maska av med rätmaskor över rätmaskor och avigmaskor över avigmaskor. Vik kanten dubbel mot avigsidan och sy fast den. |
|
Har du gjort detta mönster?Tagga då dina bilder med #dropspattern #lawlesshood eller skicka in de till #dropsfan galleriet. Behöver du hjälp med mönstret?Du hittar 17 instruktionsvideoer, kommentarer/frågor och mer i mönstret på www.garnstudio.com © 1982-2026 DROPS Design A/S. Alla rättigheter är reserverade. Detta dokument med tillhörande underdokument har copyright. Läs mer om vad du kan göra med våra mönster längst ner på vår hemsida. |
|


Med över 40 år i stick- och virkbranschen erbjuder DROPS Design en av de mest omfattande samlingarna av gratis mönster på internet - översatt till 17 språk. Per idag har vi 325 kataloger och 12298 mönster på och alla är översatta till Svenska.
Vi arbetar hårt för att kunna erbjuda det bästa inom stickning och virkning, inspiration och goda råd, men också kvalitetsgarn till fantastiska priser! Vill du använda våra mönster till annat än personligt användande? Du kan läsa om vilka regler som gäller i texten Copyright längst ner på sidan på alla våra mönster. Lycka till!
Kommentera mönster DROPS 192-2
Vi vill gärna ha din åsikt om denna modell!
Om du har en fråga kring den, kom ihåg att välja rätt kategori i menyn under, så får du snabbare svar! Obligatoriska fält är markerade med *.