
Populära kategorier
Letar du efter ett garn?


Kommentarer / Frågor (59)
![]() Gilardi Claudette skrev:
Gilardi Claudette skrev:
Je ne comprends pas l'explication des manches.que veut dire "avec les rangs raccourcis comme avant,aux mêmes endroits" Merci
31.01.2022 - 09:02DROPS Design svarede:
Bonjour Mme Gilardi, vous avez auparavant tricoté des rangs raccourcis sur toute la longueur, lorsque vous tricotez les manches, vous allez tourner aux mêmes endroit qu'avant (moins de fois car moins de marqueurs), et continuer ainsi les rangs raccourcis comme avant. Bon tricot!
31.01.2022 - 10:23
![]() Martens skrev:
Martens skrev:
Ik ben deze Eden vest aan het breien. Ik ben nu de libkermouw aan het breien. Deze moeten in verkorte toeren gebreid worden. De eerste en de tweede toer van de verkorte toeren moeten gewoon volledig heen en terug gebreid worden. Blijft dit ook gelden in de mouw? Want er zijn maar 2 verkorte toeren in de mouw ipv 3. Ik begrijp tevens niet hoe je 35 cm meet (aan de onderkant op het breedste deel) in de uitleg van de linkermouw. Kan u mij daarmee helpen, please?
09.01.2021 - 20:24DROPS Design svarede:
Dag Martens,
De lengte van de mouw meet je aan de onderkant van de mouw op het breedste deel. Als je verkorte toeren maakt op de mouw, keer je het werk op het zelfde punt als bij de panden, dus het aantal steken vanaf de hals tot het keerpunt voor de verkorte toeren moet hetzelfde zijn. Hoe de verkorte toeren herhaald worden is verder precies hetzelfde als op de panden.
10.01.2021 - 12:15
![]() Bobby Garland skrev:
Bobby Garland skrev:
OK, I think I get it. I need to do 1 more row on the LF (row 1 for me) in order to end at the top. Then, I need to attach a new yarn to stitch #64 on the WS and knit the side piece. Then I will end up with the last row on the RS. Then I will cut that yarn. Then I will go back to the top edge on the LF and pick up yarn and turn to the WS to start the sleeve on those 51 sts. It would have been nice if the instructions had been more specific, instead of saying "work approximately..."
08.01.2021 - 19:57
![]() Bobby Garland skrev:
Bobby Garland skrev:
I get what you are saying, but I am not asking about the sleeve, as I am not there yet. I need to know if I am to cut the yarn at the lower edge of the left front piece and reattach it to the WS at stitch #64 to start the first row of the side piece so as to end on the RS of the side piece as instructed. There is no other way to end up on the RS unless you start the side piece on the WS in the middle of the work.
08.01.2021 - 17:21DROPS Design svarede:
Dear Mrs Garland, after left front piece measures 23 cm, adjust so that next row will be worked from RS and now work this 1 cm starting from RS = from the bottom edge over the first 64 cm - adjust this 1 cm so that last row is worked from RS, then cut the yarn and join it to work sleeve (starting from RS) over the 51 sts left unworked on needle (starting from RS). Happy knitting!
11.01.2021 - 06:57
![]() Bobby Garland skrev:
Bobby Garland skrev:
OK, so you also cut the yarn at the end of the left front, which for me is at the lower edge, and reattach to stitch # 64 (for small size) in order to start the side piece on the WS, so as to finish last row of side piece on the RS?
08.01.2021 - 15:15DROPS Design svarede:
Dear Mrs Garland, the last row on left front piece is worked from RS, but when you turn and work sleeve, first row on sleve is worked from WS = this means you don't need to cut the yarn between left front piece and sleeve, then after sleeve, just work the 64 sts on side at the end of a WS row. - no need to cut the yarn neither between sleeve and back piece. Happy knitting!
08.01.2021 - 16:19
![]() Bobby Garland skrev:
Bobby Garland skrev:
Thank you for your response. Another question....I finished the left front and ended on row 8 of short row sequence, which means the next row would be a right side row. In order to finish the side piece on the RS as instructed and have the side pieces be the same number of rows and have a marker in the middle, I would have to start the side piece on the WS. Do I cut the yarn and start at stitch number 64 at the other end from the WS?
08.01.2021 - 14:08DROPS Design svarede:
Dear Mrs Garland, last row worked for side on front piece is worked from the right side, then cut the yarn and work sleeve. Last row worked on sleeve is from WS, after you have worked this last row on sleeve, work the stitches of the side at the end of this row = from WS, all stitches are now back on needle, turn and start short rows at the beg of next row from RS. Happy knitting!
08.01.2021 - 15:02
![]() Bobby Garland skrev:
Bobby Garland skrev:
For short rows, when moving from left front to sleeve to back to sleeve to right front, do you continue in the same numerical sequence from the previous section, or do you start again at row 1 or do you reverse the short row sequence, work rows 8-1? You start with row 1 at the left front border and end up with row 8 at the right front....the pieces would not be "mirrored." Even if you have the same number of rows, the short rows would not be in the same place. Does it matter?
04.01.2021 - 14:50DROPS Design svarede:
Dear Mrs Garland, after you have worked the sleeve, work the short rows on back piece starting from row 1 of short rows. Happy knitting!
05.01.2021 - 10:43
![]() LISA RENBARGER skrev:
LISA RENBARGER skrev:
A friend and I are about to cast on Eden to knit at the same time. My bust measurement is between size M & L. Is there positive ease built in to the pattern?
13.01.2020 - 16:49DROPS Design svarede:
Dear Mrs Renbarger, measure a similar garment you have and like the shape and compare these measurements to the one in the measurement chart (taken flat from side to side, in cm) to find out the matching size. You can then either decide if you want it rather tight or rather loose (with negative or positive ease). Read more here. Happy knitting!
14.01.2020 - 07:17
![]() Kironieke skrev:
Kironieke skrev:
If i cast on 120 stitches for size M with 23st/cm (tension) how do i get to the total height of 75cm? It only adds up to the 52cm of the body, not the yoke/sleeve part.
21.05.2019 - 20:53DROPS Design svarede:
Dear Kironieke, the 120 stitches will measure 52 cm = whole length of jacket as shown in measurement chart (= 23 cm yoke + 29 cm body). Happy knitting!
22.05.2019 - 09:14
![]() Rosie FRANCIS skrev:
Rosie FRANCIS skrev:
When knitting the left sleeve, you will have between 51 and 62 stitches, how many do you work before turning on the short rows? The short row instructions work for the whole garment (between 115 and 138 stitches)
06.08.2018 - 22:35DROPS Design svarede:
Dear Mrs Francis, you should work the short rows on the left sleeve on the same places you worked the short rows on the top of front piece before, ithe "turns" should continue and be aligned from the beg of piece. Happy knitting!
07.08.2018 - 09:38
|
||||
Eden#edencardigan |
||||
|
|
||||
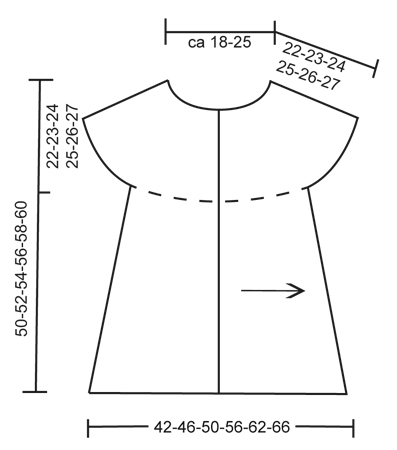
Rätstickad DROPS väst i ”Fabel”, stickad sidledes med vändningar. Stl S - XXXL
DROPS 134-4 |
||||
|
STICKTIPS: För varje gång man har vänt mitt i arb, lyfts första m, strama tråden och sticka tillbaka. Detta görs för att slippa hål i vändningarna. VÄNDNINGAR: Det stickas förkortade v med vändningar mitt i arb för att ge plagget en lätt A-form. Börja att sticka från nederkanten och upp till halsen. * Sticka över alla m, vänd arb och sticka tillbaka. Sticka 103-108-112-115-119-122 m, vänd arb och sticka tillbaka. LÄS STICKTIPS! Sticka 89-94-97-99-103-105 m, vänd och sticka tillbaka. Sticka 71-75-77-79-81-83 m, vänd och sticka tillbaka *. Upprepa *-*, dvs att 1 rapport = 2 v överst och 8 v nederst. MÄTTIPS: Alla mått tas när arb ligger platt, det är viktigt att det inte sträcks i arb när måtten tas. -------------------------------------------------------- VÄST: Västen stickas fram och tillbaka, på tvären. Man börjar mitt fram på vänster framst och avslutar mitt fram på höger framst. OBS: På bilden har västen blivit spegelvänd. VÄNSTER FRAMST: Hela plagget rätstickas, dvs maskorna stickas räta på alla v. Lägg löst upp 115-120-125-129-134-138 m på st 3,5 med ocean view Fabel. Varv 1 stickas från rätsidan (= från nederkanten och upp till halsen). Sticka 3 cm över alla m (= framkant), avsluta efter 1 v från avigsidan. KONTROLLERA STICKFASTHETEN! Sedan stickas det VÄNDNINGAR - se förkl ovan! Fortsätt så tills arb mäter ca 23-25-27-30-33-35 cm från uppläggningskanten (mätt nederst på det bredaste stället) – LÄS MÄTTIPS! Sedan stickas det sidstycke så här: Sticka 1 cm fram och tillbaka över endast 64-67-70-72-74-76 m från nederkanten. Sett i 1 markör (= mitt i sidan). Sticka 1 cm till fram och tillbaka över samma m, och sätt dem sedan på 1 tråd (avsluta efter 1 v från rätsidan, m ska senare användas på bakst). Sedan stickas det ärm. VÄNSTER ÄRM: = 51-53-55-57-60-62 m på st. Sticka fram och tillbaka med vändningar på samma ställen som förut, tills ärmen mäter ca 30-31-32-33-34-35 cm (nederst på det bredaste stället), avsluta efter 1 v från avigsidan. BAKST: Sticka tillbaka de 64-67-70-72-74-76 m från tråden in på st (från avigsidan) = 115-120-125-129-134-138 m. Sticka sedan med vändningar som förut. När arb mäter ca 21-23-25-28-31-33 cm från markören i sidan (mätt nederst på det bredaste stället) sätts det i 1 ny markör (= mitt bak). Fortsätt sedan med vändningar tills arb mäter ca 20-22-24-27-30-32 cm från markören mitt bak (mätt nederst på det bredaste stället). Nu stickas det sidstycke så här: Sticka 1 cm fram och tillbaka över endast 64-67-70-72-74-76 m från nederkanten. Sätt i 1 ny markör (= mitt i sidan). Sticka 1 cm till fram och tillbaka över samma m (avsluta efter 1 v från rätsidan), sätt dem sedan på 1 tråd. Sticka höger ärm. HÖGER ÄRM: Sticka som vänster ärm. HÖGER FRAMST: Sticka tillbaka de 64-67-70-72-74-76 m från tråden in på st (från avigsidan) = 115-120-125-129-134-138 m. Fortsätt sedan med vändningar som på bakst. När det är stickat lika många v på höger framst som på vänster framst (minus framkanten = 3 cm), stickas det framkant så här: Sticka 1½ cm fram och tillbaka över alla m. På nästa v från rätsidan avm det så här för knapphål (= från nederkanten): sticka 12 m i alla stl, maska av de 2 nästa m, * sticka 12-13-14-14-15-15 m, maska av de 2 nästa m *, upprepa *-* totalt 4 ggr, sticka v ut. På nästa v läggs det upp 2 nya m över de avm. Sticka sedan över alla m tills framkanten mäter totalt 3 cm. Maska av löst. MONTERING: Virka med 2 trådar brun med nål 4 så här: Börja nederst på höger framst med 1 fm, * 2 lm, hoppa över ca 1 cm och fäst med 1 fm *, upprepa *-* upp längs höger framst, längs kragen, bak i nacken och ned längs vänster framst, klipp av trådarna och fäst. Sy i knapparna. |
||||
Diagram förklaring |
||||
|
||||
 |
||||
Har du gjort detta mönster?Tagga då dina bilder med #dropspattern #edencardigan eller skicka in de till #dropsfan galleriet. Behöver du hjälp med mönstret?Du hittar 6 instruktionsvideoer, kommentarer/frågor och mer i mönstret på www.garnstudio.com © 1982-2026 DROPS Design A/S. Alla rättigheter är reserverade. Detta dokument med tillhörande underdokument har copyright. Läs mer om vad du kan göra med våra mönster längst ner på vår hemsida. |
||||


Med över 40 år i stick- och virkbranschen erbjuder DROPS Design en av de mest omfattande samlingarna av gratis mönster på internet - översatt till 17 språk. Per idag har vi 324 kataloger och 12290 mönster på och alla är översatta till Svenska.
Vi arbetar hårt för att kunna erbjuda det bästa inom stickning och virkning, inspiration och goda råd, men också kvalitetsgarn till fantastiska priser! Vill du använda våra mönster till annat än personligt användande? Du kan läsa om vilka regler som gäller i texten Copyright längst ner på sidan på alla våra mönster. Lycka till!
Kommentera mönster DROPS 134-4
Vi vill gärna ha din åsikt om denna modell!
Om du har en fråga kring den, kom ihåg att välja rätt kategori i menyn under, så får du snabbare svar! Obligatoriska fält är markerade med *.